2017 FORD SUPER DUTY tow
[x] Cancel search: towPage 57 of 636

GENERAL INFORMATION ON
RADIO FREQUENCIES
This device complies with Part 15 of the
FCC Rules and with Industry Canada
license-exempt RSS standard(s).
Operation is subject to the following two
conditions: (1) This device may not cause
harmful interference, and (2) This device
must accept any interference received,
including interference that may cause
undesired operation.
Note:
Changes or modifications not
expressively approved by the party
responsible for compliance could void the
user's authority to operate the equipment.
The term IC before the radio certification
number only signifies that Industry Canada
technical specifications were met.
The typical operating range for your
transmitter is approximately 33 feet (10
meters). Vehicles with the remote start
feature will have a greater range. One of
the following could cause a decrease in
operating range:
• weather conditions
• nearby radio towers
• structures around the vehicle
• other vehicles parked next to your
vehicle
Other short-distance radio transmitters,
such as amateur radios, medical
equipment, wireless headphones, remote
controls and alarm systems may operate
on the same frequency as your remote
control. If other transmitters are operating
on those frequencies, you may not be able
to use your remote control. Using your
remote control near some types of
electronic equipment, such as USB devices, computers or cell phones can interfere with
remote operation. Operating your remote
control near metal or metallic-finished
purses, bags or clothing can interfere with
remote operation. You can lock and unlock
the doors with the key.
Note:
Make sure to lock your vehicle before
leaving it unattended.
Note: If you are in range, the remote control
will operate if you press any button
unintentionally.
Intelligent Access
The system uses a radio frequency signal
to communicate with your vehicle and
authorize your vehicle to unlock when one
of the following conditions are met:
• You touch the inside of the front
exterior door handle within
3 ft (1 m)
proximity of an intelligent access key.
• You press the tailgate release button.
• You press a button on the transmitter.
If excessive radio frequency interference
is present in the area or if the transmitter
battery is low, you may need to
mechanically unlock your door. You can
use the mechanical key blade in your
intelligent access key to open the driver
door in this situation. See
Remote
Control (page 54).
REMOTE CONTROL
Integrated Keyhead Transmitter (If
Equipped)
Use the key blade to start your vehicle and
unlock or lock the driver door from outside
your vehicle. The transmitter portion
functions as the remote control.
54
Super Duty (TFE) Canada/United States of America, enUSA, First Printing Keys and Remote Controls
Page 74 of 636
7. Lift the tailgate to a 45-degree angle
from horizontal.
8. Lift the right side off its hinge.
9. Lift the tailgate to an 80-degree angle
from horizontal.
10. Remove the tailgate from the left side
hinge by sliding it to the right.
Reverse the steps to reinstall the tailgate.
TAILGATE STEP (If Equipped)
Use the step to make entering the truck
bed easier.
To reduce the risk of falling:
• Only operate the step when your
vehicle is on a level surface.
• Only operate the step in areas with
sufficient lighting.
• Always open the step panel to widen
the step.
• Always use the grab handle when
climbing on the step.
• Do not use the step with bare feet.
• Make sure the step is clean before use.
• Keep the step load, you plus the load,
below
350 lb (159 kg).
Opening the Step
Note: Make sure to close and fully latch the
step before moving your vehicle. Never drive
with the step or grab handle open.
1. Lower the tailgate.
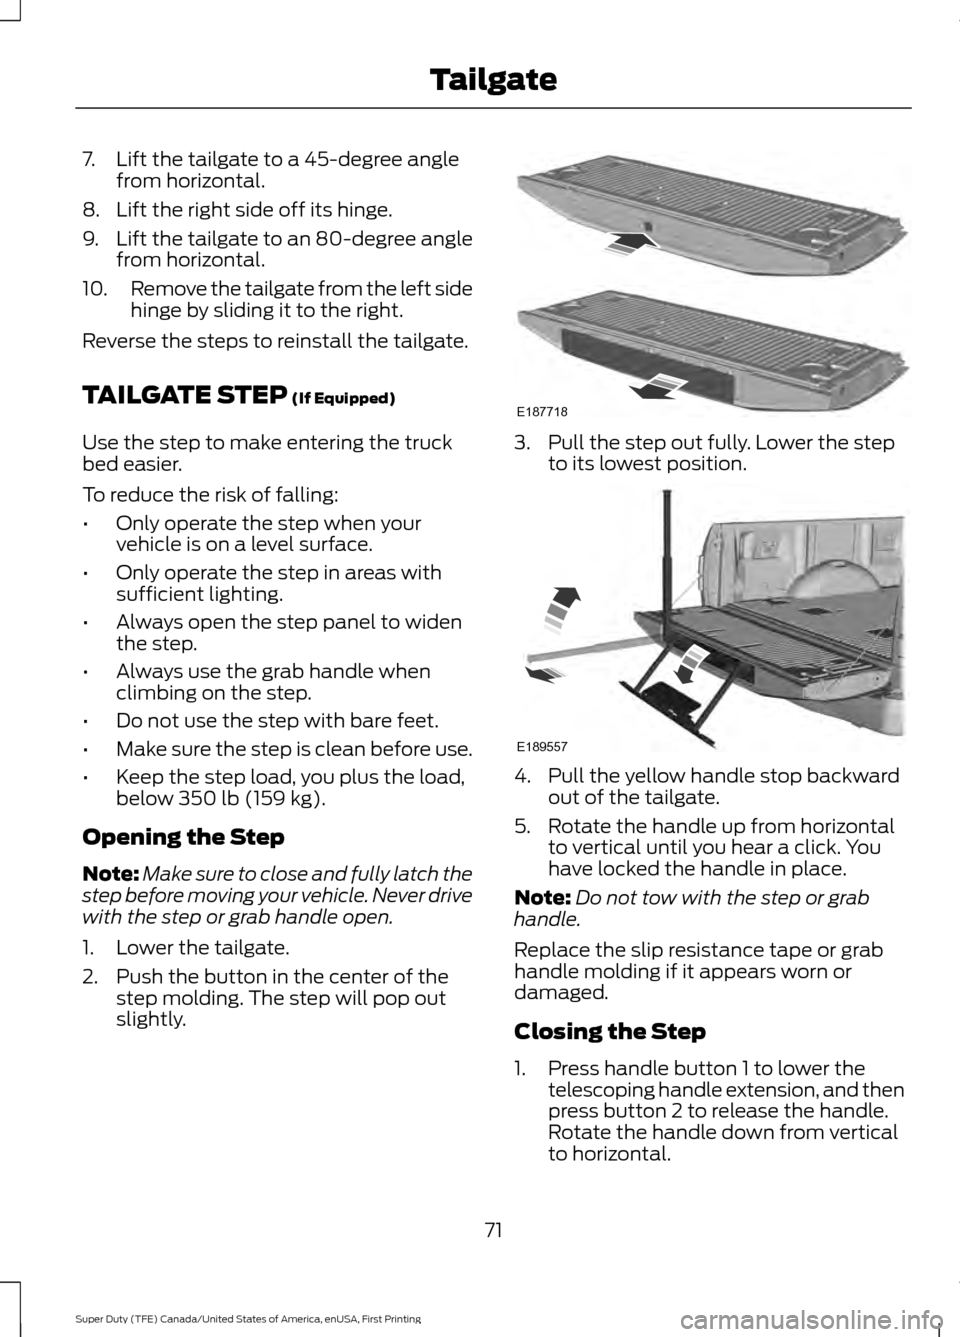
2. Push the button in the center of the step molding. The step will pop out
slightly. 3. Pull the step out fully. Lower the step
to its lowest position. 4. Pull the yellow handle stop backward
out of the tailgate.
5. Rotate the handle up from horizontal to vertical until you hear a click. You
have locked the handle in place.
Note: Do not tow with the step or grab
handle.
Replace the slip resistance tape or grab
handle molding if it appears worn or
damaged.
Closing the Step
1. Press handle button 1 to lower the telescoping handle extension, and then
press button 2 to release the handle.
Rotate the handle down from vertical
to horizontal.
71
Super Duty (TFE) Canada/United States of America, enUSA, First Printing TailgateE187718 E189557
Page 75 of 636
2.
Push the handle back into the tailgate.
3. Rotate the step up until it is horizontal,
then push it back into the tailgate until
the step is secure.
BED EXTENDER (If Equipped)
Note: Do not use the bed extender when
driving off road.
Note: Make sure to engage the locking pins
and knobs fully before driving your vehicle.
Note: Make sure to secure all cargo.
Note: Do not exceed 150 pounds (68
kilograms) on the tailgate when your vehicle
is moving.
Note: Do not keep the bed extender in the
tailgate mode when you are not using it for
restraining cargo. Always keep the bed
extender in the grocery mode or the stowed
position with the tailgate closed.
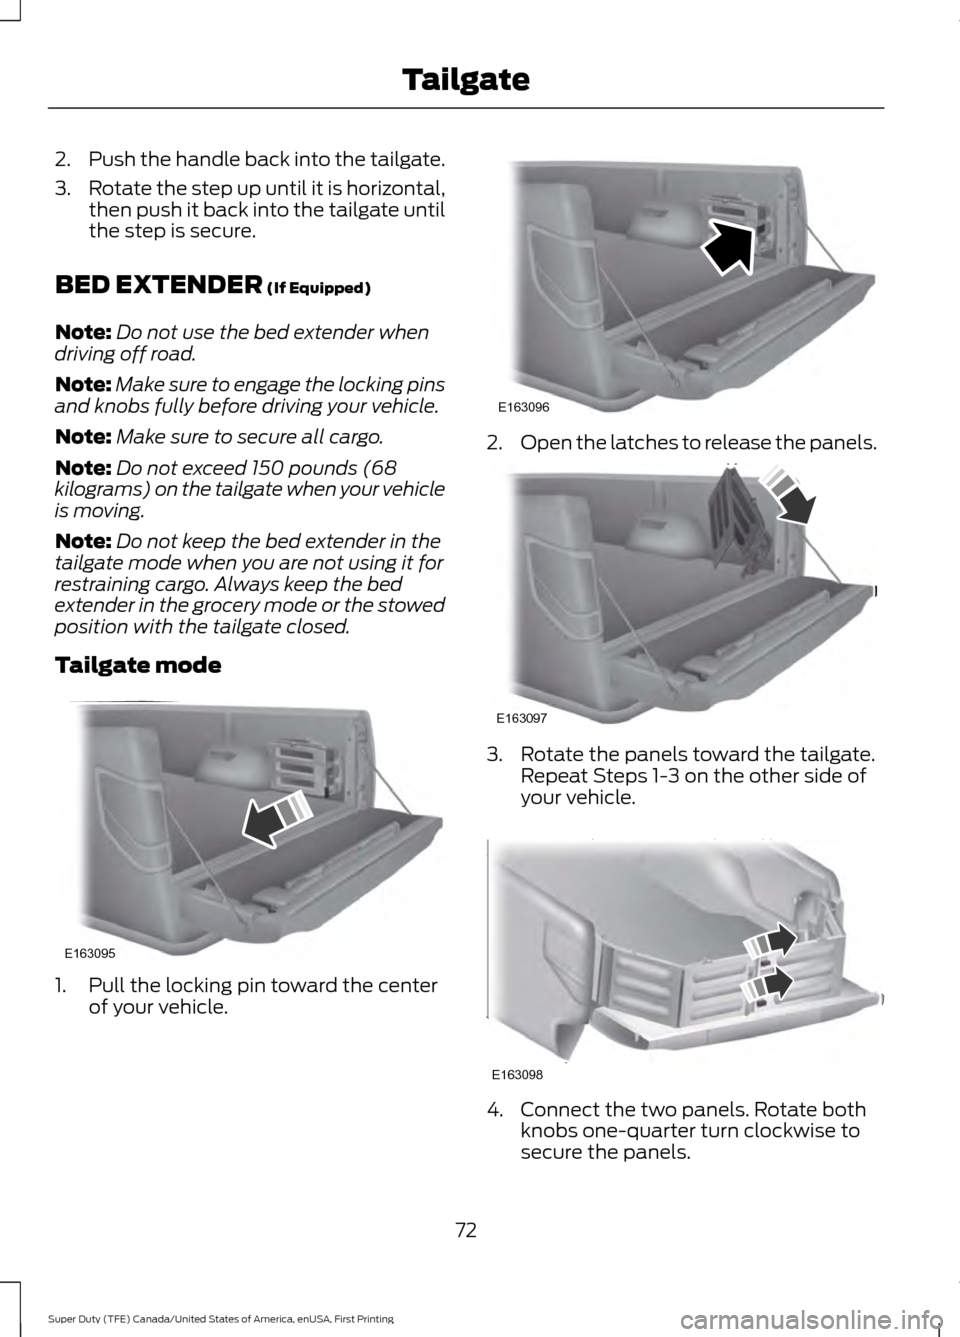
Tailgate mode 1. Pull the locking pin toward the center
of your vehicle. 2.
Open the latches to release the panels. 3. Rotate the panels toward the tailgate.
Repeat Steps 1-3 on the other side of
your vehicle. 4. Connect the two panels. Rotate both
knobs one-quarter turn clockwise to
secure the panels.
72
Super Duty (TFE) Canada/United States of America, enUSA, First Printing TailgateE163095 E163096 E163097 E163098
Page 79 of 636
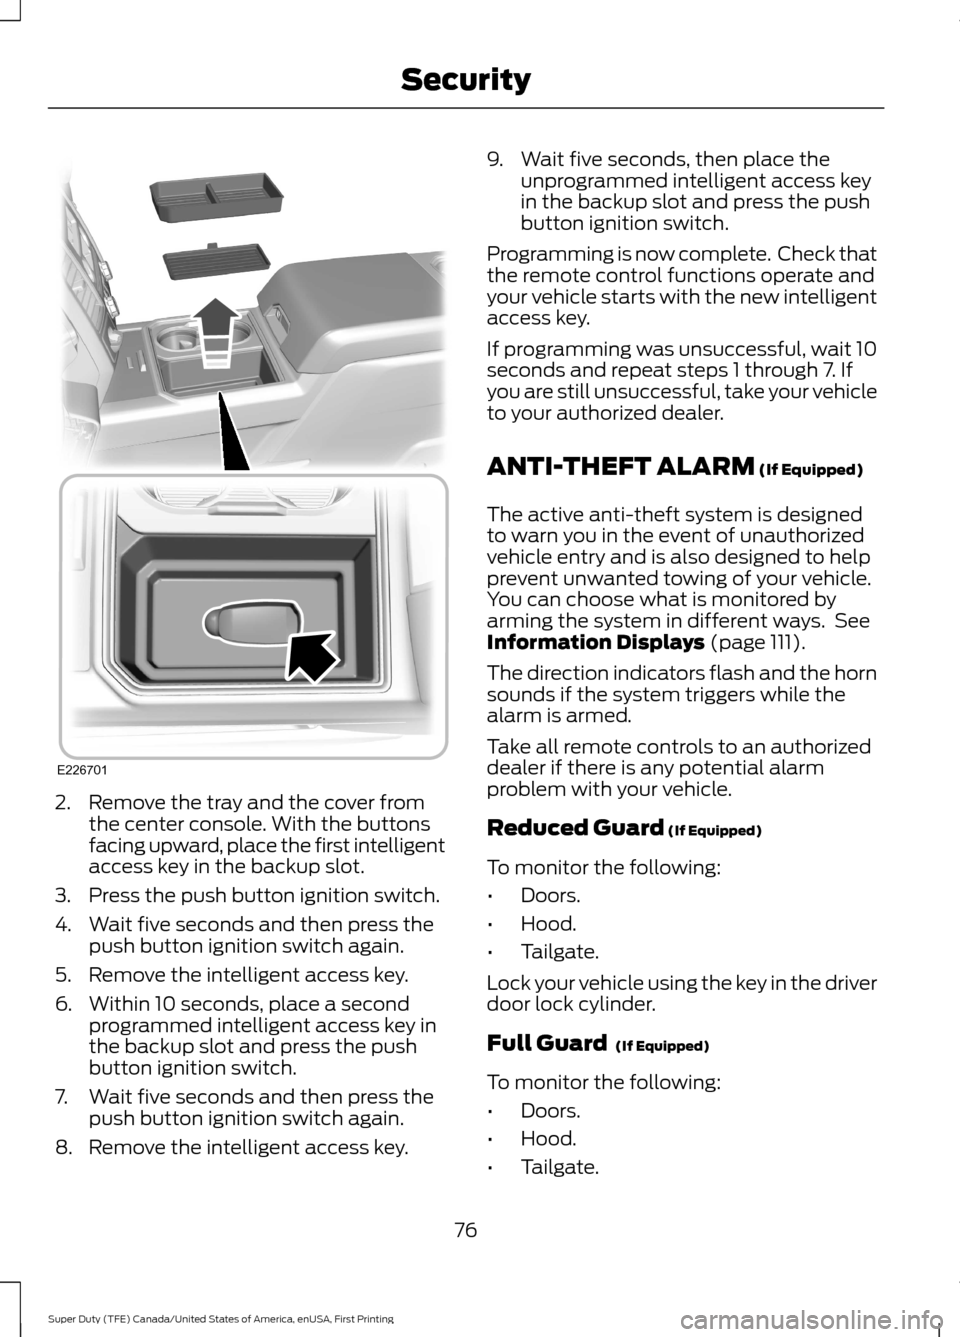
2. Remove the tray and the cover from
the center console. With the buttons
facing upward, place the first intelligent
access key in the backup slot.
3. Press the push button ignition switch.
4. Wait five seconds and then press the push button ignition switch again.
5. Remove the intelligent access key.
6. Within 10 seconds, place a second programmed intelligent access key in
the backup slot and press the push
button ignition switch.
7. Wait five seconds and then press the push button ignition switch again.
8. Remove the intelligent access key. 9. Wait five seconds, then place the
unprogrammed intelligent access key
in the backup slot and press the push
button ignition switch.
Programming is now complete. Check that
the remote control functions operate and
your vehicle starts with the new intelligent
access key.
If programming was unsuccessful, wait 10
seconds and repeat steps 1 through 7. If
you are still unsuccessful, take your vehicle
to your authorized dealer.
ANTI-THEFT ALARM (If Equipped)
The active anti-theft system is designed
to warn you in the event of unauthorized
vehicle entry and is also designed to help
prevent unwanted towing of your vehicle.
You can choose what is monitored by
arming the system in different ways. See
Information Displays
(page 111).
The direction indicators flash and the horn
sounds if the system triggers while the
alarm is armed.
Take all remote controls to an authorized
dealer if there is any potential alarm
problem with your vehicle.
Reduced Guard
(If Equipped)
To monitor the following:
• Doors.
• Hood.
• Tailgate.
Lock your vehicle using the key in the driver
door lock cylinder.
Full Guard
(If Equipped)
To monitor the following:
• Doors.
• Hood.
• Tailgate.
76
Super Duty (TFE) Canada/United States of America, enUSA, First Printing SecurityE226701
Page 80 of 636
•
Movement inside your vehicle.
• Change in vehicle inclination, for
example, unwanted towing.
Lock your vehicle using the remote control
or the power door lock control with the
accompanying door open and then close
all doors.
Note: Do not choose full monitor mode if
movement within the vehicle is likely to
occur or when the vehicle is in transport.
Note: For correct operation of the interior
motion detection system, make sure all
windows are closed prior to arming the
system. This helps prevent accidental alarm
activation due to external influences and
make sure of correct interior motion
detection. Additionally, the interior motion
sensing system will not arm if any door is
ajar.
Arming the Alarm
The alarm is ready to arm when there is
not a key in the ignition. Lock your vehicle
to arm the alarm.
The direction indicators flash once after
you lock your vehicle. This indicates the
alarm is in the pre-armed mode. It fully
arms after 20 seconds.
Disarming the Alarm
Disarm the alarm by any of the following
actions:
• Press the power door unlock button
within the 20-second pre-armed mode.
• Unlock the doors with the remote
control or keyless entry keypad.
• Switch the ignition on or start your
vehicle.
• Use a key in the driver door lock
cylinder to unlock your vehicle, then
switch the ignition on within 12
seconds. Note:
Pressing the panic button on the
remote control stops the horn and direction
indicators, but will not disarm the system.
77
Super Duty (TFE) Canada/United States of America, enUSA, First Printing Security
Page 81 of 636
USING POWER RUNNING
BOARDS
WARNINGS
In extreme climates, excessive ice
buildup may occur, causing the
running boards not to deploy. Make
sure that the running boards have
deployed, and have finished moving before
attempting to step on them. The running
boards will resume normal function once
the blockage is cleared. Turn off the running boards before
jacking or placing any object under
your vehicle. Never place your hand
between the extended running board and
your vehicle. A moving running board may
cause injury. Note:
Do not use the running boards, front
and rear hinge assemblies, running board
motors, or the running board underbody
mounts to lift your vehicle when jacking.
Always use proper jacking points.
Note: The running boards may operate
more slowly in cool temperatures.
Note: The running board mechanism may
trap debris such as mud, dirt, snow, ice and
salt. This may cause unwanted noise. If this
happens, manually set the running boards
to the deployed position. Then, wash the
system, in particular the front and rear hinge
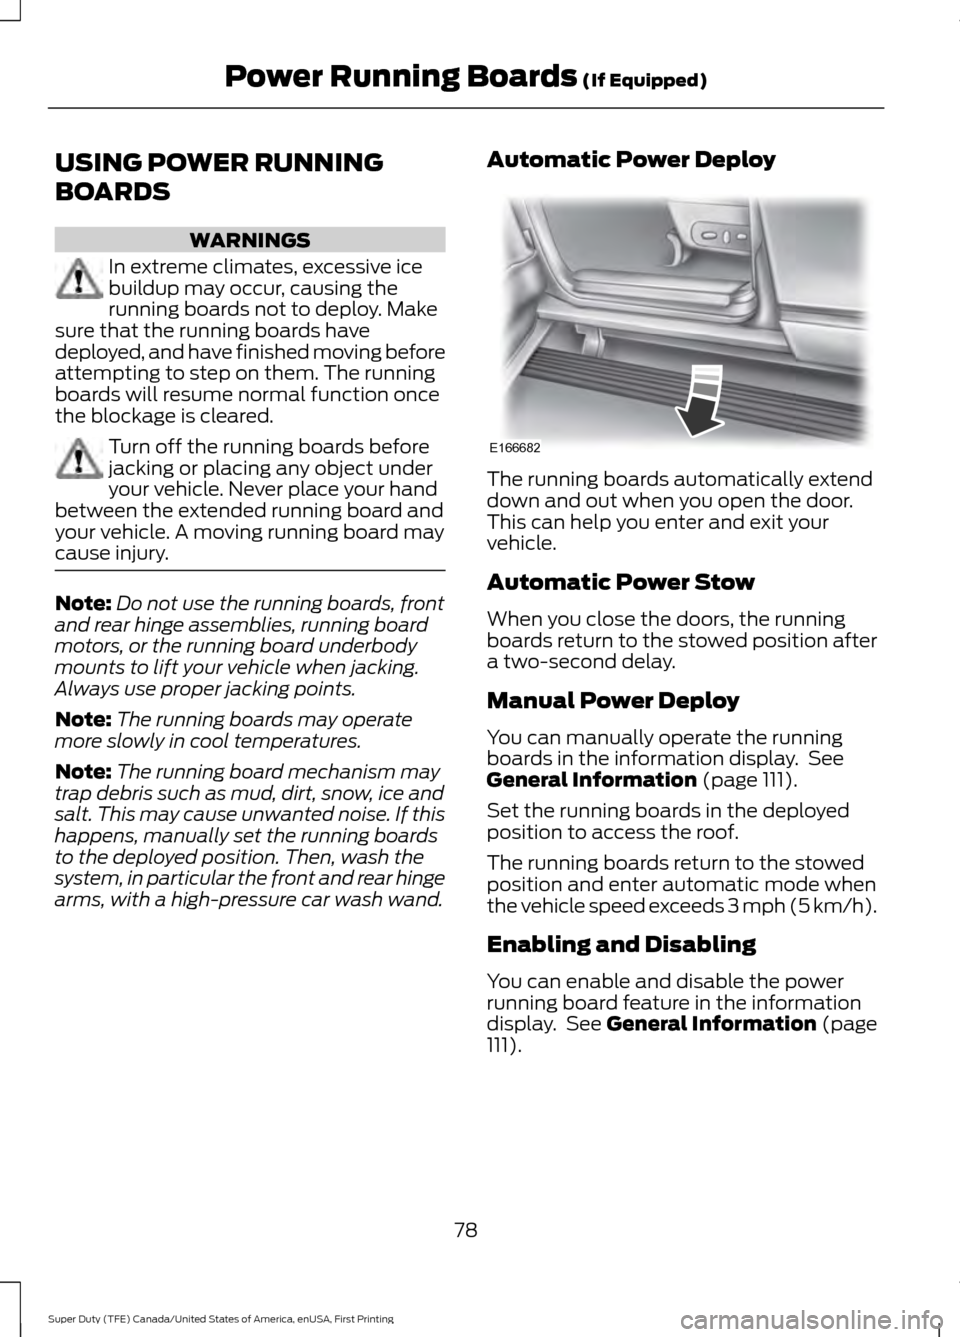
arms, with a high-pressure car wash wand. Automatic Power Deploy The running boards automatically extend
down and out when you open the door.
This can help you enter and exit your
vehicle.
Automatic Power Stow
When you close the doors, the running
boards return to the stowed position after
a two-second delay.
Manual Power Deploy
You can manually operate the running
boards in the information display. See
General Information (page 111).
Set the running boards in the deployed
position to access the roof.
The running boards return to the stowed
position and enter automatic mode when
the vehicle speed exceeds 3 mph (5 km/h).
Enabling and Disabling
You can enable and disable the power
running board feature in the information
display. See
General Information (page
111).
78
Super Duty (TFE) Canada/United States of America, enUSA, First Printing Power Running Boards
(If Equipped)E166682
Page 82 of 636
•
When disabled (OFF), the running
boards move to the stowed position
regardless of the door position.
• When enabled (
AUTO), the running
boards move back to the correct
positions based on the door position.
Bounce-back
The running board will reverse direction
and move to the end of travel if it
encounters an object while moving.
79
Super Duty (TFE) Canada/United States of America, enUSA, First Printing Power Running Boards
(If Equipped)
Page 87 of 636
WINDSHIELD WIPERS
Note:
Fully defrost the windshield before
switching on the windshield wipers.
Note: Make sure you switch off the
windshield wipers before entering a car
wash.
Note: Clean the windshield and wiper
blades if they begin to leave streaks or
smears. If that does not resolve the issue,
install new wiper blades.
Note: Do not operate the wipers on a dry
windshield. This may scratch the glass,
damage the wiper blades or cause the wiper
motor to burn out. Always use the
windshield washers before wiping a dry
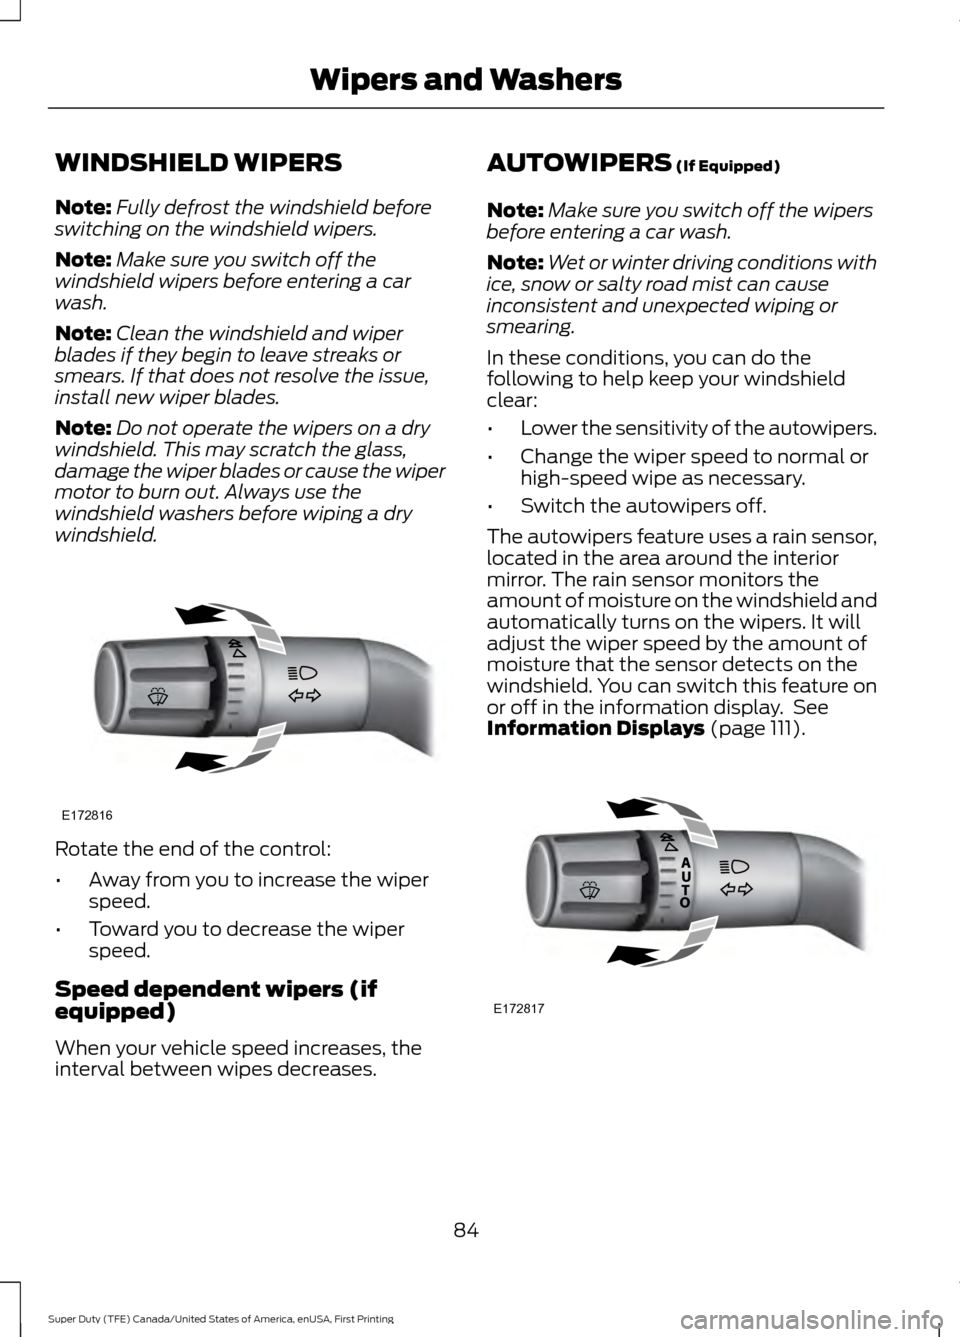
windshield. Rotate the end of the control:
•
Away from you to increase the wiper
speed.
• Toward you to decrease the wiper
speed.
Speed dependent wipers (if
equipped)
When your vehicle speed increases, the
interval between wipes decreases. AUTOWIPERS (If Equipped)
Note: Make sure you switch off the wipers
before entering a car wash.
Note: Wet or winter driving conditions with
ice, snow or salty road mist can cause
inconsistent and unexpected wiping or
smearing.
In these conditions, you can do the
following to help keep your windshield
clear:
• Lower the sensitivity of the autowipers.
• Change the wiper speed to normal or
high-speed wipe as necessary.
• Switch the autowipers off.
The autowipers feature uses a rain sensor,
located in the area around the interior
mirror. The rain sensor monitors the
amount of moisture on the windshield and
automatically turns on the wipers. It will
adjust the wiper speed by the amount of
moisture that the sensor detects on the
windshield. You can switch this feature on
or off in the information display. See
Information Displays
(page 111). 84
Super Duty (TFE) Canada/United States of America, enUSA, First Printing Wipers and WashersE172816 E172817