Page 116 of 636
Fuel Economy
Distance to E
Instant Fuel Economy
Average Fuel Economy
Average Speed
• Distance to E - Shows the approximate distance your vehicle can travel before running
out of fuel.
• Instant Fuel Economy - Shows your instantaneous fuel usage.
• Average Fuel Economy - Shows the average fuel usage based on time.
• Average Speed - Shows the average speed the vehicle has driven.
Note: Press and hold OK to reset values. Driver Assist
DEF Gauge
DEF Status
Exhaust Filter Engine Hours
Engine Hours
Engine Idle
Front Tank
Dual Fuel
Tank
Rear Tank
Hill Strt Asst. Oil Temp
Oil Temp
Tire Pressure
Trans. Temp.
Rear Park Aid
Select Your Setting
Brake Type 1
113
Super Duty (TFE) Canada/United States of America, enUSA, First Printing Information Displays
Page 117 of 636
Driver Assist
Brake Effort 1
Trailer Sway
1 Trailer setting. Settings
A. Engine Off
Vehicle
Auto RegenSelect Your Setting
DTE Calculate
Select Your Setting
Autolamp Delay
Lighting
Daytime Light
Autolock
Locks
Autounlock Select Your Setting
Remote Unlock
Follow onscreen directions to confirm or modify your
settings
Oil Life Reset
Select Your Setting
Alarm
Ask on Exit Select Your Setting
Climate Control
Remote Start
Seats
Duration
System
Remote Open
Windows
Remote Close
Courtesy Wipe
Wiper
Controls
Shows information related to the configured MyKey(s).
MyKey Status
MyKey
Follow onscreen directions to confirm or modify your
settings.
Create MyKey
114
Super Duty (TFE) Canada/United States of America, enUSA, First Printing Information Displays
Page 120 of 636

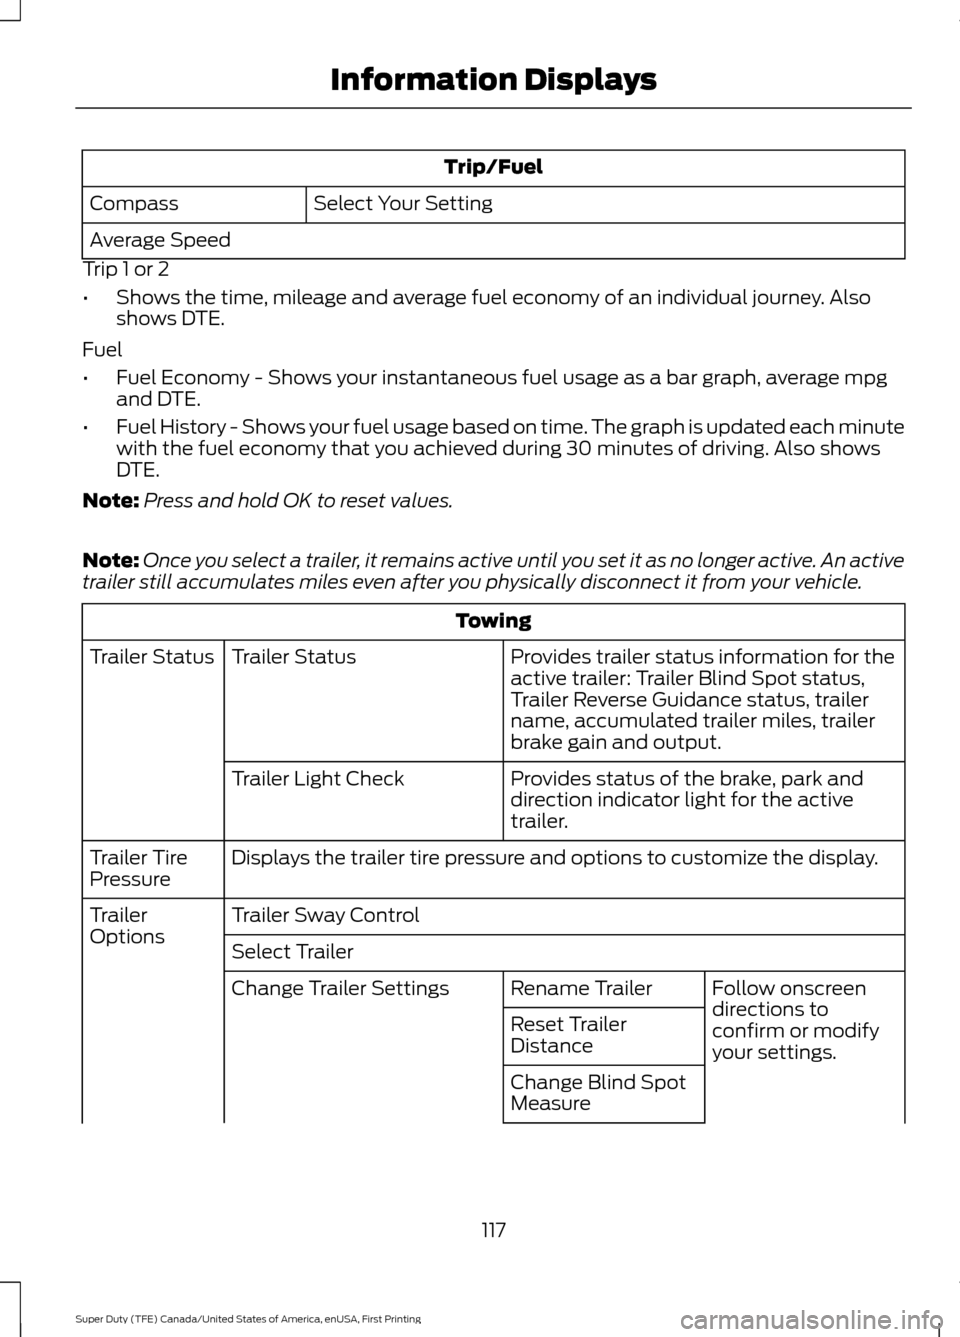
Trip/Fuel
Select Your Setting
Compass
Average Speed
Trip 1 or 2
• Shows the time, mileage and average fuel economy of an individual journey. Also
shows DTE.
Fuel
• Fuel Economy - Shows your instantaneous fuel usage as a bar graph, average mpg
and DTE.
• Fuel History - Shows your fuel usage based on time. The graph is updated each minute
with the fuel economy that you achieved during 30 minutes of driving. Also shows
DTE.
Note: Press and hold OK to reset values.
Note: Once you select a trailer, it remains active until you set it as no longer active. An active
trailer still accumulates miles even after you physically disconnect it from your vehicle. Towing
Provides trailer status information for the
active trailer: Trailer Blind Spot status,
Trailer Reverse Guidance status, trailer
name, accumulated trailer miles, trailer
brake gain and output.
Trailer Status
Trailer Status
Provides status of the brake, park and
direction indicator light for the active
trailer.
Trailer Light Check
Displays the trailer tire pressure and options to customize the display.
Trailer Tire
Pressure
Trailer Sway Control
Trailer
Options
Select Trailer
Follow onscreen
directions to
confirm or modify
your settings.
Rename Trailer
Change Trailer Settings
Reset Trailer
Distance
Change Blind Spot
Measure
117
Super Duty (TFE) Canada/United States of America, enUSA, First Printing Information Displays
Page 122 of 636
Settings
Auto Regen
Blind Spot
Cross Traffic Alert Select Your Setting
DTE Calcula-
tion
Rear Park Aid
Trailer Blind Spot
Auto Engine Off
Vehicle
Advanced
Settings
Easy Entry/Exit
Select Your Setting
Autolamp
Delay
Lighting
Daytime Lights
Autolock
Locks
AutounlockSelect Your Setting
Remote
Unlock
Climate
Control
Remote Start
Seats
Duration
System
Follow onscreen directions to confirm or
modify your settings.
Oil Life Reset
Select Your Setting
Alarm
Ask on Exit
Remote Open
Windows
Remote Close
Courtesy Wipe
Wiper
Controls
119
Super Duty (TFE) Canada/United States of America, enUSA, First Printing Information Displays
Page 128 of 636

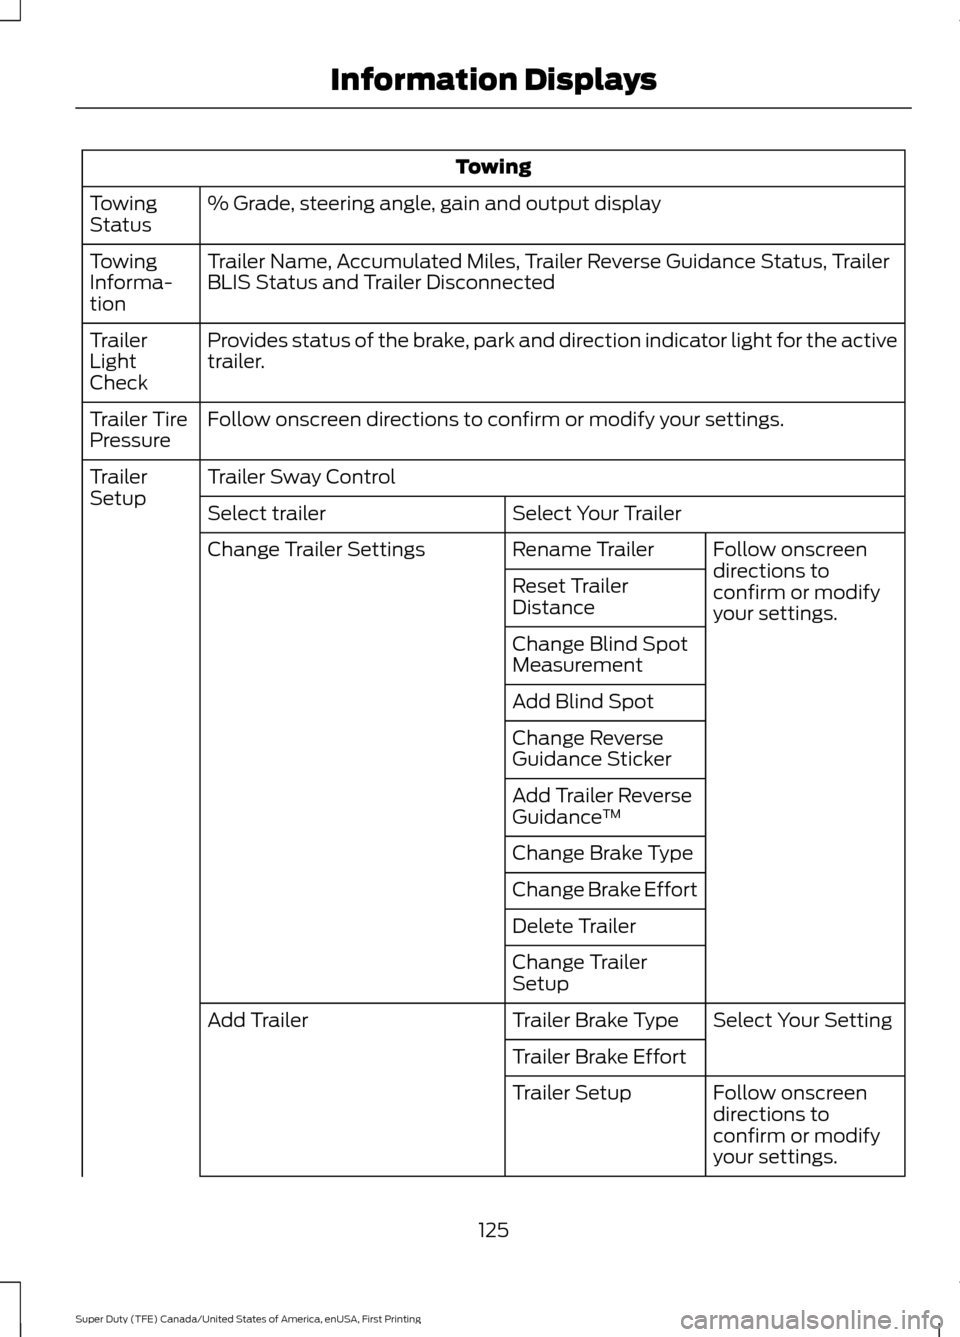
Towing
% Grade, steering angle, gain and output display
Towing
Status
Trailer Name, Accumulated Miles, Trailer Reverse Guidance Status, Trailer
BLIS Status and Trailer Disconnected
Towing
Informa-
tion
Provides status of the brake, park and direction indicator light for the active
trailer.
Trailer
Light
Check
Follow onscreen directions to confirm or modify your settings.
Trailer Tire
Pressure
Trailer Sway Control
Trailer
Setup
Select Your Trailer
Select trailer
Follow onscreen
directions to
confirm or modify
your settings.
Rename Trailer
Change Trailer Settings
Reset Trailer
Distance
Change Blind Spot
Measurement
Add Blind Spot
Change Reverse
Guidance Sticker
Add Trailer Reverse
Guidance™
Change Brake Type
Change Brake Effort
Delete Trailer
Change Trailer
Setup Select Your Setting
Trailer Brake Type
Add Trailer
Trailer Brake EffortFollow onscreen
directions to
confirm or modify
your settings.
Trailer Setup
125
Super Duty (TFE) Canada/United States of America, enUSA, First Printing Information Displays
Page 130 of 636
Settings
Auto Engine Off
Vehicle
Advanced
Settings
Easy Entry/Exit
Select Your
Setting
Autolamp Delay
Lighting
Daytime Lights
Autolock
Locks
Autounlock Select Your
Setting
Remote Unlock
Follow onscreen directions to confirm
or modify your settings.
Oil Life Reset
Select Your Setting
Alarm
Ask on Exit
Select Your Setting
Power Running
Boards
Select Your
Setting
Climate Control
Remote Start
Front Seats &
Wheel
Duration
System
Remote Open
Windows
Remote Close
Courtesy Wipe
Wiper Controls
Rain Sensing
Shows information related to the
configured MyKey(s)
MyKey Status
MyKey
Follow onscreen directions to confirm
or modify your settings.
Create MyKey
Select Your Setting
911 Assist
Do Not Disturb
127
Super Duty (TFE) Canada/United States of America, enUSA, First Printing Information Displays
Page 156 of 636

WARNINGS
Install the head restraint properly to
help minimize the risk of neck injury
in the event of a crash.
Note:
Adjust the seatback to an upright
driving position before adjusting the head
restraint. Adjust the head restraint so that
the top of it is level with the top of your head
and as far forward as possible. Make sure
that you remain comfortable. If you are
extremely tall, adjust the head restraint to
its highest position.
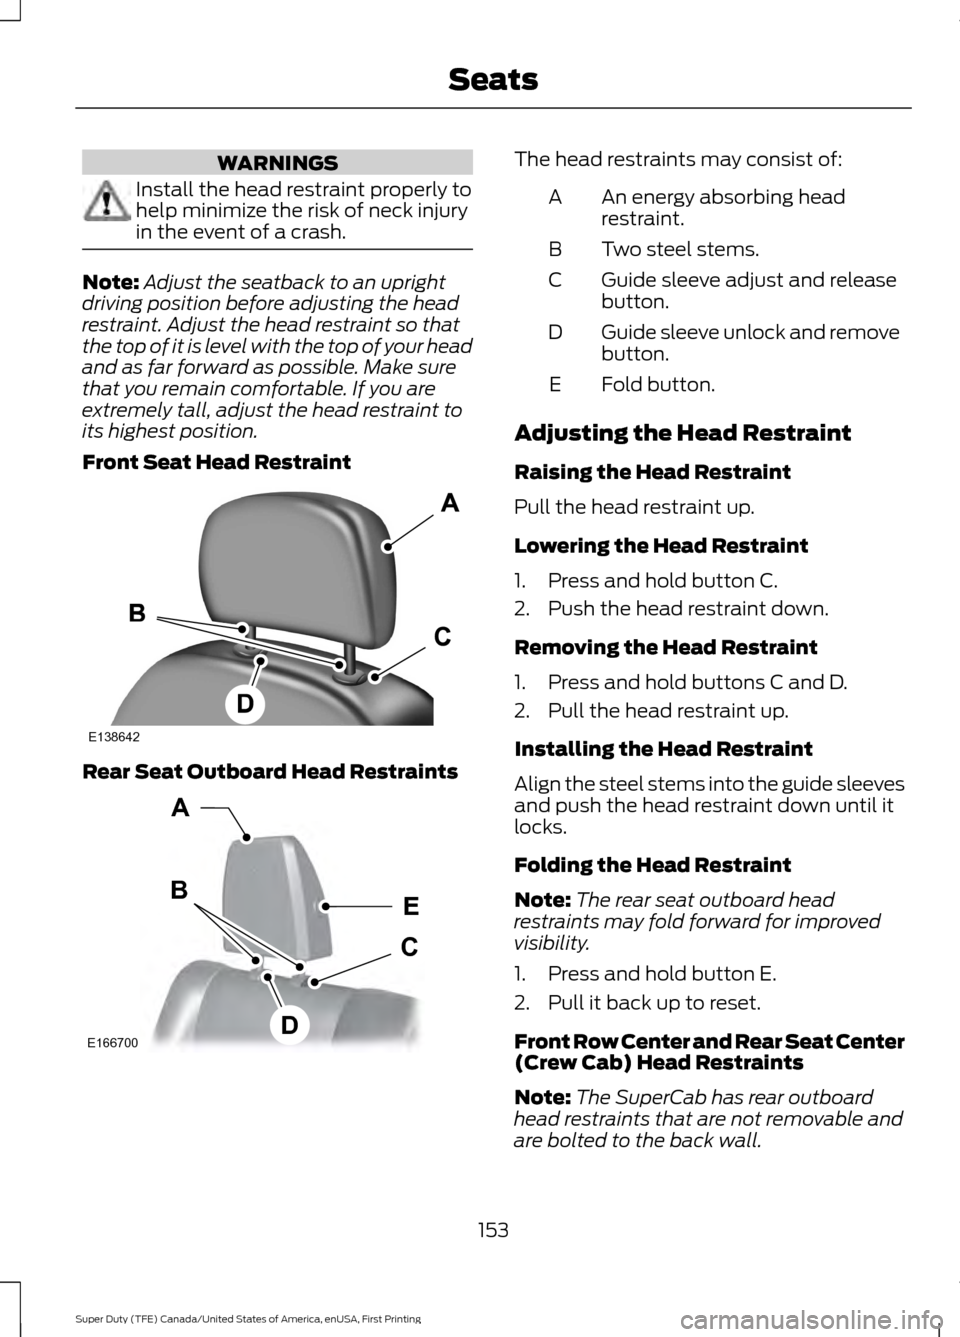
Front Seat Head Restraint Rear Seat Outboard Head Restraints The head restraints may consist of:
An energy absorbing head
restraint.
A
Two steel stems.
B
Guide sleeve adjust and release
button.
C
Guide sleeve unlock and remove
button.
D
Fold button.
E
Adjusting the Head Restraint
Raising the Head Restraint
Pull the head restraint up.
Lowering the Head Restraint
1. Press and hold button C.
2. Push the head restraint down.
Removing the Head Restraint
1. Press and hold buttons C and D.
2. Pull the head restraint up.
Installing the Head Restraint
Align the steel stems into the guide sleeves
and push the head restraint down until it
locks.
Folding the Head Restraint
Note: The rear seat outboard head
restraints may fold forward for improved
visibility.
1. Press and hold button E.
2. Pull it back up to reset.
Front Row Center and Rear Seat Center
(Crew Cab) Head Restraints
Note: The SuperCab has rear outboard
head restraints that are not removable and
are bolted to the back wall.
153
Super Duty (TFE) Canada/United States of America, enUSA, First Printing SeatsE138642 E166700
E
D
C
B
A
Page 161 of 636

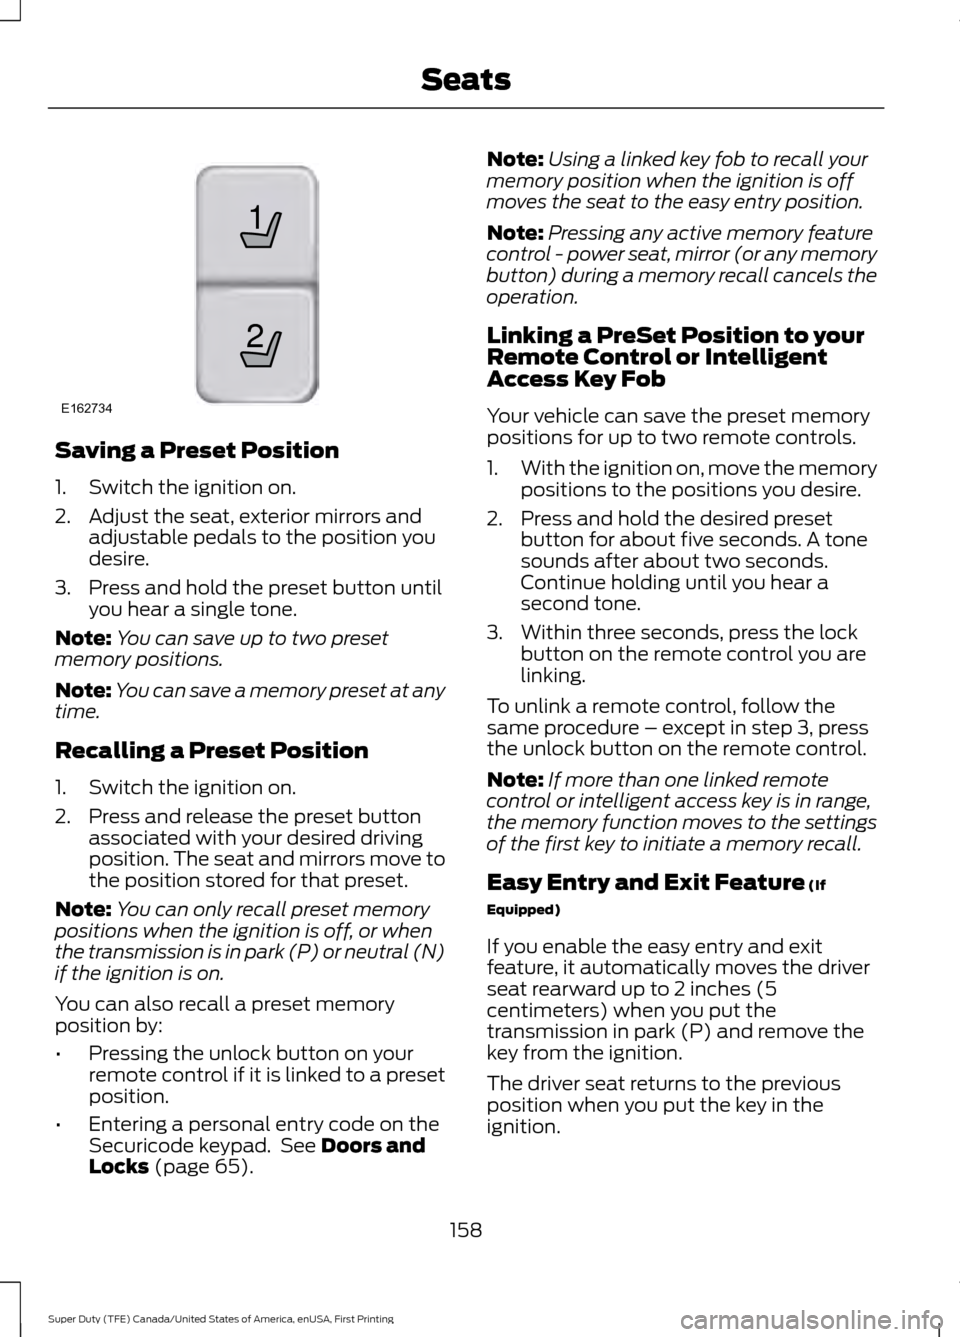
Saving a Preset Position
1. Switch the ignition on.
2. Adjust the seat, exterior mirrors and
adjustable pedals to the position you
desire.
3. Press and hold the preset button until you hear a single tone.
Note: You can save up to two preset
memory positions.
Note: You can save a memory preset at any
time.
Recalling a Preset Position
1. Switch the ignition on.
2. Press and release the preset button associated with your desired driving
position. The seat and mirrors move to
the position stored for that preset.
Note: You can only recall preset memory
positions when the ignition is off, or when
the transmission is in park (P) or neutral (N)
if the ignition is on.
You can also recall a preset memory
position by:
• Pressing the unlock button on your
remote control if it is linked to a preset
position.
• Entering a personal entry code on the
Securicode keypad. See Doors and
Locks (page 65). Note:
Using a linked key fob to recall your
memory position when the ignition is off
moves the seat to the easy entry position.
Note: Pressing any active memory feature
control - power seat, mirror (or any memory
button) during a memory recall cancels the
operation.
Linking a PreSet Position to your
Remote Control or Intelligent
Access Key Fob
Your vehicle can save the preset memory
positions for up to two remote controls.
1. With the ignition on, move the memory
positions to the positions you desire.
2. Press and hold the desired preset button for about five seconds. A tone
sounds after about two seconds.
Continue holding until you hear a
second tone.
3. Within three seconds, press the lock button on the remote control you are
linking.
To unlink a remote control, follow the
same procedure – except in step 3, press
the unlock button on the remote control.
Note: If more than one linked remote
control or intelligent access key is in range,
the memory function moves to the settings
of the first key to initiate a memory recall.
Easy Entry and Exit Feature
(If
Equipped)
If you enable the easy entry and exit
feature, it automatically moves the driver
seat rearward up to 2 inches (5
centimeters) when you put the
transmission in park (P) and remove the
key from the ignition.
The driver seat returns to the previous
position when you put the key in the
ignition.
158
Super Duty (TFE) Canada/United States of America, enUSA, First Printing Seats21
E162734