2017 FORD SUPER DUTY height
[x] Cancel search: heightPage 92 of 636
3. The transmission is not in park (P) for
vehicles with automatic transmissions
or the parking brake is released for
vehicles with manual transmissions.
4. The lighting control is in the autolamps
position.
5. The headlamps are off.
The other lighting control switch positions
do not activate the daytime running lamps,
and you can use them to temporarily
override autolamp control.
When switched off in the information
display, the daytime running lamps are off
in all lighting control switch positions.
AUTOMATIC HIGH BEAM
CONTROL (If Equipped)
The system automatically turns on the high
beams if it is dark enough and no other
traffic is present. When it detects the
headlights of an approaching vehicle, the
tail lamps of the preceding vehicle or street
lighting, the system turns off the high
beams before they distract other drivers.
The low beams remain on.
Note: If it appears that automatic high
beam is not functioning properly, check the
windshield in front of the camera for a
blockage. A clear view of the road is required
for proper system operation. Make sure that
authorized personnel repair any windshield
damage in the area of the camera's field of
view.
Note: If the system detects a blockage such
as bird droppings, bug splatter, snow or ice,
and you do not observe changes, the system
may go into low beam mode until you clear
the blockage. A message may also appear
in the information display noting the front
camera is blocked. Note:
Typical road dust, dirt and water
spots do not affect the performance of the
automatic high beam control. However, in
cold or inclement weather conditions, you
may notice a decrease in the availability of
the automatic high beam control, especially
at start up. If you want to change the beam
state independently of the system, you may
switch the high beams on or off using the
high beam lever. Automatic high beam
control resumes when conditions are
correct.
Note: Using much larger tires or equipping
vehicle accessories such as snowplows can
modify your vehicle's ride height and
degrade automatic high beam control
performance.
A camera sensor, centrally mounted
behind the windshield of your vehicle,
continuously monitors conditions to decide
when to switch the high beams off and on.
Once the system is active, the high beams
switch on if:
• The outside light level is low enough.
• There is no traffic in front of your
vehicle.
• The vehicle speed is greater than
32 mph (52 km/h)
.
The high beams switch off if:
• The system detects the headlamps of
an approaching vehicle or the rear
lamps of a vehicle in front of you.
• Vehicle speed falls below
16 mph
(26 km/h).
• The outside light level is high enough
that high beams are not required.
• The system detects severe rain, snow
or fog.
• The camera is blocked.
89
Super Duty (TFE) Canada/United States of America, enUSA, First Printing Lighting
Page 277 of 636
Accurate measurements are critical to
correct system function. If you need to
check measurements entered or change
them you can access them through the
trailer menus in the information display.
Choose the option to change the sticker
from the change trailer settings menu. It is
not necessary to remove the sticker if you
are just reviewing or changing
measurements.
The following menu warnings or difficulties
may occur during setup. Tips to resolve
them are listed below.
Measurement A has reached maximum or
minimum value:
•
The system is designed to work with
drawbars that have a license plate to
hitch ball center measurement of 9 in
(229 mm) to 16 in (406 mm) when
installed. Do not attempt to use
drawbars that have a length outside
this range as the system performance
will be degraded and could cause
improper system function.
• Make sure that the measurement being
made is the horizontal distance only
from license plate and the hitch ball
center. A straight line distance that
includes any vertical rise or drop will
increase the measurement and make
it inaccurate. Inaccurate
measurements will degrade system
performance and could cause improper
system function. See step 4 of the
setup instruction to review
measurement instructions. Measurement B has reached maximum or
minimum value:
•
Make sure that the sticker placement
instruction in step 3 of the setup has
been followed. Stickers placed outside
the allowed zone will adversely affect
the system performance and could
cause improper feature function.
• Make sure that the measurement being
made is the horizontal distance only
from center of sticker to the hitch ball
center. A straight line distance that
includes any vertical rise or drop will
increase the measurement and cause
an inaccurate value to be entered into
the system. See step 4 of the setup for
additional measurement instructions.
Measurement C has reached maximum or
minimum value:
• Make sure that the sticker placement
instructions in step 3 of the setup have
been followed. Stickers placed outside
the allowed zone will adversely affect
the system performance and could
cause improper feature function. If you
have met all the criteria for sticker
placement and you see this message
this sticker is either too far below or too
close to the camera to properly
recognize the sticker. In order for the
system to operate correctly the sticker
height must be lowered if you receive
the minimum warning or the sticker
height must be raised if you receive the
maximum warning.
•Only one sticker can be placed on
the trailer for correct system
function. The previous sticker must
be removed or covered so only one
sticker is visible to the camera.
• Measurement B and C must be
measured again if a new sticker is
placed on the trailer.
274
Super Duty (TFE) Canada/United States of America, enUSA, First Printing Towing
Page 286 of 636
The active guidelines fade in and out
depending on the steering wheel position.
The active guidelines are not shown when
the steering wheel position is straight.
Always use caution while reversing.
Objects in the red zone are closest to your
vehicle and objects in the green zone are
farther away. Objects are getting closer to
your vehicle as they move from the green
zone to the yellow or red zones. Use the
side view mirrors and rear view mirror to
get better coverage on both sides and rear
of your vehicle.
Refer to the Rear View Camera section for
additional information. See Rear View
Camera (page 232).
Hitches
Note: On pick-up trucks, the trailer hitch
provided on this vehicle enhances crash
protection for the fuel system. Do not
remove!
Note: Do not cut, drill, weld or modify trailer
hitches. Modifying trailer hitches can reduce
hitch rating.
Do not use a hitch that either clamps onto
the bumper or attaches to the axle. You
must distribute the load in your trailer so
that 10-15% for conventional towing or
15-25% for fifth wheel towing of the total
weight of the trailer is on the tongue.
Hitch components (If Equipped)
The following components will be included
in certain vehicles.
• A 5/8 inch hitch pin rated to tow up to
21,000 lbs.
• A 3 inch drawbar.
• A hitch pin sleeve to be used when
mounting the 3 inch drawbar.
• A clevis pin to help keep the hitch pin
in place. Weight-distributing Hitches WARNING
Do not adjust the spring bars so that
your vehicle's rear bumper is higher
than before attaching the trailer.
Doing so will defeat the function of the
weight-distributing hitch, which may cause
unpredictable handling, and could result
in serious personal injury. When hooking-up a trailer using a
weight-distributing hitch, always use the
following procedure:
1. Park the loaded vehicle, without the
trailer, on a level surface.
2. Measure the height to the top of your vehicle's front wheel opening on the
fender. This is H1.
3. Attach the loaded trailer to your vehicle
without the weight-distributing bars
connected.
4. Measure the height to the top of your vehicle's front wheel opening on the
fender a second time. This is H2.
5. Install and adjust the tension in the weight-distributing bars so that the
height of your vehicle's front wheel
opening on the fender is approximately
halfway between H1 and H2.
6. Check that the trailer is level or slightly
nose down toward your vehicle. If not,
adjust the ball height accordingly and
repeat Steps 2-6.
283
Super Duty (TFE) Canada/United States of America, enUSA, First Printing Towing
Page 349 of 636
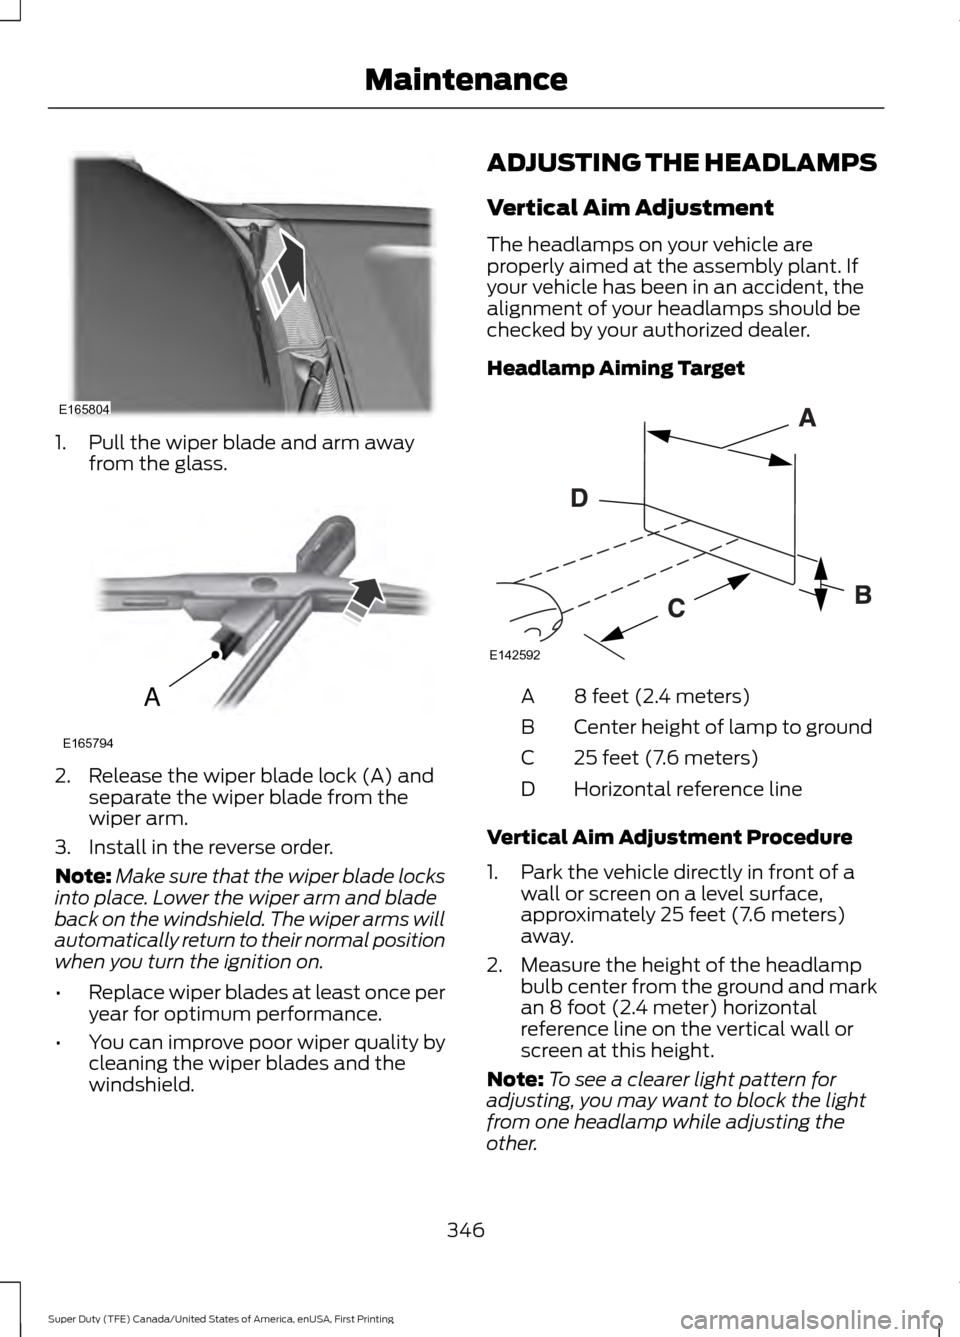
1. Pull the wiper blade and arm away
from the glass. 2. Release the wiper blade lock (A) and
separate the wiper blade from the
wiper arm.
3. Install in the reverse order.
Note: Make sure that the wiper blade locks
into place. Lower the wiper arm and blade
back on the windshield. The wiper arms will
automatically return to their normal position
when you turn the ignition on.
• Replace wiper blades at least once per
year for optimum performance.
• You can improve poor wiper quality by
cleaning the wiper blades and the
windshield. ADJUSTING THE HEADLAMPS
Vertical Aim Adjustment
The headlamps on your vehicle are
properly aimed at the assembly plant. If
your vehicle has been in an accident, the
alignment of your headlamps should be
checked by your authorized dealer.
Headlamp Aiming Target
8 feet (2.4 meters)
A
Center height of lamp to ground
B
25 feet (7.6 meters)
C
Horizontal reference line
D
Vertical Aim Adjustment Procedure
1. Park the vehicle directly in front of a wall or screen on a level surface,
approximately 25 feet (7.6 meters)
away.
2. Measure the height of the headlamp bulb center from the ground and mark
an 8 foot (2.4 meter) horizontal
reference line on the vertical wall or
screen at this height.
Note: To see a clearer light pattern for
adjusting, you may want to block the light
from one headlamp while adjusting the
other.
346
Super Duty (TFE) Canada/United States of America, enUSA, First Printing MaintenanceE165804 A
E165794 E142592
Page 379 of 636
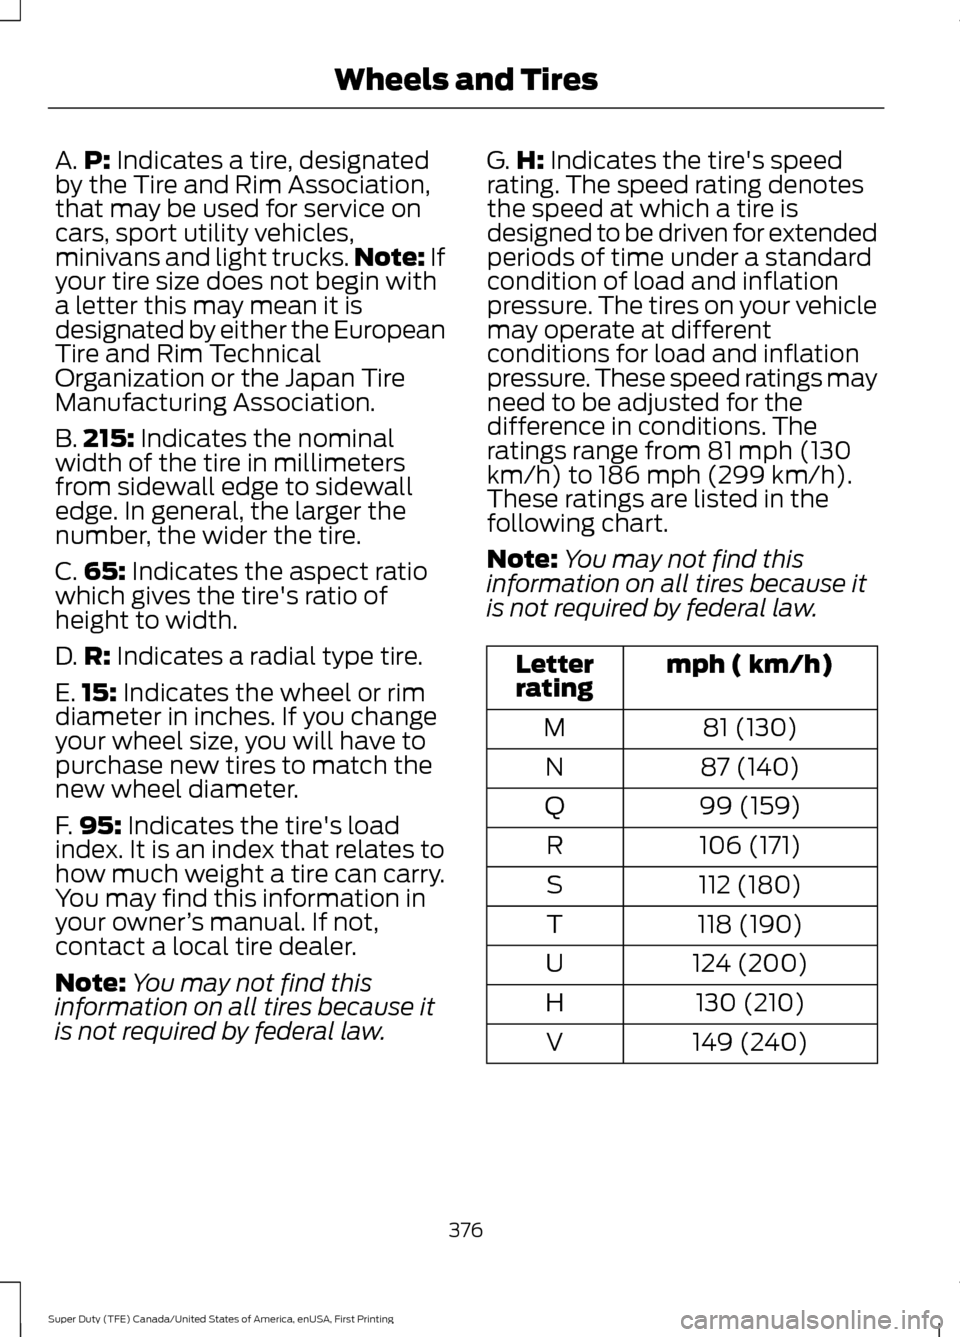
A.
P: Indicates a tire, designated
by the Tire and Rim Association,
that may be used for service on
cars, sport utility vehicles,
minivans and light trucks. Note:
If
your tire size does not begin with
a letter this may mean it is
designated by either the European
Tire and Rim Technical
Organization or the Japan Tire
Manufacturing Association.
B. 215:
Indicates the nominal
width of the tire in millimeters
from sidewall edge to sidewall
edge. In general, the larger the
number, the wider the tire.
C. 65:
Indicates the aspect ratio
which gives the tire's ratio of
height to width.
D. R:
Indicates a radial type tire.
E. 15:
Indicates the wheel or rim
diameter in inches. If you change
your wheel size, you will have to
purchase new tires to match the
new wheel diameter.
F. 95:
Indicates the tire's load
index. It is an index that relates to
how much weight a tire can carry.
You may find this information in
your owner ’s manual. If not,
contact a local tire dealer.
Note: You may not find this
information on all tires because it
is not required by federal law. G.
H:
Indicates the tire's speed
rating. The speed rating denotes
the speed at which a tire is
designed to be driven for extended
periods of time under a standard
condition of load and inflation
pressure. The tires on your vehicle
may operate at different
conditions for load and inflation
pressure. These speed ratings may
need to be adjusted for the
difference in conditions. The
ratings range from 81 mph (130
km/h) to 186 mph (299 km/h).
These ratings are listed in the
following chart.
Note: You may not find this
information on all tires because it
is not required by federal law. mph ( km/h)
Letter
rating
81 (130)
M
87 (140)
N
99 (159)
Q
106 (171)
R
112 (180)
S
118 (190)
T
124 (200)
U
130 (210)
H
149 (240)
V
376
Super Duty (TFE) Canada/United States of America, enUSA, First Printing Wheels and Tires
Page 382 of 636
D.
Maximum Load Single lb
(kg) at psi (kPa) cold: Indicates
the maximum load and tire
pressure when the tire is used as
a single; defined as two tires
(total) on the rear axle.
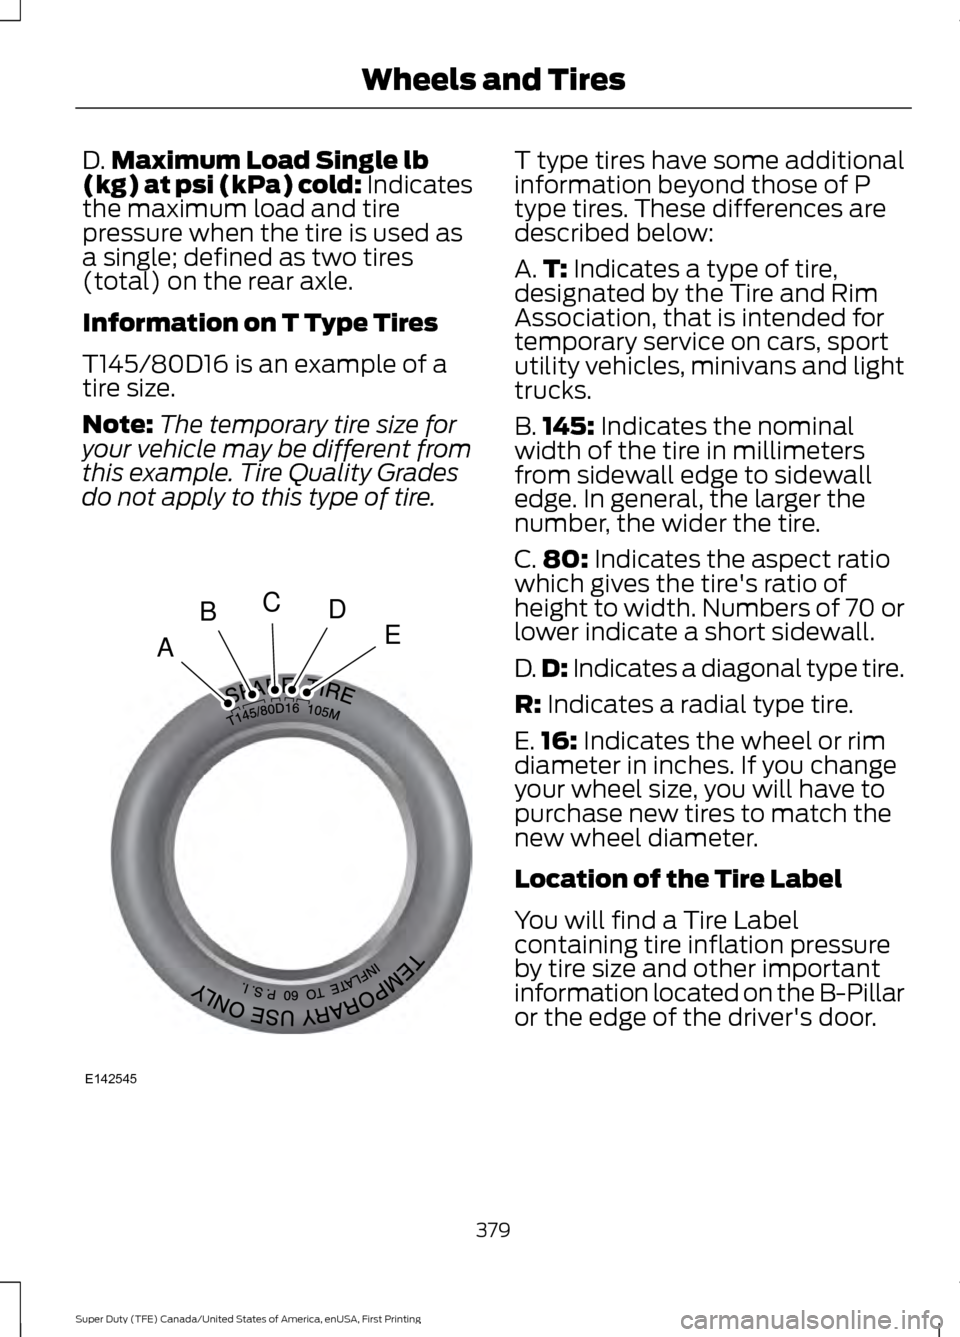
Information on T Type Tires
T145/80D16 is an example of a
tire size.
Note: The temporary tire size for
your vehicle may be different from
this example. Tire Quality Grades
do not apply to this type of tire. T type tires have some additional
information beyond those of P
type tires. These differences are
described below:
A.
T:
Indicates a type of tire,
designated by the Tire and Rim
Association, that is intended for
temporary service on cars, sport
utility vehicles, minivans and light
trucks.
B. 145:
Indicates the nominal
width of the tire in millimeters
from sidewall edge to sidewall
edge. In general, the larger the
number, the wider the tire.
C. 80:
Indicates the aspect ratio
which gives the tire's ratio of
height to width. Numbers of 70 or
lower indicate a short sidewall.
D. D:
Indicates a diagonal type tire.
R:
Indicates a radial type tire.
E. 16:
Indicates the wheel or rim
diameter in inches. If you change
your wheel size, you will have to
purchase new tires to match the
new wheel diameter.
Location of the Tire Label
You will find a Tire Label
containing tire inflation pressure
by tire size and other important
information located on the B-Pillar
or the edge of the driver's door.
379
Super Duty (TFE) Canada/United States of America, enUSA, First Printing Wheels and TiresA
BCDE
E142545
Page 387 of 636
it needs to be repaired or replaced.
For your safety, tires that are
damaged or show signs of
excessive wear should not be used
because they are more likely to
blow out or fail.
Improper or inadequate vehicle
maintenance can cause tires to
wear abnormally. Inspect all your
tires, including the spare,
frequently, and replace them if
one or more of the following
conditions exist:
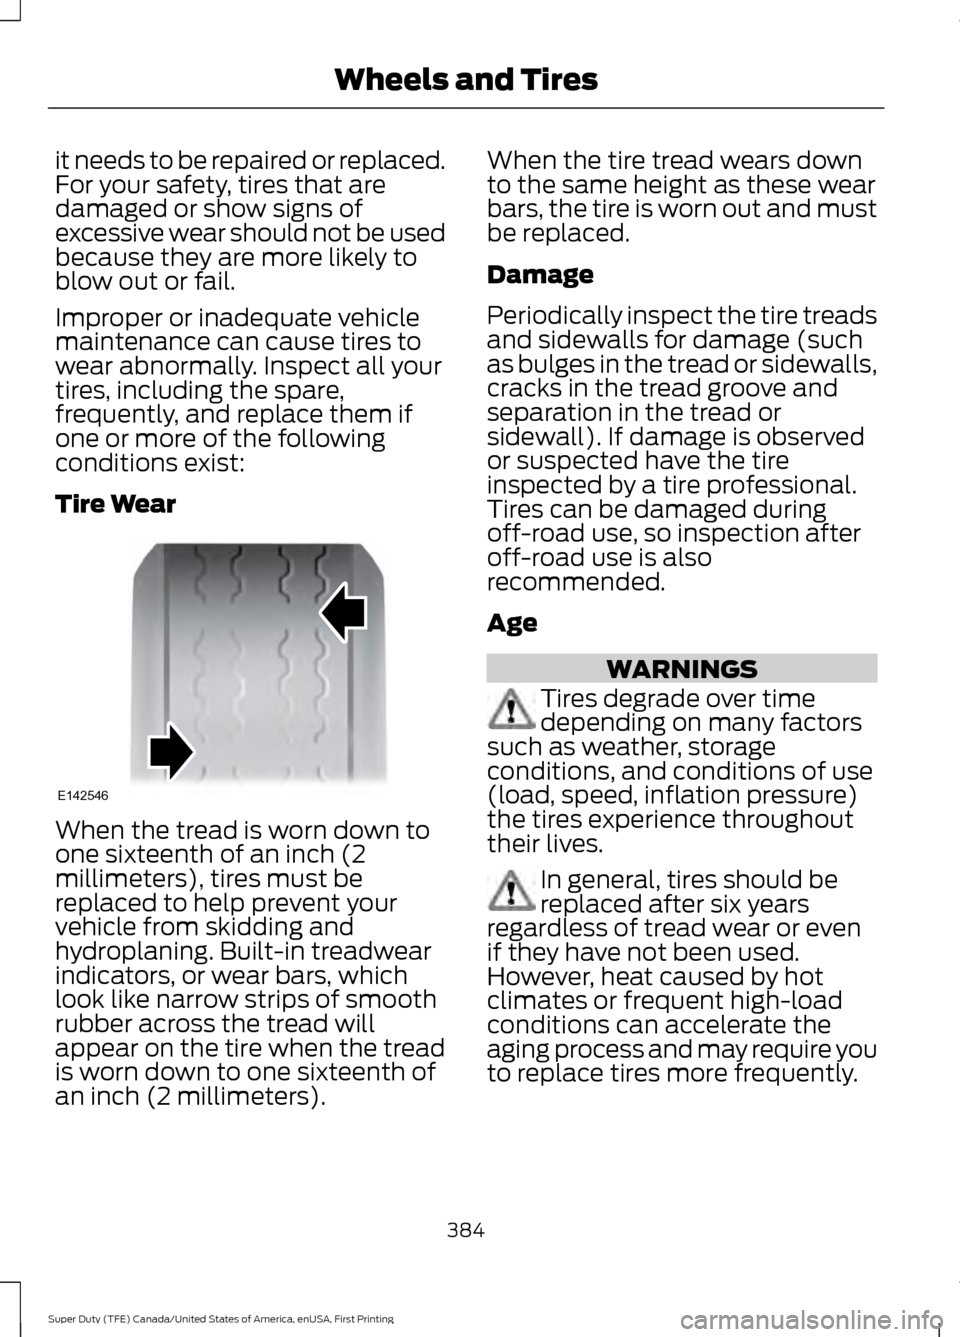
Tire Wear
When the tread is worn down to
one sixteenth of an inch (2
millimeters), tires must be
replaced to help prevent your
vehicle from skidding and
hydroplaning. Built-in treadwear
indicators, or wear bars, which
look like narrow strips of smooth
rubber across the tread will
appear on the tire when the tread
is worn down to one sixteenth of
an inch (2 millimeters). When the tire tread wears down
to the same height as these wear
bars, the tire is worn out and must
be replaced.
Damage
Periodically inspect the tire treads
and sidewalls for damage (such
as bulges in the tread or sidewalls,
cracks in the tread groove and
separation in the tread or
sidewall). If damage is observed
or suspected have the tire
inspected by a tire professional.
Tires can be damaged during
off-road use, so inspection after
off-road use is also
recommended.
Age
WARNINGS
Tires degrade over time
depending on many factors
such as weather, storage
conditions, and conditions of use
(load, speed, inflation pressure)
the tires experience throughout
their lives. In general, tires should be
replaced after six years
regardless of tread wear or even
if they have not been used.
However, heat caused by hot
climates or frequent high-load
conditions can accelerate the
aging process and may require you
to replace tires more frequently.
384
Super Duty (TFE) Canada/United States of America, enUSA, First Printing Wheels and TiresE142546
Page 632 of 636
Refueling - Gasoline....................................192
Fuel Filler Cap...................................................... 193
Remote Control..............................................54 Car Finder................................................................ 59
Integrated Keyhead Transmitter....................54
Intelligent Access Key......................................... 55
Memory Feature................................................... 58
Remote Start......................................................... 59
Replacing the Battery......................................... 56
Sounding the Panic Alarm................................ 59
Remote Start...................................................151 Automatic Settings............................................. 151
Removing the Tailgate.................................70
Repairing Minor Paint Damage..............366
Replacement Parts Recommendation........................................12
Collision Repairs.................................................... 12
Scheduled Maintenance and Mechanical Repairs.................................................................. 12
Warranty on Replacement Parts..................... 13
Replacing a Lost Key or Remote Control............................................................60
Reporting Safety Defects (Canada Only).............................................................308
Reporting Safety Defects (U.S. Only).............................................................308
Roadside Assistance
..................................295
Vehicles Sold in Canada: Getting Roadside
Assistance....................................................... 295
Vehicles Sold in Canada: Roadside Assistance Program Coverage................296
Vehicles Sold in Canada: Using Roadside Assistance....................................................... 296
Vehicles Sold in the United States: Getting Roadside Assistance................................... 295
Vehicles Sold in the United States: Using Roadside Assistance................................... 295
Roadside Emergencies
..............................295
Running-In See: Breaking-In................................................ 290
Running Out of Fuel....................................188
S
Safety Canopy ™
..............................................51
Safety Precautions......................................183 Satellite Radio..............................................445
Satellite Radio Electronic Serial Number
(ESN)................................................................ 446
Satellite Radio Reception Factors..............446
SIRIUS® Satellite Radio Service.................446
Troubleshooting................................................. 447
Scheduled Maintenance Record
...........585
Scheduled Maintenance...........................567
Seatbelt Extension........................................43
Seatbelt Height Adjustment.....................40
Seatbelt Reminder.........................................41 Belt-Minder™......................................................... 41
Seatbelts...........................................................35 Principle of Operation......................................... 35
Seatbelt Warning Lamp and Indicator Chime..............................................................40
Conditions of operation...................................... 41
Seats..................................................................152
Security...............................................................74
Selective Catalytic Reduction System - Diesel.............................................................188
Contaminated Diesel Exhaust Fluid or Inoperative Selective Catalytic Reduction
System............................................................... 192
Diesel Exhaust Fluid Guidelines and Information....................................................... 191
Diesel Exhaust Fluid Level.............................. 188
Diesel Exhaust Fluid Warning Messages and Vehicle Operations.............................. 190
Filling the Diesel Exhaust Fluid Tank..........188
Settings...........................................................535 911 Assist.............................................................. 540
Ambient Lighting............................................... 545
Bluetooth.............................................................. 537
Clock....................................................................... 536
Display................................................................... 546
General.................................................................. 544
Media Player........................................................ 536
Mobile Apps......................................................... 543
Navigation............................................................. 541
Phone..................................................................... 537
Radio...................................................................... 540
Sound..................................................................... 535
Valet Mode........................................................... 547
Vehicle................................................................... 545
Voice Control....................................................... 547
Wi-Fi....................................................................... 545
Side Airbags
.....................................................50
629
Super Duty (TFE) Canada/United States of America, enUSA, First Printing Index