2017 FORD POLICE INTERCEPTOR SEDAN horn
[x] Cancel search: hornPage 20 of 358
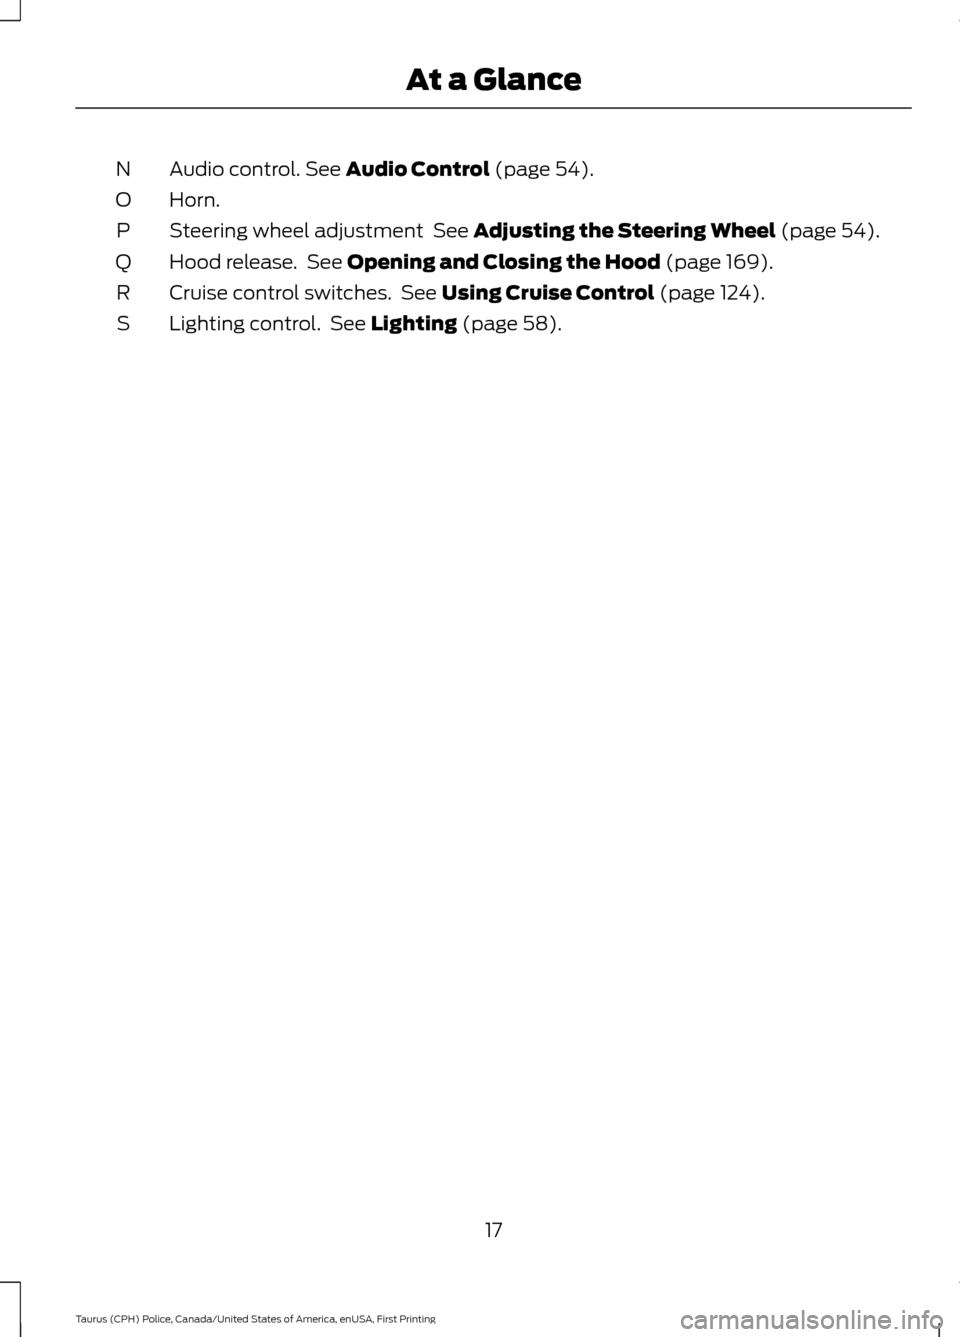
Audio control. See Audio Control (page 54).
N
Horn.
O
Steering wheel adjustment
See Adjusting the Steering Wheel (page 54).
P
Hood release. See
Opening and Closing the Hood (page 169).
Q
Cruise control switches. See
Using Cruise Control (page 124).
R
Lighting control. See
Lighting (page 58).
S
17
Taurus (CPH) Police, Canada/United States of America, enUSA, First Printing At a Glance
Page 52 of 358

1. Twist a thin coin in the slot of the
transmitter near the key ring to remove
the battery cover.
Note: Do not remove the rubber cover and
circuit board from the front housing of the
remote control.
Note: Do not wipe off any grease on the
battery terminals or on the back surface of
the circuit board.
2. Remove the old battery.
3. Insert the new battery with the +
facing down. Press the battery to make
sure it is fully in the housing.
4. Reinstall the battery housing cover onto the transmitter.
Note: Replacing the battery does not erase
the programmed key from your vehicle. The
transmitter should operate normally. Car Finder Press the button twice within
three seconds. The horn sounds
and the direction indicators
flash. We recommend you use this method
to locate your vehicle, rather than using
the panic alarm.
Note: This feature does not work for
vehicles with the Dark Car feature.
Sounding the Panic Alarm Press the button to sound the
panic alarm. Press the button
again or switch the ignition on to
turn it off.
Note: The panic alarm operates in any
ignition position.
REPLACING A LOST KEY OR
REMOTE CONTROL
Replacement keys or remote controls can
be purchased from an authorized dealer.
Authorized dealers can program remote
controls for your vehicle. See
Anti-Theft
Alarm (page 53).
49
Taurus (CPH) Police, Canada/United States of America, enUSA, First Printing Keys and Remote Controls1E203601
2 E138623 E138624
Page 53 of 358
LOCKING AND UNLOCKING
You can use the power door lock control
or the remote control to lock and unlock
your vehicle.
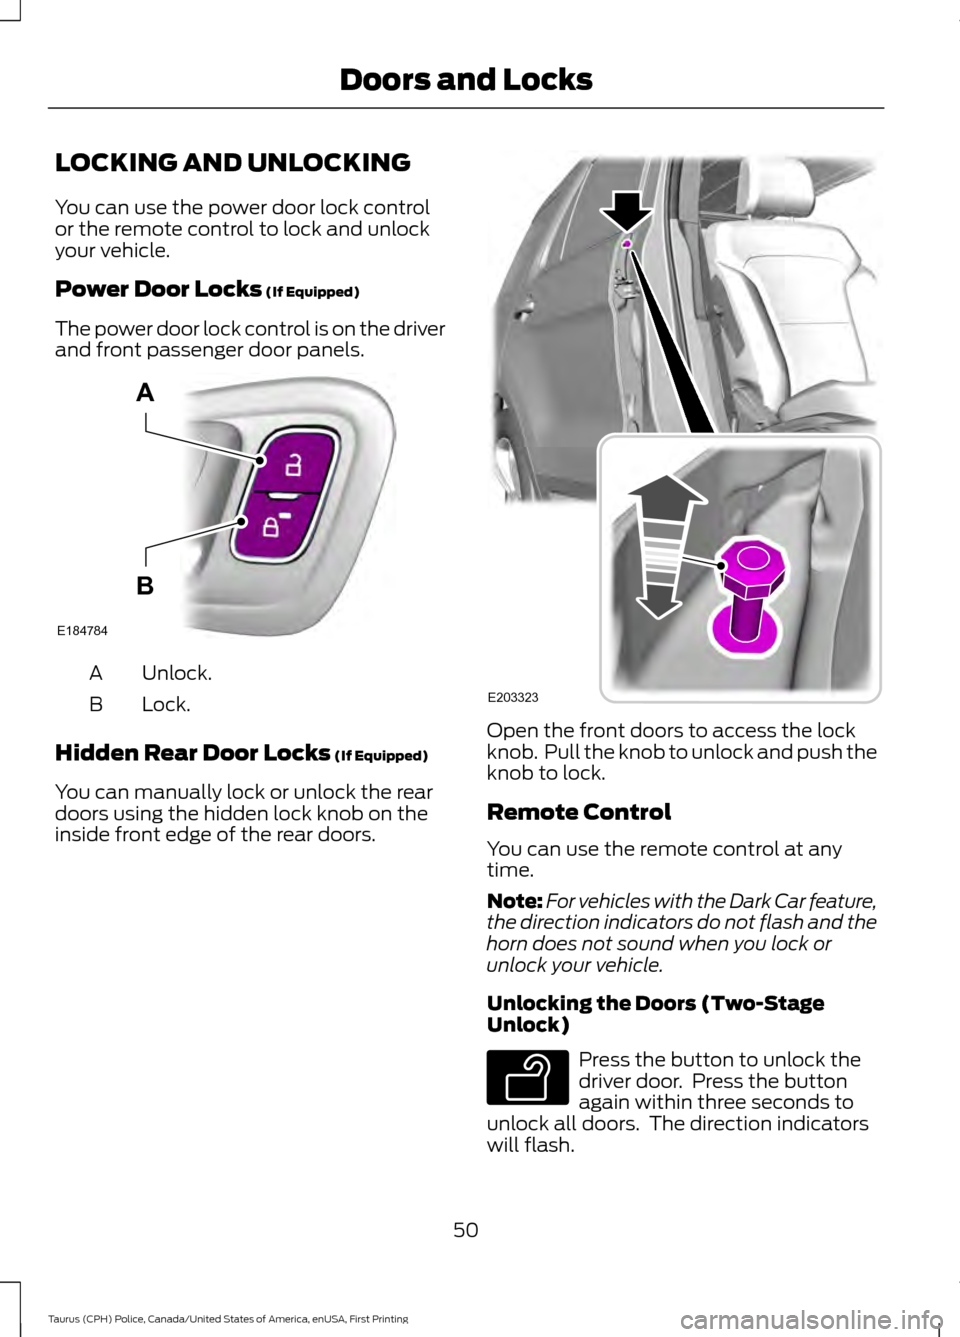
Power Door Locks (If Equipped)
The power door lock control is on the driver
and front passenger door panels. Unlock.
A
Lock.
B
Hidden Rear Door Locks
(If Equipped)
You can manually lock or unlock the rear
doors using the hidden lock knob on the
inside front edge of the rear doors. Open the front doors to access the lock
knob. Pull the knob to unlock and push the
knob to lock.
Remote Control
You can use the remote control at any
time.
Note:
For vehicles with the Dark Car feature,
the direction indicators do not flash and the
horn does not sound when you lock or
unlock your vehicle.
Unlocking the Doors (Two-Stage
Unlock) Press the button to unlock the
driver door. Press the button
again within three seconds to
unlock all doors. The direction indicators
will flash.
50
Taurus (CPH) Police, Canada/United States of America, enUSA, First Printing Doors and LocksE184784
A
B E203323 E138629
Page 54 of 358
Press and hold both the lock and unlock
buttons on the remote control for three
seconds to change between driver door or
all doors unlock mode. The direction
indicators will flash twice to indicate a
change to the unlocking mode. Driver door
mode only unlocks the driver door when
you press the unlock button once. All door
mode unlocks all doors when you press
the unlock button once. The unlocking
mode applies to the remote control.
Locking the Doors
Press the button to lock all
doors. The direction indicators
will flash. Press the button again
within three seconds to confirm that all
the doors are closed.
The doors will lock again, the horn will
sound and the direction indicators will
flash if all the doors and the luggage
compartment are closed.
Locking and Unlocking the Doors
with the Key Blade
Locking the Doors
Turn the top of the key toward the front of
your vehicle.
Unlocking the Doors
Turn the top of the key toward the rear of
your vehicle.
Note: If the hidden rear door locks are on
and you pull the interior handle, you only
switch off the emergency locking, not the
hidden rear door locks. You can only open
the doors using the external door handle.
Opening a Rear Door From the
Inside
Pull the interior door handle twice to
unlock and open a rear door. The first pull
unlocks the door and the second pull
opens the door. Illuminated Entry (If Equipped)
The interior lamps and some exterior
lamps illuminate when you unlock the
doors with the remote control.
The lamps turn off if:
• The ignition is on.
• You press the remote control lock
button.
• 25 seconds have elapsed.
The lamps do not turn off if:
• You switch them on with the lighting
control.
• Any door is open.
Illuminated Exit
(If Equipped)
The interior lamps and some exterior
lamps illuminate when all doors are closed
and you switch the ignition off.
The lamps will turn off if all the doors
remain closed and:
• 25 seconds have elapsed.
• You lock your vehicle from the outside.
Battery Saver
If you leave the courtesy lamps, interior
lamps or headlamps on, the battery saver
shuts them off 10 minutes after you switch
the ignition off.
Opening the Luggage
Compartment
With the Remote Control Press the button twice within
three seconds.
51
Taurus (CPH) Police, Canada/United States of America, enUSA, First Printing Doors and LocksE138623 E211694
Page 56 of 358
ANTI-THEFT ALARM (If Equipped)
Alarm System
The perimeter alarm is a deterrent against
unauthorized access to your vehicle
through the doors, luggage compartment
and the hood.
Triggering the Alarm
Once armed, the alarm is triggered in any
of the following ways:
• If someone opens a door, cargo area
or the hood without a valid key or
remote control.
• If you switch the ignition on without a
valid key.
If the alarm is triggered, the horn will sound
for 30 seconds and the hazard warning
flasher will flash for five minutes.
Any further attempts to perform one of the
above will trigger the alarm again.
Arming the Alarm
To arm the alarm, lock your vehicle. See
Doors and Locks
(page 50).
Disarming the Alarm
Disarm and silence the alarm by unlocking
the doors with the key and switching the
ignition on within 12 seconds, or by
unlocking the doors or the cargo area with
the remote control.
53
Taurus (CPH) Police, Canada/United States of America, enUSA, First Printing Security
Page 147 of 358

•
Transmissions give their best fuel
economy when operated in the top
cruise gear and with steady pressure
on the gas pedal.
• Four-wheel-drive operation (if
equipped) is less fuel efficient than
two-wheel-drive operation.
• Close the windows for high-speed
driving.
DRIVING THROUGH WATER WARNING
Do not drive through flowing or deep
water as you may lose control of your
vehicle.
Note:
Driving through standing water can
cause vehicle damage.
Note: Engine damage can occur if water
enters the air filter.
Before driving through standing water,
check the depth. Never drive through water
that is higher than the bottom of the front
rocker area of your vehicle. When driving through standing water, drive
very slowly and do not stop your vehicle.
Your brake performance and traction may
be limited. After driving through water and
as soon as it is safe to do so: •
Lightly press the brake pedal to dry the
brakes and to check that they work.
• Check that the horn works.
• Check that the exterior lights work.
• Turn the steering wheel to check that
the steering power assist works.
FLOOR MATS WARNINGS
Always use floor mats that are
designed to fit the foot well of your
vehicle. Only use floor mats that
leave the pedal area unobstructed. Only
use floor mats that are firmly secured to
retention posts so that they cannot slip out
of position and interfere with the pedals
or impair safe operation of your vehicle in
other ways. Pedals that cannot move freely can
cause loss of vehicle control and
increase the risk of serious personal
injury. Always make sure that the floor
mats are properly attached to the
retention posts in the carpet that are
supplied with your vehicle. Floor mats must
be properly secured to both retention posts
to make sure mats do not shift out of
position. Never place floor mats or any other
covering in the vehicle foot well that
cannot be properly secured to
prevent them from moving and interfering
with the pedals or the ability to control the
vehicle. Never place floor mats or any other
covering on top of already installed
floor mats. Floor mats should always
rest on top of vehicle carpeting surface and
not another floor mat or other covering.
Additional floor mats or any other covering
will reduce the pedal clearance and
potentially interfere with pedal operation.
144
Taurus (CPH) Police, Canada/United States of America, enUSA, First Printing Driving HintsE176360
Page 168 of 358

Protected components
Fuse amp rating
Fuse or relay number
SYNC module.
10A
9
Multi-function displays.
Electronic finish panel.
Radio frequency transceiver module.
Run accessory relay.
10A
10
Not used (spare).
10A
11
Backlighting LED.
15A
12
Interior lighting.
Backlighting feed.
Right-hand direction indicators.
15A
13
Right rear police fuse/relay box.
Left-hand direction indicators.
15A
14
Left rear police fuse/relay box.
Stop lamp.
15A
15
Backup lamp.
Right front low beam.
10A
16
Left front low beam.
10A
17
Brake-shift interlock.
10A
18
Powertrain control module wake-up.
Police B+ 8 access circuit center console.
20A
19
14-way B+ feed 2.
All lock motor relay and coil.
20A
20
Driver lock motor relay and coil.
Extended power module.
10A
21
Horn relay.
20A
22
Steering wheel control module logic
15A
23
Instrument cluster.
Steering wheel control module.
15A
24
Not used (spare).
15A
25
Ignition switch.
5A
26
Not used (spare).
20A
27
Not used (spare).
15A
28
165
Taurus (CPH) Police, Canada/United States of America, enUSA, First Printing Fuses
Page 307 of 358
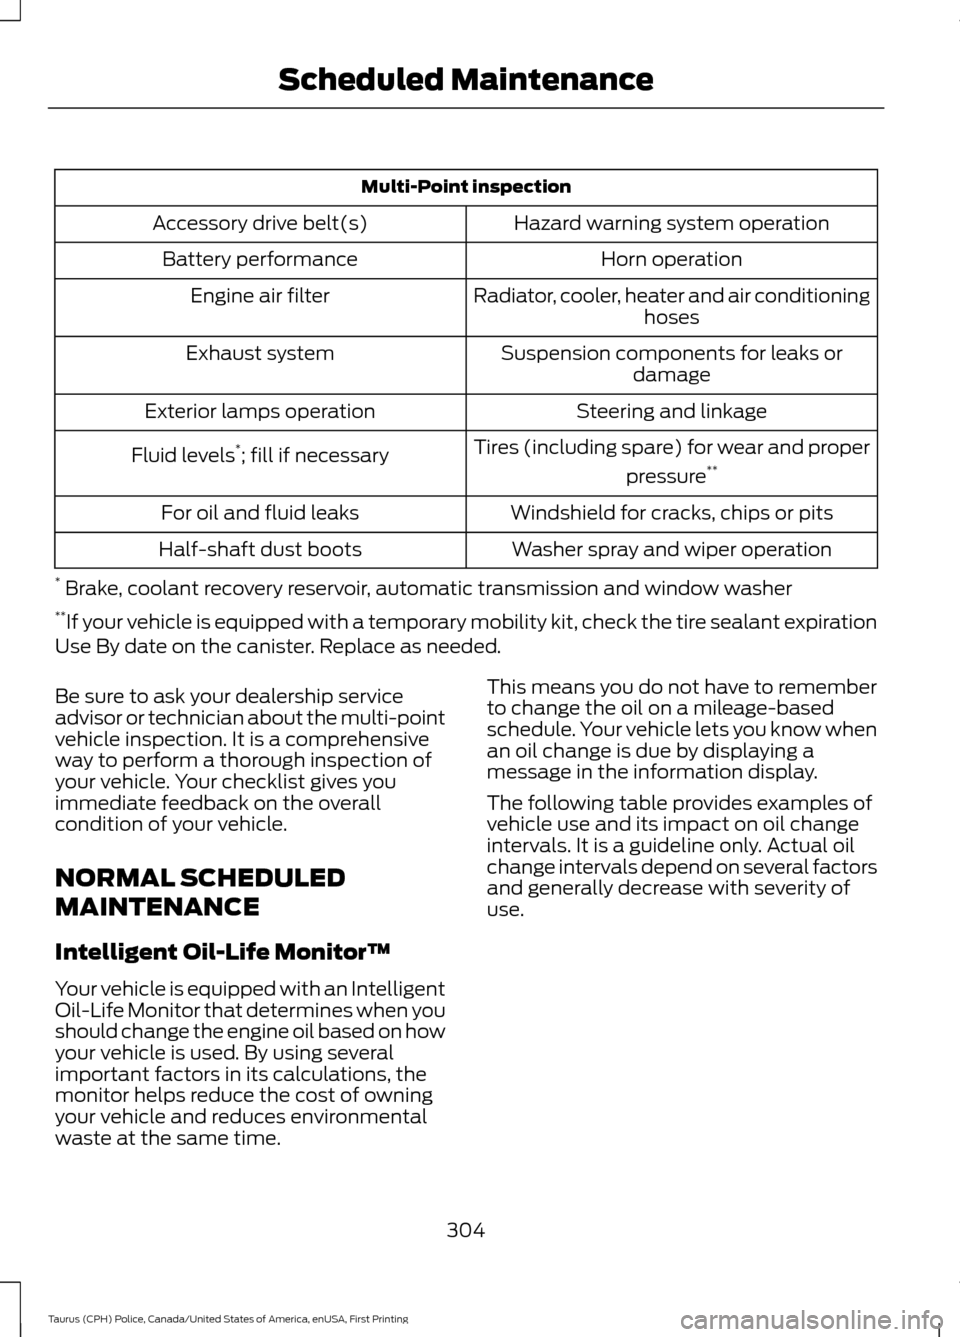
Multi-Point inspection
Hazard warning system operation
Accessory drive belt(s)
Horn operation
Battery performance
Radiator, cooler, heater and air conditioninghoses
Engine air filter
Suspension components for leaks ordamage
Exhaust system
Steering and linkage
Exterior lamps operation
Tires (including spare) for wear and properpressure**
Fluid levels *
; fill if necessary
Windshield for cracks, chips or pits
For oil and fluid leaks
Washer spray and wiper operation
Half-shaft dust boots
* Brake, coolant recovery reservoir, automatic transmission and window washer
** If your vehicle is equipped with a temporary mobility kit, check the tire sealant expiration
Use By date on the canister. Replace as needed.
Be sure to ask your dealership service
advisor or technician about the multi-point
vehicle inspection. It is a comprehensive
way to perform a thorough inspection of
your vehicle. Your checklist gives you
immediate feedback on the overall
condition of your vehicle.
NORMAL SCHEDULED
MAINTENANCE
Intelligent Oil-Life Monitor™
Your vehicle is equipped with an Intelligent
Oil-Life Monitor that determines when you
should change the engine oil based on how
your vehicle is used. By using several
important factors in its calculations, the
monitor helps reduce the cost of owning
your vehicle and reduces environmental
waste at the same time. This means you do not have to remember
to change the oil on a mileage-based
schedule. Your vehicle lets you know when
an oil change is due by displaying a
message in the information display.
The following table provides examples of
vehicle use and its impact on oil change
intervals. It is a guideline only. Actual oil
change intervals depend on several factors
and generally decrease with severity of
use.
304
Taurus (CPH) Police, Canada/United States of America, enUSA, First Printing Scheduled Maintenance