2017 FORD POLICE INTERCEPTOR SEDAN clock
[x] Cancel search: clockPage 178 of 358

3. Make sure that your vehicle is on level
ground.
4. Switch the engine off and wait 15 minutes for the oil to drain into the oil
pan. Checking the engine oil level too
soon after you switch the engine off
may result in an inaccurate reading.
5. Open the hood. See Opening and
Closing the Hood (page 169).
6. Remove the dipstick and wipe it with a clean, lint-free cloth. See
Under
Hood Overview (page 173).
7. Replace the dipstick and remove it again to check the oil level. See
Engine Oil Dipstick
(page 174).
8. Make sure that the oil level is between
the maximum and minimum marks. If
the oil level is at the minimum mark,
add oil immediately. See
Capacities
and Specifications (page 233).
9. If the oil level is correct, replace the dipstick and make sure it is fully seated.
Note: Do not remove the dipstick when the
engine is running.
Note: If the oil level is between the
maximum and minimum marks, the oil level
is acceptable. Do not add oil.
Note: The oil consumption of new engines
reaches its normal level after approximately
3,100 mi (5,000 km)
.
Adding Engine Oil WARNING
Do not remove the filler cap when
the engine is running.
Do not use supplemental engine oil
additives because they are unnecessary
and could lead to engine damage that may
not be covered by the vehicle Warranty. Only use oils certified for gasoline engines
by the American Petroleum Institute (API).
An oil with this trademark symbol
conforms to the current engine and
emission system protection standards and
fuel economy requirements of the
International Lubricants Specification
Advisory Committee (ILSAC).
To top up the engine oil level do the
following:
1. Clean the area surrounding the engine
oil filler cap before you remove it.
2. Remove the engine oil filler cap. See Under Hood Overview
(page 173).
Turn it counterclockwise and remove
it.
3. Add engine oil that meets Ford specifications. See
Capacities and
Specifications (page 233). You may
have to use a funnel to pour the engine
oil into the opening.
4. Recheck the oil level.
5. If the oil level is correct, replace the dipstick and make sure it is fully seated.
6. Replace the engine oil filler cap. Turn it clockwise until you feel a strong
resistance.
Note: Do not add oil further than the
maximum mark. Oil levels above the
maximum mark may cause engine damage.
175
Taurus (CPH) Police, Canada/United States of America, enUSA, First Printing MaintenanceE142732
Page 180 of 358

Note:
Coolant expands when it is hot. The
level may extend beyond the MAX mark.
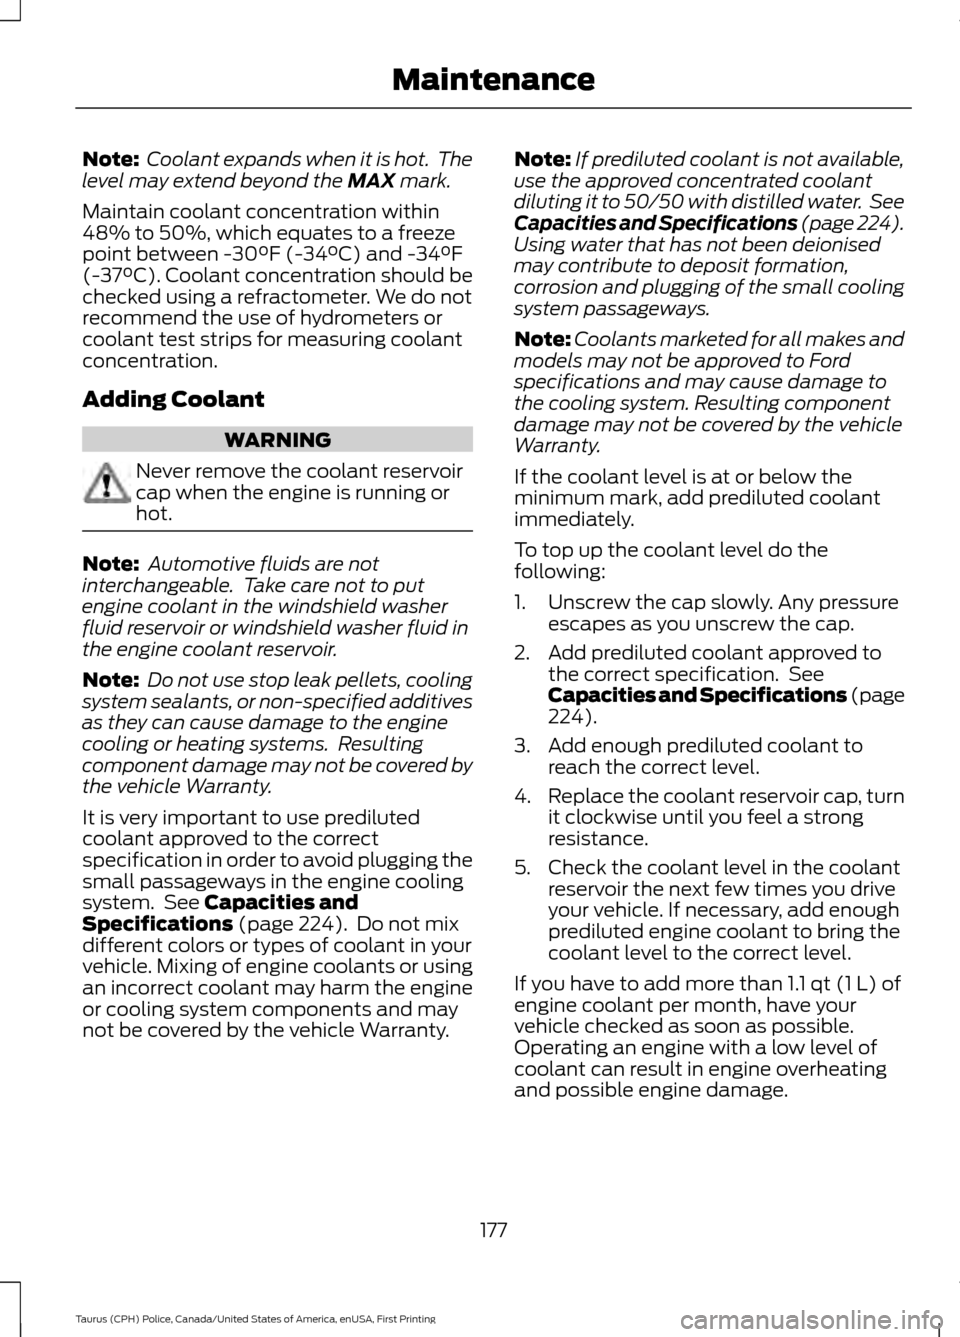
Maintain coolant concentration within
48% to 50%, which equates to a freeze
point between -30°F (-34°C) and -34°F
(-37°C). Coolant concentration should be
checked using a refractometer. We do not
recommend the use of hydrometers or
coolant test strips for measuring coolant
concentration.
Adding Coolant WARNING
Never remove the coolant reservoir
cap when the engine is running or
hot.
Note:
Automotive fluids are not
interchangeable. Take care not to put
engine coolant in the windshield washer
fluid reservoir or windshield washer fluid in
the engine coolant reservoir.
Note: Do not use stop leak pellets, cooling
system sealants, or non-specified additives
as they can cause damage to the engine
cooling or heating systems. Resulting
component damage may not be covered by
the vehicle Warranty.
It is very important to use prediluted
coolant approved to the correct
specification in order to avoid plugging the
small passageways in the engine cooling
system. See
Capacities and
Specifications (page 224). Do not mix
different colors or types of coolant in your
vehicle. Mixing of engine coolants or using
an incorrect coolant may harm the engine
or cooling system components and may
not be covered by the vehicle Warranty. Note:
If prediluted coolant is not available,
use the approved concentrated coolant
diluting it to 50/50 with distilled water. See
Capacities and Specifications (page 224).
Using water that has not been deionised
may contribute to deposit formation,
corrosion and plugging of the small cooling
system passageways.
Note: Coolants marketed for all makes and
models may not be approved to Ford
specifications and may cause damage to
the cooling system. Resulting component
damage may not be covered by the vehicle
Warranty.
If the coolant level is at or below the
minimum mark, add prediluted coolant
immediately.
To top up the coolant level do the
following:
1. Unscrew the cap slowly. Any pressure escapes as you unscrew the cap.
2. Add prediluted coolant approved to the correct specification. See
Capacities and Specifications (page
224
).
3. Add enough prediluted coolant to reach the correct level.
4. Replace the coolant reservoir cap, turn
it clockwise until you feel a strong
resistance.
5. Check the coolant level in the coolant reservoir the next few times you drive
your vehicle. If necessary, add enough
prediluted engine coolant to bring the
coolant level to the correct level.
If you have to add more than
1.1 qt (1 L) of
engine coolant per month, have your
vehicle checked as soon as possible.
Operating an engine with a low level of
coolant can result in engine overheating
and possible engine damage.
177
Taurus (CPH) Police, Canada/United States of America, enUSA, First Printing Maintenance
Page 185 of 358

4. Remove two bolts that attach the air
filter assembly to the front of the
vehicle.
5. Remove the harness retaining clip by pulling up.
6. Do not disconnect the sensor. 7. Pull the air filter assembly up to
disconnect it from the seated
grommets located under the air filter
assembly.
8. Rotate the air filter assembly 90 degrees counterclockwise. Make sure
the rubber hose is still connected to the
air filter assembly.
9. Tighten the clamp.
You can now access the transmission fluid
level indicator.
Checking the fluid level
Check the transmission fluid at the normal
operating temperatures between
88°C+5°C (190°F+10°F) on a level
surface. Drive your vehicle until you warm
it up to the normal operating temperature
after approximately 20 mi (30 km).
Correct fluid level Target the transmission fluid level within
the marked area at the normal operating
temperature between 88°C+5°C
(190°F+10°F).
182
Taurus (CPH) Police, Canada/United States of America, enUSA, First Printing MaintenanceE173334
654 E173400 E235672
Page 189 of 358

If you see any corrosion on the battery or
terminals, remove the cables from the
terminals and clean with a wire brush. You
can neutralize the acid with a solution of
baking soda and water.
Because your vehicle
’s engine is
electronically controlled by a computer,
some control conditions are maintained
by power from the battery. When the
battery is disconnected or a new battery
is installed, the engine must relearn its idle
and fuel trim strategy for optimum
driveability and performance. Flexible fuel
vehicles (FFV) must also relearn the
ethanol content of the fuel for optimum
driveability and performance.
To restore the settings, do the following:
1. Apply the parking brake.
2. Shift into park (P) or neutral (N).
3. Switch off all accessories.
4. Press the brake pedal and start your vehicle.
5. Run the engine until it reaches normal operating temperature. While the
engine is warming up, complete the
following: Reset the clock. See Audio
System (page 251). Reset the power
windows bounce-back feature. See
Windows and Mirrors
(page 62).
Reset the radio station presets. See
Audio System
(page 251).
6. Allow the engine to idle for at least one
minute.
7. Drive the vehicle at least 10 mi (16 km)
to completely relearn the idle trim and
fuel trim strategy.
Note: If you do not allow the engine to
relearn the idle and fuel trim strategy, the
idle quality of your vehicle may be adversely
affected until the engine computer
eventually relearns the idle trim and fuel
trim strategy. Note:
For flexible fuel vehicles, if you are
operating on E85, you may experience poor
starts or an inability to start the engine and
driveability problems until the fuel trim and
ethanol content have been relearned.
Make sure that you dispose of old batteries
in an environmentally friendly way. Seek
advice from your local authority about
recycling old batteries.
If storing your vehicle for more than 30
days without recharging the battery, we
recommend that you disconnect the
battery cables to maintain battery charge
for quick starting.
Battery Management System
(If
Equipped)
The battery management system monitors
battery conditions and takes actions to
extend battery life. If excessive battery
drain is detected, the system temporarily
disables some electrical systems to
protect the battery.
Systems included are:
• Heated rear window.
• Heated seats.
• Climate control.
• Heated steering wheel.
• Audio unit.
• Navigation system.
A message may appear in the information
displays to alert you that battery
protection actions are active. These
messages are only for notification that an
action is taking place, and not intended to
indicate an electrical problem or that the
battery requires replacement.
186
Taurus (CPH) Police, Canada/United States of America, enUSA, First Printing Maintenance
Page 191 of 358

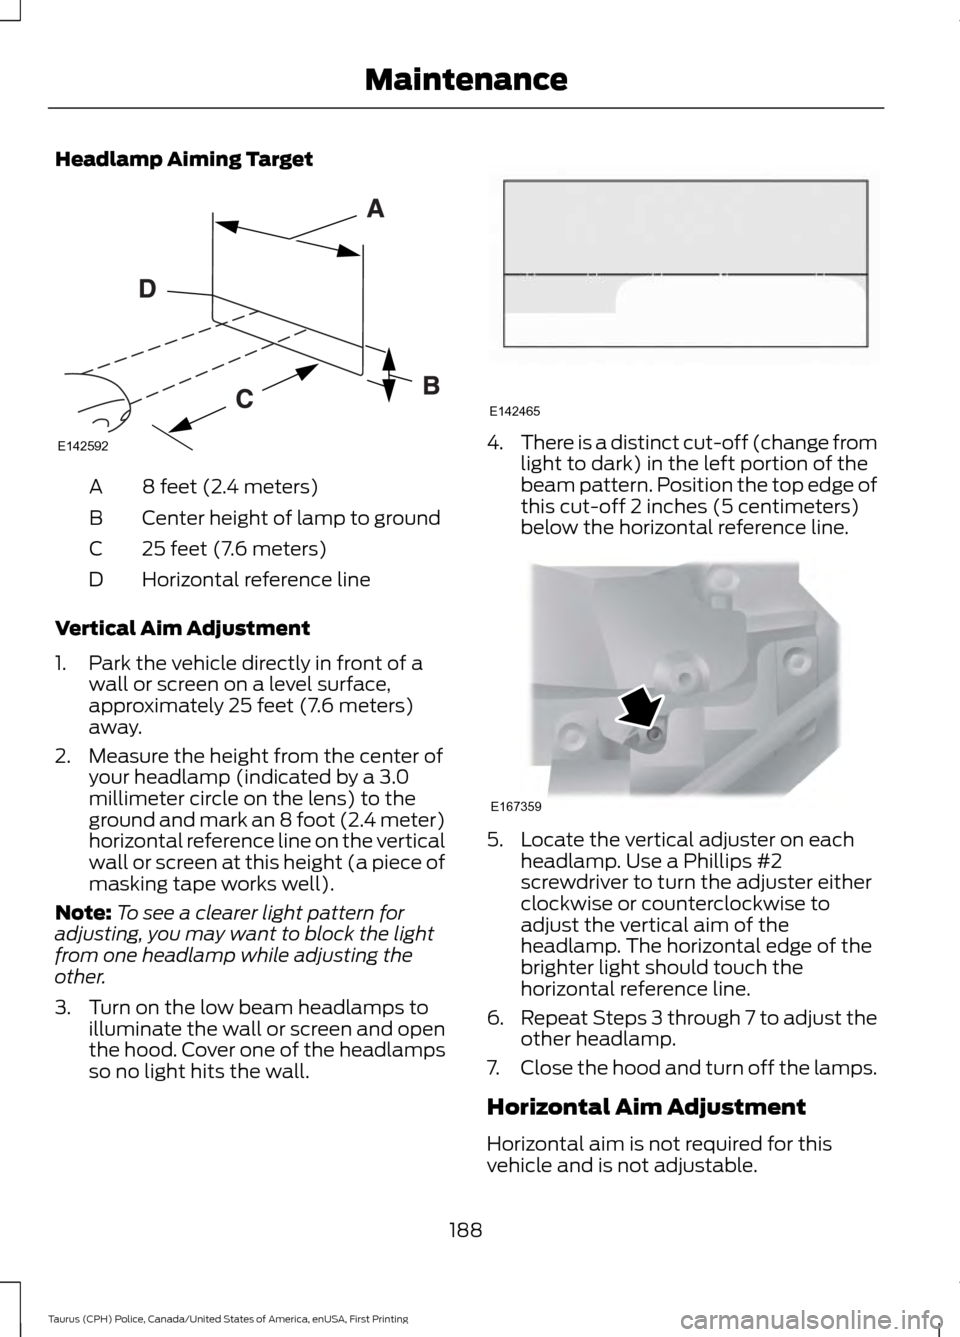
Headlamp Aiming Target
8 feet (2.4 meters)
A
Center height of lamp to ground
B
25 feet (7.6 meters)
C
Horizontal reference line
D
Vertical Aim Adjustment
1. Park the vehicle directly in front of a wall or screen on a level surface,
approximately 25 feet (7.6 meters)
away.
2. Measure the height from the center of your headlamp (indicated by a 3.0
millimeter circle on the lens) to the
ground and mark an 8 foot (2.4 meter)
horizontal reference line on the vertical
wall or screen at this height (a piece of
masking tape works well).
Note: To see a clearer light pattern for
adjusting, you may want to block the light
from one headlamp while adjusting the
other.
3. Turn on the low beam headlamps to illuminate the wall or screen and open
the hood. Cover one of the headlamps
so no light hits the wall. 4.
There is a distinct cut-off (change from
light to dark) in the left portion of the
beam pattern. Position the top edge of
this cut-off 2 inches (5 centimeters)
below the horizontal reference line. 5. Locate the vertical adjuster on each
headlamp. Use a Phillips #2
screwdriver to turn the adjuster either
clockwise or counterclockwise to
adjust the vertical aim of the
headlamp. The horizontal edge of the
brighter light should touch the
horizontal reference line.
6. Repeat Steps 3 through 7 to adjust the
other headlamp.
7. Close the hood and turn off the lamps.
Horizontal Aim Adjustment
Horizontal aim is not required for this
vehicle and is not adjustable.
188
Taurus (CPH) Police, Canada/United States of America, enUSA, First Printing MaintenanceE142592 E142465 E167359
Page 192 of 358

CHANGING A BULB
WARNINGS
Bulbs can become hot. Let the bulb
cool down before removing it. Failure
to do so could result in personal
injury. Switch the lamps and the ignition off.
Failure to follow this warning could
result in serious personal injury.
Use the correct specification bulb. See
Bulb Specification Chart (page 190).
Install in the reverse order unless otherwise
stated.
High-Intensity Discharge
Headlamps
These lamps operate at a high voltage. See
an authorized dealer if they fail.
Front Fog Lamp
(If Equipped) 1.
Switch all of the lamps and the ignition
off.
2. Disconnect the electrical connector.
3. Turn the bulb holder counterclockwise
and remove it.
Note: Do not touch the bulb glass.
Note: You cannot separate the bulb from
the bulb holder. LED Lamps
LED lamps are not serviceable items. See
an authorized dealer if they fail.
The following lamps are LED:
•
Front parking lamps.
• Front side marker lamps.
• Front direction indicators.
• Front side marker lamps.
• Side direction indicators.
• Brake and rear lamps.
• Central high mounted brake lamp.
• Rear direction indicators.
• Reversing lamps.
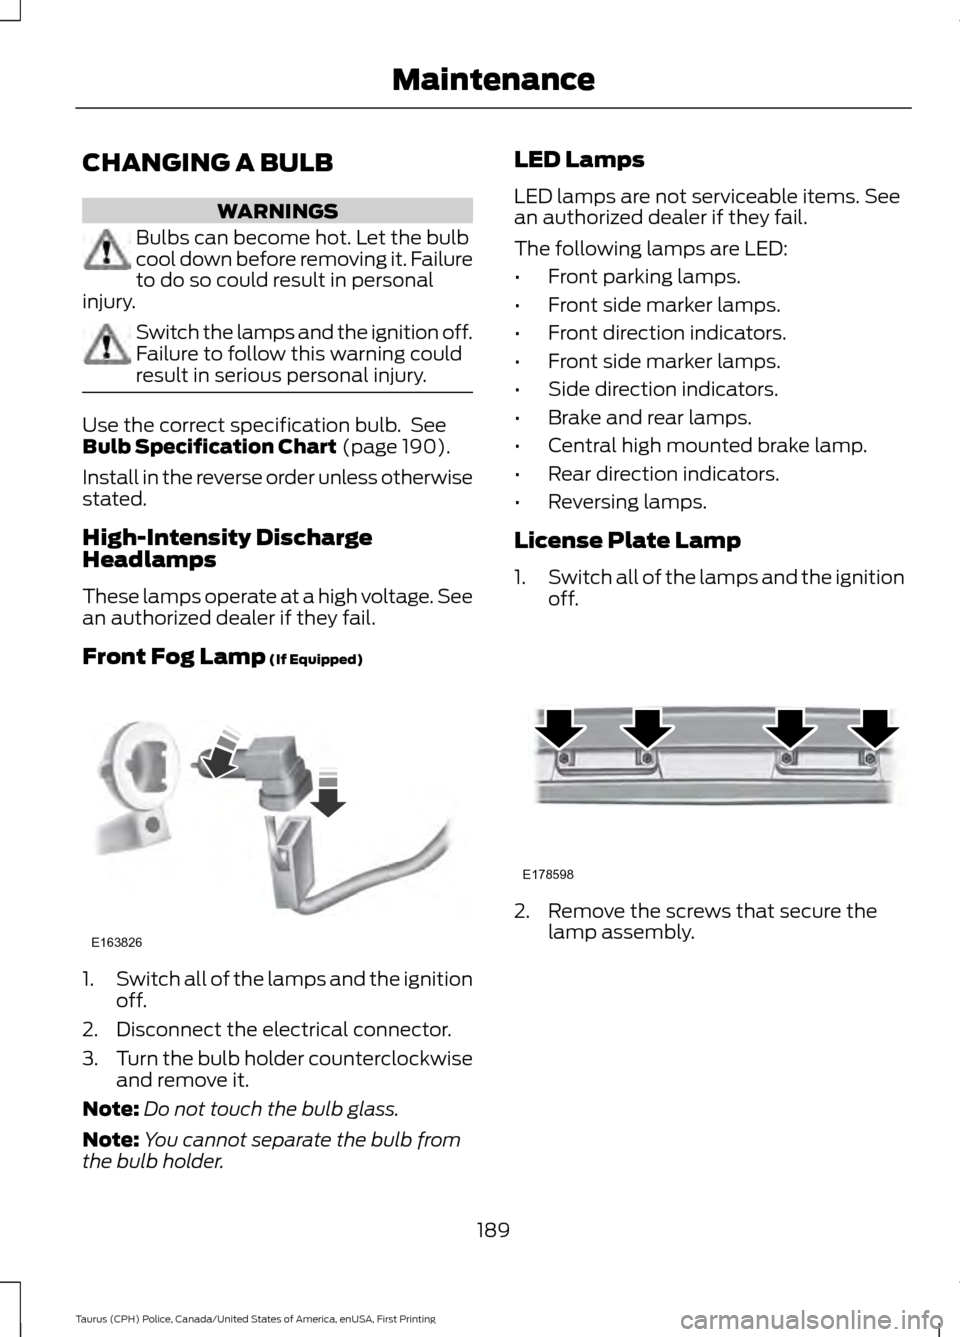
License Plate Lamp
1. Switch all of the lamps and the ignition
off. 2. Remove the screws that secure the
lamp assembly.
189
Taurus (CPH) Police, Canada/United States of America, enUSA, First Printing MaintenanceE163826 E178598
Page 223 of 358

WARNINGS
Do not attempt to change a tire on
the side of the vehicle close to
moving traffic. Pull far enough off the
road to avoid the danger of being hit when
operating the jack or changing the wheel. Always use the jack provided as
original equipment with your vehicle.
If using a jack other than the one
provided, make sure the jack capacity is
adequate for the vehicle weight, including
any vehicle cargo or modifications. If you
are unsure if the jack capacity is adequate,
contact the authorized dealer. To reduce the risk of possible serious
injury or death, do not remove the full
size spare tire from the factory
secured location. This location is necessary
to achieve police-rated 75 mph (120 km/h)
rear impact crash-test performance.
Removal increases the risk of fuel leak in
high-speed rear impacts. Note:
Passengers should not remain in your
vehicle when the vehicle is being jacked.
Note: Jack at the specified locations to
avoid damage to the vehicle.
1. Park on a level surface, set the parking
brake and activate the hazard flashers.
2. Place the transmission in park (P) and
turn the engine off. 3. Block the diagonally opposite wheel.
4.
Lift truck cargo cover, then remove the
wingnut that secures the spare tire by
turning counterclockwise.
5. Remove the spare tire from the spare tire well.
6. Remove the wing nut bolt that secures
the jack kit by turning it
counterclockwise.
7. Remove the jack and the wrench from the bag. Fold down the wrench socket
to use to loosen the lug nuts and to
operate the jack.
8. Loosen each wheel lug nut one-half turn counterclockwise, but do not
remove them until the wheel is raised
off the ground. 9. The vehicle jacking points are shown
here, and are depicted on the warning
label on the jack. Small arrow-shaped
marks on the sills show the location of
the jacking points. 220
Taurus (CPH) Police, Canada/United States of America, enUSA, First Printing Wheels and TiresE142551 E145908 E201156
Page 224 of 358

10. Raise the wheel by turning the jack
handle clockwise.
11. Remove the lug nuts with the lug wrench.
12. Replace the flat tire with the spare tire, marking sure the valve stem is
facing outward. Reinstall the lug nuts
until the wheel is snug against the
hub. Do not fully tighten the lug nuts
until the wheel has been lowered.
13. Lower the wheel by turning the jack handle counterclockwise. 14.
Remove the jack and fully tighten the
lug nuts in the order shown. See
Technical Specifications (page
222). Stowing the jack and flat tire
1. Insert the straight end of the jack
retention bracket through the eyelet of
the angled bracket and swing the
retention bracket over the jack. With
the jack in place, place the end of the
retention bracket over the threaded
stud in the trunk floor and secure it with
the plastic wing nut.
2. Screw the extension bolt onto the threaded stud of the jack retention
bracket.
221
Taurus (CPH) Police, Canada/United States of America, enUSA, First Printing Wheels and Tires12
3
4
5
E75442 E211101