Page 193 of 313

Changing Tires With a Tire
Pressure Monitoring System
Note:
Each road tire is equipped with a tire
pressure sensor located inside the wheel
and tire assembly cavity. The pressure
sensor is attached to the valve stem. The
pressure sensor is covered by the tire and is
not visible unless the tire is removed. Take
care when changing the tire to avoid
damaging the sensor
You should always have your tires serviced
by an authorized dealer.
Check the tire pressure periodically (at
least monthly) using an accurate tire
gauge. See Inflating Your Tires in this
chapter. Understanding Your Tire Pressure
Monitoring System
The tire pressure monitoring system
measures pressure in your road tires and
sends the tire pressure readings to your
vehicle. You can view the tire pressure
readings through the information display.
See General Information (page 68). The
low tire pressure warning light will turn on
if the tire pressure is significantly low. Once
the light is illuminated, your tires are
under-inflated and need to be inflated to
the manufacturer
’s recommended tire
pressure. Even if the light turns on and a
short time later turns off, your tire pressure
still needs to be checked.
When Your Temporary Spare Tire is
Installed
When one of your road tires needs to be
replaced with the temporary spare, the
system will continue to identify an issue to
remind you that the damaged road wheel
and tire assembly needs to be repaired and
put back on your vehicle.
To restore the full function of the tire
pressure monitoring system, have the
damaged road wheel and tire assembly
repaired and remounted on your vehicle.
190
Ford GT (CGX) Canada/United States of America, enUSA, First Printing Wheels and TiresE252349 E142549 E250820
Page 194 of 313

When You Believe Your System is Not
Operating Properly
The main function of the tire pressure
monitoring system is to warn you when
your tires need air. It can also warn you in
the event the system is no longer capable
of functioning as intended. See the
following chart for information concerning
your tire pressure monitoring system: Customer action required
Possible cause
Low tire pressure
warning light
Make sure tires are at the proper pres-
sure. See Inflating your tires in this
chapter. After inflating your tires to the
manufacturer’s recommended pressure
as shown on the Tire Label (located on
the edge of driver ’s door or the B-Pillar),
the vehicle must be driven for at least
two minutes over 20 mph (32 km/h)
before the light turns off.
Tire(s) under-inflated
Solid warning light
Repair the damaged road wheel and tire
assembly and reinstall it on the vehicle
to restore system function. For a
description on how the system functions,
see
When your temporary spare tire
is installed in this section.
Spare tire in use
If the tires are properly inflated and the
spare tire is not in use but the light
remains on, contact your authorized
dealer as soon as possible.
TPMS malfunction
Repair the damaged road wheel and tire
assembly and reinstall it on the vehicle
to restore system function. For a
description on how the system functions,
see
When your temporary spare tire
is installed in this section.
Spare tire in use
Flashing warning
light
If the tires are properly inflated and the
spare tire is not in use but the light
remains on, contact your authorized
dealer as soon as possible.
TPMS malfunction
When Inflating Your Tires
Note: Do not use the tire pressure display
screen as a tire pressure gauge, this can
result in over or under inflation of a tire. When putting air into your tires (such as at
a gas station or in your garage), the tire
pressure monitoring system may not
respond immediately to the air added to
your tires.
191
Ford GT (CGX) Canada/United States of America, enUSA, First Printing Wheels and Tires
Page 195 of 313

It may take up to two minutes of driving
over 20 mph (32 km/h) for the light to turn
off after you have filled your tires to the
recommended inflation pressure.
How Temperature Affects Your Tire
Pressure
The tire pressure monitoring system
monitors tire pressure in each pneumatic
tire. While driving in a normal manner, a
typical passenger tire inflation pressure
may increase about 2
–4 psi (14– 28 kPa)
from a cold start situation. If the vehicle is
stationary overnight with the outside
temperature significantly lower than the
daytime temperature, the tire pressure may
decrease about 3 psi (21 kPa) for a drop of
30°F (17°C) in ambient temperature. This
lower pressure value may be detected by
the tire pressure monitoring system as
being significantly lower than the
recommended inflation pressure and
activate the system warning light for low
tire pressure. If the low tire pressure
warning light is on, visually check each tire
to verify that no tire is flat. If one or more
tires are flat, repair as necessary. Check
the air pressure in the road tires. If any tire
is under-inflated, carefully drive the vehicle
to the nearest location where air can be
added to the tires. Inflate all the tires to
the recommended inflation pressure.
CHANGING A ROAD WHEEL
Important Information for Lifting
or Jacking
A vehicle jack is not included with your
vehicle. If you are on the road and need to
change a wheel, it is recommended that
you contact the Ford GT Concierge to
obtain roadside assistance. See
Special
Notices (page 10). Front lift points
A
Middle lift points
B
Rear lift points
C
To avoid damage to your vehicle, use a low
profile hydraulic jack when removing a road
wheel. Only place the jack on one of the
alloy lifting posts when lifting your vehicle.
Do not lift your vehicle on the carbon fiber
panels.
Note: It is recommended that an interface
be used between the alloy lifting point and
the vehicle jack (for example, a hockey puck
or dense rubber pad).
DRIVING AT HIGH SPEED
Tire Pressure - Speeds Greater
Than
165 mph (265 km/h) WARNING
Always re-inflate tires to
recommended tire pressures before
the vehicle is operated on-road. The
recommended pressure is located on the
tire label or safety certification label,
located on the B-pillar, inside the driver's
door. Note:
When driving over
165 mph
(265 km/h), be sure to check and adjust
your tire pressures accordingly.
192
Ford GT (CGX) Canada/United States of America, enUSA, First Printing Wheels and TiresE228623
Page 196 of 313

Note:
If you are not sure about the proper
tire inflation pressures, contact an
authorized dealer or service center. Your tires may require additional inflation
pressure for operation at speeds greater
than 165 mph (265 km/h). If this label is
present on your vehicle, you must adjust
the tire pressure accordingly.
TECHNICAL SPECIFICATIONS
Wheel Lug Nut Torque Specifications WARNING
When you install a wheel, always remove any corrosion, dirt or foreign materials
present on the mounting surfaces of the wheel or the surface of the wheel hub,
brake drum or brake disc that contacts the wheel. Make sure to secure any fasteners
that attach the rotor to the hub so they do not interfere with the mounting surfaces of
the wheel. Installing wheels without correct metal-to-metal contact at the wheel mounting
surfaces can cause the wheel nuts to loosen and the wheel to come off while your vehicle
is in motion, resulting in loss of vehicle control, personal injury or death. Ib-ft (Nm)
*
Bolt size
150 lb.ft (204 Nm)
M14 X 1.5
* Torque specifications are for nut and bolt threads free of dirt and rust. Use only Ford
recommended replacement fasteners.
Retighten the lug nuts to the specified torque within 100 miles (160 kilometers) after any
wheel disturbance (such as tire rotation, changing a flat tire, wheel removal).
193
Ford GT (CGX) Canada/United States of America, enUSA, First Printing Wheels and TiresE247515
Page 197 of 313
Wheel pilot bore
A
Inspect the wheel pilot bore and
mounting surface prior to installation.
Remove any visible corrosion or loose
particles.
Note: The wheel stud length differs
depending on the wheels equipped. The
hub on carbon fiber wheels require longer
wheel studs due to a thicker hub. If
changing wheel types between alloy and
carbon fiber, in either direction, you must
also change the wheel studs to match the
length required for that wheel type. Also
use the longer studs for the carbon fiber
wheels and then use open lug nuts if
putting alloy wheels back on the car.
194
Ford GT (CGX) Canada/United States of America, enUSA, First Printing Wheels and TiresE145950
Page 198 of 313
ENGINE SPECIFICATIONS
Specification
Measurement
214 in³ (3,506 cm³)
Cubic inches.
1-4-2-5-3-6
Firing order.
Coil on plug
Ignition system.
0.030 in (0.75 mm)
Spark plug gap.
9:1
Compression ratio.
Premium fuel only
Fuel quality.
195
Ford GT (CGX) Canada/United States of America, enUSA, First Printing Capacities and Specifications
Page 199 of 313

MOTORCRAFT PARTS
Part Number
Component
FA-1912-A*
Air filter element.
HG7Z-6731-A**
Oil filter.
HG7Z-10655-A**
Battery.
SP-542*
Spark plugs.
FP-70*
Cabin air filter.
HG7Z-17528-A (driver side)**
Windshield wiper blade.
HG7Z-17528-B (passenger side)**
*Motorcraft® part number
**Ford part number
We recommend Ford and Motorcraft®
replacement parts available at your Ford
dealer or at fordparts.com for scheduled
maintenance. These parts meet or exceed
Ford Motor Company ’s specifications and
are engineered for your vehicle. Use of
other parts may impact vehicle
performance, emissions and durability.
Your warranty may be void for any damage
related to use of other parts.
For spark plug replacement, contact an
authorized dealer. Replace the spark plugs
at the appropriate intervals.
VEHICLE IDENTIFICATION
NUMBER
You can find the vehicle identification
number at the following locations.
On the vehicle certification label inside the
driver's door opening. On the left-hand side of the instrument
panel.
196
Ford GT (CGX) Canada/United States of America, enUSA, First Printing Capacities and SpecificationsE227109
Page 200 of 313
Please note that in the graphic, XXXX is
representative of your vehicle identification
number.
The Vehicle Identification Number contains
the following information:
World manufacturer identifier
A
Brake system, Gross Vehicle
Weight Rating, Restraint Devices
and their locations
B
Make, vehicle line, series, body
type
C
Engine type
D
Check digit
E Model year
F
Assembly plant
G
Production sequence number
H
VEHICLE CERTIFICATION
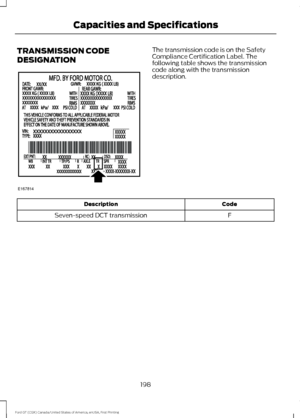
LABEL The National Highway Traffic Safety
Administration Regulations require that a
Safety Compliance Certification Label be
affixed to a vehicle and prescribe where
the Safety Compliance Certification Label
may be located. The Safety Compliance
Certification Label shall be affixed to either
the door hinge pillar, the door latch post,
or the edge of the door near the door latch,
next to the driver's seating position.
197
Ford GT (CGX) Canada/United States of America, enUSA, First Printing Capacities and SpecificationsE252123 E142477 E245288