2017 FORD F450 SUPER DUTY seat adjustment
[x] Cancel search: seat adjustmentPage 4 of 642

Introduction
About This Manual...........................................7
Symbols Glossary.............................................8
Data Recording................................................10
California Proposition 65.............................12
Perchlorate.........................................................12
Ford Credit.........................................................12
Replacement PartsRecommendation.......................................12
Special Notices................................................13
Mobile CommunicationsEquipment.....................................................14
Export Unique Options.................................14
Environment
Protecting the Environment........................16
Child Safety
General Information.......................................17
Installing Child Restraints............................18
Booster Seats..................................................30
Child Restraint Positioning.........................32
Child Safety Locks..........................................33
Seatbelts
Principle of Operation..................................35
Fastening the Seatbelts..............................36
Seatbelt Height Adjustment.....................40
Seatbelt Warning Lamp and IndicatorChime.............................................................40
Seatbelt Reminder.........................................41
Child Restraint and SeatbeltMaintenance................................................42
Seatbelt Extension........................................43
Supplementary RestraintsSystem
Principle of Operation..................................44
Driver and Passenger Airbags...................45
Side Airbags.....................................................50
Safety Canopy™..............................................51
Crash Sensors and Airbag Indicator........52
Airbag Disposal...............................................53
Keys and Remote Controls
General Information on RadioFrequencies..................................................54
Remote Control..............................................54
Replacing a Lost Key or RemoteControl...........................................................60
MyKey™
Principle of Operation...................................61
Creating a MyKey............................................62
Clearing All MyKeys.......................................63
Checking MyKey System Status...............63
Using MyKey With Remote StartSystems.........................................................63
MyKey Troubleshooting...............................64
Doors and Locks
Locking and Unlocking.................................65
Keyless Entry...................................................68
Tailgate
Tailgate Lock....................................................70
Removing the Tailgate.................................70
Tailgate Step.....................................................71
Bed Extender....................................................72
Security
Passive Anti-Theft System.........................74
Anti-Theft Alarm............................................76
Power Running Boards
Using Power Running Boards....................78
Steering Wheel
Adjusting the Steering Wheel...................80
Audio Control...................................................81
1
Super Duty (TFE) Canada/United States of America, enUSA, Edition date: 201710, Second Printing
Table of Contents
Page 41 of 642

Seatbelt Locking Modes
WARNINGS
After any vehicle crash, the seatbeltsystem at all passenger seatingpositions must be checked by anauthorized dealer to verify that theautomatic locking retractor feature forchild seats is still functioning properly. Inaddition, all seatbelts should be checkedfor proper function.
The belt and retractor must bereplaced if the seatbelt assemblyautomatic locking retractor featureor any other seatbelt function is notoperating properly when checked by anauthorized dealer. Failure to replace thebelt and retractor assembly could increasethe risk of injury in crashes.
All safety restraints in the vehicle arecombination lap and shoulder belts. Thedriver seatbelt has the first type of lockingmode, and the front outboard passengerand rear seat seatbelts have both types oflocking modes described as follows:
Vehicle Sensitive Mode
This is the normal retractor mode, whichallows free shoulder belt lengthadjustment to your movements andlocking in response to vehicle movement.For example, if the driver brakes suddenly,turns a corner sharply, or the vehiclereceives an impact of about 5 mph(8 km/h) or more, the combinationseatbelts will lock to help reduce forwardmovement of the driver and passengers.
In addition, the retractor is designed to lockif the webbing is pulled out too quickly. Ifthis occurs, let the belt retract slightly andpull webbing out again in a slow andcontrolled manner.
Automatic Locking Mode
In this mode, the shoulder belt isautomatically pre-locked. The belt will stillretract to remove any slack in the shoulderbelt. The automatic locking mode is notavailable on the driver seatbelt.
When to Use the Automatic LockingMode
Use this mode any time you install a childsafety seat in a front outboard passengerseating position in a Regular Cab,SuperCab, SuperCrew or any rear seatingposition of a SuperCab or SuperCrew. Theoptional front seat's center seatbelt has acinch mechanism. Children 12 years oldand under should be properly restrained ina rear seat whenever possible. See ChildSafety (page 17).
How to Use the Automatic LockingMode
Non-inflatable seatbelts
1. Buckle the combination lap andshoulder belt.
2. Grasp the shoulder portion and pulldownward until you pull the entire beltout.
3. Allow the belt to retract. As the beltretracts, you will hear a clicking sound.This indicates the seatbelt is now in theautomatic locking mode.
38
Super Duty (TFE) Canada/United States of America, enUSA, Edition date: 201710, Second Printing
SeatbeltsE142591
Page 43 of 642
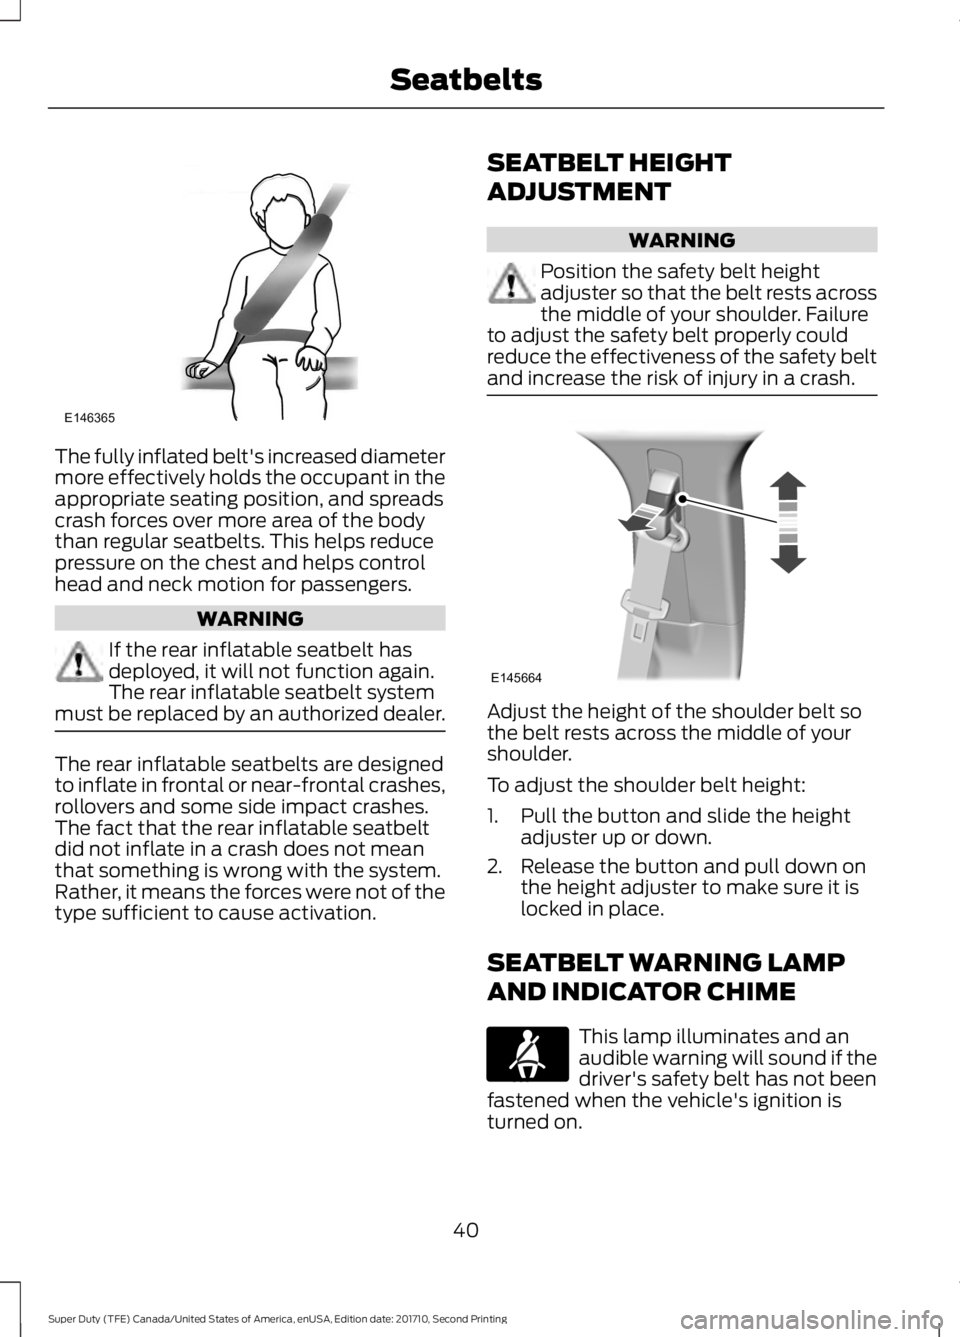
The fully inflated belt's increased diametermore effectively holds the occupant in theappropriate seating position, and spreadscrash forces over more area of the bodythan regular seatbelts. This helps reducepressure on the chest and helps controlhead and neck motion for passengers.
WARNING
If the rear inflatable seatbelt hasdeployed, it will not function again.The rear inflatable seatbelt systemmust be replaced by an authorized dealer.
The rear inflatable seatbelts are designedto inflate in frontal or near-frontal crashes,rollovers and some side impact crashes.The fact that the rear inflatable seatbeltdid not inflate in a crash does not meanthat something is wrong with the system.Rather, it means the forces were not of thetype sufficient to cause activation.
SEATBELT HEIGHT
ADJUSTMENT
WARNING
Position the safety belt heightadjuster so that the belt rests acrossthe middle of your shoulder. Failureto adjust the safety belt properly couldreduce the effectiveness of the safety beltand increase the risk of injury in a crash.
Adjust the height of the shoulder belt sothe belt rests across the middle of yourshoulder.
To adjust the shoulder belt height:
1. Pull the button and slide the heightadjuster up or down.
2. Release the button and pull down onthe height adjuster to make sure it islocked in place.
SEATBELT WARNING LAMP
AND INDICATOR CHIME
This lamp illuminates and anaudible warning will sound if thedriver's safety belt has not beenfastened when the vehicle's ignition isturned on.
40
Super Duty (TFE) Canada/United States of America, enUSA, Edition date: 201710, Second Printing
SeatbeltsE146365 E145664 E71880
Page 52 of 642
Transport Canada Deactivation Criteria(Canada Only)
WARNING
This vehicle has special energymanagement seatbelts for the driverand right front passenger. Theseparticular seatbelts are specificallydesigned to work with airbags to helpreduce the risk of injury in a crash. Theenergy management seatbelt gives orreleases additional seatbelt webbing insome accidents to reduce theconcentration of force on an occupant'schest and to reduce the risk of certain bonefractures and injuries to underlying organs.In a crash, if the airbag is off, this energymanagement seatbelt might permit thepassenger wearing the seatbelt to moveforward enough to have a serious or fatalinjury. The more severe the crash, and theheavier the occupant, the greater the risk.Make sure the airbag is on for anypassenger who does not qualify under theNational Highway Traffic SafetyAdministration deactivation criteria.
1.Infant: An infant (less than 1 year old)must ride in the front seat because:
•My vehicle has no rear seat;
•The rear seat in my vehicle cannotaccommodate a rear-facing infantseat;
•The infant has a medical conditionwhich, according to the infant'sphysician, makes it necessary for theinfant to ride in the front seat so thatthe driver can monitor the infant'scondition.
2.Child age 12 or under: A child age 12 orunder must ride in the front seat because:
•My vehicle has no rear seat;
•Although children age 12 and under ridein the rear seat whenever possible,children age 12 and under have nooption but to sometimes ride in thefront seat because rear seat space isinsufficient;
•The child has a medical condition that,according to the child's physician,makes it necessary for the child to ridein the front seat so that the driver canmonitor the child's condition.
3.Medical condition: A passenger has amedical condition that, according to his orher physician:
•Poses a special risk for the passengerif the airbag deploys; and
•Makes the potential harm from thepassenger airbag deployment greaterthan the potential harm from turningoff the airbag and experiencing a crashwithout the protection offered by theairbag
Proper Driver and Front PassengerSeating Adjustment
WARNING
National Highway Traffic SafetyAdministration (NHTSA)recommends a minimum distanceof at least 10 in (25 cm) between anoccupant’s chest and the driver airbagmodule.
To properly position yourself away fromthe airbag:
•Move your seat to the rear as far as youcan while still reaching the pedalscomfortably.
•Recline the seat slightly (one or twodegrees) from the upright position.
49
Super Duty (TFE) Canada/United States of America, enUSA, Edition date: 201710, Second Printing
Supplementary Restraints System
Page 154 of 642
Note:Do not clean the mirror housing orglass with harsh abrasives, fuel or otherpetroleum-based cleaning products.
HEATED EXTERIOR MIRRORS
Note:Do not remove ice from the mirrorswith a scraper or adjust the mirror glasswhen it is frozen in place.
Note:Do not clean the mirror housing orglass with harsh abrasives, fuel or otherpetroleum-based cleaning products.
The heated exterior mirrors will removeice, mist and fog.
CABIN AIR FILTER
Your vehicle is equipped with a cabin airfilter, which gives you and your passengersthe following benefits:
•It improves your driving comfort byreducing particle concentration.
•It improves the interior compartmentcleanliness.
•It protects the climate controlcomponents from particle deposits.
You can locate the cabin air filter behindthe glove box.
Note:Make sure you have a cabin air filterinstalled at all times. This prevents foreignobjects from entering the system. Runningthe system without a filter in place couldresult in degradation or damage to thesystem.
Replace the filter at regular intervals. SeeScheduled Maintenance (page 573).
For additional cabin air filter information,or to replace the filter, see an authorizeddealer.
REMOTE START (If Equipped)
You can switch this feature on or off andadjust the settings using the informationdisplay.
The system adjusts the interiortemperature depending on your chosensettings during remote start.
You cannot adjust the climate controlsetting during remote start operation.When you switch the ignition on, theclimate control system returns to theprevious settings. You can now makeadjustments.
You need to switch on certainvehicle-dependent features, such as:
•Heated seats.
•Cooled seats.
•Heated steering wheel.
•Heated mirrors.
•Heated rear window.
Automatic Settings
In hot weather, the system is set to 72°F(22°C). The cooled seats are set to high(if available, and selected to AUTO in theinformation display).
In moderate weather, the system eitherheats or cools (based on previoussettings). The rear defroster, heatedmirrors and heated or cooled seats do notautomatically turn on.
In cold weather, the system is set to 72°F(22°C). The heated seats are set to high(if available, and selected to AUTO in theinformation display). The heated rearwindow and heated mirrors automaticallyturn on.
151
Super Duty (TFE) Canada/United States of America, enUSA, Edition date: 201710, Second Printing
Climate Control
Page 158 of 642
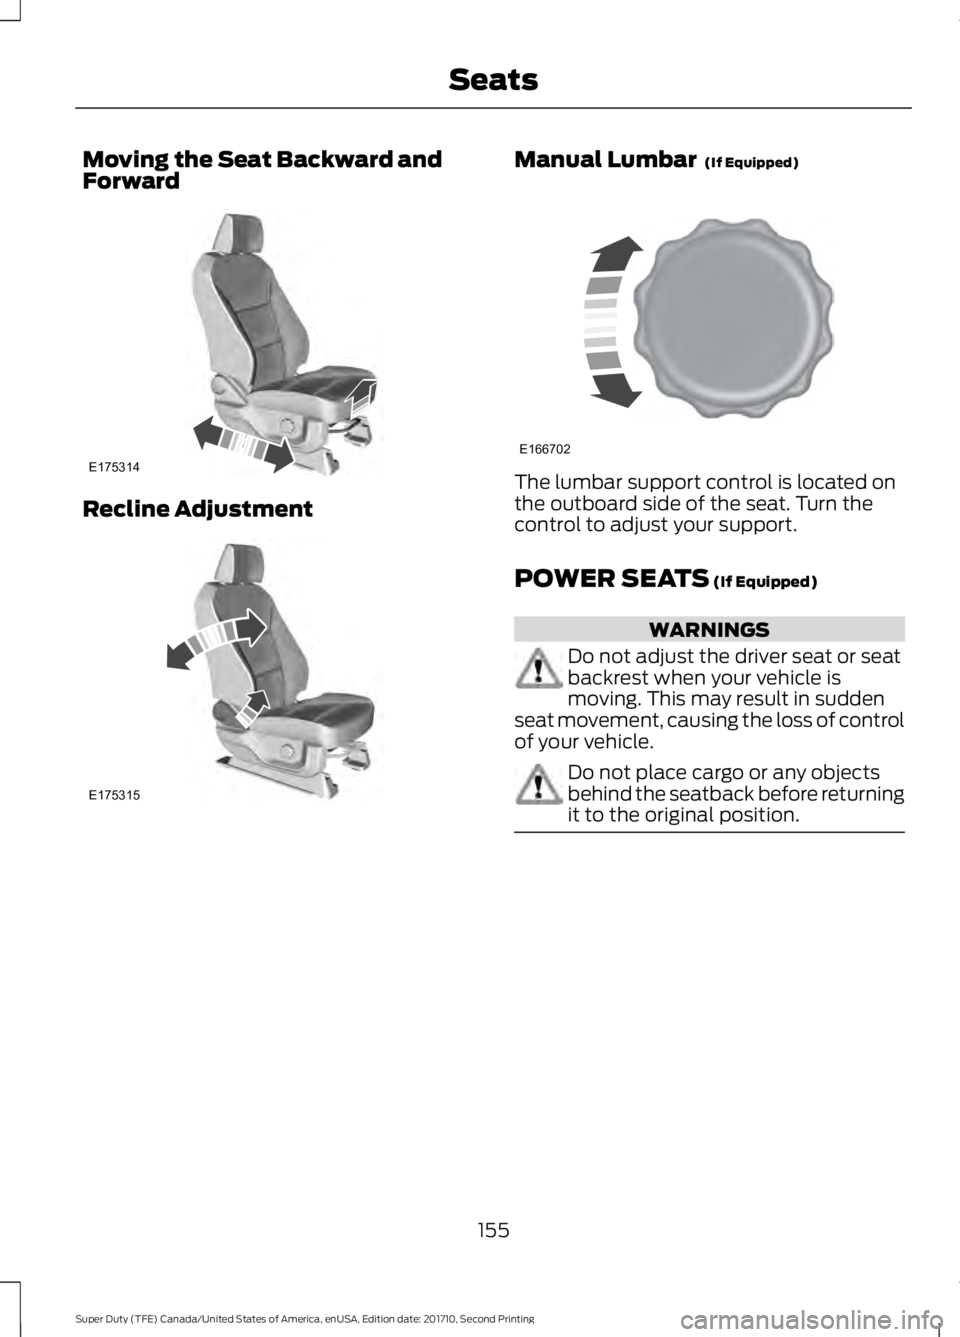
Moving the Seat Backward andForward
Recline Adjustment
Manual Lumbar (If Equipped)
The lumbar support control is located onthe outboard side of the seat. Turn thecontrol to adjust your support.
POWER SEATS (If Equipped)
WARNINGS
Do not adjust the driver seat or seatbackrest when your vehicle ismoving. This may result in suddenseat movement, causing the loss of controlof your vehicle.
Do not place cargo or any objectsbehind the seatback before returningit to the original position.
155
Super Duty (TFE) Canada/United States of America, enUSA, Edition date: 201710, Second Printing
SeatsE175314 E175315 E166702
Page 160 of 642
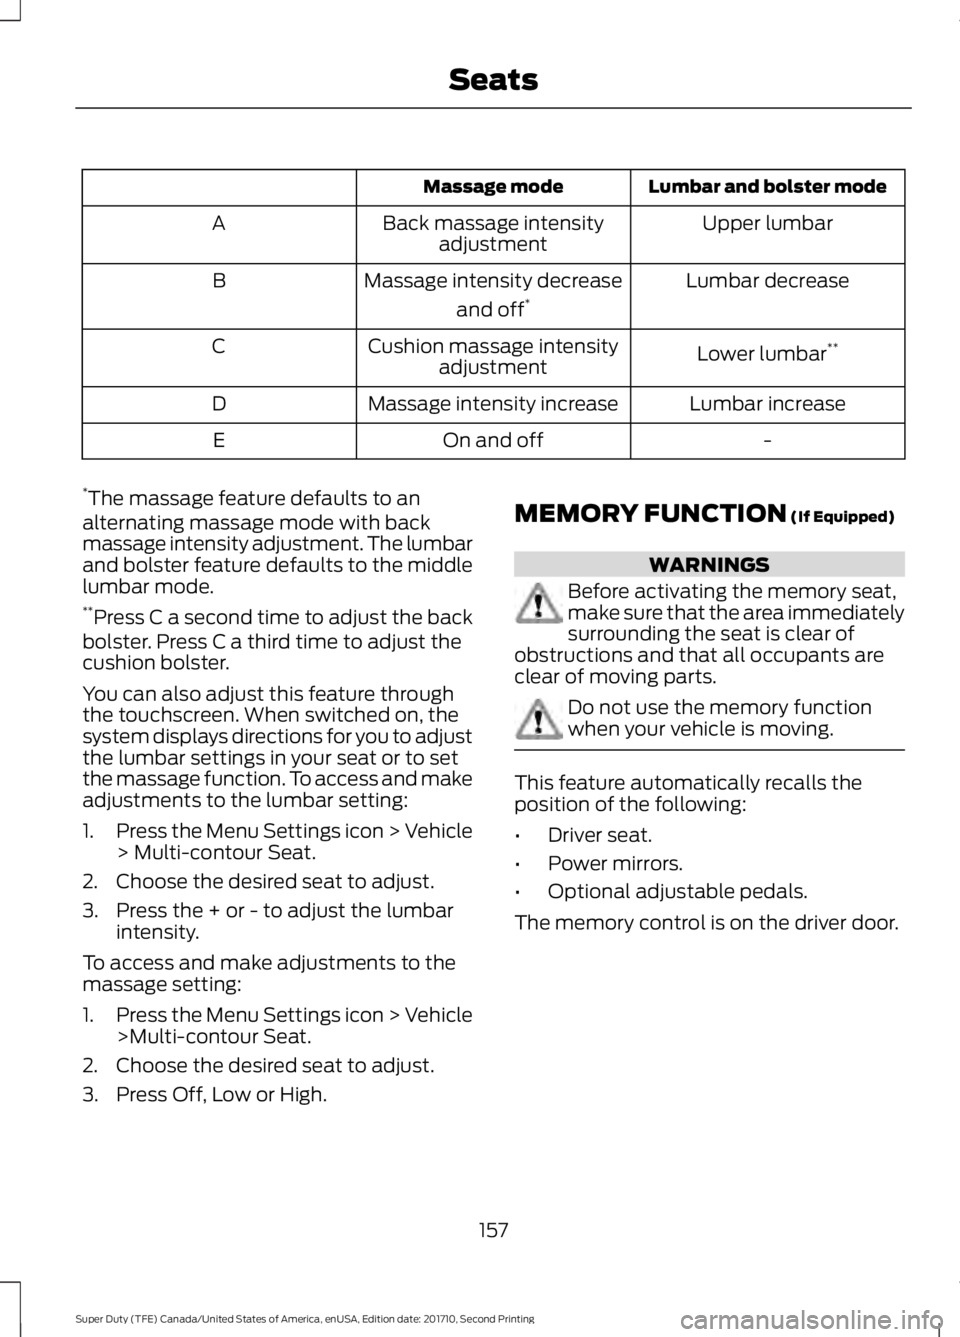
Lumbar and bolster modeMassage mode
Upper lumbarBack massage intensityadjustmentA
Lumbar decreaseMassage intensity decrease
and off*B
Lower lumbar**Cushion massage intensityadjustmentC
Lumbar increaseMassage intensity increaseD
-On and offE
*The massage feature defaults to analternating massage mode with backmassage intensity adjustment. The lumbarand bolster feature defaults to the middlelumbar mode.**Press C a second time to adjust the backbolster. Press C a third time to adjust thecushion bolster.
You can also adjust this feature throughthe touchscreen. When switched on, thesystem displays directions for you to adjustthe lumbar settings in your seat or to setthe massage function. To access and makeadjustments to the lumbar setting:
1.Press the Menu Settings icon > Vehicle> Multi-contour Seat.
2. Choose the desired seat to adjust.
3. Press the + or - to adjust the lumbarintensity.
To access and make adjustments to themassage setting:
1.Press the Menu Settings icon > Vehicle>Multi-contour Seat.
2. Choose the desired seat to adjust.
3. Press Off, Low or High.
MEMORY FUNCTION (If Equipped)
WARNINGS
Before activating the memory seat,make sure that the area immediatelysurrounding the seat is clear ofobstructions and that all occupants areclear of moving parts.
Do not use the memory functionwhen your vehicle is moving.
This feature automatically recalls theposition of the following:
•Driver seat.
•Power mirrors.
•Optional adjustable pedals.
The memory control is on the driver door.
157
Super Duty (TFE) Canada/United States of America, enUSA, Edition date: 201710, Second Printing
Seats
Page 298 of 642

•Front wheel toe may requirere-adjustment to prevent prematureuneven tire wear. Specifications are inthe Ford Workshop Manual.
•Headlight aim may requirere-adjustment.
•The tire air pressures recommendedfor general driving are on the vehicle’sSafety Certification Label. Themaximum cold inflation pressure forthe tire and associated load rating ison the tire sidewall. Tire air pressuremay require re-adjustment within thesepressure limits to accommodate theadditional weight of the snowplowinstallation.
•Federal and some local regulationsrequire additional exterior lamps forsnowplow-equipped vehicles. Consultyour authorized dealer for additionalinformation.
Operating the Vehicle with theSnowplow Attached
Note:Do not use your vehicle for snowremoval until you have driven at least500 mi (800 km).
Ford recommends vehicle speed does notexceed 45 mph (72 km/h) whensnowplowing.
The attached snowplow blade restrictsairflow to the radiator, and may cause theengine to run at a higher temperature:Attention to engine temperature isespecially important when outsidetemperatures are above freezing. Anglethe blade to maximize airflow to theradiator and monitor engine temperatureto determine whether a left or right angleprovides the best performance.
Follow the severe duty schedule in yourScheduled Maintenance information forengine oil and transmission fluid changeintervals.
Snowplowing with your AirbagEquipped Vehicle
WARNINGS
Do not attempt to service, repair, ormodify the airbag supplementalrestraint system (SRS) or its fuses.Contact an authorized dealer.
Additional equipment for examplesnowplow equipment may affect theperformance of the airbag sensorsincreasing the risk of injury. Please refer tothe Body Builders Layout Book forinstructions about the appropriateinstallation of additional equipment.
All occupants of the vehicle,including the driver, should alwaysproperly wear their seatbelt, evenwhen provided with an airbagsupplemental restraint system (SRS).
Your vehicle is equipped with a driver andpassenger airbag supplemental restraintsystem. The supplemental restraint systemwill activate in certain frontal and offsetfrontal collisions when the vehicle sustainssufficient frontal deceleration.
Careless or high speed driving whileplowing snow that results in sufficientvehicle decelerations can deploy theairbags. Such driving also increases the riskof accidents.
Never remove or defeat the trippingmechanisms designed into the snowremoval equipment by its manufacturer.Doing so may cause damage to the vehicleand the snow removal equipment as wellas possible airbag deployment.
Engine temperature while plowing
When driving with a plow, your engine mayrun at a higher temperature than normalbecause the attached snowplow blade willrestrict airflow to the radiator.
295
Super Duty (TFE) Canada/United States of America, enUSA, Edition date: 201710, Second Printing
Driving Hints