2017 FORD F450 SUPER DUTY door lock
[x] Cancel search: door lockPage 110 of 642

Cruise Control (If Equipped)
Illuminates when you switch thisfeature on. See Using CruiseControl (page 239).
Direction Indicator
Illuminates when the left or rightturn signal or the hazard warningflasher is turned on. If theindicators stay on or flash faster, check fora burned out bulb.
Door Ajar
Displays when the ignition is onand any door is not completelyclosed.
Electronic Locking Differential (If
Equipped)
Illuminates when using theelectronic locking differential.
Engine Coolant Temperature
Illuminates when the enginecoolant temperature is high.Stop the vehicle as soon aspossible, switch off the engine and let cool.
Engine Oil
If it illuminates with the enginerunning or when you are driving,this indicates a malfunction.Stop your vehicle as soon as it is safe todo so and switch the engine off. Check theengine oil level. See Engine Oil Check(page 327).
Note:Do not resume your journey if itilluminates despite the level being correct.Have the system checked by your authorizeddealer immediately.
Fasten Seatbelt
It illuminates and a chimesounds to remind you to fastenyour seatbelt.
Front Airbag
If it fails to illuminate when youstart your vehicle, continues toflash or remains on, it indicatesa malfunction. Have the system checkedby your authorized dealer.
Front Fog Lamps (If Equipped)
It illuminates when you switchthe front fog lamps on.
High Beam
Illuminates when you switch thehigh beam headlamps on. It willflash when you use theheadlamp flasher.
Hill Descent (If Equipped)
Illuminates when hill descent isswitched on.
Low Fuel Level
Illuminates when the fuel levelis low or the fuel tank is nearlyempty. Refuel as soon aspossible.
Low Tire Pressure Warning
Illuminates when your tirepressure is low. If the lampremains on with the enginerunning or when driving, check your tirepressure as soon as possible.
107
Super Duty (TFE) Canada/United States of America, enUSA, Edition date: 201710, Second Printing
Instrument ClusterE71340 E163170 E71880 E67017 E163171
Page 138 of 642
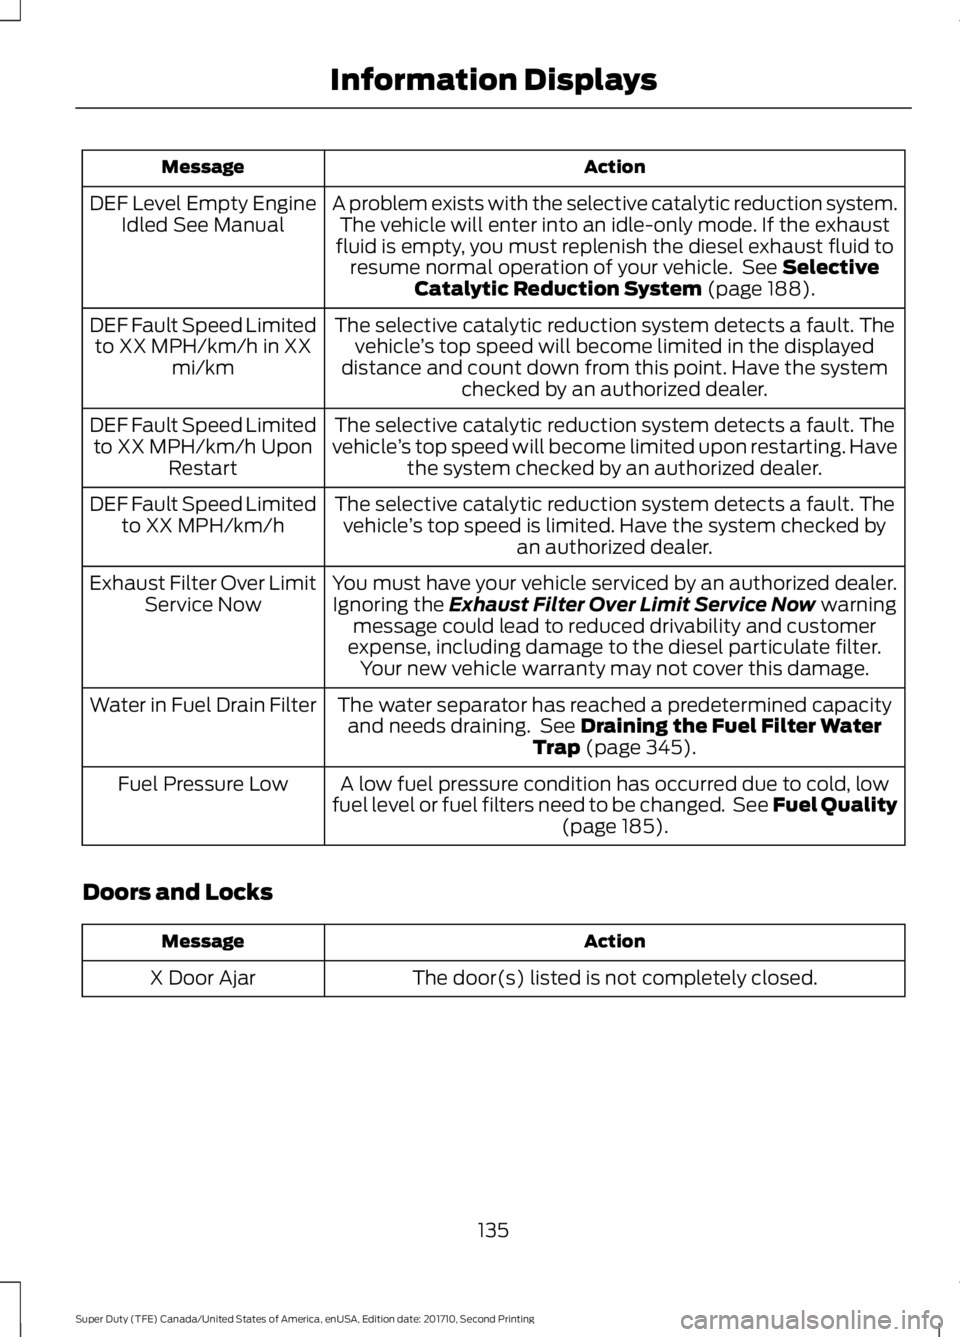
ActionMessage
A problem exists with the selective catalytic reduction system.The vehicle will enter into an idle-only mode. If the exhaustfluid is empty, you must replenish the diesel exhaust fluid toresume normal operation of your vehicle. See SelectiveCatalytic Reduction System (page 188).
DEF Level Empty EngineIdled See Manual
The selective catalytic reduction system detects a fault. Thevehicle’s top speed will become limited in the displayeddistance and count down from this point. Have the systemchecked by an authorized dealer.
DEF Fault Speed Limitedto XX MPH/km/h in XXmi/km
The selective catalytic reduction system detects a fault. Thevehicle’s top speed will become limited upon restarting. Havethe system checked by an authorized dealer.
DEF Fault Speed Limitedto XX MPH/km/h UponRestart
The selective catalytic reduction system detects a fault. Thevehicle’s top speed is limited. Have the system checked byan authorized dealer.
DEF Fault Speed Limitedto XX MPH/km/h
You must have your vehicle serviced by an authorized dealer.Ignoring the Exhaust Filter Over Limit Service Now warningmessage could lead to reduced drivability and customerexpense, including damage to the diesel particulate filter.Your new vehicle warranty may not cover this damage.
Exhaust Filter Over LimitService Now
The water separator has reached a predetermined capacityand needs draining. See Draining the Fuel Filter WaterTrap (page 345).
Water in Fuel Drain Filter
A low fuel pressure condition has occurred due to cold, lowfuel level or fuel filters need to be changed. See Fuel Quality(page 185).
Fuel Pressure Low
Doors and Locks
ActionMessage
The door(s) listed is not completely closed.X Door Ajar
135
Super Duty (TFE) Canada/United States of America, enUSA, Edition date: 201710, Second Printing
Information Displays
Page 161 of 642
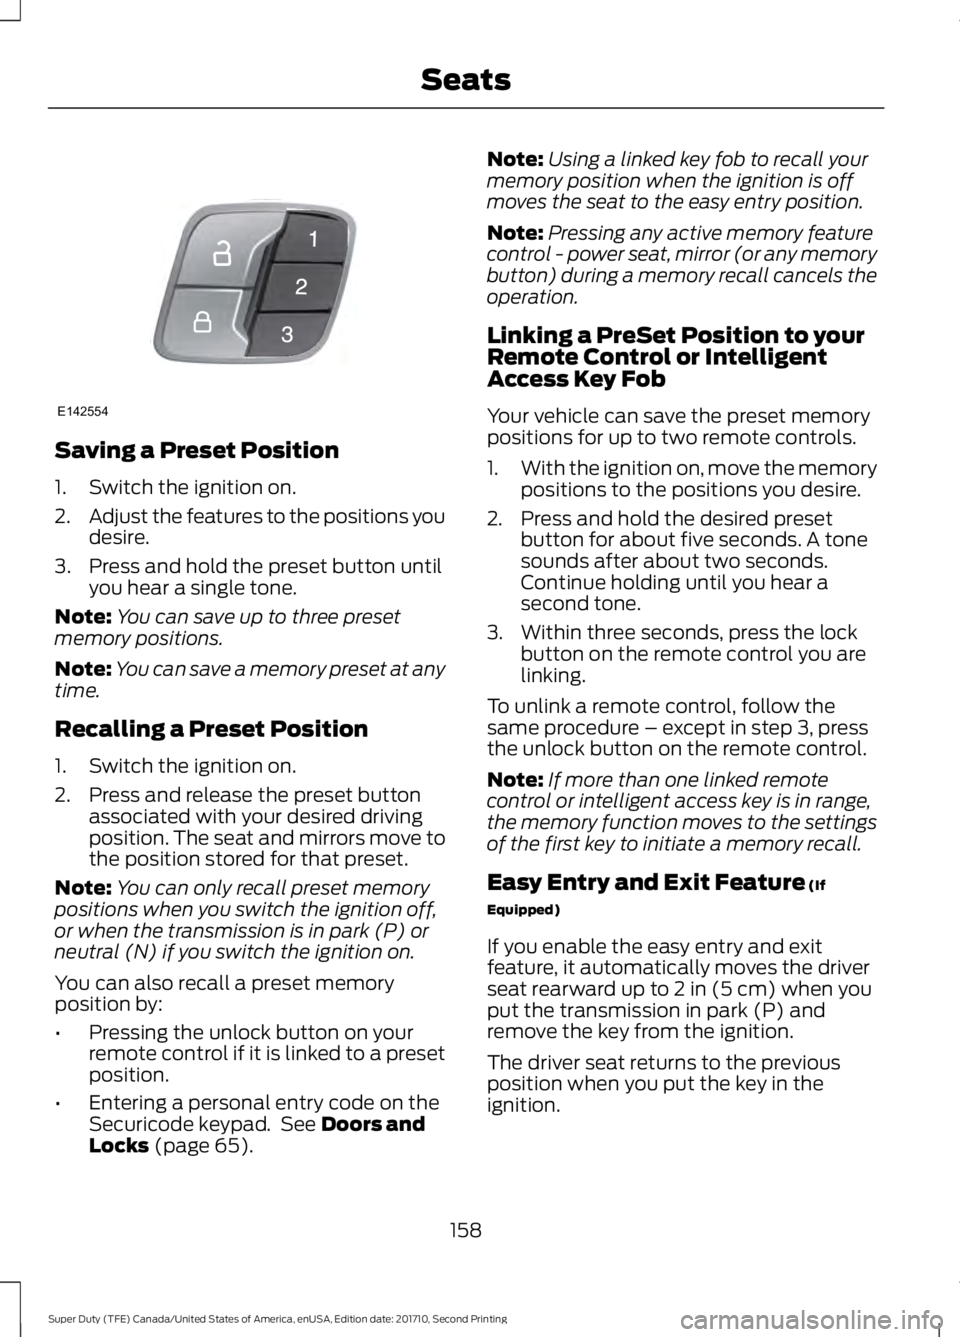
Saving a Preset Position
1. Switch the ignition on.
2.Adjust the features to the positions youdesire.
3. Press and hold the preset button untilyou hear a single tone.
Note:You can save up to three presetmemory positions.
Note:You can save a memory preset at anytime.
Recalling a Preset Position
1. Switch the ignition on.
2. Press and release the preset buttonassociated with your desired drivingposition. The seat and mirrors move tothe position stored for that preset.
Note:You can only recall preset memorypositions when you switch the ignition off,or when the transmission is in park (P) orneutral (N) if you switch the ignition on.
You can also recall a preset memoryposition by:
•Pressing the unlock button on yourremote control if it is linked to a presetposition.
•Entering a personal entry code on theSecuricode keypad. See Doors andLocks (page 65).
Note:Using a linked key fob to recall yourmemory position when the ignition is offmoves the seat to the easy entry position.
Note:Pressing any active memory featurecontrol - power seat, mirror (or any memorybutton) during a memory recall cancels theoperation.
Linking a PreSet Position to yourRemote Control or IntelligentAccess Key Fob
Your vehicle can save the preset memorypositions for up to two remote controls.
1.With the ignition on, move the memorypositions to the positions you desire.
2. Press and hold the desired presetbutton for about five seconds. A tonesounds after about two seconds.Continue holding until you hear asecond tone.
3. Within three seconds, press the lockbutton on the remote control you arelinking.
To unlink a remote control, follow thesame procedure – except in step 3, pressthe unlock button on the remote control.
Note:If more than one linked remotecontrol or intelligent access key is in range,the memory function moves to the settingsof the first key to initiate a memory recall.
Easy Entry and Exit Feature (If
Equipped)
If you enable the easy entry and exitfeature, it automatically moves the driverseat rearward up to 2 in (5 cm) when youput the transmission in park (P) andremove the key from the ignition.
The driver seat returns to the previousposition when you put the key in theignition.
158
Super Duty (TFE) Canada/United States of America, enUSA, Edition date: 201710, Second Printing
SeatsE142554
Page 167 of 642
HomeLink Wireless ControlSystem
WARNINGS
Make sure that the garage door andsecurity device are free fromobstruction when you areprogramming. Do not program the systemwith the vehicle in the garage.
Do not use the system with anygarage door opener that does nothave the safety stop and reversefeature as required by U.S. Federal SafetyStandards (this includes any garage dooropener manufactured before April 1, 1982).A garage door opener which cannot detectan object, signaling the door to stop andreverse, does not meet current federalsafety standards. Using a garage dooropener without these features increasesthe risk of serious injury or death.
Note:Make sure you keep the originalremote control transmitter for use in othervehicles as well as for future systemprogramming.
Note:We recommend that upon the saleor lease termination of your vehicle, youerase the programmed function buttons forsecurity reasons. See Erasing the FunctionButton Codes later in this section.
Note:You can program a maximum ofthree devices. To change or replace any ofthe three devices after it has been initiallyprogrammed, you must first erase thecurrent settings. See Erasing the FunctionButton Codes.
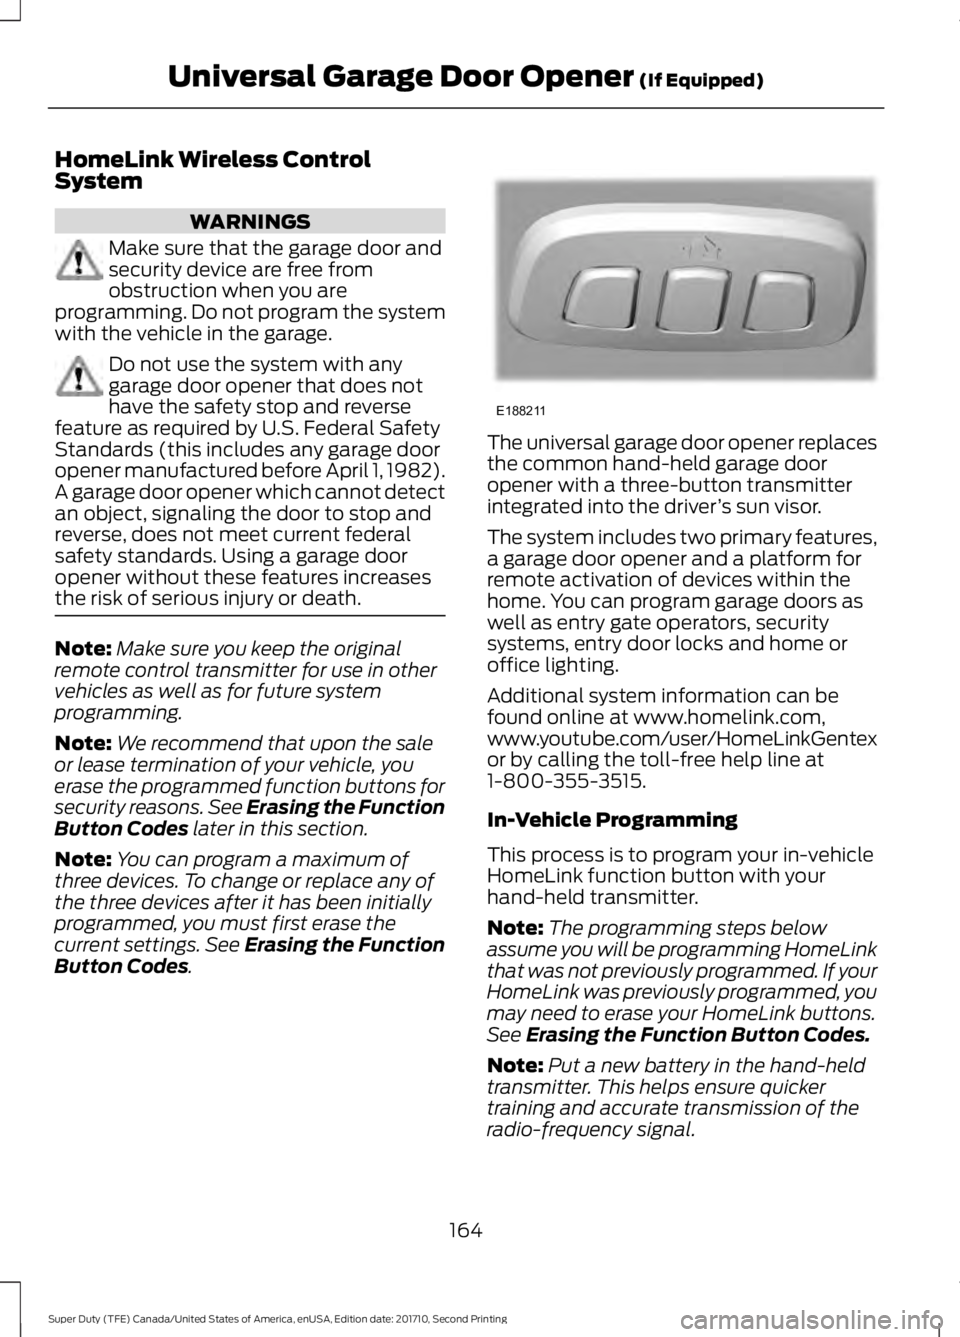
The universal garage door opener replacesthe common hand-held garage dooropener with a three-button transmitterintegrated into the driver’s sun visor.
The system includes two primary features,a garage door opener and a platform forremote activation of devices within thehome. You can program garage doors aswell as entry gate operators, securitysystems, entry door locks and home oroffice lighting.
Additional system information can befound online at www.homelink.com,www.youtube.com/user/HomeLinkGentexor by calling the toll-free help line at1-800-355-3515.
In-Vehicle Programming
This process is to program your in-vehicleHomeLink function button with yourhand-held transmitter.
Note:The programming steps belowassume you will be programming HomeLinkthat was not previously programmed. If yourHomeLink was previously programmed, youmay need to erase your HomeLink buttons.See Erasing the Function Button Codes.
Note:Put a new battery in the hand-heldtransmitter. This helps ensure quickertraining and accurate transmission of theradio-frequency signal.
164
Super Duty (TFE) Canada/United States of America, enUSA, Edition date: 201710, Second Printing
Universal Garage Door Opener (If Equipped)E188211
Page 184 of 642
To help prolong engine life, werecommended you allow the engine to idlefor three to five minutes, especially afterany of the following:
•Continuous engine speed.
•High ambient temperature.
•High GVW or GCW operation, forexample heavy loads or trailers.
This allows the turbo charged engine tocool down.
ENGINE IDLE SHUTDOWN (If
Equipped)
Your vehicle may be equipped with anengine idle shutdown system. This systemautomatically shuts down your enginewhen it has been idling in P (Park) or N(Neutral) for five minutes (parking brakeset) or 15 minutes (parking brake not set).When the engine idle shutdown processhas started:
•A chime sounds and the informationdisplay will show ENGINE TURNS OFFIN 30 (seconds) and start countingdown
•You can restart the five or 15-minutetimer by changing the position of theaccelerator pedal, brake pedal or thepark brake within the final 30 seconds
•When the timer reaches zero, theengine shuts down and this messagewill appear in your information displayENGINE TURNED OFF
•One minute after the engine has shutdown, the electrical system simulateskey off, even though the ignition is stillin the on position, initiating normalaccessory delay period
•You must move the ignition to the offposition to reset the system beforerestarting your vehicle.
The engine idle shutdown idle timer doesnot start if:
•The engine is operating in powertake-off mode.
•The engine coolant temperature isbelow 60°F (16°C).
•The exhaust emission control device isregenerating.
ENGINE BLOCK HEATER (If
Equipped)
WARNINGS
Failure to follow engine block heaterinstructions could result in propertydamage or serious personal injury.
Do not use your heater withungrounded electrical systems ortwo-pronged adapters. There is a riskof electrical shock.
Note:The heater is most effective whenoutdoor temperatures are below 0°F(-18°C).
The heater acts as a starting aid bywarming the engine coolant. This allowsthe climate control system to respondquickly. The equipment includes a heaterelement (installed in the engine block) anda wire harness. You can connect thesystem to a grounded 120-volt ACelectrical source.
181
Super Duty (TFE) Canada/United States of America, enUSA, Edition date: 201710, Second Printing
Starting and Stopping the Engine
Page 185 of 642
We recommend that you do the followingfor a safe and correct operation:
•Make sure your vehicle is parked in aclean area, clear of combustibles.
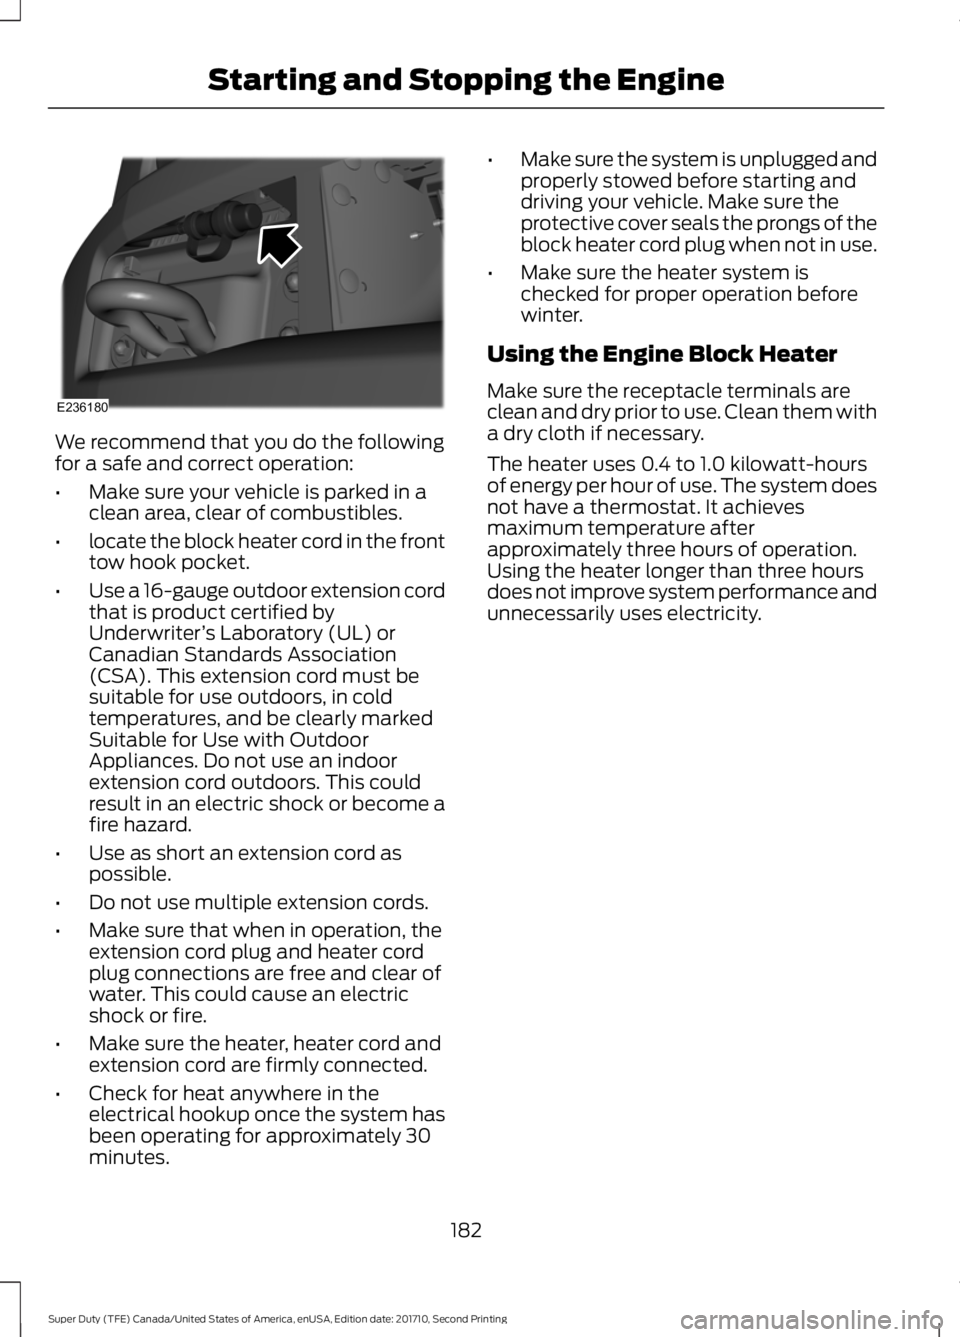
•locate the block heater cord in the fronttow hook pocket.
•Use a 16-gauge outdoor extension cordthat is product certified byUnderwriter’s Laboratory (UL) orCanadian Standards Association(CSA). This extension cord must besuitable for use outdoors, in coldtemperatures, and be clearly markedSuitable for Use with OutdoorAppliances. Do not use an indoorextension cord outdoors. This couldresult in an electric shock or become afire hazard.
•Use as short an extension cord aspossible.
•Do not use multiple extension cords.
•Make sure that when in operation, theextension cord plug and heater cordplug connections are free and clear ofwater. This could cause an electricshock or fire.
•Make sure the heater, heater cord andextension cord are firmly connected.
•Check for heat anywhere in theelectrical hookup once the system hasbeen operating for approximately 30minutes.
•Make sure the system is unplugged andproperly stowed before starting anddriving your vehicle. Make sure theprotective cover seals the prongs of theblock heater cord plug when not in use.
•Make sure the heater system ischecked for proper operation beforewinter.
Using the Engine Block Heater
Make sure the receptacle terminals areclean and dry prior to use. Clean them witha dry cloth if necessary.
The heater uses 0.4 to 1.0 kilowatt-hoursof energy per hour of use. The system doesnot have a thermostat. It achievesmaximum temperature afterapproximately three hours of operation.Using the heater longer than three hoursdoes not improve system performance andunnecessarily uses electricity.
182
Super Duty (TFE) Canada/United States of America, enUSA, Edition date: 201710, Second Printing
Starting and Stopping the EngineE236180
Page 196 of 642
Use the following guidelines to avoidelectrostatic charge build-up when fillingan ungrounded fuel container:
•Place approved fuel container on theground.
•Do not fill a fuel container while it is inthe vehicle (including the cargo area).
•Keep the fuel pump nozzle in contactwith the fuel container while filling.
•Do not use a device that would holdthe fuel pump handle in the fill position.
Fuel Filler Cap
WARNINGS
The fuel system may be underpressure. If you hear a hissing soundnear the fuel filler door, do not refueluntil the sound stops. Otherwise, fuel mayspray out, which could cause seriouspersonal injury.
If you do not use the proper fuel fillercap, excessive pressure or vacuumin the fuel tank may damage the fuelsystem or cause the fuel cap to disengagein a collision, which may result in possiblepersonal injury.
Note:If you must replace the fuel filler cap,replace it with a fuel filler cap that isdesigned for your vehicle. The customerwarranty may be void for any damage to thefuel tank or fuel system if the correctgenuine Ford, Motorcraft or other certifiedfuel filler cap is not used.
Your fuel tank filler cap has an indexeddesign with a 1/4th turn on and off feature.When fueling your vehicle:
1. Put your vehicle in park (P).
2. Switch the engine off.
3. Carefully turn the filler capcounterclockwise until it spins off.
4. Pull to remove the cap from the fuelfiller pipe.
5.To install the cap, align the tabs on thecap with the notches on the filler pipe.
6. Turn the filler cap clockwise 1/4 of aturn clockwise until it clicks at leastonce.
If the Check Fuel Cap light or a Check FuelCap message appears in the instrumentcluster and stays on after you start theengine, you may not have installed the fuelfiller properly.
If the fuel cap light remains on, at the nextopportunity, safely pull off of the road,remove the fuel filler cap, align the capproperly and reinstall it. The check fuel caplight or Check fuel cap message may notreset immediately. It may take severaldriving cycles for the indicators to turn off.A driving cycle consists of an enginestart-up (after four or more hours with theengine off) followed by normal city andhighway driving.
REFUELING - DIESEL
WARNINGS
Read and follow all the instructionson the pump island.
Stay outside your vehicle and do notleave the fuel pump unattendedwhen refueling your vehicle.
Keep children away from the fuelpump. Never let children pump fuel.
Wait at least 10 seconds beforeremoving the fuel pump nozzle toallow any residual fuel to drain intothe fuel tank.
Do not remove the fuel pump nozzlefrom its fully inserted position whenrefueling.
193
Super Duty (TFE) Canada/United States of America, enUSA, Edition date: 201710, Second Printing
Fuel and Refueling
Page 197 of 642
WARNINGS
When refueling always shut theengine off and never allow sparks oropen flames near the fuel tank fillervalve. Never smoke or use a cell phonewhile refueling. Fuel vapor is extremelyhazardous under certain conditions. Avoidinhaling excess fumes.
Stop refueling after the fuel pumpnozzle automatically shuts off for thesecond time. Failure to follow thiswill fill the expansion space in the fuel tankand could lead to fuel overflowing.
The fuel system may be underpressure. If the fuel filler cap isventing vapor or if you hear a hissingsound, wait until it stops before completelyremoving the fuel filler cap. Otherwise, fuelmay spray out and injure you or others.
If you do not use the proper fuel fillercap, excessive pressure or vacuumin the fuel tank may damage the fuelsystem or cause the fuel cap to disengagein a collision, which may result in possiblepersonal injury.
Note:If you must replace the fuel filler cap,replace it with a fuel filler cap designed foryour vehicle. The vehicle Warranty may bevoid for any damage to the fuel tank or fuelsystem if the correct genuine Ford orMotorcraft® fuel filler cap is not used.
Fueling Tips
If air is allowed to enter the fuel system theengine automatically purges any trappedair. To purge the air sooner: prior to enginestart, prime the system by turning the keyto on for 30 seconds then to off. Repeatthis several times. The engine may runrough and produce white smoke while airis in the system. This is normal.
Use only clean, approved containers thatwill prevent the entry of dirt or waterwhenever you store diesel fuel.
Diesel fuel must not be stored in agalvanized container. The fuel will dissolvethe zinc in the galvanized container. Thezinc will then remain in the fuel. If you runthe contaminated fuel through the engine,the zinc will deposit in the fuel injectorscausing expensive-to-repair damage.
Diesel fuel dispensing nozzle fill rate
Your vehicle has a fuel fill pipe that is ableto accept fuel up to 20 gal (76 L) perminute from an 1.2 in (30 mm)fuel-dispensing nozzle. Pumping fuel atgreater flow rates may result in prematurenozzle shut-off or spit back.
Truck stops have pumps and nozzlesdesigned for larger, heavy-duty trucks.When refueling at truck stops: if the nozzleshuts off repeatedly when refueling, wait5–10 seconds; then use a slower rate offlow, do not depress the nozzle trigger asfar.
Refueling
When fueling your vehicle do the following:
1.Fully open the fuel tank filler door untilit engages and remove the fuel tankfiller cap. The fuel tank filler cap hasan indexed design with a 1/4 turnon/off feature. Carefully turn the fillercap counterclockwise until it spins off.
194
Super Duty (TFE) Canada/United States of America, enUSA, Edition date: 201710, Second Printing
Fuel and Refueling