2017 FORD F450 SUPER DUTY ECU
[x] Cancel search: ECUPage 27 of 642
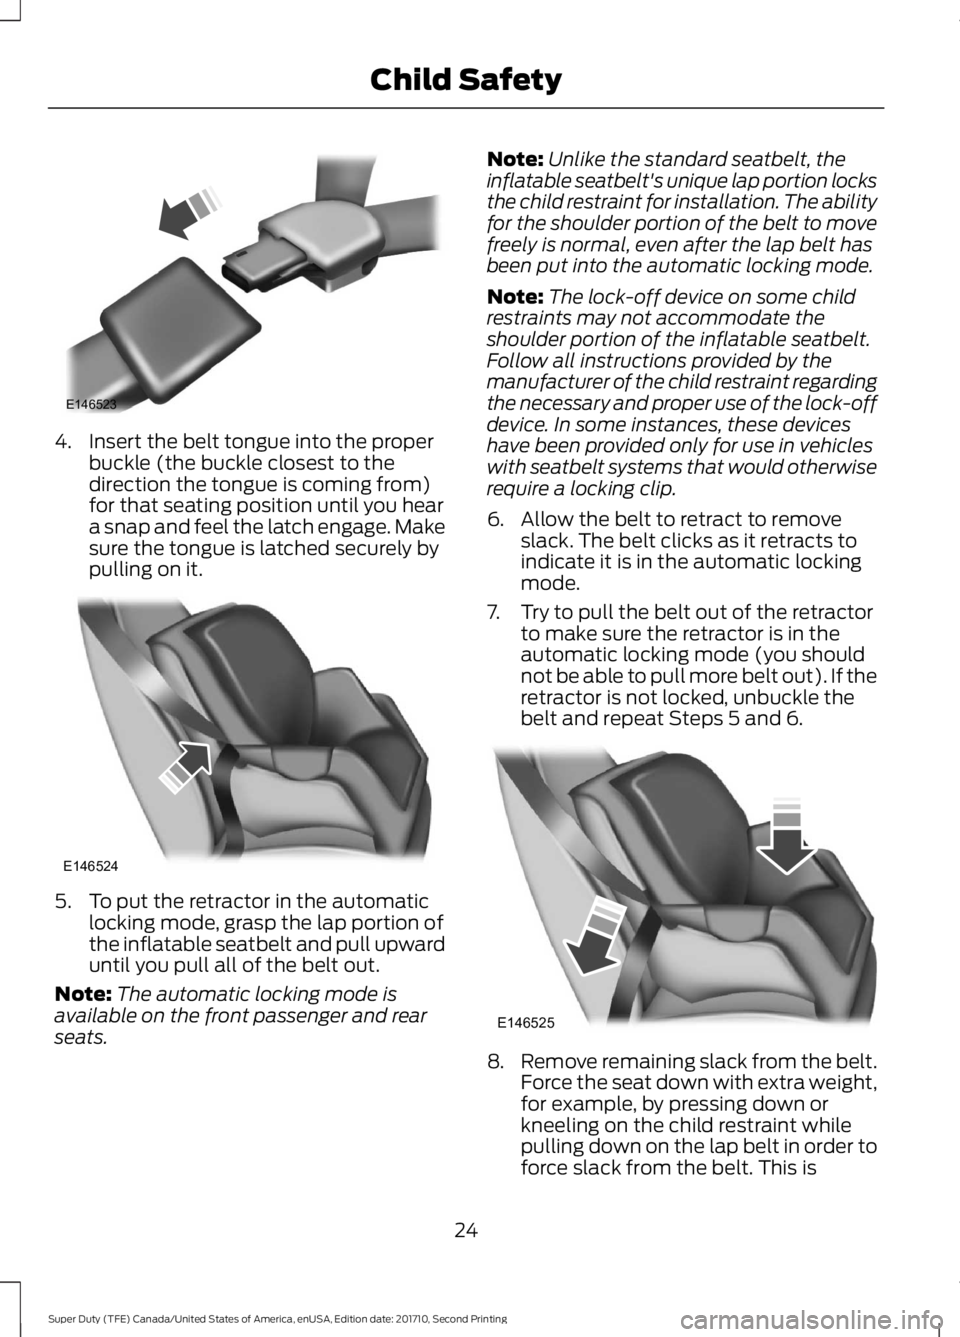
4. Insert the belt tongue into the properbuckle (the buckle closest to thedirection the tongue is coming from)for that seating position until you heara snap and feel the latch engage. Makesure the tongue is latched securely bypulling on it.
5. To put the retractor in the automaticlocking mode, grasp the lap portion ofthe inflatable seatbelt and pull upwarduntil you pull all of the belt out.
Note:The automatic locking mode isavailable on the front passenger and rearseats.
Note:Unlike the standard seatbelt, theinflatable seatbelt's unique lap portion locksthe child restraint for installation. The abilityfor the shoulder portion of the belt to movefreely is normal, even after the lap belt hasbeen put into the automatic locking mode.
Note:The lock-off device on some childrestraints may not accommodate theshoulder portion of the inflatable seatbelt.Follow all instructions provided by themanufacturer of the child restraint regardingthe necessary and proper use of the lock-offdevice. In some instances, these deviceshave been provided only for use in vehicleswith seatbelt systems that would otherwiserequire a locking clip.
6. Allow the belt to retract to removeslack. The belt clicks as it retracts toindicate it is in the automatic lockingmode.
7. Try to pull the belt out of the retractorto make sure the retractor is in theautomatic locking mode (you shouldnot be able to pull more belt out). If theretractor is not locked, unbuckle thebelt and repeat Steps 5 and 6.
8.Remove remaining slack from the belt.Force the seat down with extra weight,for example, by pressing down orkneeling on the child restraint whilepulling down on the lap belt in order toforce slack from the belt. This is
24
Super Duty (TFE) Canada/United States of America, enUSA, Edition date: 201710, Second Printing
Child SafetyE146523 E146524 E146525
Page 28 of 642

necessary to remove the remainingslack that will exist once the extraweight of the child is added to the childrestraint. It also helps to achieve theproper snugness of the child restraintto your vehicle. Sometimes, a slightlean toward the buckle will additionallyhelp to remove remaining slack fromthe belt.
9. Attach the tether strap (if the childrestraint is equipped).
10. Before placing the child in the seat,forcibly move the seat forward andback to make sure the seat is securelyheld in place. To check this, grab theseat at the belt path and attempt tomove it side to side and forward andback. There should be no more than1 in (2.5 cm) of movement for properinstallation.
We recommend checking with a NHTSACertified Child Passenger SafetyTechnician to make certain the childrestraint is properly installed. In Canada,check with Transport Canada for referralto a Child Car Seat Clinic.
Using Lower Anchors and Tethersfor CHildren (LATCH)
WARNINGS
Do not attach two child safetyrestraints to the same anchor. In acrash, one anchor may not be strongenough to hold two child safety restraintattachments and may break, causingserious injury or death.
Depending on where you secure achild restraint, and depending on thechild restraint design, you may blockaccess to certain seatbelt buckleassemblies and LATCH lower anchors,rendering those features potentiallyunusable. To avoid risk of injury, make sureoccupants only use seating positionswhere they are able to be properlyrestrained.
The LATCH system is composed of threevehicle anchor points: two lower anchorswhere the vehicle seatback and seatcushion meet (called the seat bight) andone top tether anchor behind that seatingposition.
LATCH compatible child safety seats havetwo rigid or webbing mountedattachments that connect to the two loweranchors at the LATCH equipped seatingpositions in your vehicle. This type ofattachment method eliminates the needto use seatbelts to attach the childrestraint. However, you can still use theseatbelt to attach the child restraint if thelower anchors are not used. Forforward-facing child restraints, you mustalso attach the top tether strap to theproper top tether anchor if a top tetherstrap has been provided with your childrestraint.
Your vehicle has LATCH lower anchors forchild restraint installation at the followingseating positions (LATCH is not availableon Regular Cab):
25
Super Duty (TFE) Canada/United States of America, enUSA, Edition date: 201710, Second Printing
Child SafetyE142534
Page 29 of 642
Crew Cab and Super Cab
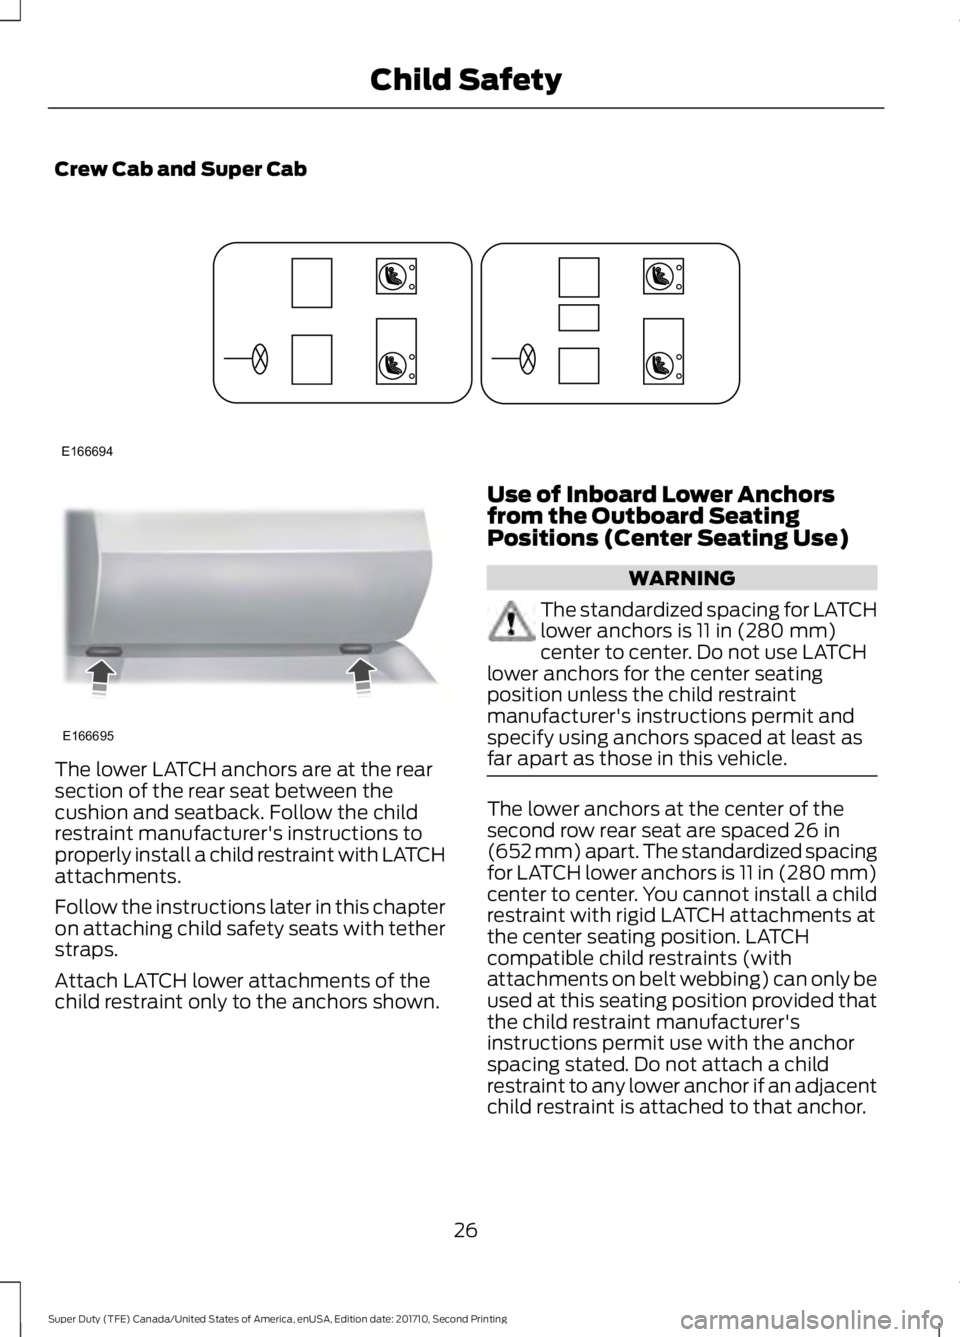
The lower LATCH anchors are at the rearsection of the rear seat between thecushion and seatback. Follow the childrestraint manufacturer's instructions toproperly install a child restraint with LATCHattachments.
Follow the instructions later in this chapteron attaching child safety seats with tetherstraps.
Attach LATCH lower attachments of thechild restraint only to the anchors shown.
Use of Inboard Lower Anchorsfrom the Outboard SeatingPositions (Center Seating Use)
WARNING
The standardized spacing for LATCHlower anchors is 11 in (280 mm)center to center. Do not use LATCHlower anchors for the center seatingposition unless the child restraintmanufacturer's instructions permit andspecify using anchors spaced at least asfar apart as those in this vehicle.
The lower anchors at the center of thesecond row rear seat are spaced 26 in(652 mm) apart. The standardized spacingfor LATCH lower anchors is 11 in (280 mm)center to center. You cannot install a childrestraint with rigid LATCH attachments atthe center seating position. LATCHcompatible child restraints (withattachments on belt webbing) can only beused at this seating position provided thatthe child restraint manufacturer'sinstructions permit use with the anchorspacing stated. Do not attach a childrestraint to any lower anchor if an adjacentchild restraint is attached to that anchor.
26
Super Duty (TFE) Canada/United States of America, enUSA, Edition date: 201710, Second Printing
Child SafetyE166694 E166695
Page 30 of 642
Each time you use the safety seat, checkthat the seat is properly attached to thelower anchors and tether anchor, ifapplicable. Tug the child restraint from sideto side and forward and back where it issecured to the vehicle. The seat shouldmove less than 1 in (2.5 cm) when you dothis for a proper installation.
If the safety seat is not anchored properly,the risk of a child being injured in a crashgreatly increases.
Combining Seatbelt and LATCHLower Anchors for Attaching ChildSafety Seats
When used in combination, either theseatbelt or the LATCH lower anchors maybe attached first, provided a properinstallation is achieved. Attach the tetherstrap afterward, if included with the childrestraint.
Using Tether Straps
Many forward-facing child safety seatsinclude a tether strap which extends fromthe back of the child safety seat and hooksto an anchoring point called the top tetheranchor. Tether straps are available as anaccessory for many older safety seats.
Contact the manufacturer of your childrestraint for information about ordering atether strap, or to obtain a longer tetherstrap if the tether strap on your safety seatdoes not reach the appropriate top tetheranchor in the vehicle.
The passenger seats of your vehicle mayhave built-in tether strap anchors behindthe seats as described below.
The tether anchors in your vehicle may beloops of webbing above the seatback oran anchor bracket behind the seat on therear edge of the seat cushion.
The rear seat in the Crew Cab and SuperCab has three straps along the top of theseatback that function as both routingloops for the tether straps and anchorloops.
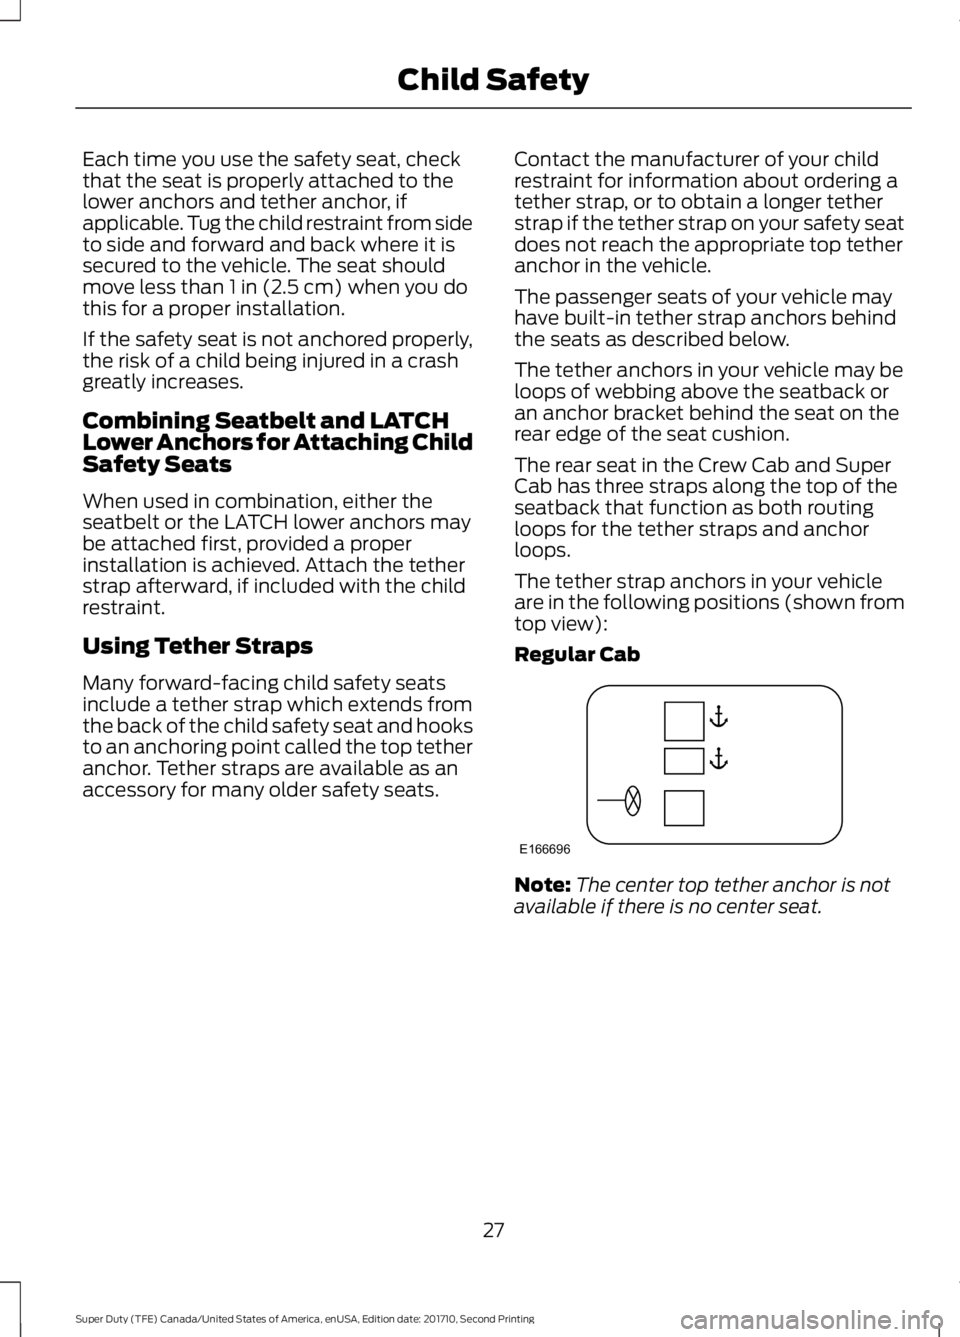
The tether strap anchors in your vehicleare in the following positions (shown fromtop view):
Regular Cab
Note:The center top tether anchor is notavailable if there is no center seat.
27
Super Duty (TFE) Canada/United States of America, enUSA, Edition date: 201710, Second Printing
Child SafetyE166696
Page 39 of 642
The seatbelt pretensioners at the frontseating positions are designed to tightenthe seatbelts when activated. In frontaland near-frontal crashes, the seatbeltpretensioners may be activated alone or,if the crash is of sufficient severity, togetherwith the front airbags. In side crashes androllovers, the seatbelt pretensionersactivate when the Safety Canopy isactivated.
FASTENING THE SEATBELTS
Standard belts shown, inflatable beltssimilar
The front outboard and rear safetyrestraints in the vehicle are combinationlap and shoulder belts.
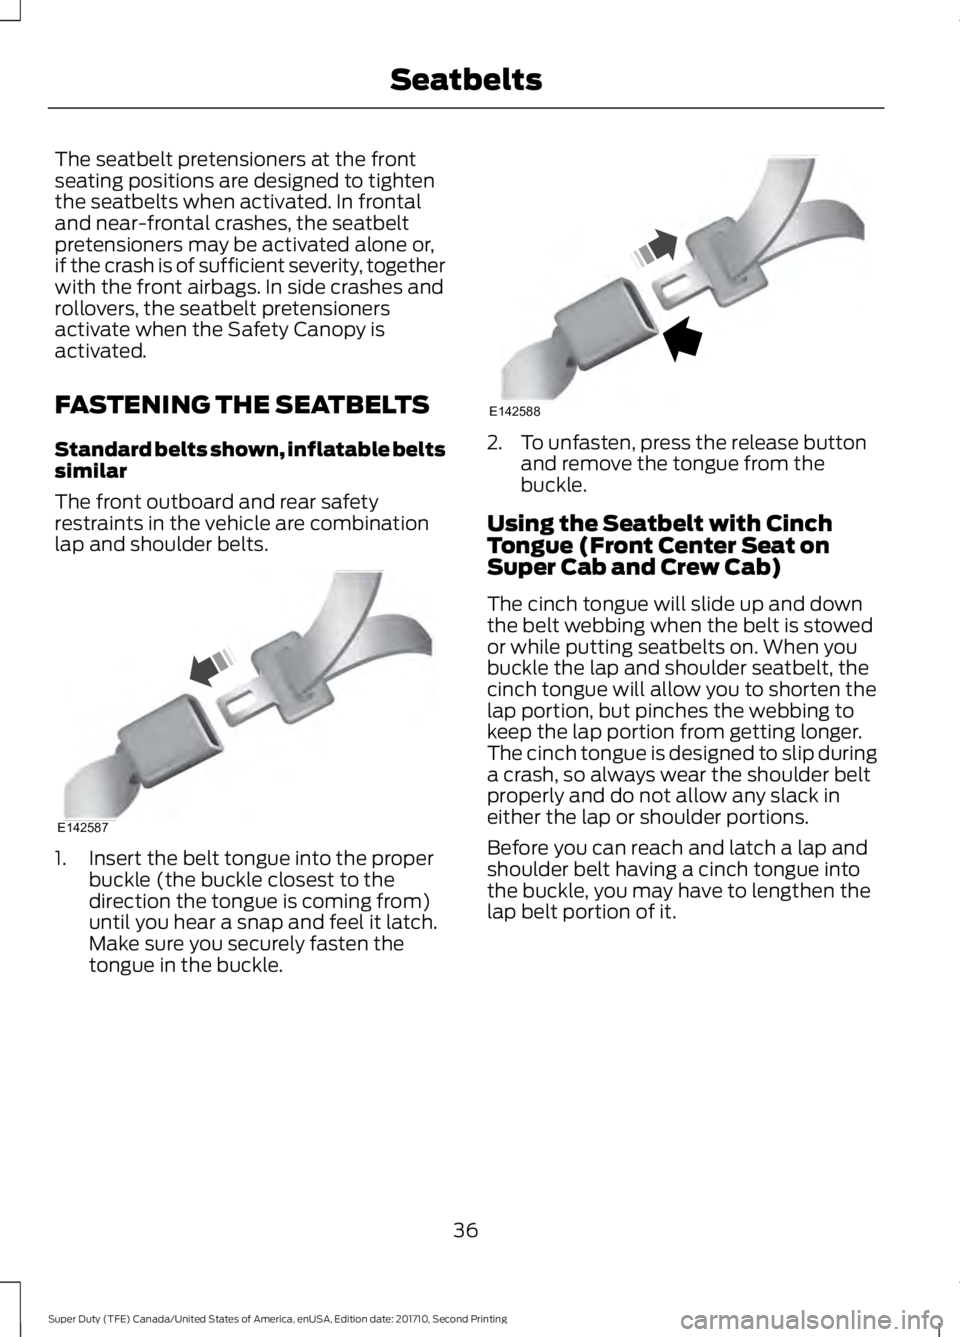
1. Insert the belt tongue into the properbuckle (the buckle closest to thedirection the tongue is coming from)until you hear a snap and feel it latch.Make sure you securely fasten thetongue in the buckle.
2. To unfasten, press the release buttonand remove the tongue from thebuckle.
Using the Seatbelt with CinchTongue (Front Center Seat onSuper Cab and Crew Cab)
The cinch tongue will slide up and downthe belt webbing when the belt is stowedor while putting seatbelts on. When youbuckle the lap and shoulder seatbelt, thecinch tongue will allow you to shorten thelap portion, but pinches the webbing tokeep the lap portion from getting longer.The cinch tongue is designed to slip duringa crash, so always wear the shoulder beltproperly and do not allow any slack ineither the lap or shoulder portions.
Before you can reach and latch a lap andshoulder belt having a cinch tongue intothe buckle, you may have to lengthen thelap belt portion of it.
36
Super Duty (TFE) Canada/United States of America, enUSA, Edition date: 201710, Second Printing
SeatbeltsE142587 E142588
Page 40 of 642
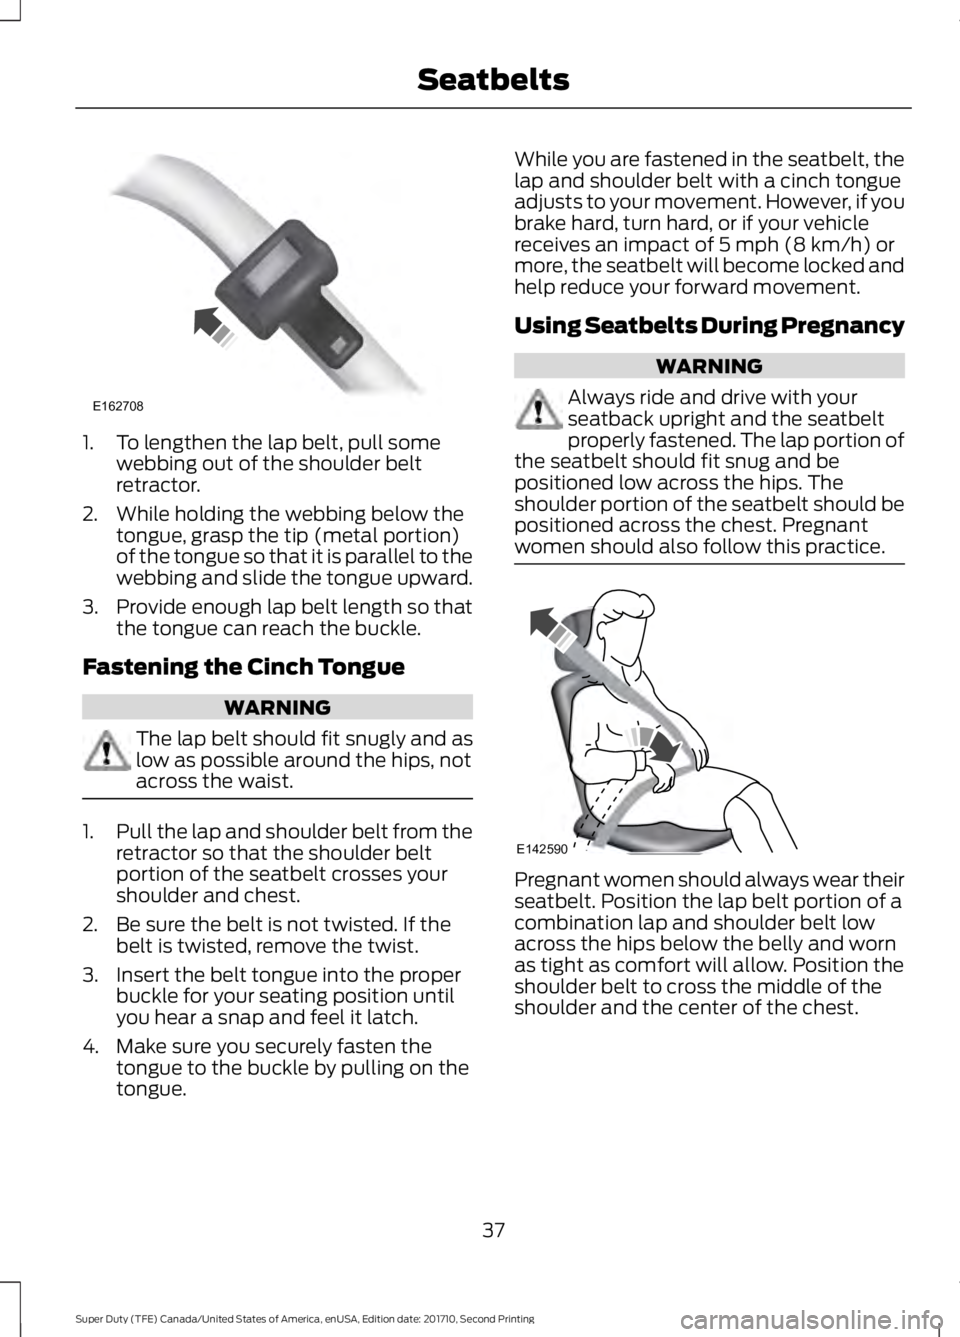
1. To lengthen the lap belt, pull somewebbing out of the shoulder beltretractor.
2. While holding the webbing below thetongue, grasp the tip (metal portion)of the tongue so that it is parallel to thewebbing and slide the tongue upward.
3.Provide enough lap belt length so thatthe tongue can reach the buckle.
Fastening the Cinch Tongue
WARNING
The lap belt should fit snugly and aslow as possible around the hips, notacross the waist.
1.Pull the lap and shoulder belt from theretractor so that the shoulder beltportion of the seatbelt crosses yourshoulder and chest.
2. Be sure the belt is not twisted. If thebelt is twisted, remove the twist.
3. Insert the belt tongue into the properbuckle for your seating position untilyou hear a snap and feel it latch.
4. Make sure you securely fasten thetongue to the buckle by pulling on thetongue.
While you are fastened in the seatbelt, thelap and shoulder belt with a cinch tongueadjusts to your movement. However, if youbrake hard, turn hard, or if your vehiclereceives an impact of 5 mph (8 km/h) ormore, the seatbelt will become locked andhelp reduce your forward movement.
Using Seatbelts During Pregnancy
WARNING
Always ride and drive with yourseatback upright and the seatbeltproperly fastened. The lap portion ofthe seatbelt should fit snug and bepositioned low across the hips. Theshoulder portion of the seatbelt should bepositioned across the chest. Pregnantwomen should also follow this practice.
Pregnant women should always wear theirseatbelt. Position the lap belt portion of acombination lap and shoulder belt lowacross the hips below the belly and wornas tight as comfort will allow. Position theshoulder belt to cross the middle of theshoulder and the center of the chest.
37
Super Duty (TFE) Canada/United States of America, enUSA, Edition date: 201710, Second Printing
SeatbeltsE162708 E142590
Page 58 of 642

Press the button to release the key blade.Press and hold the button to fold the keyblade back in when not in use.
Note: Your vehicle keys came with asecurity label that provides important keycut information. Keep the label in a safeplace for future reference.
Intelligent Access Key (If Equipped)
The intelligent access keys operate thepower locks and the remote start system.The key must be in your vehicle to use thepush button start.
Removable Key Blade
The intelligent access key also contains aremovable key blade that you can use tounlock your vehicle.
55
Super Duty (TFE) Canada/United States of America, enUSA, Edition date: 201710, Second Printing
Keys and Remote ControlsE191532 E151795 E226461
Page 59 of 642

Press the release button and pull the keyblade out.
Note: Your vehicle keys came with asecurity label that provides important keycut information. Keep the label in a safeplace for future reference.
Replacing the Battery
Note:Refer to local regulations whendisposing of transmitter batteries.
Note:Do not wipe off any grease on thebattery terminals or on the back surface ofthe circuit board.
Note: Replacing the battery does not erasethe programmed key from your vehicle. Thetransmitter should operate normally.
A message appears in the informationdisplay when the remote control batteryis low. See General Information (page111).
Integrated Keyhead Transmitter
The remote control uses one coin-typethree-volt lithium battery CR2032 orequivalent.
Press the button to release the key bladebefore beginning the procedure.
1. Insert a suitable tool, for example ascrewdriver, in the position shown andgently push the clip.
2. Press the clip down to release thebattery cover.
3. Carefully remove the cover.
56
Super Duty (TFE) Canada/United States of America, enUSA, Edition date: 201710, Second Printing
Keys and Remote ControlsE226462 E151795 E191533 E151799