2017 FORD F150 warning light
[x] Cancel search: warning lightPage 359 of 599

*Traction: The traction grades,
from highest to lowest are AA, A,
B, and C. The grades represent the
tire's ability to stop on wet
pavement as measured under
controlled conditions on specified
government test surfaces of
asphalt and concrete. A tire
marked C may have poor traction
performance.
*
Temperature: The temperature
grades are A (the highest), B and
C, representing the tire's
resistance to the generation of
heat and its ability to dissipate
heat when tested under controlled
conditions on a specified indoor
laboratory test wheel.
M. Maximum Inflation
Pressure:
Indicates the tire
manufacturers' maximum
permissible pressure or the
pressure at which the maximum
load can be carried by the tire. This
pressure is normally higher than
the vehicle manufacturer's
recommended cold inflation
pressure which can be found on
the Safety Compliance
Certification Label (affixed to
either the door hinge pillar,
door-latch post, or the door edge
that meets the door-latch post,
next to the driver's seating
position), or Tire Label located on
the B-pillar or the edge of the
driver's door. The cold inflation
pressure should never be set lower
than the recommended pressure
on the vehicle label. The tire suppliers may have
additional markings, notes or
warnings such as standard load
or radial tubeless.
Additional Information
Contained on the Tire Sidewall
for LT Type Tires
Note:
Tire Quality Grades do not
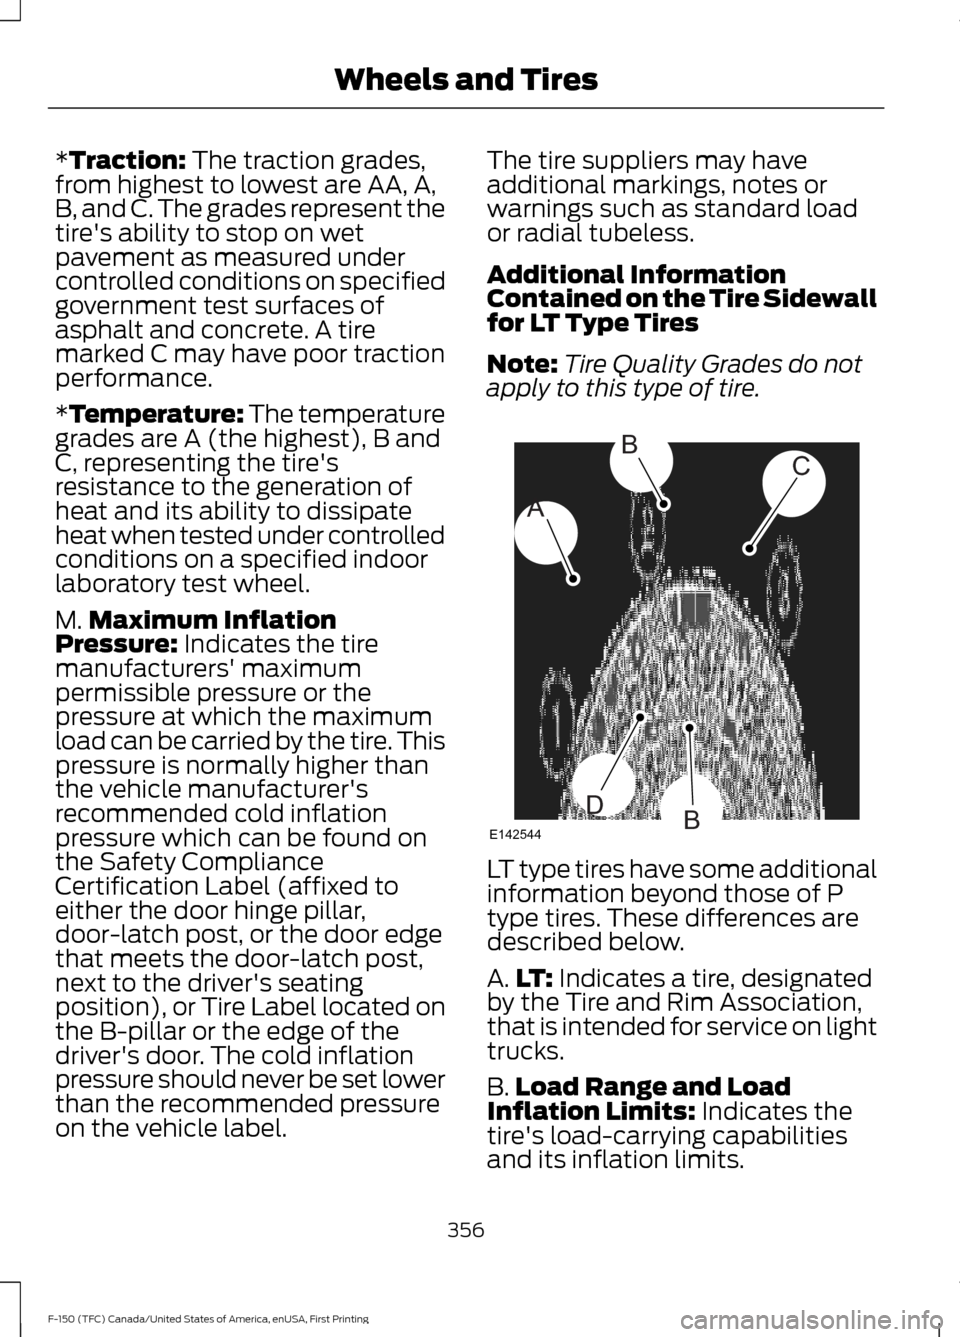
apply to this type of tire. LT type tires have some additional
information beyond those of P
type tires. These differences are
described below.
A.
LT:
Indicates a tire, designated
by the Tire and Rim Association,
that is intended for service on light
trucks.
B. Load Range and Load
Inflation Limits:
Indicates the
tire's load-carrying capabilities
and its inflation limits.
356
F-150 (TFC) Canada/United States of America, enUSA, First Printing Wheels and TiresA
BC
BDE142544
Page 371 of 599

This device complies with part 15 of the
FCC Rules and with Licence exempt RSS
Standards of Industry Canada. Operation
is subject to the following two conditions:
•
This device may not cause harmful
interference.
• This device must accept any
interference received, including
interference that may cause undesired
operation.
Changing Tires With a Tire
Pressure Monitoring System Note:
Each road tire is equipped with a tire
pressure sensor located inside the wheel
and tire assembly cavity. The pressure
sensor is attached to the valve stem. The
pressure sensor is covered by the tire and is
not visible unless the tire is removed. Take
care when changing the tire to avoid
damaging the sensor.
You should always have your tires serviced
by an authorized dealer.
Check the tire pressure periodically (at
least monthly) using an accurate tire
gauge. See Inflating Your Tires in this
chapter. Understanding Your Tire Pressure
Monitoring System
The tire pressure monitoring system
measures pressure in your four road tires
and sends the tire pressure readings to
your vehicle.
The low tire pressure warning light will turn
on if the tire pressure is significantly low.
Once the light is illuminated, your tires are
under-inflated and need to be inflated to
the manufacturer
’s recommended tire
pressure. Even if the light turns on and a
short time later turns off, your tire pressure
still needs to be checked.
When Your Temporary Spare Tire is
Installed
When one of your road tires needs to be
replaced with the temporary spare, the
system will continue to identify an issue to
remind you that the damaged road wheel
and tire assembly needs to be repaired and
put back on your vehicle.
To restore the full function of the tire
pressure monitoring system, have the
damaged road wheel and tire assembly
repaired and remounted on your vehicle.
368
F-150 (TFC) Canada/United States of America, enUSA, First Printing Wheels and TiresE142549 E224333
Page 372 of 599

When You Believe Your System is Not
Operating Properly
The main function of the tire pressure
monitoring system is to warn you when
your tires need air. It can also warn you in
the event the system is no longer capable
of functioning as intended. See the
following chart for information concerning
your tire pressure monitoring system: Customer action required
Possible cause
Low tire pressure
warning light
Make sure tires are at the proper pres-
sure. See Inflating your tires in this
chapter. After inflating your tires to the
manufacturer’s recommended pressure
as shown on the Tire Label (located on
the edge of driver ’s door or the B-Pillar),
the vehicle must be driven for at least
two minutes over 20 mph (32 km/h)
before the light turns off.
Tire(s) under-inflated
Solid warning light
Repair the damaged road wheel and tire
assembly and reinstall it on the vehicle
to restore system function. For a
description on how the system functions,
see When your temporary spare tire
is installed in this section.
Spare tire in use
If the tires are properly inflated and the
spare tire is not in use but the light
remains on, contact your authorized
dealer as soon as possible.
Tire pressure monitoring
system malfunction
On vehicles with different front and rear
tire pressures, the system must be
retrained following every tire rotation.
See
Tire Care (page 351).
Tire rotation without
sensor training
Repair the damaged road wheel and tire
assembly and reinstall it on the vehicle
to restore system function. For a
description on how the system functions,
see
When your temporary spare tire
is installed in this section.
Spare tire in use
Flashing warning
light
If the tires are properly inflated and the
spare tire is not in use but the light
remains on, contact your authorized
dealer as soon as possible.
Tire pressure monitoring
system malfunction
369
F-150 (TFC) Canada/United States of America, enUSA, First Printing Wheels and Tires
Page 373 of 599

When Inflating Your Tires
When putting air into your tires (such as at
a gas station or in your garage), the tire
pressure monitoring system may not
respond immediately to the air added to
your tires.
It may take up to two minutes of driving
over 20 mph (32 km/h) for the light to turn
off after you have filled your tires to the
recommended inflation pressure.
How Temperature Affects Your Tire
Pressure
The tire pressure monitoring system
monitors tire pressure in each pneumatic
tire. While driving in a normal manner, a
typical passenger tire inflation pressure
may increase about 2 to 4 psi (14 to 28
kPa) from a cold start situation. If the
vehicle is stationary overnight with the
outside temperature significantly lower
than the daytime temperature, the tire
pressure may decrease about 3 psi (21
kPa) for a drop of 30°F (17°C) in ambient
temperature. This lower pressure value
may be detected by the tire pressure
monitoring system as being significantly
lower than the recommended inflation
pressure and activate the system warning
light for low tire pressure.
If the low tire pressure warning light is on,
visually check each tire to verify that no tire
is flat. If one or more tires are flat, repair as
necessary. Check the air pressure in the
road tires. If any tire is under-inflated,
carefully drive the vehicle to the nearest
location where air can be added to the
tires. Inflate all the tires to the
recommended inflation pressure.
Tire Pressure Monitoring System Reset
Procedure WARNING
To determine the required
pressure(s) for your vehicle, see the
Safety Compliance Certification
Label (on the door hinge pillar, door-latch
post or the door edge that meets the
door-latch post, next to the driver seat) or
the Tire Label on the B-Pillar or the edge
of the driver door. Note:
You need to perform the tire pressure
monitoring system reset procedure after
each tire rotation on vehicles that require
different recommended tire pressures in the
front tires as compared to the rear tires.
Overview
To provide the vehicle's load carrying
capability, some vehicles require different
recommended tire pressures in the front
tires as compared to the rear tires. The tire
pressure monitoring system equipped on
these vehicles is designed to illuminate the
low tire pressure warning light at two
different pressures; one for the front tires
and one for the rear tires.
Since tires need to be rotated to provide
consistent performance and maximum tire
life, the tire pressure monitoring system
needs to know when the tires are rotated
to determine which set of tires are on the
front and which are on the rear. With this
information, the system can detect and
properly warn of low tire pressures.
System reset tips:
370
F-150 (TFC) Canada/United States of America, enUSA, First Printing Wheels and Tires
Page 375 of 599

11.
Set all four tires to the recommended
air pressure as indicated on the
Safety Compliance Certification
Label (affixed to either the door hinge
pillar, door-latch post, or the door
edge that meets the door-latch post,
next to the driver's seating position)
or Tire Label located on the B-Pillar
or the edge of the driver's door.
CHANGING A ROAD WHEEL WARNINGS
Do not use tire sealants as they may
damage the tire pressure monitoring
system.
If the tire pressure monitor sensor
becomes damaged it may not
function.
Note:
The tire pressure monitoring system
indicator light will illuminate when the spare
tire is in use. To restore the full function of
the monitoring system, all road wheels
equipped with tire pressure monitoring
sensors must be mounted on this vehicle.
If you get a flat tire while driving, do not
apply the brake heavily. Instead, gradually
decrease your speed. Hold the steering
wheel firmly and slowly move to a safe
place on the side of the road.
Have a flat serviced by an authorized
dealer in order to prevent damage to the
system sensors See Tire Pressure
Monitoring System (page 367). Replace
the spare tire with a road tire as soon as
possible. During repairing or replacing of
the flat tire, have the authorized dealer
inspect the system sensor for damage. Dissimilar Spare Wheel and Tire
Assembly Information WARNING
Failure to follow these guidelines
could result in an increased risk of
loss of vehicle control, injury or death.
If you have a dissimilar spare wheel and
tire, then it is intended for temporary use
only. This means that if you need to use it,
you should replace it as soon as possible
with a road wheel and tire assembly that
is the same size and type as the road tires
and wheels that were originally provided
by Ford. If the dissimilar spare tire or wheel
is damaged, it should be replaced rather
than repaired.
A dissimilar spare wheel and tire assembly
is defined as a spare wheel and tire
assembly that is different in brand, size or
appearance from the road tires and wheels
and can be one of three types:
1.
T-type mini-spare:
This spare tire
begins with the letter T for tire size and
may have Temporary Use Only molded in
the sidewall.
2. Full-size dissimilar spare with label
on wheel:
This spare tire has a label on
the wheel that states: THIS WHEEL AND
TIRE ASSEMBLY FOR TEMPORARY USE
ONLY
When driving with one of the dissimilar
spare tires listed above, do not:
• Exceed
50 mph (80 km/h).
• Load the vehicle beyond maximum
vehicle load rating listed on the Safety
Compliance Label.
• Tow a trailer.
• Use snow chains on the end of the
vehicle with the dissimilar spare tire.
• Use more than one dissimilar spare tire
at a time.
372
F-150 (TFC) Canada/United States of America, enUSA, First Printing Wheels and Tires
Page 377 of 599

WARNINGS
Always use the jack provided as
original equipment with your vehicle.
If using a jack other than the one
provided, make sure the jack capacity is
adequate for the vehicle weight, including
any vehicle cargo or modifications. If you
are unsure if the jack capacity is adequate,
contact the authorized dealer. Switch off the running boards before
jacking or placing any object under
your vehicle. Never place your hand
between the extended running board and
your vehicle. A moving running board may
cause injury. Note:
Only use the spare tire carrier to stow
the tire and wheel combination provided
with your vehicle. Other tire and wheel
combinations can cause the tire carrier to
fail.
Note: Do not use impact tools or power
tools operating at over 200 RPM on the
spare tire carrier, this may cause a winch
malfunction and prevent a secure fit.
Override the winch at least three times
(there will be an audible click each time) to
make sure the wheel and tire have been
installed securely.
Note: Passengers should not remain in the
vehicle when the vehicle is being jacked.
Park on a level surface, activate the hazard
flashers and set the parking brake. Then,
place the transmission in park (P) and turn
the engine off.
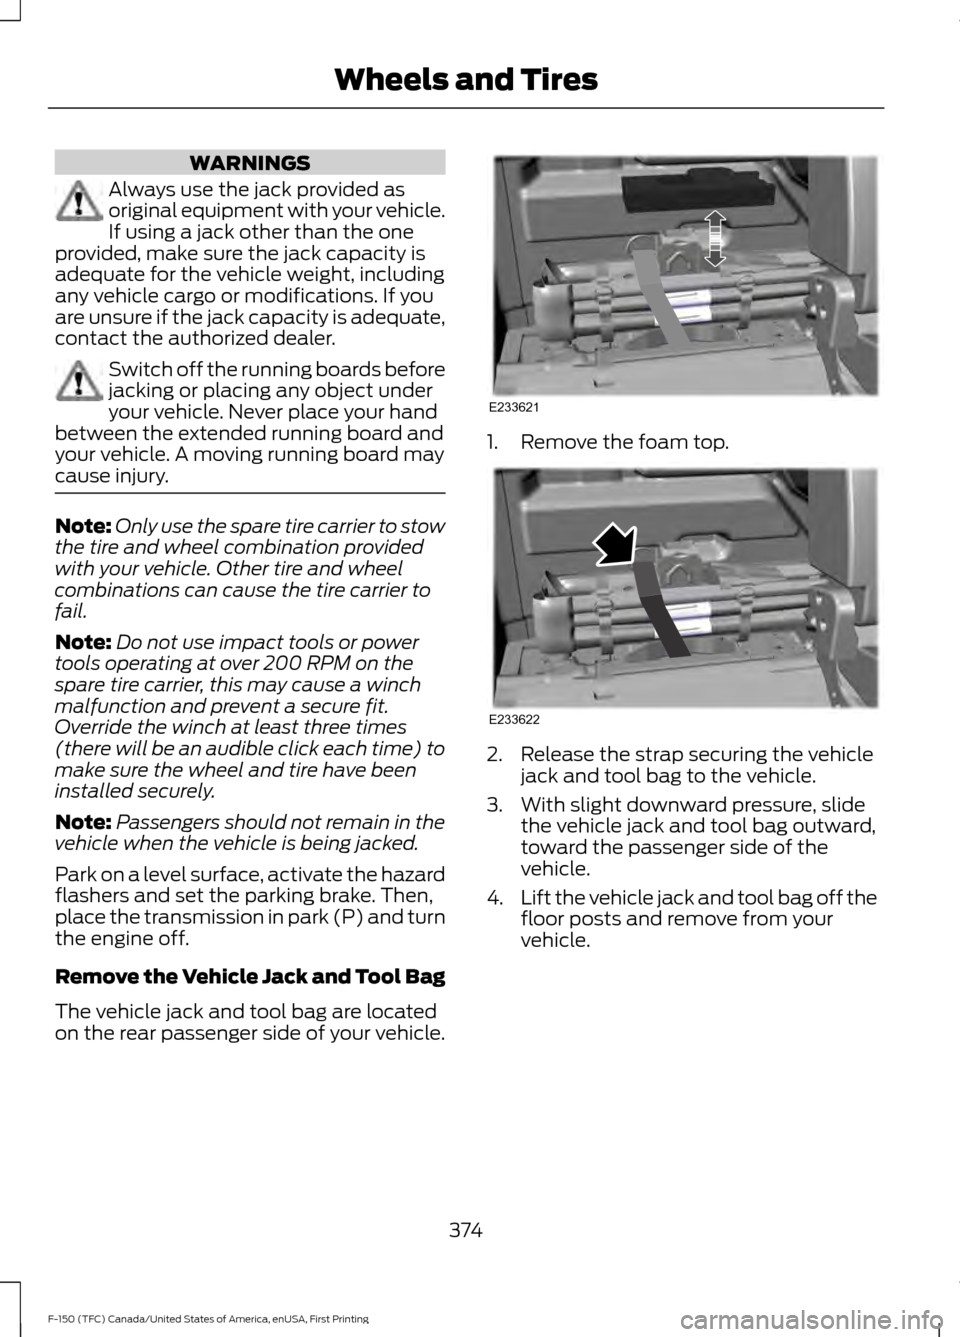
Remove the Vehicle Jack and Tool Bag
The vehicle jack and tool bag are located
on the rear passenger side of your vehicle. 1. Remove the foam top.
2. Release the strap securing the vehicle
jack and tool bag to the vehicle.
3. With slight downward pressure, slide the vehicle jack and tool bag outward,
toward the passenger side of the
vehicle.
4. Lift the vehicle jack and tool bag off the
floor posts and remove from your
vehicle.
374
F-150 (TFC) Canada/United States of America, enUSA, First Printing Wheels and TiresE233621 E233622
Page 544 of 599

Check every month
Engine oil level.
Function of all interior and exterior lights.
Tires (including spare) for wear and proper pressure. Windshield washer fluid level. Check every six months
Battery connections. Clean if necessary.
Body and door drain holes for obstructions. Clean if necessary. Cooling system fluid level and coolant strength.
Door weatherstrips for wear. Lubricate if necessary.
Hinges, latches and outside locks for proper operation. Lubricate if necessary. Parking brake for proper operation.
Safety belts and seat latches for wear and function.
Safety warning lamps (brake, ABS, airbag and safety belt) for operation.
Washer spray and wiper operation. Clean or replace blades as necessary.
Multi-Point Inspection
In order to keep your vehicle running right,
it is important to have the systems on your
vehicle checked regularly. This can help
identify potential issues and prevent major
problems. We recommend having the
following multi-point inspection performed
at every scheduled maintenance interval
to help make sure your vehicle keeps
running great.
541
F-150 (TFC) Canada/United States of America, enUSA, First Printing Scheduled Maintenance
Page 588 of 599

3
360 Degree Camera....................................221
Camera Views...................................................... 221
Front Camera....................................................... 222
Side Camera........................................................ 222
4
4WD See: Four-Wheel Drive...................................... 193
A
A/C See: Climate Control.......................................... 141
About This Manual
...........................................7
ABS See: Brakes.......................................................... 203
ABS driving hints See: Hints on Driving With Anti-Lock
Brakes............................................................... 203
Accessories....................................................534 Exterior style........................................................ 534
Interior style......................................................... 534
Lifestyle................................................................. 534
Peace of mind..................................................... 534
Accessories See: Replacement Parts
Recommendation............................................ 12
ACC See: Using Adaptive Cruise Control............225
Active Park Assist
.........................................214
Automatic Steering into Parking
Space................................................................. 216
Deactivating the Park Assist Feature..........216
Troubleshooting the System........................... 217
Using Active Park Assist................................... 215
Adjusting the Headlamps.........................332 Horizontal Aim Adjustment........................... 333
Vertical Aim Adjustment................................. 332
Adjusting the Pedals....................................84
Adjusting the Steering Wheel...................80 Power Tilt and Telescope Steering
Column............................................................... 80
Airbag Disposal
...............................................52
Air Conditioning See: Climate Control.......................................... 141Air Filter
See: Changing the Engine Air Filter.............339
Alarm See: Anti-Theft Alarm........................................ 76
Ambient Lighting
...........................................94
Anti-Theft Alarm............................................76
Arming the Alarm.................................................. 77
Disarming the Alarm............................................ 77
Full Guard ................................................................ 77
Reduced Guard...................................................... 76
Appendices....................................................558
Apps
.................................................................506
........................................................................\
......... 506
SiriusXM Traffic and Travel Link.................. 508
Audible Warnings and Indicators...........108 Airbag Secondary Warning............................ 108
Beltminder Warning.......................................... 109
Door Ajar Warning.............................................. 109
Headlamps On Warning.................................. 109
Key in Ignition Warning..................................... 109
Keyless Warning Alert....................................... 109
Parking Brake On Warning.............................. 109
Rear Park Aid Warning..................................... 109
Service Advancetrac Warning....................... 109
Audio Control
...................................................81
Media........................................................................\
. 81
Seek, Next or Previous......................................... 81
Audio System
...............................................405
General Information......................................... 405
Audio Unit - Vehicles With: AM/FM/CD/ SYNC/Satellite Radio
..............................413
Audio Unit - Vehicles With: AM/FM/ CD..................................................................408
Audio Unit - Vehicles With: AM/FM/ SYNC...............................................................411
Audio Unit - Vehicles With: AM/ FM..................................................................406
Audio Unit - Vehicles With: Sony AM/ FM/CD............................................................415
Autolamps........................................................87 Windshield Wiper Activated
Headlamps........................................................ 88
Automatic Climate Control.......................143
Automatic High Beam Control.................89 Activating the System........................................ 90
Manually Overriding the System................... 90
Automatic Transmission
...........................186
Brake-Shift Interlock......................................... 190
585
F-150 (TFC) Canada/United States of America, enUSA, First Printing Index