2017 FORD F150 service reset
[x] Cancel search: service resetPage 7 of 599

Load Carrying
Load Retaining Fixtures.............................247
Load Limit......................................................248
Bed Access
.....................................................252
Bed Ramps
.....................................................253
Towing
Towing a Trailer
............................................256
Trailer Reversing Aids..................................257
Trailer Sway Control....................................267
Recommended Towing Weights............267
Essential Towing Checks..........................278
Towing the Vehicle on Four Wheels
......285
Driving Hints
Breaking-In....................................................288
Economical Driving
.....................................288
Driving Through Water
..............................289
Floor Mats
......................................................289
Snowplowing................................................290
Roadside Emergencies
Roadside Assistance..................................293
Hazard Warning Flashers.........................294
Fuel Shutoff...................................................294
Jump Starting the Vehicle........................295
Post-Crash Alert System
..........................297
Transporting the Vehicle...........................297
Towing Points
...............................................298
Customer Assistance
Getting the Services You Need..............300
In California (U.S. Only).............................301
The Better Business Bureau (BBB) Auto Line Program (U.S. Only).....................302
Utilizing the Mediation/Arbitration Program (Canada Only).......................303
Getting Assistance Outside the U.S. and Canada
........................................................303 Ordering Additional Owner's
Literature....................................................304
Reporting Safety Defects (U.S. Only)............................................................305
Reporting Safety Defects (Canada Only)............................................................305
Fuses
Fuse Specification Chart..........................307
Changing a Fuse............................................315
Maintenance
General Information
.....................................317
Opening and Closing the Hood...............317
Under Hood Overview - 2.7L EcoBoost™.................................................318
Under Hood Overview - 3.5L
....................319
Under Hood Overview - 3.5L Ecoboost™................................................320
Under Hood Overview - 5.0L....................321
Engine Oil Dipstick.......................................322
Engine Oil Check..........................................322
Oil Change Indicator Reset.......................323
Engine Coolant Check................................323
Automatic Transmission Fluid Check............................................................327
Transfer Case Fluid Check........................328
Brake Fluid Check
........................................328
Power Steering Fluid Check.....................328
Washer Fluid Check
....................................329
Fuel Filter........................................................329
Changing the 12V Battery.........................329
Checking the Wiper Blades.......................331
Changing the Wiper Blades......................331
Adjusting the Headlamps.........................332
Changing a Bulb
...........................................333
Bulb Specification Chart...........................337
Changing the Engine Air Filter................339
Vehicle Care
General Information
...................................340
4
F-150 (TFC) Canada/United States of America, enUSA, First Printing Table of Contents
Page 185 of 599

4. Operate the fuel pump nozzle within
the area shown. 5.
Slightly raise the fuel pump nozzle and
then slowly remove it.
6. Fully close the fuel tank filler door.
Note: Do not attempt to start the engine
if you have filled the fuel tank with incorrect
fuel. Incorrect fuel use can cause damage
not covered by the vehicle Warranty. Have
your vehicle checked immediately.
System Warnings (If Equipped)
If the fuel filler inlet does not fully close a
warning message appears in the
information display.
1. Stop your vehicle as soon as safely possible and shift the transmission into
park (P) or neutral (N).
2. Apply the parking brake and switch the
ignition off.
3. Fully open the fuel tank filler door until
it engages.
4. Check the fuel filler inlet and the area around it for any items or debris that
may be obstructing its movement. 5. Insert a fuel pump nozzle or the fuel
filler funnel provided with your vehicle
in to the fuel tank filler pipe opening.
This action should dislodge any debris
that may be preventing the fuel filler
inlet from fully closing.
Note: If this action corrects the problem
the message may not reset immediately. If
the message remains and the service engine
soon warning lamp appears in the
information display, have your vehicle
checked as soon as possible.
FUEL CONSUMPTION
The advertised capacity is the maximum
amount of fuel that you can add to the fuel
tank after running out of fuel. Included in
the advertised capacity is an empty
reserve. The empty reserve is an
unspecified amount of fuel that remains
in the fuel tank when the fuel gauge
indicates empty.
Note: The amount of fuel in the empty
reserve varies and should not be relied upon
to increase driving range.
Filling the Fuel Tank
For consistent results when refueling:
• Turn the ignition off before fueling; an
inaccurate reading results if the engine
is left running.
• Use the same fill rate
(low-medium-high) each time the tank
is filled.
• Allow no more than one automatic
shut-off when refueling.
Results are most accurate when the filling
method is consistent.
182
F-150 (TFC) Canada/United States of America, enUSA, First Printing Fuel and RefuelingE206912
AB E119081
Page 329 of 599
Coolant Change
At specific mileage intervals, as listed in
the scheduled maintenance information,
the coolant should be changed. Add
prediluted coolant approved to the correct
specification. See Capacities and
Specifications (page 381).
Fail-Safe Cooling
Fail-safe cooling allows you to temporarily
drive your vehicle before any incremental
component damage occurs. The fail-safe
distance depends on ambient
temperature, vehicle load and terrain.
How Fail-Safe Cooling Works
If the engine begins to overheat, the
coolant temperature gauge moves toward
the red zone: A warning lamp illuminates and
a message may appear in the
information display.
If the engine reaches a preset
over-temperature condition, the engine
automatically switches to alternating
cylinder operation. Each disabled cylinder
acts as an air pump and cools the engine.
When this occurs, your vehicle still
operates, however:
• Engine power is limited.
• The air conditioning system turns off.
Continued operation increases the engine
temperature, causing the engine to
completely shut down. Your steering and
braking effort increases in this situation.
When the engine temperature cools, you
can re-start the engine. Have your vehicle
checked as soon as possible to minimize
engine damage. When Fail-Safe Mode Is Activated WARNINGS
Fail-safe mode is for use during
emergencies only. Operate your
vehicle in fail-safe mode only as long
as necessary to bring your vehicle to rest
in a safe location and seek immediate
repairs. When in fail-safe mode, your
vehicle will have limited power, will not be
able to maintain high-speed operation, and
may completely shut down without
warning, potentially losing engine power,
power steering assist, and power brake
assist, which may increase the possibility
of a crash resulting in serious injury. Never remove the coolant reservoir
cap when the engine is running or
hot.
Your vehicle has limited engine power
when in the fail-safe mode, drive your
vehicle with caution. Your vehicle does not
maintain high-speed operation and the
engine may operate poorly.
Remember that the engine is capable of
automatically shutting down to prevent
engine damage. In this situation:
1. Pull off the road as soon as safely
possible and switch the engine off.
2. If you are a member of a roadside assistance program, we recommend
that you contact your roadside
assistance service provider.
3. If this is not possible, wait a short period for the engine to cool.
4. Check the coolant level. If the coolant level is at or below the minimum mark,
add prediluted coolant immediately.
5. When the engine temperature cools, you can re-start the engine. Have your
vehicle checked as soon as possible to
minimize engine damage.
326
F-150 (TFC) Canada/United States of America, enUSA, First Printing Maintenance
Page 374 of 599

•
To reduce the chances of interference
from another vehicle, perform the
system reset procedure at least three
feet (one meter) away from another
Ford Motor Company vehicle
undergoing the system reset procedure
at the same time.
• Do not wait more than two minutes
between resetting each tire sensor or
the system will time-out and the entire
procedure will have to be repeated on
all four wheels.
• A double horn will sound indicating the
need to repeat the procedure.
Performing the System Reset Procedure
Read the entire procedure before
attempting.
1. Drive the vehicle above 20 mph (32 km/h) for at least two minutes, then
park in a safe location where you can
easily get to all four tires and have
access to an air pump.
2. Place the ignition in the off position and
keep the key in the ignition.
3. Cycle the ignition to the on position with the engine off.
4. Turn the hazard flashers on then off three times. You must accomplish this
within 10 seconds. If the reset mode
has been entered successfully, the horn
will sound once, the system indicator
will flash and a message is shown in
the information display. If this does not
occur, please try again starting at Step
2. If after repeated attempts to enter
the reset mode, the horn does not
sound, the system indicator does not
flash and no message is shown in the
information display, seek service from
your authorized dealer. 5. Train the tire pressure monitoring
system sensors in the tires using the
following system reset sequence
starting with the left front tire in the
following clockwise order: Left front
(driver's side front tire), Right front
(passenger's side front tire), Right rear
(passenger's side rear tire), Left rear
(driver's side rear tire).
6. Remove the valve cap from the valve stem on the left front tire. Decrease the
air pressure until the horn sounds.
Note: The single horn chirp confirms that
the sensor identification code has been
learned by the module for this position. If a
double horn is heard, the reset procedure
was unsuccessful, and you must repeat it.
7. Remove the valve cap from the valve stem on the right front tire. Decrease
the air pressure until the horn sounds.
8. Remove the valve cap from the valve stem on the right rear tire. Decrease the
air pressure until the horn sounds.
9. Remove the valve cap from the valve stem on the left rear tire. Decrease the
air pressure until the horn sounds.
Training is complete after the horn
sounds for the last tire trained (driver's
side rear tire), the system indicator
stops flashing, and a message is shown
in the information display.
10. Turn the ignition off. If two short horn
beeps are heard, the reset procedure
was unsuccessful and you must
repeat it. If after repeating the
procedure and two short beeps are
heard when the ignition is turned to
off, seek assistance from your
authorized dealer.
371
F-150 (TFC) Canada/United States of America, enUSA, First Printing Wheels and Tires
Page 422 of 599
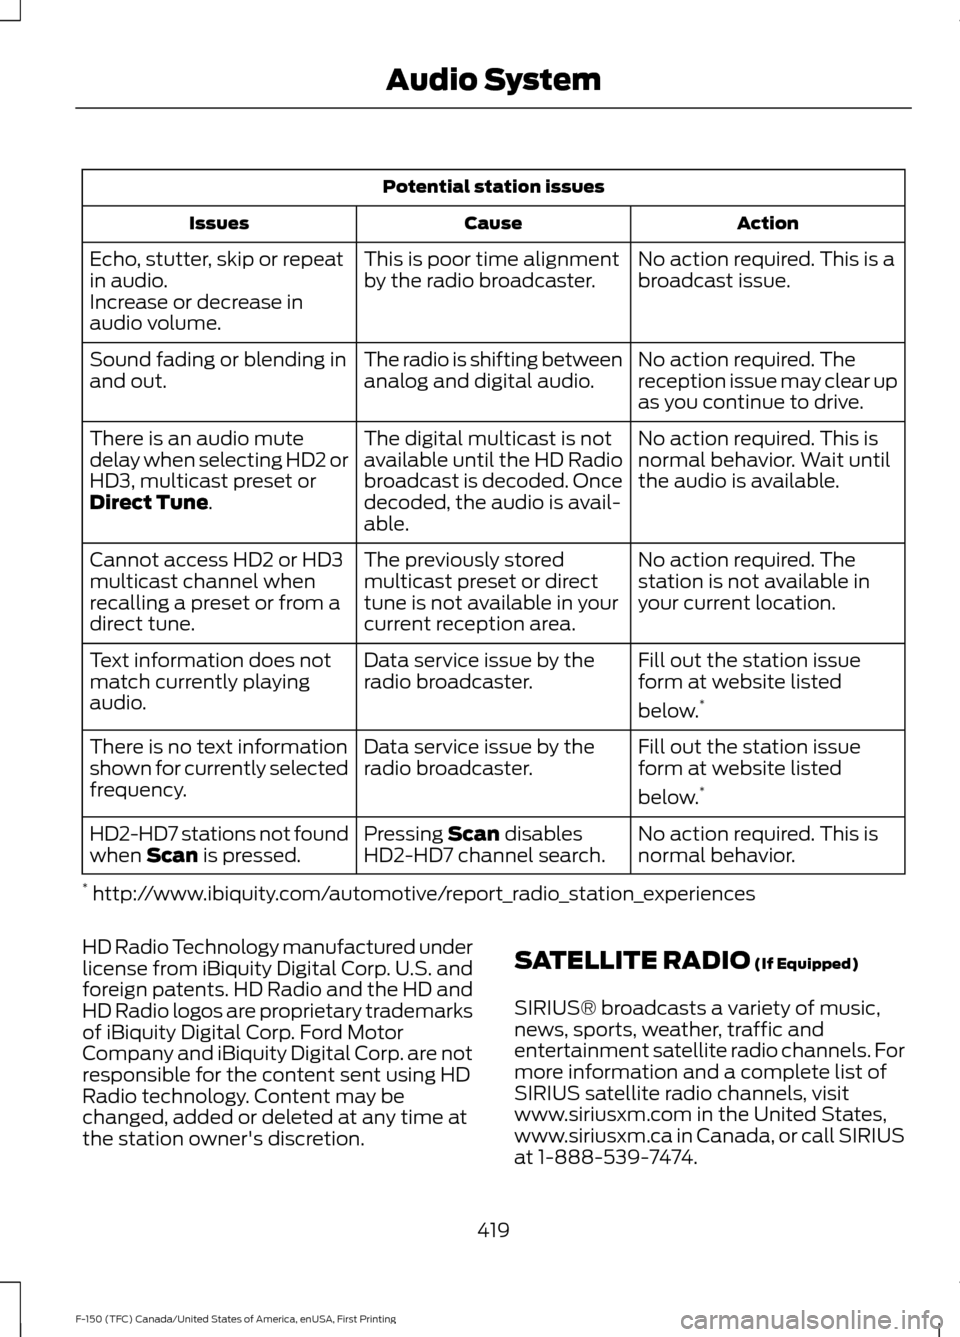
Potential station issues
Action
Cause
Issues
No action required. This is a
broadcast issue.
This is poor time alignment
by the radio broadcaster.
Echo, stutter, skip or repeat
in audio.
Increase or decrease in
audio volume.
No action required. The
reception issue may clear up
as you continue to drive.
The radio is shifting between
analog and digital audio.
Sound fading or blending in
and out.
No action required. This is
normal behavior. Wait until
the audio is available.
The digital multicast is not
available until the HD Radio
broadcast is decoded. Once
decoded, the audio is avail-
able.
There is an audio mute
delay when selecting HD2 or
HD3, multicast preset or
Direct Tune.
No action required. The
station is not available in
your current location.
The previously stored
multicast preset or direct
tune is not available in your
current reception area.
Cannot access HD2 or HD3
multicast channel when
recalling a preset or from a
direct tune.
Fill out the station issue
form at website listed
below.*
Data service issue by the
radio broadcaster.
Text information does not
match currently playing
audio.
Fill out the station issue
form at website listed
below.*
Data service issue by the
radio broadcaster.
There is no text information
shown for currently selected
frequency.
No action required. This is
normal behavior.
Pressing
Scan disables
HD2-HD7 channel search.
HD2-HD7 stations not found
when Scan is pressed.
* http://www.ibiquity.com/automotive/report_radio_station_experiences
HD Radio Technology manufactured under
license from iBiquity Digital Corp. U.S. and
foreign patents. HD Radio and the HD and
HD Radio logos are proprietary trademarks
of iBiquity Digital Corp. Ford Motor
Company and iBiquity Digital Corp. are not
responsible for the content sent using HD
Radio technology. Content may be
changed, added or deleted at any time at
the station owner's discretion. SATELLITE RADIO
(If Equipped)
SIRIUS® broadcasts a variety of music,
news, sports, weather, traffic and
entertainment satellite radio channels. For
more information and a complete list of
SIRIUS satellite radio channels, visit
www.siriusxm.com in the United States,
www.siriusxm.ca in Canada, or call SIRIUS
at 1-888-539-7474.
419
F-150 (TFC) Canada/United States of America, enUSA, First Printing Audio System
Page 424 of 599
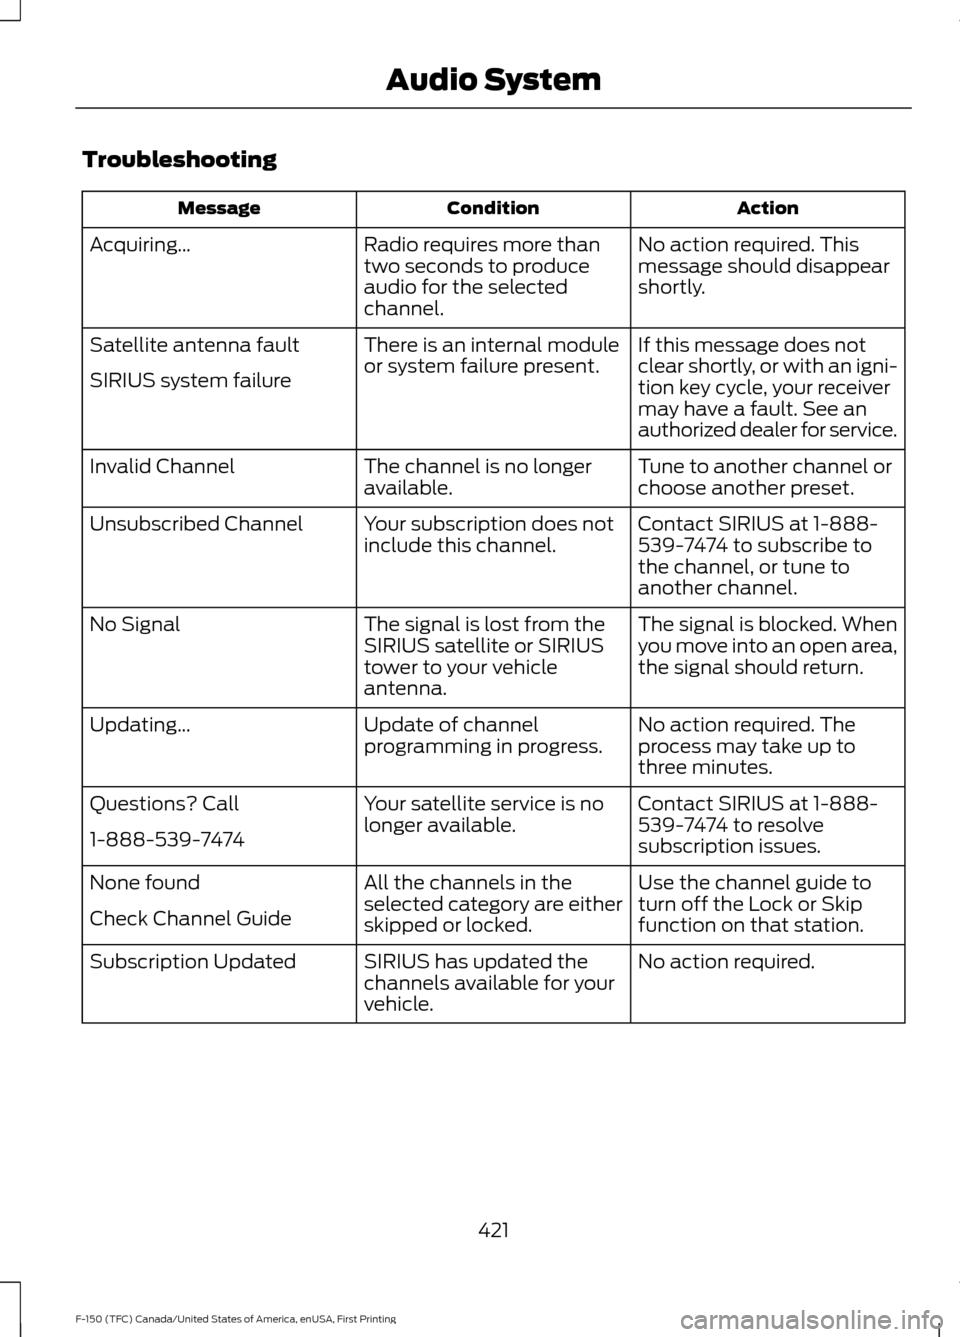
Troubleshooting
Action
Condition
Message
No action required. This
message should disappear
shortly.
Radio requires more than
two seconds to produce
audio for the selected
channel.
Acquiring\b
If this message does not
clear shortly, or with an igni-
tion key cycle, your receiver
may have a fault. See an
authorized dealer for service.
There is an internal module
or system failure present.
Satellite antenna fault
SIRIUS system failure
Tune to another channel or
choose another preset.
The channel is no longer
available.
Invalid Channel
Contact SIRIUS at 1-888-
539-7474 to subscribe to
the channel, or tune to
another channel.
Your subscription does not
include this channel.
Unsubscribed Channel
The signal is blocked. When
you move into an open area,
the signal should return.
The signal is lost from the
SIRIUS satellite or SIRIUS
tower to your vehicle
antenna.
No Signal
No action required. The
process may take up to
three minutes.
Update of channel
programming in progress.
Updating\b
Contact SIRIUS at 1-888-
539-7474 to resolve
subscription issues.
Your satellite service is no
longer available.
Questions? Call
1-888-539-7474
Use the channel guide to
turn off the Lock or Skip
function on that station.
All the channels in the
selected category are either
skipped or locked.
None found
Check Channel Guide
No action required.
SIRIUS has updated the
channels available for your
vehicle.
Subscription Updated
421
F-150 (TFC) Canada/United States of America, enUSA, First Printing Audio System
Page 427 of 599
Sunday, 10:30am-7:30pm EST.
In the United States, call 1-800-392-3673.
In Canada, call 1-800-565-3673.
Times are subject to change due to
holidays.
SYNC Owner Account
Why do I need a SYNC owner account?
•
Essential for keeping up with the latest
software downloads available for
SYNC.
• Access to customer support for any
questions you may have.
Driving Restrictions
For your safety, certain features are
speed-dependent and restricted when your
vehicle is traveling over 3 mi (5 km).
Safety Information WARNING
Driving while distracted can result in
loss of vehicle control, crash and
injury. We strongly recommend that
you use extreme caution when using any
device that may take your focus off the
road. Your primary responsibility is the safe
operation of your vehicle. We recommend
against the use of any hand-held device
while driving and encourage the use of
voice-operated systems when possible.
Make sure you are aware of all applicable
local laws that may affect the use of
electronic devices while driving. When using SYNC:
•
Do not operate playing devices if the
power cords or cables are broken, split
or damaged. Place cords and cables
out of the way, so they do not interfere
with the operation of pedals, seats,
compartments or safe driving abilities.
• Do not leave playing devices in your
vehicle during extreme conditions as it
could cause them damage. See your
device's manual for further information.
• Do not attempt to service or repair the
system. See an authorized dealer.
Privacy Information
When a cellular phone is connected to
SYNC, the system creates a profile within
your vehicle that is linked to that cellular
phone. This profile is created in order to
offer you more cellular features and to
operate more efficiently. Among other
things, this profile may contain data about
your cellular phone book, text messages
(read and unread), and call history,
including history of calls when your cellular
phone was not connected to the system.
In addition, if you connect a media device,
the system creates and retains an index of
supported media content. The system also
records a short development log of
approximately 10 minutes of all recent
system activity. The log profile and other
system data may be used to improve the
system and help diagnose any problems
that may occur.
The cellular profile, media device index,
and development log will remain in the
vehicle unless you delete them and are
generally accessible only in the vehicle
when the cellular phone or media player
is connected. If you no longer plan to use
the system or the vehicle, we recommend
you perform a Master Reset to erase all
stored information.
424
F-150 (TFC) Canada/United States of America, enUSA, First Printing SYNC™
(If Equipped)
Page 469 of 599
SEEK PREVIOUS:
•
While in radio mode, press to seek
between memory presets.
• While in USB, Bluetooth Audio or CD
mode, press to seek between songs or
press and hold to fast seek.
PHONE ACCEPT: Press to answer a call
or switch between calls.
PHONE REJECT:
Press to end a call or
reject an incoming call.
Note: On some models, SEEK NEXT
may
be combined with PHONE REJECT and
SEEK PREVIOUS may be combined with
PHONE ACCEPT.
M:
Touch the control repeatedly to switch
between media sources (modes).
See
Steering Wheel (page 80).
Using Your Bezel Controls
Depending on your vehicle and option
package, you may also have these controls
on your instrument panel:
• Power:
Switch the audio system on
and off.
• VOL:
Control the volume of playing
audio.
• Seek
and Tune: Use as you normally
would in audio modes.
• Eject:
Eject a CD from the audio
system.
• SOURCE
or MEDIA: Press repeatedly
to advance through available media
modes.
• SOUND:
Press to access the Sound
menu where you can adjust sound and
other audio settings.
• 1-6:
Press and hold to store or press to
select an AM, FM or SIRIUS memory
preset. See Audio System (page
405). •
DISP:
Switch the display on or off. You
can also touch the screen to switch the
display back on.
• Temperature, fan and climate
control buttons:
Control the
temperature, fan speed or settings of
the climate control system. See
Climate Control
(page 141).
911 Assist WARNINGS
Unless the 911 Assist setting is set on
before a crash, the system will not
dial for help which could delay
response time, potentially increasing the
risk of serious injury or death after a crash.
setting is set on before a crash, the system
will not dial for help which could delay
response time, potentially increasing the
risk of serious injury or death after a crash. Do not wait for 911 Assist to make an
emergency call if you can do it
yourself. Dial emergency services
immediately to avoid delayed response
time which could increase the risk of
serious injury or death after a crash. If you
do not hear 911 Assist within five seconds
of the crash, the system or phone may be
damaged or non-functional. Always place your phone in a secure
location in your vehicle so it does not
become a projectile or get damaged
in a crash. Failure to do so may cause
serious injury to someone or damage the
phone which could prevent 911 Assist from
working properly. Note:
The SYNC 911 Assist feature must be
set on before the incident.
Note: The SYNC 911 Assist feature only
operates in the U.S., Canada or in a territory
in which 911 is the emergency number.
466
F-150 (TFC) Canada/United States of America, enUSA, First Printing SYNC™ 3
(If Equipped)