2017 FORD EXPEDITION EL steering
[x] Cancel search: steeringPage 111 of 500
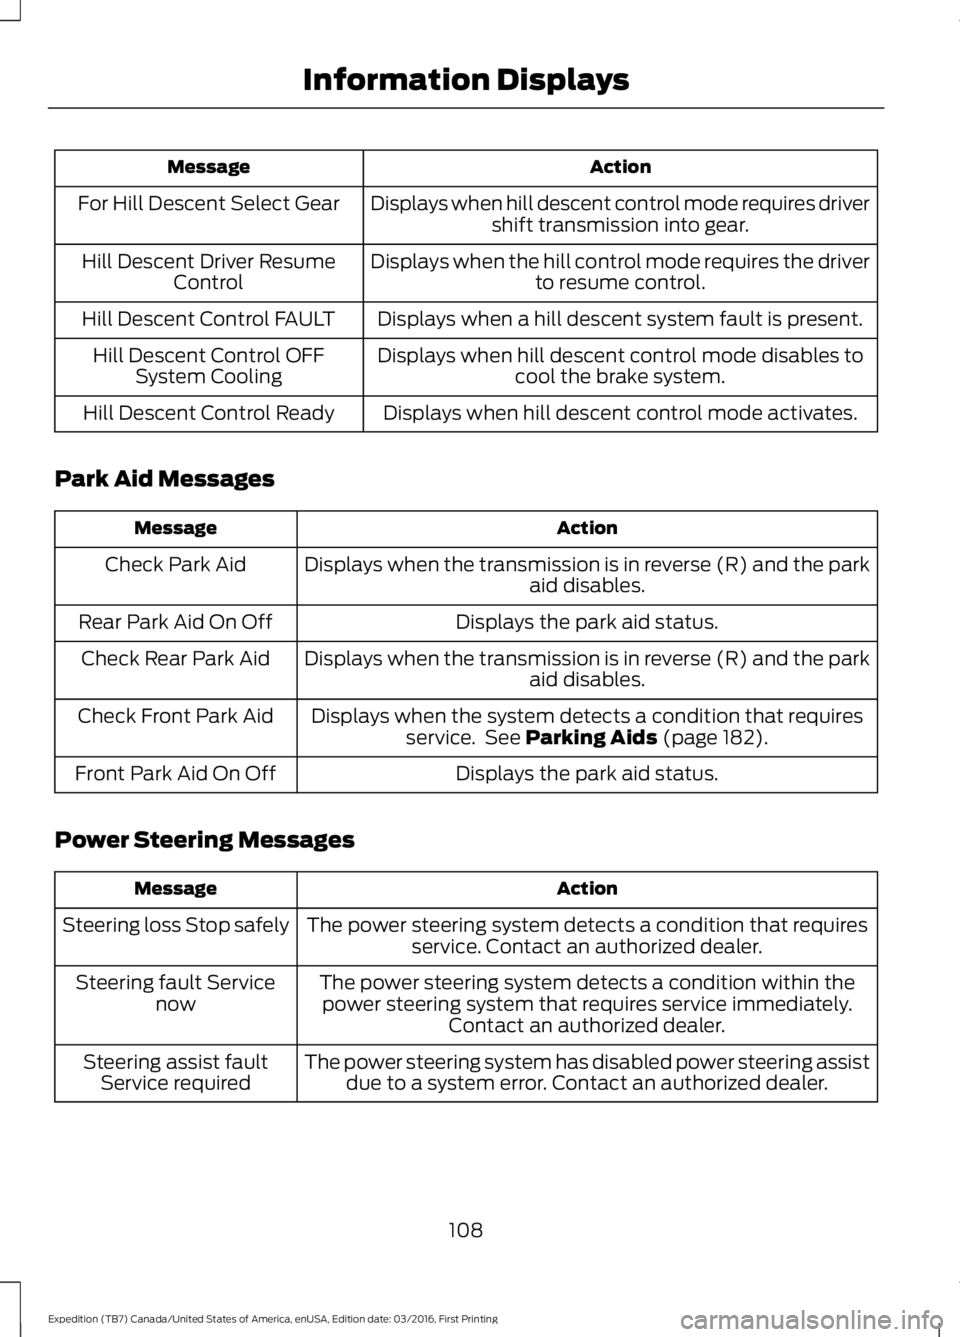
ActionMessage
Displays when hill descent control mode requires drivershift transmission into gear.For Hill Descent Select Gear
Displays when the hill control mode requires the driverto resume control.Hill Descent Driver ResumeControl
Displays when a hill descent system fault is present.Hill Descent Control FAULT
Displays when hill descent control mode disables tocool the brake system.Hill Descent Control OFFSystem Cooling
Displays when hill descent control mode activates.Hill Descent Control Ready
Park Aid Messages
ActionMessage
Displays when the transmission is in reverse (R) and the parkaid disables.Check Park Aid
Displays the park aid status.Rear Park Aid On Off
Displays when the transmission is in reverse (R) and the parkaid disables.Check Rear Park Aid
Displays when the system detects a condition that requiresservice. See Parking Aids (page 182).Check Front Park Aid
Displays the park aid status.Front Park Aid On Off
Power Steering Messages
ActionMessage
The power steering system detects a condition that requiresservice. Contact an authorized dealer.Steering loss Stop safely
The power steering system detects a condition within thepower steering system that requires service immediately.Contact an authorized dealer.
Steering fault Servicenow
The power steering system has disabled power steering assistdue to a system error. Contact an authorized dealer.Steering assist faultService required
108
Expedition (TB7) Canada/United States of America, enUSA, Edition date: 03/2016, First Printing
Information Displays
Page 123 of 500

HEATED WINDOWS AND
MIRRORS
Heated Rear Window
Note:Make sure the engine is runningbefore operating the heated windows.
Press the button to clear theheated rear window of thin iceand fog. The heated rear windowwill automatically turn off after a shortperiod of time. Start the engine before youswitch the heated rear window on.
Note:Do not use razor blades or othersharp objects to clean or remove decalsfrom the inside of the heated rear window.The vehicle warranty does not coverdamage caused to the heated rear windowgrid lines.
Heated Exterior Mirror (If Equipped)
When you switch the heated rear windowon, the heated exterior mirrors willautomatically turn on.
Note:Do not remove ice from the mirrorswith a scraper or adjust the mirror glasswhen it is frozen in place.
Note:Do not clean the mirror housing orglass with harsh abrasives, fuel or otherpetroleum-based cleaning products.
REMOTE START (If Equipped)
The remote start feature allows you topre-condition the interior of your vehicle.The climate control system works toachieve comfort according to your previoussettings.
Note:You cannot adjust the system duringremote start operation.
Turn the ignition on to return the systemto its previous settings. You can now makeadjustments normally, but you need to turncertain vehicle-dependent features backon, such as:
•Heated seats.
•Cooled seats.
•Heated steering wheel.
•Heated mirrors.
•Heated rear window.
You can adjust the default remote startsettings using the information displaycontrols. See Information Displays(page 91).
Automatic Settings
In hot weather, the system is set to 72°F(22°C). The cooled seats are set to high(if available, and selected to AUTO in theinformation display).
In moderate weather, the system eitherheats or cools (based on previoussettings). The rear defroster, heatedmirrors and heated seats do notautomatically turn on.
In cold weather, the system is set to 72°F(22°C). The heated seats are set to high(if available, and selected to AUTO in theinformation display). The rear defrosterand heated mirrors automatically turn on.
120
Expedition (TB7) Canada/United States of America, enUSA, Edition date: 03/2016, First Printing
Climate ControlE184884
Page 124 of 500
SITTING IN THE CORRECT
POSITION
WARNINGS
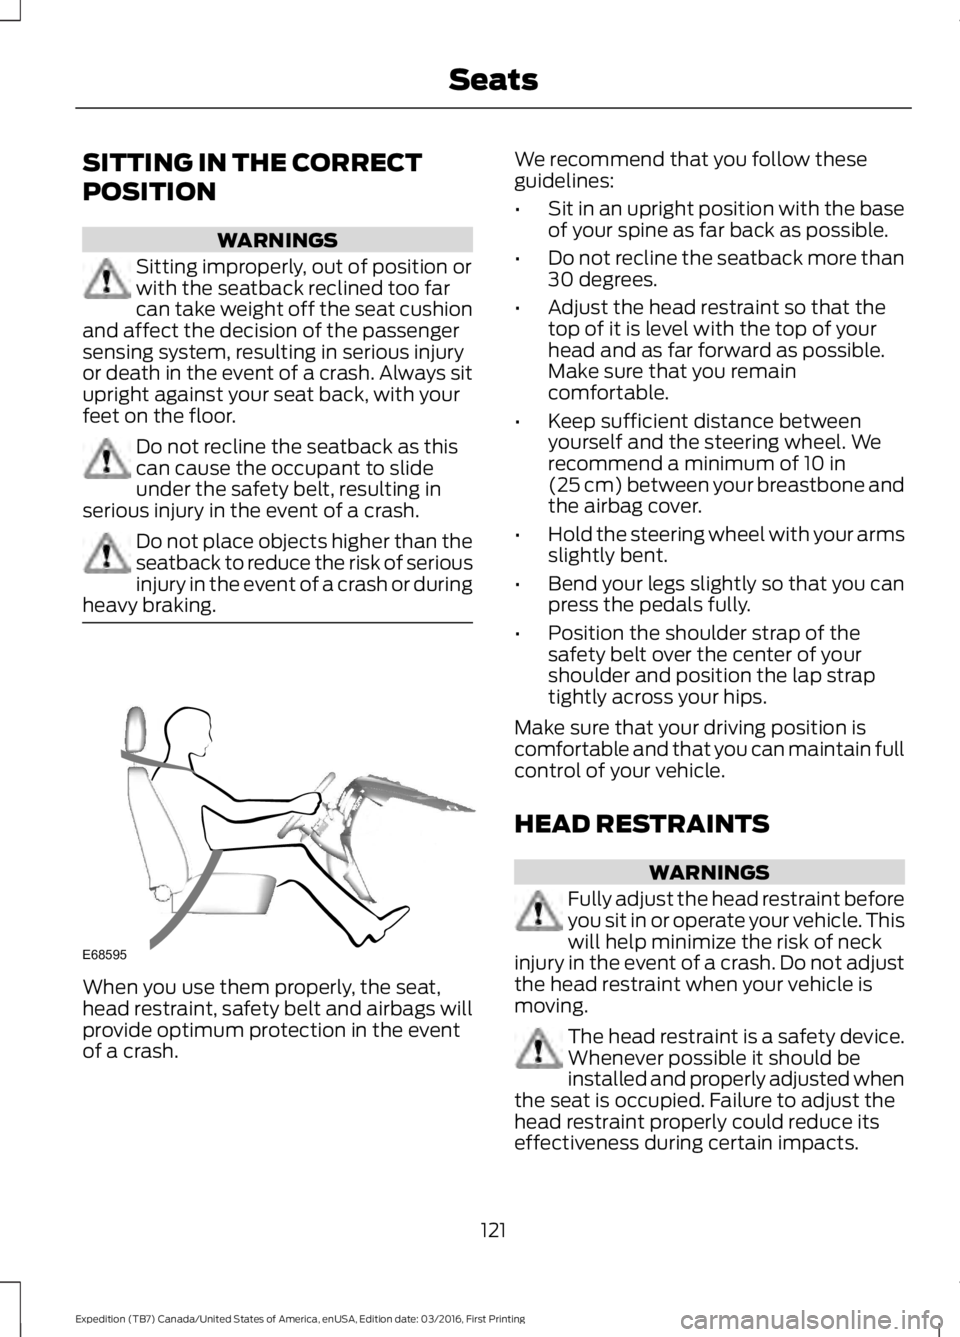
Sitting improperly, out of position orwith the seatback reclined too farcan take weight off the seat cushionand affect the decision of the passengersensing system, resulting in serious injuryor death in the event of a crash. Always situpright against your seat back, with yourfeet on the floor.
Do not recline the seatback as thiscan cause the occupant to slideunder the safety belt, resulting inserious injury in the event of a crash.
Do not place objects higher than theseatback to reduce the risk of seriousinjury in the event of a crash or duringheavy braking.
When you use them properly, the seat,head restraint, safety belt and airbags willprovide optimum protection in the eventof a crash.
We recommend that you follow theseguidelines:
•Sit in an upright position with the baseof your spine as far back as possible.
•Do not recline the seatback more than30 degrees.
•Adjust the head restraint so that thetop of it is level with the top of yourhead and as far forward as possible.Make sure that you remaincomfortable.
•Keep sufficient distance betweenyourself and the steering wheel. Werecommend a minimum of 10 in(25 cm) between your breastbone andthe airbag cover.
•Hold the steering wheel with your armsslightly bent.
•Bend your legs slightly so that you canpress the pedals fully.
•Position the shoulder strap of thesafety belt over the center of yourshoulder and position the lap straptightly across your hips.
Make sure that your driving position iscomfortable and that you can maintain fullcontrol of your vehicle.
HEAD RESTRAINTS
WARNINGS
Fully adjust the head restraint beforeyou sit in or operate your vehicle. Thiswill help minimize the risk of neckinjury in the event of a crash. Do not adjustthe head restraint when your vehicle ismoving.
The head restraint is a safety device.Whenever possible it should beinstalled and properly adjusted whenthe seat is occupied. Failure to adjust thehead restraint properly could reduce itseffectiveness during certain impacts.
121
Expedition (TB7) Canada/United States of America, enUSA, Edition date: 03/2016, First Printing
SeatsE68595
Page 128 of 500
2. Continue pressing the control until itreaches the end of the seat track.
3.Continue pressing the control for abouttwo seconds. You will feel the seatbounce back slightly.
Power Lumbar (If Equipped)
The control is located on the outboard sideof the seat. Press the forward or rearwardside of the control for more or less support.
MEMORY FUNCTION (If Equipped)
WARNINGS
Before activating the memory seat,make sure that the area immediatelysurrounding the seat is clear ofobstructions and that all occupants areclear of moving parts.
Do not use the memory functionwhen your vehicle is moving.
This feature automatically recalls theposition of the following:
•Driver seat.
•Power mirrors.
•Power steering column.
•Optional power adjustable foot pedals.
The memory control is on the left side ofthe driver seat.
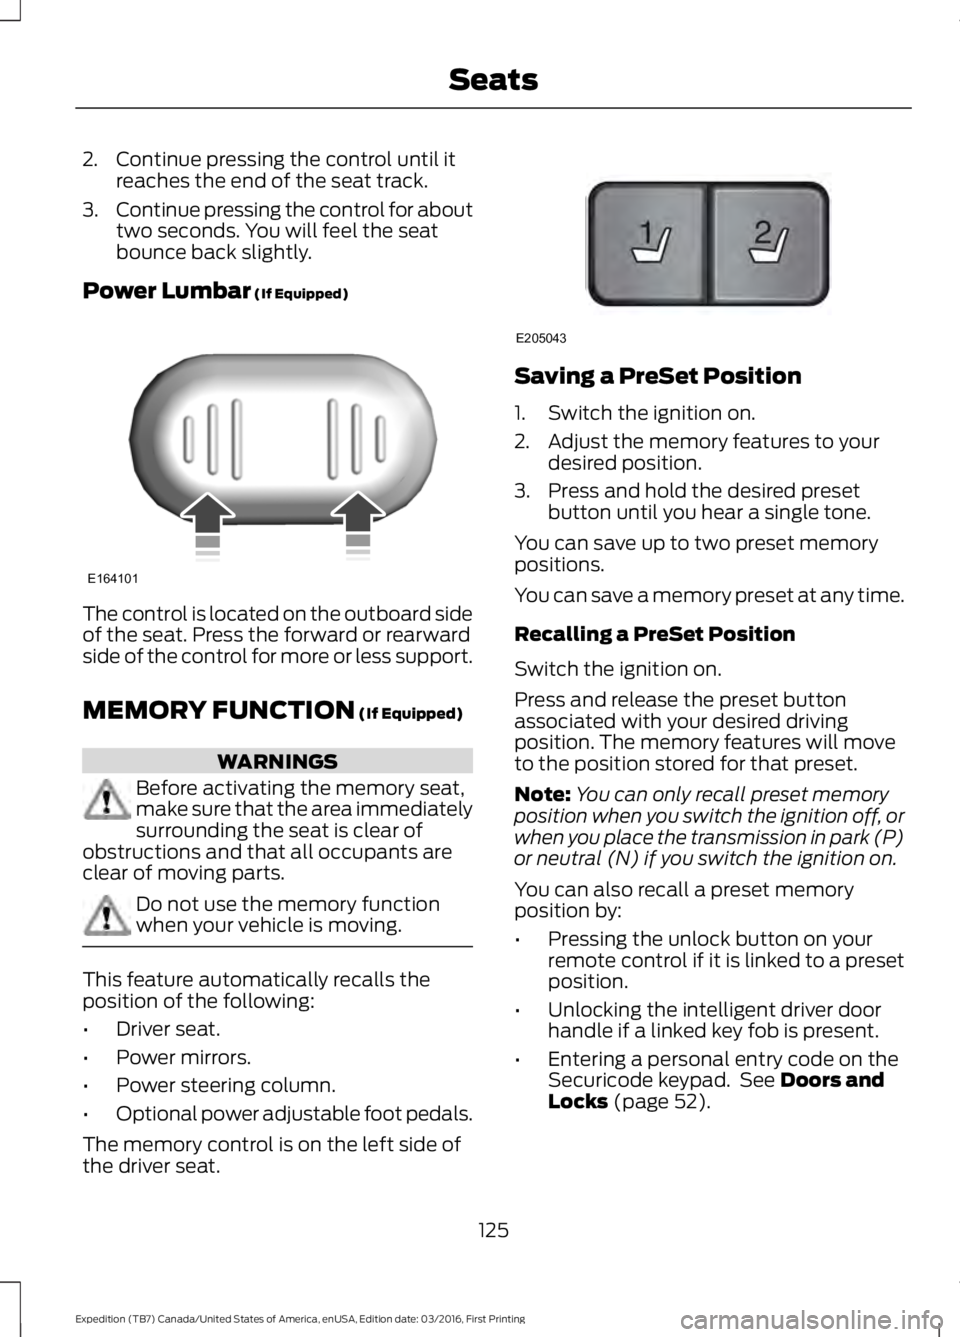
Saving a PreSet Position
1. Switch the ignition on.
2. Adjust the memory features to yourdesired position.
3. Press and hold the desired presetbutton until you hear a single tone.
You can save up to two preset memorypositions.
You can save a memory preset at any time.
Recalling a PreSet Position
Switch the ignition on.
Press and release the preset buttonassociated with your desired drivingposition. The memory features will moveto the position stored for that preset.
Note:You can only recall preset memoryposition when you switch the ignition off, orwhen you place the transmission in park (P)or neutral (N) if you switch the ignition on.
You can also recall a preset memoryposition by:
•Pressing the unlock button on yourremote control if it is linked to a presetposition.
•Unlocking the intelligent driver doorhandle if a linked key fob is present.
•Entering a personal entry code on theSecuricode keypad. See Doors andLocks (page 52).
125
Expedition (TB7) Canada/United States of America, enUSA, Edition date: 03/2016, First Printing
SeatsE164101 21
E205043
Page 129 of 500
Note:Using a linked key fob to recall yourmemory position when the ignition is offmoves the seat and steering column to theEasy Entry position.
Note:Pressing any active memory featurecontrol - power seat, mirror (or steeringcolumn switch) (or any memory button)during a memory recall cancels theoperation.
Linking a PreSet Position to yourRemote Control or Intelligent AccessKey Fob
Your vehicle can save the preset memorypositions for up to two remote controls.
1.With the ignition on, move the memorypositions to the desired positions.
2. Press and hold the desired presetbutton for about five seconds. A tonesounds after about two seconds.Continue holding until you hear asecond tone.
3. Within three seconds, press the lockbutton on the remote control you arelinking.
To unlink a remote control, follow thesame procedure – except in step 3, pressthe unlock button on the remote control.
Note:If more than one linked remotecontrol or intelligent access key is in range,the memory function moves to the settingsof the first key to initiate a memory recall.
Easy Entry and Exit Feature (If
Equipped)
This feature adjusts the position of the seatand steering column to allow easier exitand entry to the vehicle.
The driver seat automatically moves 2inches (5 centimeters) rearward when thetransmission is in park (P) and you removethe key from the ignition or you switch theignition off.
The driver seat returns to the previousposition when you put the key in theignition or switch the ignition on.
You can enable or disable this feature inthe information display. See InformationDisplays (page 91).
REAR SEATS
Folding Down the Second Row40% Seat
WARNINGS
Use caution when folding theseatback to the flat back position asthe system will move forward whenyou lift the release handle.
Before returning the seatback to itsoriginal position, make sure thatcargo or any objects are not trappedbehind the seatback. After returning theseatback to its original position, pull on theseatback to make sure that it has fullylatched. An unlatched seat may becomedangerous in the event of a sudden stopor crash.
Make sure that the head restraint is in thedown position and no objects such asbooks, purses or briefcases are on the floorin front of the second row seats beforefolding them down.
Move the front passenger seat forward sothat the second row seat head restraintclears the front seat.
126
Expedition (TB7) Canada/United States of America, enUSA, Edition date: 03/2016, First Printing
Seats
Page 148 of 500
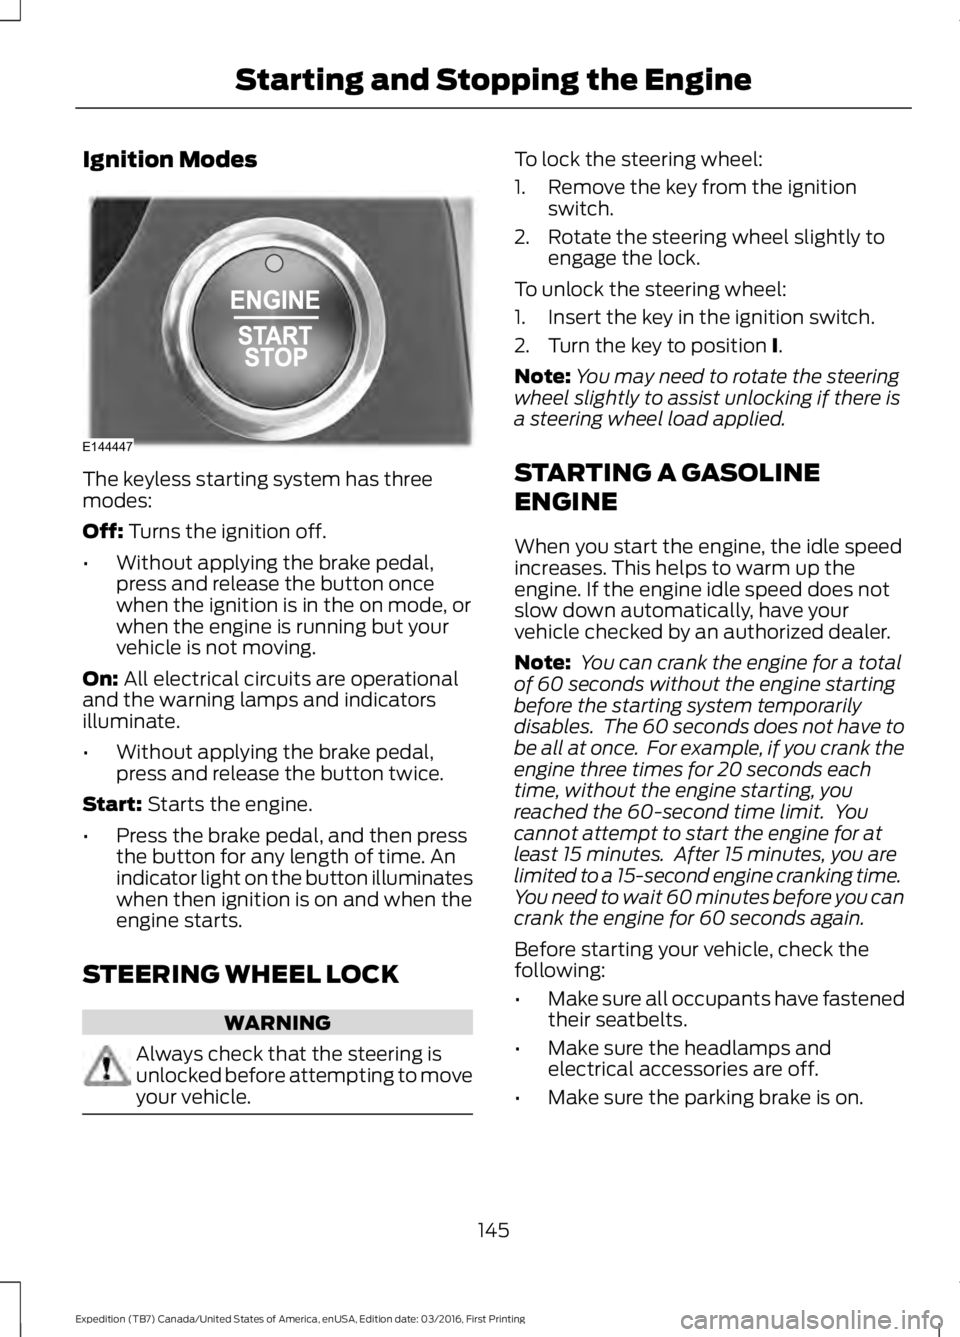
Ignition Modes
The keyless starting system has threemodes:
Off: Turns the ignition off.
•Without applying the brake pedal,press and release the button oncewhen the ignition is in the on mode, orwhen the engine is running but yourvehicle is not moving.
On: All electrical circuits are operationaland the warning lamps and indicatorsilluminate.
•Without applying the brake pedal,press and release the button twice.
Start: Starts the engine.
•Press the brake pedal, and then pressthe button for any length of time. Anindicator light on the button illuminateswhen then ignition is on and when theengine starts.
STEERING WHEEL LOCK
WARNING
Always check that the steering isunlocked before attempting to moveyour vehicle.
To lock the steering wheel:
1. Remove the key from the ignitionswitch.
2. Rotate the steering wheel slightly toengage the lock.
To unlock the steering wheel:
1. Insert the key in the ignition switch.
2. Turn the key to position I.
Note:You may need to rotate the steeringwheel slightly to assist unlocking if there isa steering wheel load applied.
STARTING A GASOLINE
ENGINE
When you start the engine, the idle speedincreases. This helps to warm up theengine. If the engine idle speed does notslow down automatically, have yourvehicle checked by an authorized dealer.
Note: You can crank the engine for a totalof 60 seconds without the engine startingbefore the starting system temporarilydisables. The 60 seconds does not have tobe all at once. For example, if you crank theengine three times for 20 seconds eachtime, without the engine starting, youreached the 60-second time limit. Youcannot attempt to start the engine for atleast 15 minutes. After 15 minutes, you arelimited to a 15-second engine cranking time.You need to wait 60 minutes before you cancrank the engine for 60 seconds again.
Before starting your vehicle, check thefollowing:
•Make sure all occupants have fastenedtheir seatbelts.
•Make sure the headlamps andelectrical accessories are off.
•Make sure the parking brake is on.
145
Expedition (TB7) Canada/United States of America, enUSA, Edition date: 03/2016, First Printing
Starting and Stopping the EngineE144447
Page 151 of 500
Stopping the Engine When YourVehicle is Moving
WARNING
Switching off the engine when thevehicle is still moving will result in aloss of brake and steering assistance.The steering will not lock, but higher effortwill be required. When the ignition isswitched off, some electrical circuits,including air bags, warning lamps andindicators may also be off. If the ignitionwas turned off accidentally, you can shiftinto neutral (N) and re-start the engine.
Vehicles with an Ignition Key
1.Shift into neutral and use the brakes tobring your vehicle to a safe stop.
2. When your vehicle has stopped, shiftinto park (P) and switch the ignitionoff.
3. Apply the parking brake.
Vehicles with Keyless Start
1.Shift into neutral and use the brakes tobring your vehicle to a safe stop.
2. When your vehicle has stopped, shiftinto park (P).
3.Press and hold the push button ignitionswitch, or press it three times withintwo seconds.
4. Apply the parking brake.
Guarding Against Exhaust Fumes
WARNING
Exhaust leaks may result in entry ofharmful and potentially lethal fumesinto the passenger compartment. Ifyou smell exhaust fumes inside yourvehicle, have your vehicle inspectedimmediately. Do not drive if you smellexhaust fumes.
Important Ventilating Information
If you stop your vehicle and then leave theengine idling for long periods, werecommend that you do one of thefollowing:
•Open the windows at least 1 in (3 cm).
•Set your climate control to outside air.
ENGINE BLOCK HEATER (If
Equipped)
WARNINGS
Failure to follow engine block heaterinstructions could result in propertydamage or serious personal injury.
Do not use your heater withungrounded electrical systems ortwo-pronged adapters. There is a riskof electrical shock.
Do not fully close the hood, or allowit to drop under its own weight whenusing the engine block heater. Thiscould damage the power cable and maycause an electrical short resulting in fire,injury and property damage.
Note:The heater is most effective whenoutdoor temperatures are below 0°F(-18°C).
The heater acts as a starting aid bywarming the engine coolant. This allowsthe climate control system to respondquickly. The equipment includes a heaterelement (installed in the engine block) anda wire harness. You can connect thesystem to a grounded 120-volt ACelectrical source.
148
Expedition (TB7) Canada/United States of America, enUSA, Edition date: 03/2016, First Printing
Starting and Stopping the Engine
Page 165 of 500
Manual (M)
Moving the gearshift lever to the manual(M) position will allow you to manuallyselect the gear you desire. Only the currentgear will display. Use the buttons on thegearshift lever to manually select gears.
Press the + button to upshift or the –button to downshift. Return thetransmission to a different gearshiftposition to deactivate manual control.
Upshift to the recommended shift speedsaccording to the following chart:
Upshifts when accelerating (recommended for best fuel economy)
Shift from:
15 mph (24 km/h)1 – 2
25 mph (40 km/h)2 – 3
40 mph (64 km/h)3 – 4
45 mph (72 km/h)4 – 5
50 mph (80 km/h)5 – 6
Brake-Shift Interlock
WARNINGS
Do not drive your vehicle until youverify that the brake lamps areworking.
When doing this procedure, you needto take the transmission out of park(P) which means your vehicle canroll freely. To avoid unwanted vehiclemovement, always fully set the parkingbrake prior to doing this procedure. Usewheels chocks if appropriate.
If the parking brake is fully released,but the brake warning lamp remainsilluminated, the brakes may not beworking properly. Have your vehiclechecked as soon as possible.
Your vehicle is equipped with a brake-shiftinterlock feature that prevents moving thegearshift lever from park (P) when theignition is in the on position and the brakepedal is not pressed.
If you cannot move the gearshift lever outof park (P) position with the ignition in theon position and the brake pedal pressed,a malfunction may have occurred. It ispossible that a fuse has blown or yourvehicle’s brake lamps are not operatingproperly. See Fuse Specification Chart(page 233).
If the fuse is not blown and the brakelamps are working properly, the followingprocedure will allow you to move thegearshift lever from park (P):
Column-shifter
1. Apply the parking brake. Turn theignition key to the off position, thenremove the key.
2. Move the steering column to the fulldown and full rearward position(toward the driver’s seat).
3. Remove the gearshift lever boot.
162
Expedition (TB7) Canada/United States of America, enUSA, Edition date: 03/2016, First Printing
Transmission