2017 FORD EXPEDITION EL steering
[x] Cancel search: steeringPage 196 of 500
Switching the System Off and On
One or both systems can be switched offtemporarily by using the informationdisplay control; See InformationDisplays (page 91). . When you switch offthe Blind Spot Information System, youwill not receive alerts and the informationdisplay will display a system off message.The yellow alert indicator in the outsidemirror will also flash twice. The systemswitches back on whenever you switch theignition on.
You can also have the Blind SpotInformation System switched offpermanently at an authorized dealer. Onceswitched off permanently, the system canonly be switched back on at an authorizeddealer.
STEERING
Electric Power Steering
WARNINGS
The electric power steering systemhas diagnostic checks thatcontinuously monitor the system. Ifa fault is detected, a message displays inthe information display. Stop your vehicleas soon as it is safe to do so. Switch theignition off. After at least 10 seconds,switch the ignition on and watch theinformation display for a steering systemwarning message. If a steering systemwarning message returns, have the systemchecked by an authorized dealer.
If the system detects an error, youmay not feel a difference in thesteering, however a serious conditionmay exist. Obtain immediate service froman authorized dealer, failure to do so mayresult in loss of steering control.
Your vehicle has an electric power steeringsystem. There is no fluid reservoir. Nomaintenance is required.
If your vehicle loses electrical power whileyou are driving, electric power steeringassistance is lost. The steering system stilloperates and you can steer your vehiclemanually. Manually steering your vehiclerequires more effort.
Extreme continuous steering may increasethe effort required for you to steer yourvehicle. This increased effort preventsoverheating and permanent damage tothe steering system. You do not lose theability to steer your vehicle manually.Typical steering and driving maneuversallow the system to cool and return tonormal operation.
Steering Tips
If the steering wanders or pulls, check for:
•Correct tire pressures.
•Uneven tire wear.
•Loose or worn suspensioncomponents.
•Loose or worn steering components.
•Improper vehicle alignment.
Note:A high crown in the road or highcrosswinds may also make the steeringseem to wander or pull.
Adaptive Learning
The electronic power steering systemadaptive learning helps correct roadirregularities and improves overall handlingand steering feel. It communicates withthe brake system to help operateadvanced stability control and accidentavoidance systems. Additionally, wheneverthe battery is disconnected or a newbattery installed, you must drive yourvehicle a short distance before the systemrelearns the strategy and reactivates allsystems.
193
Expedition (TB7) Canada/United States of America, enUSA, Edition date: 03/2016, First Printing
Driving Aids
Page 197 of 500
DRIVE CONTROL
Driver Select Suspension (If Equipped)
Driver select suspension delivers a uniquedriving experience through a suite ofsophisticated electronic vehicle systems.These systems continuously monitor yourdriving inputs and the road conditions tooptimize ride comfort, steering andhandling.
Driver select suspension consists of thefollowing systems:
•Continuously controlled dampingdynamically adjusts the shockabsorbers stiffness in real time tomatch the road surface and driverinputs. This system continuouslymonitors your vehicle’s motion (roll,pitch, bounce), suspension position,load, speed, road conditions, andsteering to adjust the suspensiondamping for optimal vehicle control.
•Electronically power-assisted steeringadjusts steering effort and feel basedon your vehicle speed and your inputs.
The configuration remains active untilmodified from the main menu on theinformation display. See GeneralInformation (page 91).
Modes:
•Comfort – Provides a more relaxeddriving experience, maximizing comfort.Your steering effort decreases and thesuspension movement is more fluid.Comfort mode is ideal when you desireenhanced traveling comfort.
•Normal – Delivers a balancedcombination of comfortable, controlledride and confident handling. This modeprovides an engaging drive experienceand a direct connection to the roadwithout sacrificing any of thecomposure demanded from yourvehicle.
•Sport – Provides a sportier drivingexperience. The suspension stiffens,with an emphasis on handling andcontrol. The engine responds moredirectly to your inputs. Sport mode isideal for use during more spiriteddriving.
SELF-LEVELING SUSPENSION
The self-leveling suspension system isdesigned to improve ride, handling andgeneral vehicle performance during:
•Certain road conditions
•Steering maneuvers
•Braking
•Acceleration
•Towing
This system keeps the rear of your vehicleat a constant level through a hydraulicpump inside each rear shock. Dependingon the payload or road surface conditionsit will take approximately 2 mi (3.2 km) forthe leveling to complete.
194
Expedition (TB7) Canada/United States of America, enUSA, Edition date: 03/2016, First Printing
Driving Aids
Page 217 of 500

•Allow more distance for stopping witha trailer attached. Anticipate stops andbrake gradually.
•Avoid parking on a grade. However, ifyou must park on a grade:
1. Turn the steering wheel to point yourvehicle tires away from traffic flow.
2. Set your vehicle parking brake.
3. Place the automatic transmission inposition P.
4. Place wheel chocks in front and backof the trailer wheels. (Chocks notincluded with vehicle.)
Your vehicle may be equipped with atemporary or conventional spare tire. A"temporary" spare tire is different in size(diameter or width), tread-type(All-Season or All Terrain) or is from adifferent manufacturer than the road tireson your vehicle. Consult information on thetire label or Safety Compliance label forlimitations when using.
Launching or Retrieving a Boat orPersonal Watercraft (PWC)
Note:Disconnect the wiring to the trailerbefore backing the trailer into the water.
Note:Reconnect the wiring to the trailerafter removing the trailer from the water.
When backing down a ramp during boatlaunching or retrieval:
•Do not allow the static water level torise above the bottom edge of the rearbumper.
•Do not allow waves to break higherthan 6 inches (15 centimeters) abovethe bottom edge of the rear bumper.
Exceeding these limits may allow water toenter vehicle components:
•Causing internal damage to thecomponents.
•Affecting driveability, emissions, andreliability.
Replace the rear axle lubricant anytimethe rear axle has been submerged in water.Water may have contaminated the rearaxle lubricant, which is not normallychecked or changed unless a leak issuspected or other axle repair is required.
TOWING POINTS (If Equipped)
WARNINGS
Using recovery hooks is dangerousand should only be done by a personfamiliar with proper vehicle recoverysafety practices. Improper use of recoveryhooks may cause hook failure or separationfrom the vehicle and could result in seriousinjury or death.
Always slowly remove the slack fromthe recovery strap prior to pulling.Failure to do so can introducesignificantly higher loads which can causethe recovery hooks to break off, or therecovery strap to fail which can causeserious injury or death.
Never link two straps together witha clevis pin. These heavy metalobjects could become projectiles ifthe strap breaks and can cause seriousinjury or death.
Your vehicle comes equipped withframe-mounted front recovery hooks.These hooks should never have a loadapplied to them greater than the grossvehicle weight rating of your vehicle.
214
Expedition (TB7) Canada/United States of America, enUSA, Edition date: 03/2016, First Printing
Towing
Page 218 of 500
Before using recovery hooks:
•Make sure all attaching points aresecure and capable of withstandingthe applied load.
•Never use chains, cables or tow strapswith metal hook ends.
•Only use recovery straps that have aminimum breaking strength two tothree times the gross vehicle weight ofthe stuck vehicle.
•Make sure the recovery strap is in goodcondition and free of visible cuts, tearsor damage.
•Use a damper device such as a tarp,heavy blanket or piece of carpetdraped over the recovery strap to helpabsorb the energy in the event thestrap breaks.
•Make sure the stuck vehicle is notloaded heavier than its gross vehicleweight rating specified on thecertification label.
•Always align the tow vehicle and stuckvehicle in a straight line (within 10degrees).
•Keep bystanders to the sides of thevehicle, at a distance of at least twicethe length of the recovery strap. Thishelps avoid injury from the hazard of arecovery hook or strap breaking, or avehicle lurching into their path.
TOWING THE VEHICLE ON
FOUR WHEELS
WARNING
If your vehicle has a steering wheellock make sure the ignition is in theaccessory or on position when beingtowed.
Emergency Towing
If your vehicle becomes inoperable(without access to wheel dollies,car-hauling trailer, or flatbed transportvehicle), it can be flat-towed (all wheelson the ground, regardless of the powertrainand transmission configuration) under thefollowing conditions:
•Your vehicle is facing forward fortowing in a forward direction.
•Place the transmission in position N. Ifyou cannot move the transmission intoN, you may need to override it. SeeTransmission (page 159).
•Maximum speed is 35 mph (56 km/h).
•Maximum distance is 50 mi (80 km).
Recreational Towing
Note:Put your climate control system inrecirculated air mode to prevent exhaustfumes from entering your vehicle. SeeClimate Control (page 112).
Follow these guidelines if you have a needfor recreational towing, for example towingyour vehicle behind a motorhome. Theseguidelines prevent damage to yourtransmission.
Two Wheel Drive Vehicles
You cannot tow a two wheel drive vehiclewith any wheels on the ground as vehicleor transmission damage may occur. Youmust tow your vehicle with all four wheelsoff the ground, for example when using acar-hauling trailer.
215
Expedition (TB7) Canada/United States of America, enUSA, Edition date: 03/2016, First Printing
Towing
Page 222 of 500

•Avoid using speed control in hillyterrain.
•Do not rest your foot on the brakepedal while driving.
•Avoid carrying unnecessary weight.
•Avoid adding particular accessories toyour vehicle (e.g. bug deflectors,rollbars/light bars, running boards, skiracks).
•Avoid driving with the wheels out ofalignment.
DRIVING THROUGH WATER
WARNING
Do not drive through flowing or deepwater as you may lose control of yourvehicle.
Note:Driving through standing water cancause vehicle damage.
Note:Engine damage can occur if waterenters the air filter.
Before driving through standing water,check the depth. Never drive through waterthat is higher than the bottom of the wheelhubs.
When driving through standing water, drivevery slowly and do not stop your vehicle.Your brake performance and traction maybe limited. After driving through water andas soon as it is safe to do so:
•Lightly press the brake pedal to dry thebrakes and to check that they work.
•Check that the horn works.
•Check that the exterior lights work.
•Turn the steering wheel to check thatthe steering power assist works.
FLOOR MATS (If Equipped)
WARNINGS
Always use floor mats that aredesigned to fit the foot well of yourvehicle. Only use floor mats thatleave the pedal area unobstructed. Onlyuse floor mats that are firmly secured toretention posts so that they cannot slip outof position and interfere with the pedalsor impair safe operation of your vehicle inother ways.
Pedals that cannot move freely cancause loss of vehicle control andincrease the risk of serious personalinjury.
Always make sure that the floormats are properly attached to theretention posts in the carpet that aresupplied with your vehicle. Floor mats mustbe properly secured to both retention poststo make sure mats do not shift out ofposition.
Never place floor mats or any othercovering in the vehicle foot well thatcannot be properly secured toprevent them from moving and interferingwith the pedals or the ability to control thevehicle.
219
Expedition (TB7) Canada/United States of America, enUSA, Edition date: 03/2016, First Printing
Driving HintsE176913
Page 238 of 500
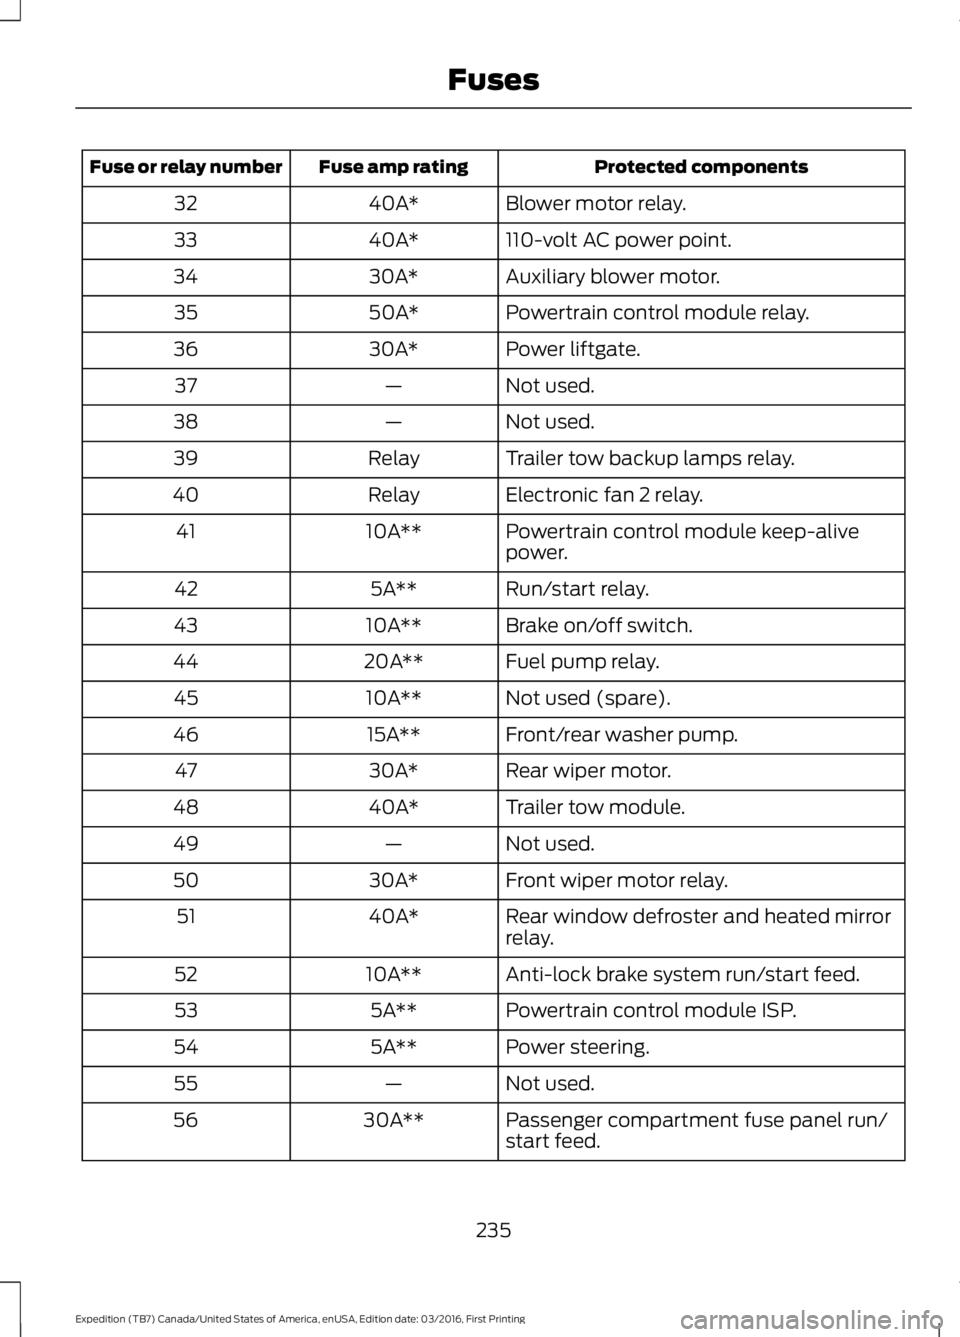
Protected componentsFuse amp ratingFuse or relay number
Blower motor relay.40A*32
110-volt AC power point.40A*33
Auxiliary blower motor.30A*34
Powertrain control module relay.50A*35
Power liftgate.30A*36
Not used.—37
Not used.—38
Trailer tow backup lamps relay.Relay39
Electronic fan 2 relay.Relay40
Powertrain control module keep-alivepower.10A**41
Run/start relay.5A**42
Brake on/off switch.10A**43
Fuel pump relay.20A**44
Not used (spare).10A**45
Front/rear washer pump.15A**46
Rear wiper motor.30A*47
Trailer tow module.40A*48
Not used.—49
Front wiper motor relay.30A*50
Rear window defroster and heated mirrorrelay.40A*51
Anti-lock brake system run/start feed.10A**52
Powertrain control module ISP.5A**53
Power steering.5A**54
Not used.—55
Passenger compartment fuse panel run/start feed.30A**56
235
Expedition (TB7) Canada/United States of America, enUSA, Edition date: 03/2016, First Printing
Fuses
Page 242 of 500
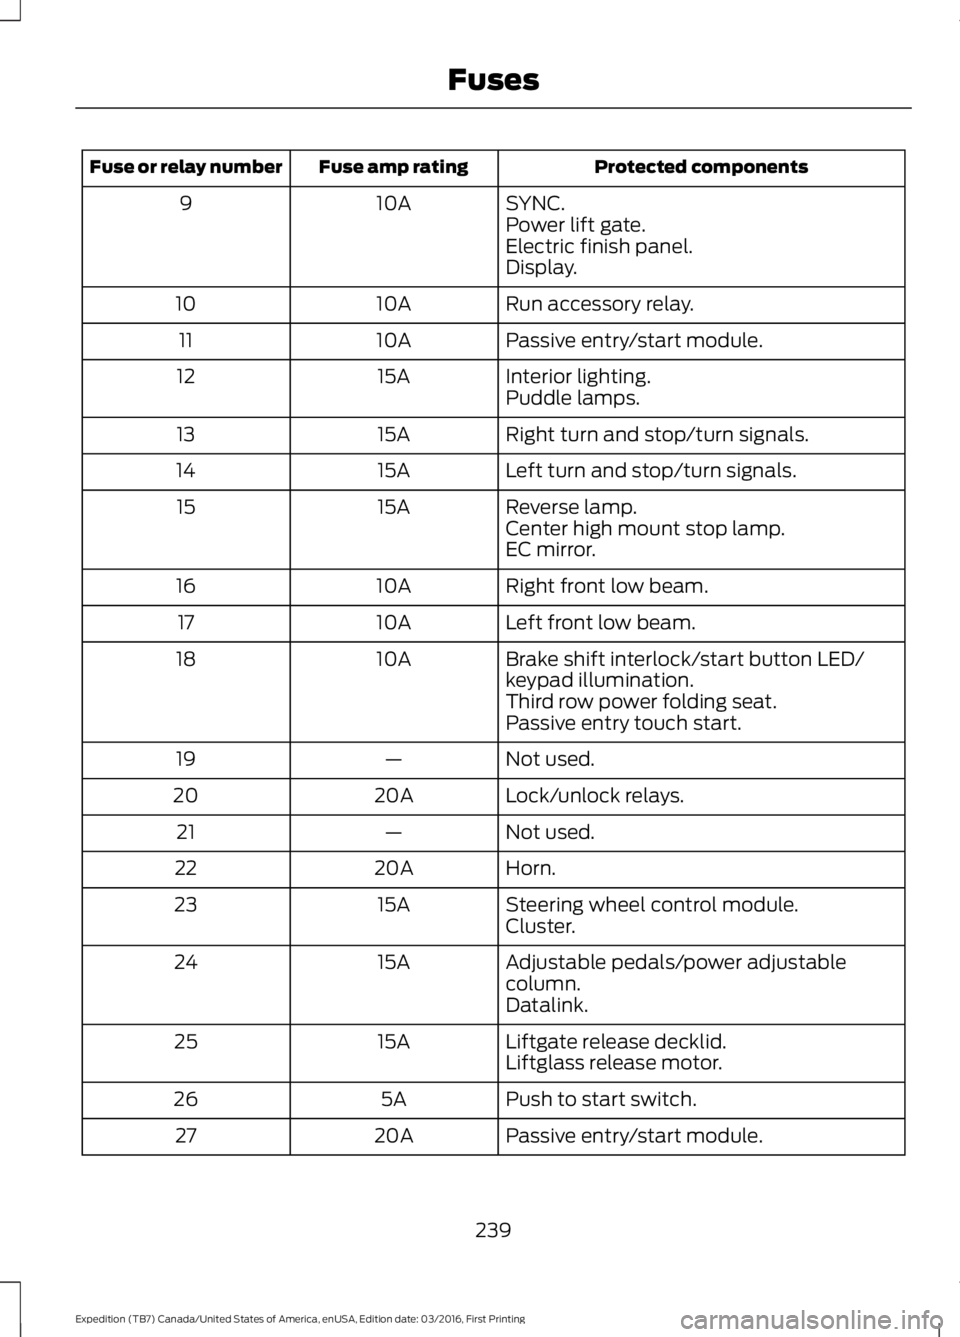
Protected componentsFuse amp ratingFuse or relay number
SYNC.10A9Power lift gate.Electric finish panel.Display.
Run accessory relay.10A10
Passive entry/start module.10A11
Interior lighting.15A12Puddle lamps.
Right turn and stop/turn signals.15A13
Left turn and stop/turn signals.15A14
Reverse lamp.15A15Center high mount stop lamp.EC mirror.
Right front low beam.10A16
Left front low beam.10A17
Brake shift interlock/start button LED/keypad illumination.10A18
Third row power folding seat.Passive entry touch start.
Not used.—19
Lock/unlock relays.20A20
Not used.—21
Horn.20A22
Steering wheel control module.15A23Cluster.
Adjustable pedals/power adjustablecolumn.15A24
Datalink.
Liftgate release decklid.15A25Liftglass release motor.
Push to start switch.5A26
Passive entry/start module.20A27
239
Expedition (TB7) Canada/United States of America, enUSA, Edition date: 03/2016, First Printing
Fuses
Page 249 of 500
Do not use supplemental engine oiladditives because they are unnecessaryand could lead to engine damage that maynot be covered by the vehicle Warranty.
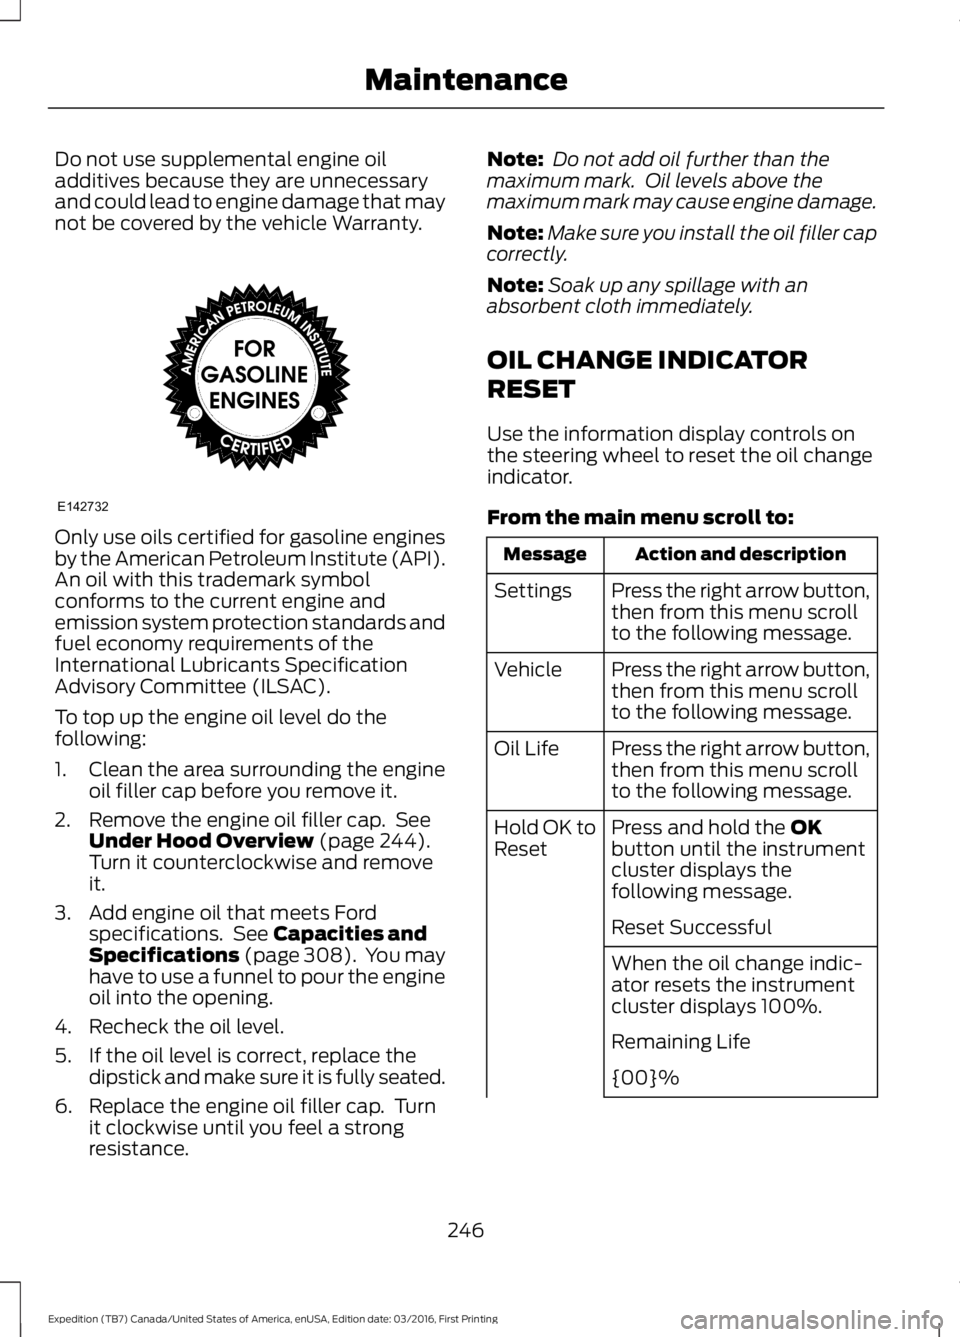
Only use oils certified for gasoline enginesby the American Petroleum Institute (API).An oil with this trademark symbolconforms to the current engine andemission system protection standards andfuel economy requirements of theInternational Lubricants SpecificationAdvisory Committee (ILSAC).
To top up the engine oil level do thefollowing:
1. Clean the area surrounding the engineoil filler cap before you remove it.
2. Remove the engine oil filler cap. SeeUnder Hood Overview (page 244).Turn it counterclockwise and removeit.
3. Add engine oil that meets Fordspecifications. See Capacities andSpecifications (page 308). You mayhave to use a funnel to pour the engineoil into the opening.
4. Recheck the oil level.
5. If the oil level is correct, replace thedipstick and make sure it is fully seated.
6. Replace the engine oil filler cap. Turnit clockwise until you feel a strongresistance.
Note: Do not add oil further than themaximum mark. Oil levels above themaximum mark may cause engine damage.
Note:Make sure you install the oil filler capcorrectly.
Note:Soak up any spillage with anabsorbent cloth immediately.
OIL CHANGE INDICATOR
RESET
Use the information display controls onthe steering wheel to reset the oil changeindicator.
From the main menu scroll to:
Action and descriptionMessage
Press the right arrow button,then from this menu scrollto the following message.
Settings
Press the right arrow button,then from this menu scrollto the following message.
Vehicle
Press the right arrow button,then from this menu scrollto the following message.
Oil Life
Press and hold the OKbutton until the instrumentcluster displays thefollowing message.
Hold OK toReset
Reset Successful
When the oil change indic-ator resets the instrumentcluster displays 100%.
Remaining Life
{00}%
246
Expedition (TB7) Canada/United States of America, enUSA, Edition date: 03/2016, First Printing
MaintenanceE142732