2017 FORD EXPEDITION EL flat tire
[x] Cancel search: flat tirePage 295 of 500
TIRE PRESSURE MONITORING
SYSTEM
WARNING
The tire pressure monitoring systemis not a substitute for manuallychecking tire pressures. You shouldperiodically check tire pressures using apressure gauge. Failure to correctlymaintain tire pressures could increase therisk of tire failure, loss of control, vehiclerollover and personal injury.
Each tire, including the spare (ifprovided), should be checkedmonthly when cold and inflatedto the inflation pressure recommended bythe vehicle manufacturer on the vehicleplacard or tire inflation pressure label. (Ifyour vehicle has tires of a different sizethan the size indicated on the vehicleplacard or tire inflation pressure label, youshould determine the proper tire inflationpressure for those tires.)
As an added safety feature, your vehiclehas been equipped with a Tire PressureMonitoring System (TPMS) thatilluminates a low tire pressure telltalewhen one or more of your tires issignificantly under-inflated. Accordingly,when the low tire pressure telltaleilluminates, you should stop and checkyour tires as soon as possible, and inflatethem to the proper pressure. Driving on asignificantly under-inflated tire causes thetire to overheat and can lead to tire failure.Under-inflation also reduces fuel efficiencyand tire tread life, and may affect thevehicle’s handling and stopping ability.
Please note that the TPMS is not asubstitute for proper tire maintenance, andit is the driver’s responsibility to maintaincorrect tire pressure, even if under-inflationhas not reached the level to triggerillumination of the TPMS low tire pressuretelltale.
Your vehicle has also been equipped witha TPMS malfunction indicator to indicatewhen the system is not operating properly.The TPMS malfunction indicator iscombined with the low tire pressuretelltale. When the system detects amalfunction, the telltale will flash forapproximately one minute and then remaincontinuously illuminated. This sequencewill continue upon subsequent vehiclestart-ups as long as the malfunction exists.
When the malfunction indicator isilluminated, the system may not be ableto detect or signal low tire pressure asintended. TPMS malfunctions may occurfor a variety of reasons, including theinstallation of replacement or alternatetires or wheels on the vehicle that preventthe TPMS from functioning properly.Always check the TPMS malfunctiontelltale after replacing one or more tires orwheels on your vehicle to ensure that thereplacement or alternate tires and wheelsallow the TPMS to continue to functionproperly.
The tire pressure monitoring systemcomplies with part 15 of the FCC rules andwith RSS-210 of Industry Canada.Operation is subject to the following twoconditions: (1) This device may not causeharmful interference, and (2) This devicemust accept any interference received,including interference that may causeundesired operation.
292
Expedition (TB7) Canada/United States of America, enUSA, Edition date: 03/2016, First Printing
Wheels and Tires
Page 296 of 500

This device complies with part 15 of theFCC Rules and with Licence exempt RSSStandards of Industry Canada. Operationis subject to the following two conditions:
•This device may not cause harmfulinterference.
•This device must accept anyinterference received, includinginterference that may cause undesiredoperation.
Changing Tires With a TirePressure Monitoring System
Note:Each road tire is equipped with a tirepressure sensor located inside the wheeland tire assembly cavity. The pressuresensor is attached to the valve stem. Thepressure sensor is covered by the tire and isnot visible unless the tire is removed. Takecare when changing the tire to avoiddamaging the sensor.
You should always have your tires servicedby an authorized dealer.
Check the tire pressure periodically (atleast monthly) using an accurate tiregauge. See Inflating Your Tires in thischapter.
Understanding Your Tire PressureMonitoring System
The tire pressure monitoring systemmeasures pressure in your four road tiresand sends the tire pressure readings toyour vehicle.
The low tire pressure warning light will turnon if the tire pressure is significantly low.Once the light is illuminated, your tires areunder-inflated and need to be inflated tothe manufacturer’s recommended tirepressure. Even if the light turns on and ashort time later turns off, your tire pressurestill needs to be checked.
When Your Temporary Spare Tire isInstalled
When one of your road tires needs to bereplaced with the temporary spare, thesystem will continue to identify an issue toremind you that the damaged road wheeland tire assembly needs to be repaired andput back on your vehicle.
To restore the full function of the tirepressure monitoring system, have thedamaged road wheel and tire assemblyrepaired and remounted on your vehicle.
When You Believe Your System is NotOperating Properly
The main function of the tire pressuremonitoring system is to warn you whenyour tires need air. It can also warn you inthe event the system is no longer capableof functioning as intended. See thefollowing chart for information concerningyour tire pressure monitoring system:
293
Expedition (TB7) Canada/United States of America, enUSA, Edition date: 03/2016, First Printing
Wheels and TiresE142549
Page 297 of 500

Customer action requiredPossible causeLow tire pressurewarning light
Make sure tires are at the proper pres-sure. See Inflating your tires in thischapter. After inflating your tires to themanufacturer’s recommended pressureas shown on the Tire Label (located onthe edge of driver’s door or the B-Pillar),the vehicle must be driven for at leasttwo minutes over 20 mph (32 km/h)before the light turns off.
Tire(s) under-inflatedSolid warning light
Repair the damaged road wheel and tireassembly and reinstall it on the vehicleto restore system function. For adescription on how the system functions,see When your temporary spare tireis installed in this section.
Spare tire in use
If the tires are properly inflated and thespare tire is not in use but the lightremains on, contact your authorizeddealer as soon as possible.
Tire pressure monitoringsystem malfunction
On vehicles with different front and reartire pressures, the system must beretrained following every tire rotation.See Tire Care (page 276).
Tire rotation withoutsensor training
Repair the damaged road wheel and tireassembly and reinstall it on the vehicleto restore system function. For adescription on how the system functions,see When your temporary spare tireis installed in this section.
Spare tire in useFlashing warninglight
If the tires are properly inflated and thespare tire is not in use but the lightremains on, contact your authorizeddealer as soon as possible.
Tire pressure monitoringsystem malfunction
294
Expedition (TB7) Canada/United States of America, enUSA, Edition date: 03/2016, First Printing
Wheels and Tires
Page 298 of 500
When Inflating Your Tires
When putting air into your tires (such as ata gas station or in your garage), the tirepressure monitoring system may notrespond immediately to the air added toyour tires.
It may take up to two minutes of drivingover 20 mph (32 km/h) for the light to turnoff after you have filled your tires to therecommended inflation pressure.
How Temperature Affects Your TirePressure
The tire pressure monitoring systemmonitors tire pressure in each pneumatictire. While driving in a normal manner, atypical passenger tire inflation pressuremay increase about 2 to 4 psi (14 to 28kPa) from a cold start situation. If thevehicle is stationary overnight with theoutside temperature significantly lowerthan the daytime temperature, the tirepressure may decrease about 3 psi (21kPa) for a drop of 30°F (17°C) in ambienttemperature. This lower pressure valuemay be detected by the tire pressuremonitoring system as being significantlylower than the recommended inflationpressure and activate the system warninglight for low tire pressure.
If the low tire pressure warning light is on,visually check each tire to verify that no tireis flat. If one or more tires are flat, repair asnecessary. Check the air pressure in theroad tires. If any tire is under-inflated,carefully drive the vehicle to the nearestlocation where air can be added to thetires. Inflate all the tires to therecommended inflation pressure.
Tire Pressure Monitoring System ResetProcedure
WARNING
To determine the requiredpressure(s) for your vehicle, see theSafety Compliance CertificationLabel (on the door hinge pillar, door-latchpost or the door edge that meets thedoor-latch post, next to the driver seat) orthe Tire Label on the B-Pillar or the edgeof the driver door.
Note:You need to perform the tire pressuremonitoring system reset procedure aftereach tire rotation on vehicles that requiredifferent recommended tire pressures in thefront tires as compared to the rear tires.
Overview
To provide the vehicle's load carryingcapability, some vehicles require differentrecommended tire pressures in the fronttires as compared to the rear tires. The tirepressure monitoring system equipped onthese vehicles is designed to illuminate thelow tire pressure warning light at twodifferent pressures; one for the front tiresand one for the rear tires.
Since tires need to be rotated to provideconsistent performance and maximum tirelife, the tire pressure monitoring systemneeds to know when the tires are rotatedto determine which set of tires are on thefront and which are on the rear. With thisinformation, the system can detect andproperly warn of low tire pressures.
System reset tips:
295
Expedition (TB7) Canada/United States of America, enUSA, Edition date: 03/2016, First Printing
Wheels and Tires
Page 300 of 500

11.Set all four tires to the recommendedair pressure as indicated on theSafety Compliance CertificationLabel (affixed to either the door hingepillar, door-latch post, or the dooredge that meets the door-latch post,next to the driver's seating position)or Tire Label located on the B-Pillaror the edge of the driver's door.
CHANGING A ROAD WHEEL
WARNINGS
The use of tire sealant may damageyour tire pressure monitoring systemand should only be used in roadsideemergencies. If you must use a sealant, theFord Tire Mobility Kit sealant should beused. The tire pressure monitoring systemsensor and valve stem on the wheel mustbe replaced by an authorized dealer afteruse of the sealant.
If the tire pressure monitor sensorbecomes damaged, it will no longerfunction. See Tire PressureMonitoring System (page 292).
Note:The tire pressure monitoring systemindicator light will illuminate when the sparetire is in use. To restore the full function ofthe monitoring system, all road wheelsequipped with tire pressure monitoringsensors must be mounted on this vehicle.
If you get a flat tire while driving, do notapply the brake heavily. Instead, graduallydecrease your speed. Hold the steeringwheel firmly and slowly move to a safeplace on the side of the road.
Have a flat serviced by an authorizeddealer in order to prevent damage to thesystem sensors See Tire PressureMonitoring System (page 292). Replacethe spare tire with a road tire as soon aspossible. During repairing or replacing ofthe flat tire, have the authorized dealerinspect the system sensor for damage.
Dissimilar Spare Wheel and TireAssembly Information
WARNING
Failure to follow these guidelinescould result in an increased risk ofloss of vehicle control, injury or death.
If you have a dissimilar spare wheel andtire, then it is intended for temporary useonly. This means that if you need to use it,you should replace it as soon as possiblewith a road wheel and tire assembly thatis the same size and type as the road tiresand wheels that were originally providedby Ford. If the dissimilar spare tire or wheelis damaged, it should be replaced ratherthan repaired.
A dissimilar spare wheel and tire assemblyis defined as a spare wheel and tireassembly that is different in brand, size orappearance from the road tires and wheelsand can be one of three types:
1.T-type mini-spare: This spare tirebegins with the letter T for tire size andmay have Temporary Use Only molded inthe sidewall.
2.Full-size dissimilar spare with labelon wheel: This spare tire has a label onthe wheel that states: THIS WHEEL ANDTIRE ASSEMBLY FOR TEMPORARY USEONLY
297
Expedition (TB7) Canada/United States of America, enUSA, Edition date: 03/2016, First Printing
Wheels and Tires
Page 304 of 500
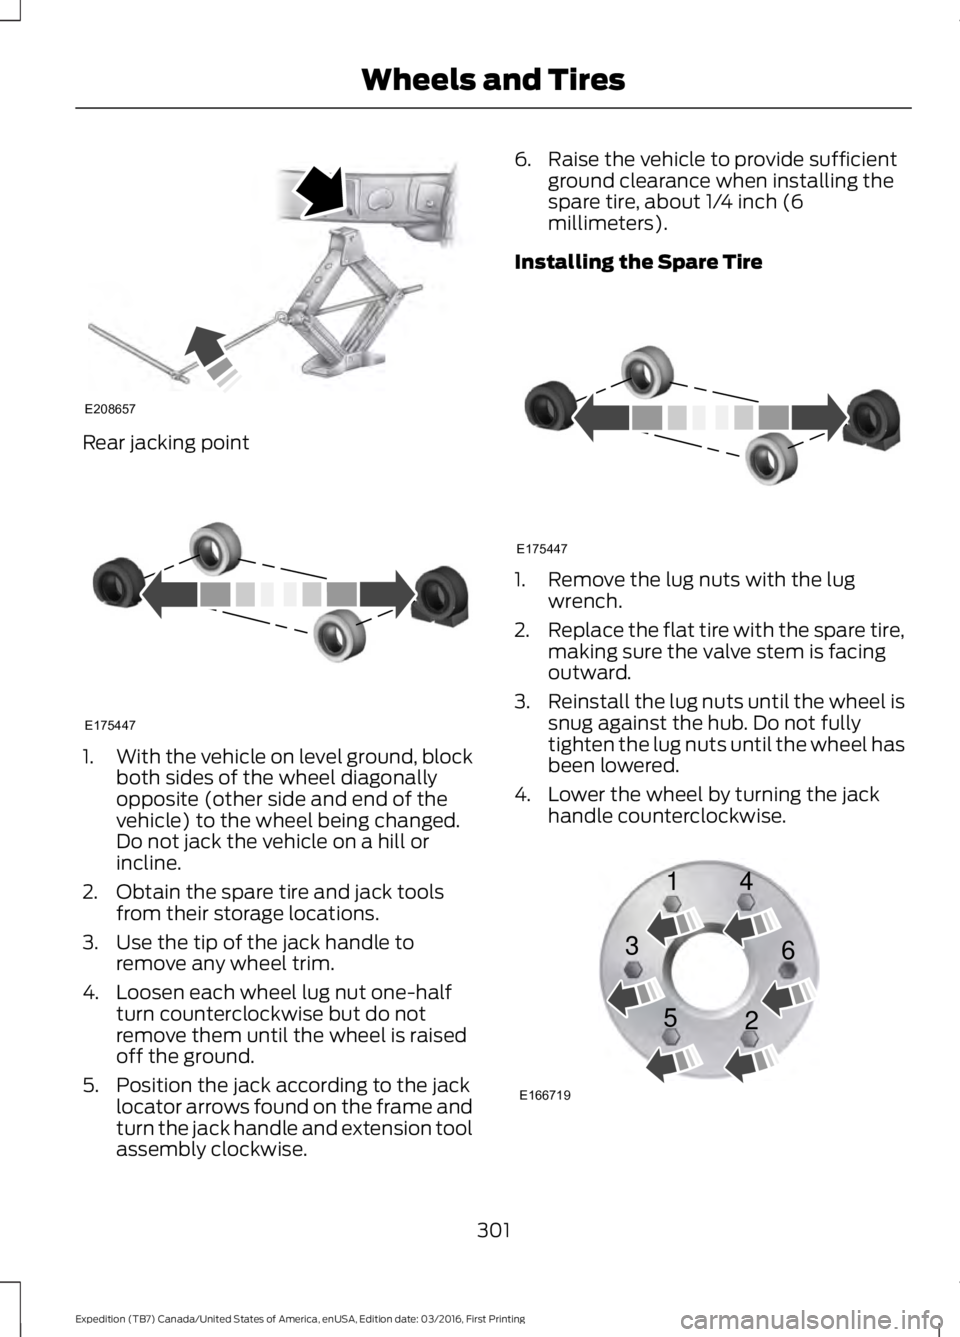
Rear jacking point
1.With the vehicle on level ground, blockboth sides of the wheel diagonallyopposite (other side and end of thevehicle) to the wheel being changed.Do not jack the vehicle on a hill orincline.
2. Obtain the spare tire and jack toolsfrom their storage locations.
3. Use the tip of the jack handle toremove any wheel trim.
4. Loosen each wheel lug nut one-halfturn counterclockwise but do notremove them until the wheel is raisedoff the ground.
5. Position the jack according to the jacklocator arrows found on the frame andturn the jack handle and extension toolassembly clockwise.
6. Raise the vehicle to provide sufficientground clearance when installing thespare tire, about 1/4 inch (6millimeters).
Installing the Spare Tire
1. Remove the lug nuts with the lugwrench.
2.Replace the flat tire with the spare tire,making sure the valve stem is facingoutward.
3.Reinstall the lug nuts until the wheel issnug against the hub. Do not fullytighten the lug nuts until the wheel hasbeen lowered.
4. Lower the wheel by turning the jackhandle counterclockwise.
301
Expedition (TB7) Canada/United States of America, enUSA, Edition date: 03/2016, First Printing
Wheels and TiresE208657 E175447 E175447 E166719
1
3
5 4
6
2
Page 305 of 500
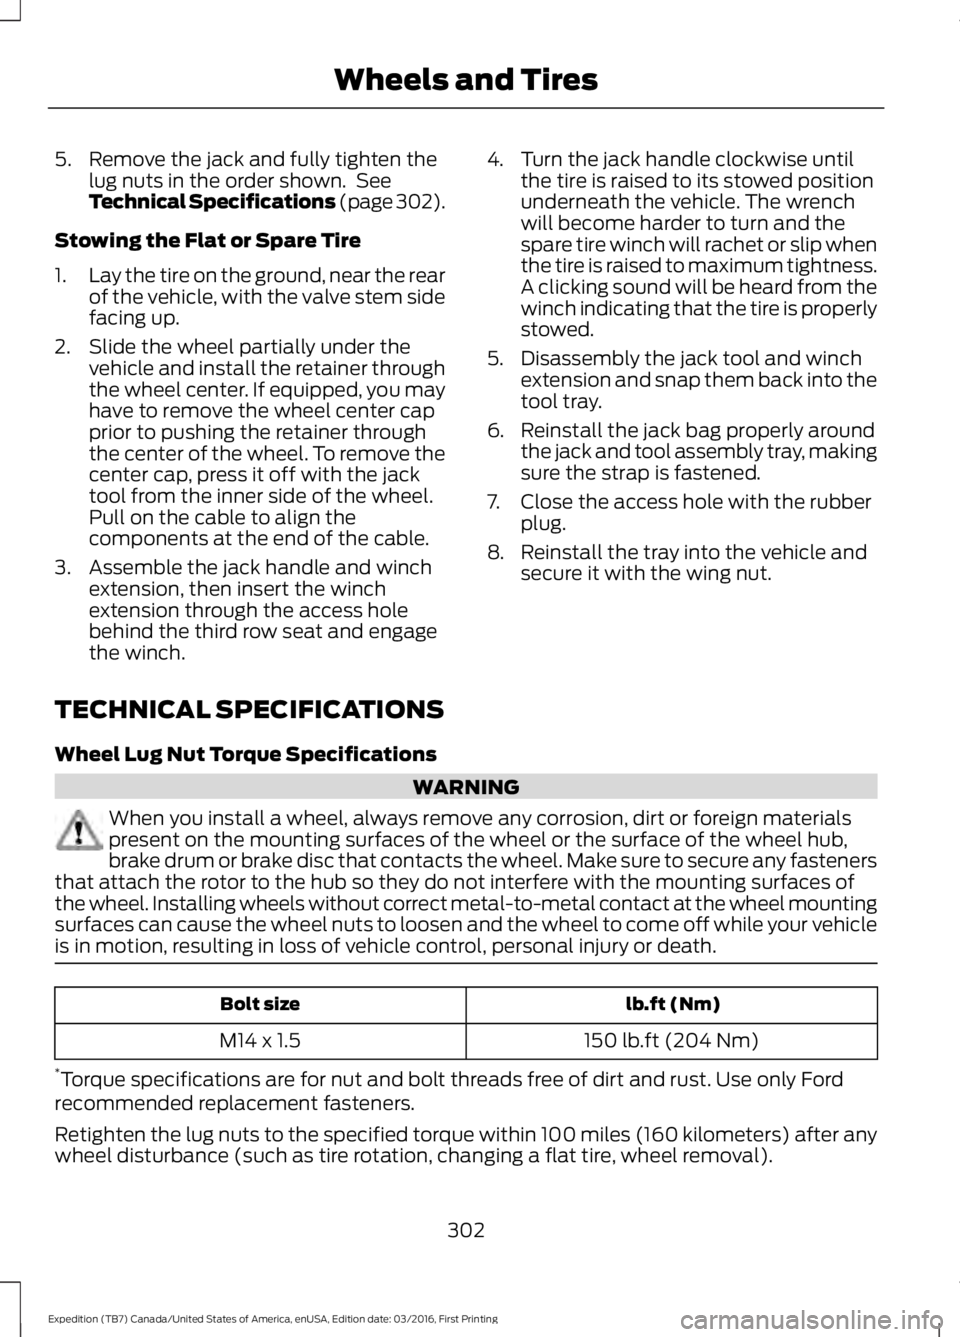
5. Remove the jack and fully tighten thelug nuts in the order shown. SeeTechnical Specifications (page 302).
Stowing the Flat or Spare Tire
1.Lay the tire on the ground, near the rearof the vehicle, with the valve stem sidefacing up.
2. Slide the wheel partially under thevehicle and install the retainer throughthe wheel center. If equipped, you mayhave to remove the wheel center capprior to pushing the retainer throughthe center of the wheel. To remove thecenter cap, press it off with the jacktool from the inner side of the wheel.Pull on the cable to align thecomponents at the end of the cable.
3. Assemble the jack handle and winchextension, then insert the winchextension through the access holebehind the third row seat and engagethe winch.
4. Turn the jack handle clockwise untilthe tire is raised to its stowed positionunderneath the vehicle. The wrenchwill become harder to turn and thespare tire winch will rachet or slip whenthe tire is raised to maximum tightness.A clicking sound will be heard from thewinch indicating that the tire is properlystowed.
5. Disassembly the jack tool and winchextension and snap them back into thetool tray.
6. Reinstall the jack bag properly aroundthe jack and tool assembly tray, makingsure the strap is fastened.
7. Close the access hole with the rubberplug.
8. Reinstall the tray into the vehicle andsecure it with the wing nut.
TECHNICAL SPECIFICATIONS
Wheel Lug Nut Torque Specifications
WARNING
When you install a wheel, always remove any corrosion, dirt or foreign materialspresent on the mounting surfaces of the wheel or the surface of the wheel hub,brake drum or brake disc that contacts the wheel. Make sure to secure any fastenersthat attach the rotor to the hub so they do not interfere with the mounting surfaces ofthe wheel. Installing wheels without correct metal-to-metal contact at the wheel mountingsurfaces can cause the wheel nuts to loosen and the wheel to come off while your vehicleis in motion, resulting in loss of vehicle control, personal injury or death.
lb.ft (Nm)Bolt size
150 lb.ft (204 Nm)M14 x 1.5
*Torque specifications are for nut and bolt threads free of dirt and rust. Use only Fordrecommended replacement fasteners.
Retighten the lug nuts to the specified torque within 100 miles (160 kilometers) after anywheel disturbance (such as tire rotation, changing a flat tire, wheel removal).
302
Expedition (TB7) Canada/United States of America, enUSA, Edition date: 03/2016, First Printing
Wheels and Tires
Page 444 of 500
PROTECT YOURSELF FROM THE RISINGCOST OF VEHICLE REPAIRS WITH A FORDPROTECT EXTENDED SERVICE PLAN.
Ford Protect Extended ServicePlans (U.S. Only)
Ford Protect means peace of mind. It’s theextended service plan backed by FordMotor Company, and provides moreprotection beyond the New Vehicle LimitedWarranty coverage. When you visit yourFord Dealer, Insist on genuine Ford Protectextended service plans!
Ford Protect Can Quickly Pay for Itself
One trip to the Service Center could easilyexceed the price of your Ford ProtectExtended Service Plan. With Ford Protectyou minimize your risk for unexpectedrepair bills and rising repair costs.
Up to 1,000+ Covered VehicleComponents
There are four mechanical Ford Protectwith different levels of coverage. Ask yourauthorized dealer for details.
1. PremiumCARE - Our mostcomprehensive coverage. With over1,000 covered components, this planis so complete it’s probably easier tolist what’s not covered.
2. ExtraCARE - Covers 113 components,and includes many high-tech items.
3. BaseCARE - Covers 84 components.
4. PowertrainCARE - Covers 29 criticalcomponents.
Ford Protect Extended Service Plans arehonored by all authorized Ford dealers inthe U.S., Canada and Mexico.
That means you get:
•Reliable, quality service at any Ford orLincoln dealership.
•Repairs performed by factory trainedtechnicians, using genuine parts.
Rental Car Reimbursement
1st day Rental Benefit
If you bring your car into your dealer forservice, we’ll give you a loaner to use forthe day.
Extended Rental Benefits
If your vehicle is kept overnight for coveredrepairs, you are eligible for rental carcoverage, including bumper to bumperwarranty repairs, and Field Service Actions.
Roadside Assistance
Exclusive 24/7 roadside assistance,including:
•Towing, flat-tire change and batteryjump starts.
•Out of fuel and lock-out assistance.
•Travel expense reimbursement forlodging, meals and rental car.
•Assistance for taxi, shuttle, rental carcoverage or other transportation.
Transferable Coverage
If you sell your vehicle before your FordProtect plan coverage expires, you cantransfer any remaining coverage to the newowner. Which should give you and yourpotential buyer a little more peace of mind.
441
Expedition (TB7) Canada/United States of America, enUSA, Edition date: 03/2016, First Printing
Ford Protect