2017 FORD EXPEDITION EL trailer
[x] Cancel search: trailerPage 163 of 500

Second (2)
Transmission operates in second (2) gearonly. Use second (2) gear to start-up onslippery roads.
First (1)
•Transmission operates in first (1) gearonly.
•Provides maximum engine braking.
•Allows upshifts by moving gearshiftlever.
•Will not downshift into first (1) gear athigh speeds; allows for first (1) gearwhen vehicle reaches slower speeds.
Tow/Haul Mode
WARNING
Do not use the tow/haul featurewhen driving in icy or slipperyconditions as the increased enginebraking can cause the rear wheels to slideand your vehicle to swing around with thepossible loss of vehicle control.
To activate tow/haul, press thebutton on the gearshift leveronce. The TOW HAUL indicatorlight will illuminate in the instrumentcluster.
The tow/haul feature:
•Delays upshifts to reduce the frequencyof transmission shifting.
•Provides engine braking in all forwardgears, which will slow your vehicle andassist you in controlling your vehiclewhen descending a grade.
•Depending on driving conditions andload conditions, may downshift thetransmission, slow your vehicle andcontrol your vehicle speed whendescending a hill, without pressing theaccelerator pedal. The amount ofdownshift braking provided will varybased upon the amount the brakepedal is pressed.
The tow/haul feature improvestransmission operation when towing atrailer or a heavy load. All transmissiongear ranges are available when usingtow/haul.
To deactivate the tow/haul feature andreturn to normal driving mode, press thebutton on the gearshift lever twice. TheTOW HAUL light will deactivate. Tow/haulwill also deactivate when you power downyour vehicle.
Forced Downshifts
•Allowed in drive (D) with the tow/haulfeature on or off.
•Press the accelerator to the floor.
•Allows transmission to select anappropriate gear.
160
Expedition (TB7) Canada/United States of America, enUSA, Edition date: 03/2016, First Printing
TransmissionE161509
Page 177 of 500

PARKING BRAKE
WARNING
Always set the parking brake fullyand make sure the transmission isplaced in park (P). Failure to set theparking brake and engage park could resultin vehicle roll-away, property damage orbodily injury. Turn the ignition to the lockposition and remove the key whenever youleave your vehicle.
Apply the parking brake whenever yourvehicle is parked. Press the pedaldownward to set the parking brake. Thebrake warning lamp in the instrumentcluster will illuminate and remainsilluminated until the parking brake isreleased.
To release, pull the brake release leverlocated at the lower left side of theinstrument panel.
If you are parking your vehicle on a gradeor with a trailer, press and hold the brakepedal down, then set the parking brake.There may be a little vehicle movement asthe parking brake sets to hold the vehicle'sweight. This is normal and should be noreason for concern. If needed, press andhold the service brake pedal down, thentry reapplying the parking brake. Chock thewheels if required. If the parking brakecannot hold the weight of the vehicle, theparking brake may need to be serviced orthe vehicle may be overloaded.
HILL START ASSIST
WARNINGS
The system does not replace theparking brake. When you leave yourvehicle, always apply the parkingbrake and shift the transmission into park(P) (automatic transmission) or first gear(1) (manual transmission).
WARNINGS
You must remain in your vehicle onceyou have activated the system.
During all times, you are responsiblefor controlling your vehicle,supervising the system andintervening, if required.
If the engine is revved excessively, orif a malfunction is detected, thesystem will be deactivated.
The system makes it easier to pull awaywhen your vehicle is on a slope without theneed to use the parking brake.
When the system is active, your vehicle willremain stationary on the slope for two tothree seconds after you release the brakepedal. This allows you time to move yourfoot from the brake to the acceleratorpedal. The brakes release automaticallywhen the engine has sufficient torque toprevent your vehicle from rolling down thegrade. This is an advantage when pullingaway on a slope, for example from a carpark ramp, traffic lights or when reversinguphill into a parking space.
The system will activate automatically onany slope that will cause significant vehiclerollback. For vehicles with a manualtransmission, you can switch this featureoff using the information display. SeeInformation Displays (page 91). Thesystem will remain on or off depending onhow it was last set.
Note:There is no warning lamp to indicatethe system is either on or off.
Note:If your vehicle is equipped with AutoHold, Hill Start Assist will not be availablewhile Auto Hold is active.
174
Expedition (TB7) Canada/United States of America, enUSA, Edition date: 03/2016, First Printing
Brakes
Page 185 of 500

PRINCIPLE OF OPERATION
WARNINGS
To help avoid personal injury, pleaseread and understand the limitationsof the system as contained in thissection. Sensing is only an aid for some(generally large and fixed) objects whenmoving on a flat surface at parking speeds.Certain objects with surfaces that absorbultrasonic waves, surrounding vehicle'sparking aid systems, traffic controlsystems, fluorescent lamps, inclementweather, air brakes, and external motorsand fans may also affect the function ofthe sensing system; this may includereduced performance or a false activation.
To help avoid personal injury, alwaysuse caution when in reverse (R) andwhen using the sensing system.
This system is not designed toprevent contact with small or movingobjects. The system is designed toprovide a warning to assist the driver indetecting large stationary objects to avoiddamaging your vehicle. The system maynot detect smaller objects, particularlythose close to the ground.
Certain add-on devices such as largetrailer hitches, bike or surfboard racksand any device that may block thenormal detection zone of the system, maycreate false beeps.
Note:Keep the sensors, located on thebumper or fascia, free from snow, ice andlarge accumulations of dirt. If the sensorsare covered, the system’s accuracy can beaffected. Do not clean the sensors withsharp objects.
Note:If your vehicle sustains damage tothe bumper or fascia, leaving it misalignedor bent, the sensing zone may be alteredcausing inaccurate measurement ofobstacles or false alarms.
Note:The sensing system cannot be turnedoff when a MyKey is present. See Principleof Operation (page 47).
Note:If you attach certain add-on devicessuch as a trailer or bike rack, the rear sensingsystem may detect that add-on device andtherefore provide warnings. It is suggestedthat you disable the rear sensing systemwhen you attach an add-on device to yourvehicle to prevent these warnings.
The sensing system warns the driver ofobstacles within a certain range of yourvehicle. The system turns on automaticallywhenever you switch the ignition on.
You can turn the system on oroff by pressing the parking aidbutton. If your vehicle does nothave a parking aid button, the system canbe switched off through the informationdisplay menu or from the pop-up messagethat appears once you shift thetransmission into reverse (R). See GeneralInformation (page 91).
If a fault is present in the system, a warningmessage appears in the informationdisplay. See Information Messages(page 102).
REAR PARKING AID (If Equipped)
The rear sensors are only active when thetransmission is in reverse (R). As yourvehicle moves closer to the obstacle, therate of the audible warning increases.When the obstacle is less than 12 in(30 cm) away, the warning soundscontinuously. If the system detects astationary or receding object farther than12 in (30 cm) from the corners of thebumper, the tone sounds for only threeseconds. Once the system detects anobject approaching, the warning soundsagain.
182
Expedition (TB7) Canada/United States of America, enUSA, Edition date: 03/2016, First Printing
Parking AidsE139213
Page 188 of 500

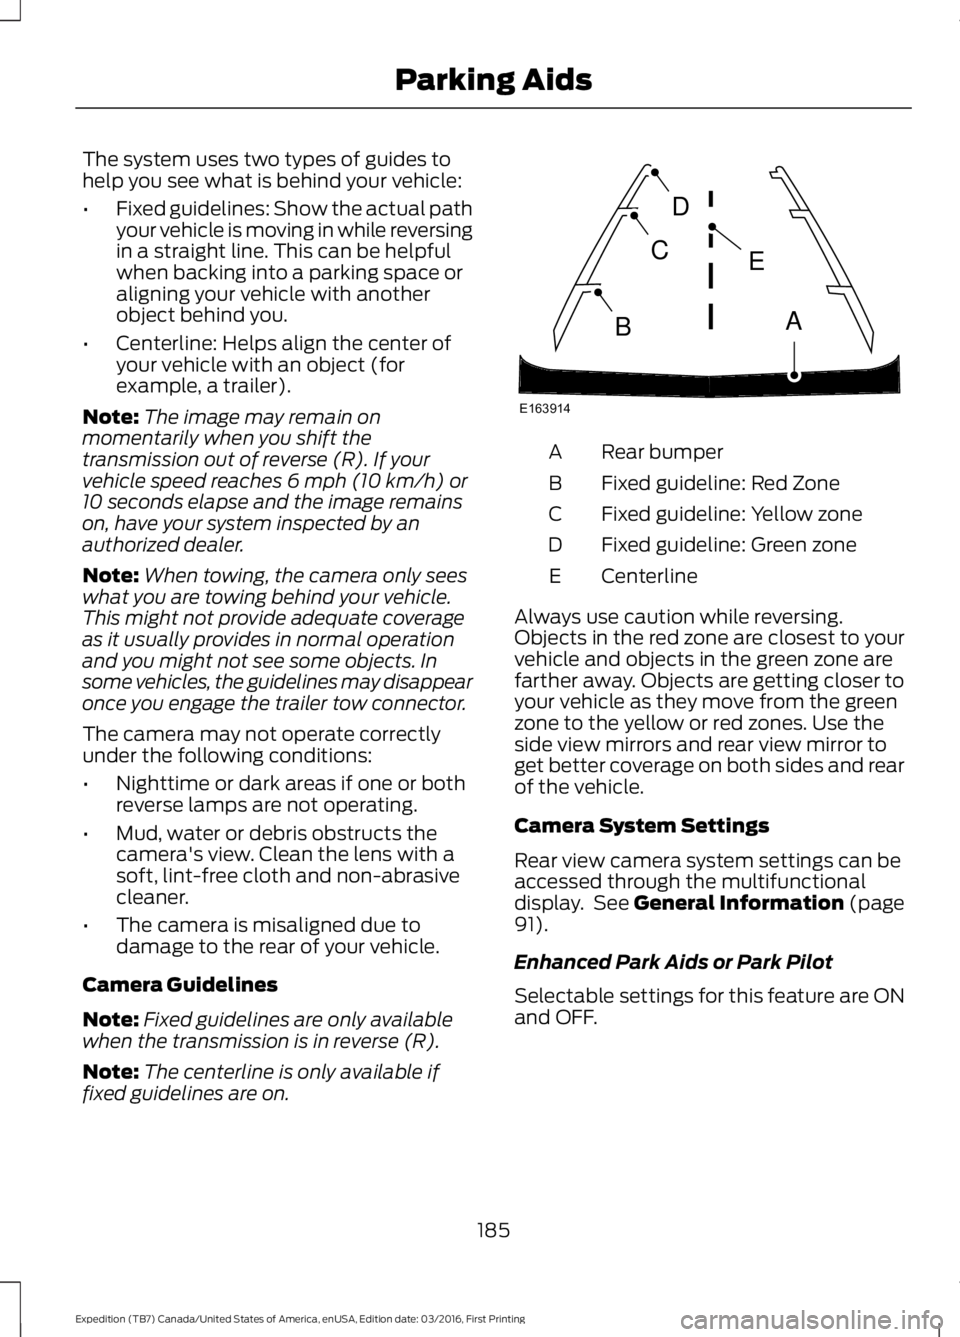
The system uses two types of guides tohelp you see what is behind your vehicle:
•Fixed guidelines: Show the actual pathyour vehicle is moving in while reversingin a straight line. This can be helpfulwhen backing into a parking space oraligning your vehicle with anotherobject behind you.
•Centerline: Helps align the center ofyour vehicle with an object (forexample, a trailer).
Note:The image may remain onmomentarily when you shift thetransmission out of reverse (R). If yourvehicle speed reaches 6 mph (10 km/h) or10 seconds elapse and the image remainson, have your system inspected by anauthorized dealer.
Note:When towing, the camera only seeswhat you are towing behind your vehicle.This might not provide adequate coverageas it usually provides in normal operationand you might not see some objects. Insome vehicles, the guidelines may disappearonce you engage the trailer tow connector.
The camera may not operate correctlyunder the following conditions:
•Nighttime or dark areas if one or bothreverse lamps are not operating.
•Mud, water or debris obstructs thecamera's view. Clean the lens with asoft, lint-free cloth and non-abrasivecleaner.
•The camera is misaligned due todamage to the rear of your vehicle.
Camera Guidelines
Note:Fixed guidelines are only availablewhen the transmission is in reverse (R).
Note:The centerline is only available iffixed guidelines are on.
Rear bumperA
Fixed guideline: Red ZoneB
Fixed guideline: Yellow zoneC
Fixed guideline: Green zoneD
CenterlineE
Always use caution while reversing.Objects in the red zone are closest to yourvehicle and objects in the green zone arefarther away. Objects are getting closer toyour vehicle as they move from the greenzone to the yellow or red zones. Use theside view mirrors and rear view mirror toget better coverage on both sides and rearof the vehicle.
Camera System Settings
Rear view camera system settings can beaccessed through the multifunctionaldisplay. See General Information (page91).
Enhanced Park Aids or Park Pilot
Selectable settings for this feature are ONand OFF.
185
Expedition (TB7) Canada/United States of America, enUSA, Edition date: 03/2016, First Printing
Parking AidsE163914
A
E
D
C
B
Page 195 of 500

When the blockage is removed, the systemcan be reset in two ways: 1) when at leasttwo objects are detected while driving, or2) turn the ignition key from on to off, then
back on. If the blockage is still present afterthe key cycle, the system senses again thatit is blocked after driving in traffic.
Reasons for messages being displayed
Clean the fascia area in front of the radaror remove the obstruction.The radar surface is dirty or obstructed
Drive normally in traffic for a few minutesto allow the radar to detect passingvehicles so it can clear the blocked state.
The radar surface is not dirty or obstructed
No action required. The system automatic-ally resets to an unblocked state once therainfall/snowfall rate decreases or stops.Do not use the Blind Spot InformationSystem or Cross Traffic Alert in theseconditions.
Heavy rainfall/snowfall interferes with theradar signals
System Limitations
The Blind Spot Information and CrossTraffic Alert systems do have theirlimitations; situations such as severeweather conditions or debris build-up onthe sensor area may limit vehicle detection.
The following are other situations that maylimit the Blind Spot Information System:
•Certain maneuvering of vehiclesentering and exiting the blind zone.
•Vehicles passing through the blind zoneat very fast rates.
•When several vehicles forming aconvoy pass through the blind zone.
The following are other situations that maylimit the Cross Traffic Alert:
•Adjacently parked vehicles or objectsobstructing the sensors.
•Approaching vehicles passing atspeeds greater than 15 mph (24 km/h).
•Driving in reverse faster than 3 mph(5 km/h).
•Backing out of an angled parking spot.
False Alerts
Note:If you connected a trailer to yourvehicle, the Blind Spot Information Systemmay detect the trailer causing a false alert.To avoid false alerts you may want to turnthe system off manually.
There may be certain instances wheneither the Blind Spot Information or CrossTraffic Alert systems illuminate the alertindicator with no vehicle in the coveragezone; this is known as a false alert. Someamount of false alerts are normal; they aretemporary and self-correct.
System Errors
If the system senses a problem with theleft or right sensor, the telltale willilluminate and a message will appear inthe information display. See InformationMessages (page 102).
192
Expedition (TB7) Canada/United States of America, enUSA, Edition date: 03/2016, First Printing
Driving Aids
Page 198 of 500

If the loaded vehicle is not moved forapproximately 12 hours, the leveling systemmay bleed down to a lower height. Thiscan be especially apparent if a trailer is leftattached to the parked vehicle for longperiods of time. You must drive your vehiclein order to re-level the suspension.
If a self-equalizing hitch is used, yourvehicle should be driven approximately2 mi (3.2 km) with the trailer prior toadjusting (leveling) the hitch.
195
Expedition (TB7) Canada/United States of America, enUSA, Edition date: 03/2016, First Printing
Driving Aids
Page 201 of 500

LOAD LIMIT
Vehicle Loading - with andwithout a Trailer
This section guides you in theproper loading of your vehicle,trailer, or both. Keep your loadedvehicle weight within its designrating capability, with or withouta trailer. Properly loading yourvehicle provides maximum returnof vehicle design performance.Before you load your vehicle,become familiar with thefollowing terms for determiningyour vehicle’s weight rating, withor without a trailer, from thevehicle’s Tire and LoadingInformation label or SafetyCompliance Certification label.
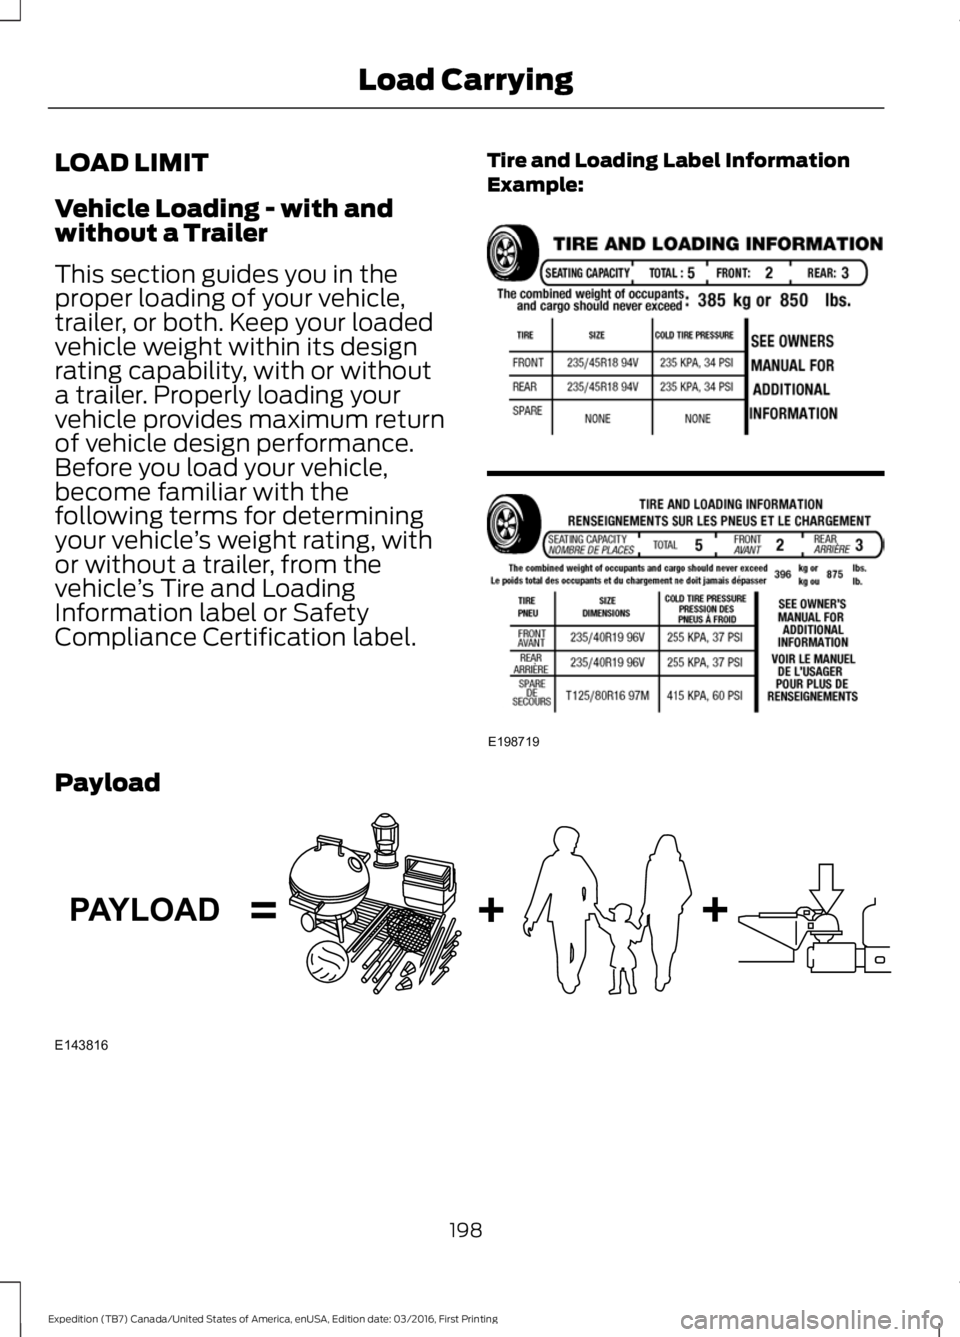
Tire and Loading Label InformationExample:
Payload
198
Expedition (TB7) Canada/United States of America, enUSA, Edition date: 03/2016, First Printing
Load CarryingE198719 E143816PAYLOAD
Page 202 of 500

Payload is the combined weightof cargo and passengers that yourvehicle is carrying. The maximumpayload for your vehicle appearson the Tire and Loading label. Thelabel is either on the B-pillar or theedge of the driver door. Vehiclesexported outside the US andCanada may not have a tire andloading label. Look for “Thecombined weight of occupantsand cargo should never exceedXXX kg OR XXX lb” for maximumpayload. The payload listed on theTire and Loading Information labelis the maximum payload for yourvehicle as built by the assemblyplant. If you install any additionalequipment on your vehicle, youmust determine the new payload.Subtract the weight of theequipment from the payload listedon the Tire and Loading label.When towing, trailer tongueweight or king pin weight is alsopart of payload.
WARNING
The appropriate loadingcapacity of your vehicle canbe limited either by volumecapacity (how much space isavailable) or by payload capacity(how much weight the vehicleshould carry). Once you havereached the maximum payload ofyour vehicle, do not add morecargo, even if there is spaceavailable. Overloading orimproperly loading your vehicle
can contribute to loss of vehiclecontrol and vehicle rollover.
GAWR (Gross Axle WeightRating)
GAWR is the maximum allowableweight that a single axle (front orrear) can carry. These numbersare on the Safety ComplianceCertification label. The label islocated on the door hinge pillar,door-latch post, or the door edgethat meets the door-latch post,next to the driver seating position.
The total load on each axle mustnever exceed its Gross AxleWeight Rating.
GVWR (Gross Vehicle WeightRating)
GVWR is the maximum allowableweight of the fully loaded vehicle.
This includes all options,equipment, passengers and cargo.It appears on the SafetyCompliance Certification label.The label is located on the doorhinge pillar, door-latch post, or thedoor edge that meets thedoor-latch post, next to the driverseating position.
The gross vehicle weight mustnever exceed the Gross VehicleWeight Rating.
199
Expedition (TB7) Canada/United States of America, enUSA, Edition date: 03/2016, First Printing
Load Carrying