2017 FORD EXPEDITION EL tow
[x] Cancel search: towPage 45 of 500

PRINCIPLE OF OPERATION
The remote control allows you to:
•Remotely lock or unlock the vehicledoors.
•Unlock the doors without actively usinga key or remote control (intelligentaccess only).
•Remotely open the power liftgate (ifequipped).
•Remotely start or stop the engine anduser pre-set features (if equipped).
•Arm and disarm the anti-theft system.
•Activate the panic alarm.
GENERAL INFORMATION ON
RADIO FREQUENCIES
This device complies with Part 15 of theFCC Rules and with Industry Canadalicense-exempt RSS standard(s).Operation is subject to the following twoconditions: (1) This device may not causeharmful interference, and (2) This devicemust accept any interference received,including interference that may causeundesired operation.
Note:Changes or modifications notexpressively approved by the partyresponsible for compliance could void theuser's authority to operate the equipment.The term IC before the radio certificationnumber only signifies that Industry Canadatechnical specifications were met.
The typical operating range for yourtransmitter is approximately 33 feet (10meters). Vehicles with the remote startfeature will have a greater range. One ofthe following could cause a decrease inoperating range:
•Weather conditions.
•Nearby radio towers.
•Structures around the vehicle.
•Other vehicles parked next to yourvehicle.
The radio frequency used by your remotecontrol can also be used by other radiotransmitters, for example amateur radios,medical equipment, wireless headphones,wireless remote controls, cell phones,battery chargers and alarm systems. If thefrequencies are jammed, you will not beable to use your remote control. You canlock and unlock the doors with the key.
Note:Make sure to lock your vehicle beforeleaving it unattended.
Note:If you are in range, the remote controlwill operate if you press any buttonunintentionally.
Intelligent Access (If Equipped)
The system uses a radio frequency signalto communicate with your vehicle andauthorize your vehicle to unlock when oneof the following conditions are met:
•You press any button on the keylessentry keypad within 3 ft (1 m) proximityof an intelligent access key.
•You press the luggage compartmentbutton.
•You press a button on the transmitter.
If excessive radio frequency interferenceis present in the area or if the transmitterbattery is low, you may need tomechanically unlock your door. You canuse the mechanical key blade in yourintelligent access key to open the driverdoor in this situation. See RemoteControl (page 43).
42
Expedition (TB7) Canada/United States of America, enUSA, Edition date: 03/2016, First Printing
Keys and Remote Controls
Page 64 of 500

PASSIVE ANTI-THEFT
SYSTEM
Note:The system is not compatible withnon-Ford aftermarket remote start systems.Use of these systems may result in vehiclestarting problems and a loss of securityprotection.
Note:Metallic objects, electronic devicesor a second coded key on the same keychain may cause vehicle starting problemsif they are too close to the key when startingthe engine. Prevent these objects fromtouching the coded key while starting theengine. Switch the ignition off, move allobjects on the key chain away from thecoded key and restart the engine if aproblem occurs.
Note:Do not leave a duplicate coded keyin the vehicle. Always take your keys andlock all doors when leaving the vehicle.
SecuriLock®
The system is an engine immobilizationsystem. It is designed to help prevent theengine from being started unless a codedkey programmed to your vehicle is used.Using the wrong key may prevent theengine from starting. A message mayappear in the information display.
If you are unable to start the engine with acorrectly coded key, a malfunction hashappened and a message may appear inthe information display.
Automatic Arming
The vehicle arms immediately after youswitch the ignition off.
Automatic Disarming
Switching the ignition on with a coded keydisarms the vehicle.
Replacement Keys
Note:Your vehicle comes equipped withtwo integrated keyhead transmitters or twointelligent access keys.
The integrated keyhead transmitterfunctions as a programmed ignition keythat operates all the locks and starts thevehicle, as well as a remote control.
The intelligent access key functions as aprogrammed key that operates the driverdoor lock and activates the intelligentaccess with push button start system, aswell as a remote control.
If your programmed transmitters orstandard SecuriLock coded keys(integrated keyhead transmitters only) arelost or stolen and you do not have an extracoded key, you will need to have yourvehicle towed to an authorized dealer. Youneed to erase the key codes from yourvehicle and program new coded keys.
Store an extra programmed key away fromthe vehicle in a safe place to help preventany inconveniences. See your authorizeddealer to purchase additional spare orreplacement keys.
Programming a Spare IntegratedKeyhead Transmitter
Note:You can program a maximum of eightcoded keys to your vehicle. All eight can beintegrated keyhead transmitters.
You can program your own integratedkeyhead transmitter or standardSecuriLock coded keys to your vehicle. Thisprocedure will program both the engineimmobilizer keycode and the remote entryportion of the remote control to yourvehicle
Only use integrated keyhead transmittersor standard SecuriLock keys.
61
Expedition (TB7) Canada/United States of America, enUSA, Edition date: 03/2016, First Printing
Security
Page 66 of 500

USING POWER RUNNING
BOARDS
WARNINGS
In extreme climates, excessive icebuildup may occur, causing therunning boards not to deploy. Makesure that the running boards havedeployed, and have finished moving beforeattempting to step on them. The runningboards will resume normal function oncethe blockage is cleared.
Turn off the running boards beforejacking or placing any object underyour vehicle. Never place your handbetween the extended running board andyour vehicle. A moving running board maycause injury.
Note:Do not use the running boards, frontand rear hinge assemblies, running boardmotors, or the running board underbodymounts to lift your vehicle when jacking.Always use proper jacking points.
Note:The running boards may operatemore slowly in cool temperatures.
Note:The running board mechanism maytrap debris such as mud, dirt, snow, ice andsalt. This may cause unwanted noise. If thishappens, manually set the running boardsto the deployed position. Then, wash thesystem, in particular the front and rear hingearms, with a high-pressure car wash wand.
Automatic Power Deploy
The running boards automatically extenddown and out when you open the door.This can help you enter and exit yourvehicle.
Automatic Power Stow
When you close the doors, the runningboards return to the stowed position aftera two-second delay.
Manual Power Deploy
You can manually operate the runningboards in the information display. SeeGeneral Information (page 91).
Set the running boards in the deployedposition to access the roof.
The running boards return to the stowedposition and enter automatic mode whenthe vehicle speed exceeds 5 mph (8 km/h).
Enabling and Disabling
You can enable and disable the powerrunning board feature in the informationdisplay. See General Information (page91).
63
Expedition (TB7) Canada/United States of America, enUSA, Edition date: 03/2016, First Printing
Power Running Boards (If Equipped)E166682
Page 67 of 500

•When disabled (OFF), the runningboards move to the stowed positionregardless of the door position.
•When enabled (AUTO), the runningboards move back to the correctpositions based on the door position.
Bounce-back
The running board will reverse directionand move to the end of travel if itencounters an object while moving.
64
Expedition (TB7) Canada/United States of America, enUSA, Edition date: 03/2016, First Printing
Power Running Boards (If Equipped)
Page 74 of 500

WINDSHIELD WIPERS
Note:Fully defrost the windshield beforeyou switch the windshield wipers on.
Note:Make sure you switch the windshieldwipers off before entering a car wash.
Note:Clean the windshield and wiperblades if they begin to leave streaks orsmears. If that does not resolve the issue,install new wiper blades. See Changingthe Wiper Blades (page 255).
Note:Do not operate the wipers on a drywindshield. This may scratch the glass,damage the wiper blades or cause the wipermotor to burn out. Always use thewindshield washers before wiping a drywindshield.
Rotate the end of the control:
•Away from you to increase the wiperspeed.
•Toward you to decrease the wiperspeed.
Speed Dependent Wipers
When your vehicle speed increases, theinterval between wipes decreases.
AUTOWIPERS (If Equipped)
Note:Fully defrost the windshield beforeswitching on the windshield wipers.
Note:Make sure you switch off thewindshield wipers before entering a carwash.
Note:Clean the windshield and wiperblades if they begin to leave streaks orsmears. If that does not resolve the issue,install new wiper blades. See Changingthe Wiper Blades (page 255).
Wet or winter driving conditions with ice,snow or salty road mist can causeinconsistent and unexpected wiping orsmearing. In these conditions, you can dothe following to help keep your windshieldclear:
•Lower the sensitivity of the autowipersto reduce the amount of smearing.
•Switch to normal or high-speed wipe.
•Switch the autowipers off.
The autowipers feature uses a rain sensor,located in the area around the interiormirror. The rain sensor monitors theamount of moisture on the windshield andautomatically turns on the wipers. Itadjusts the wiper speed by the amount ofmoisture that the sensor detects on thewindshield.
Note:This autowiper feature isautomatically set to on and remains on untilyou switch it off in the information display.You can also switch the feature back on atany time. See General Information (page91).
Use the rotary control to adjust thesensitivity of the rain sensor. Set thecontrol to low sensitivity, and the wiperswill turn on when the rain sensor detectsa large amount of moisture on thewindshield. Set the control to highsensitivity, and the wipers will turn on whenthe rain sensor detects a small amount ofmoisture on the windshield.
Note:When you set the wiper system tointermittent wipe and the autowiper systemis on, the autowiper sensitivity settingadjusts the wiper speed according to themoisture on the windshield only. Use thewiper lever to wipe the windshieldon-demand.
71
Expedition (TB7) Canada/United States of America, enUSA, Edition date: 03/2016, First Printing
Wipers and WashersE205527
Page 76 of 500

GENERAL INFORMATION
Condensation in Lamp Assemblies
Exterior lamps have vents toaccommodate normal changes in airpressure.
Condensation can be a natural by-productof this design. When moist air enters thelamp assembly through the vents, there isa possibility that condensation can occurwhen the temperature is cold. Whennormal condensation occurs, a fine mistcan form on the interior of the lens. Thefine mist eventually clears and exitsthrough the vents during normal operation.
Clearing time may take as long as 48 hoursunder dry weather conditions.
Examples of acceptable condensation are:
•The presence of a fine mist (no streaks,drip marks or large droplets).
•A fine mist covers less than 50% of thelens.
Examples of unacceptable condensationare:
•A water puddle inside the lamp.
•Streaks, drip marks or large dropletspresent on the interior of the lens.
If you see any unacceptable condensation,have your vehicle checked by an authorizeddealer.
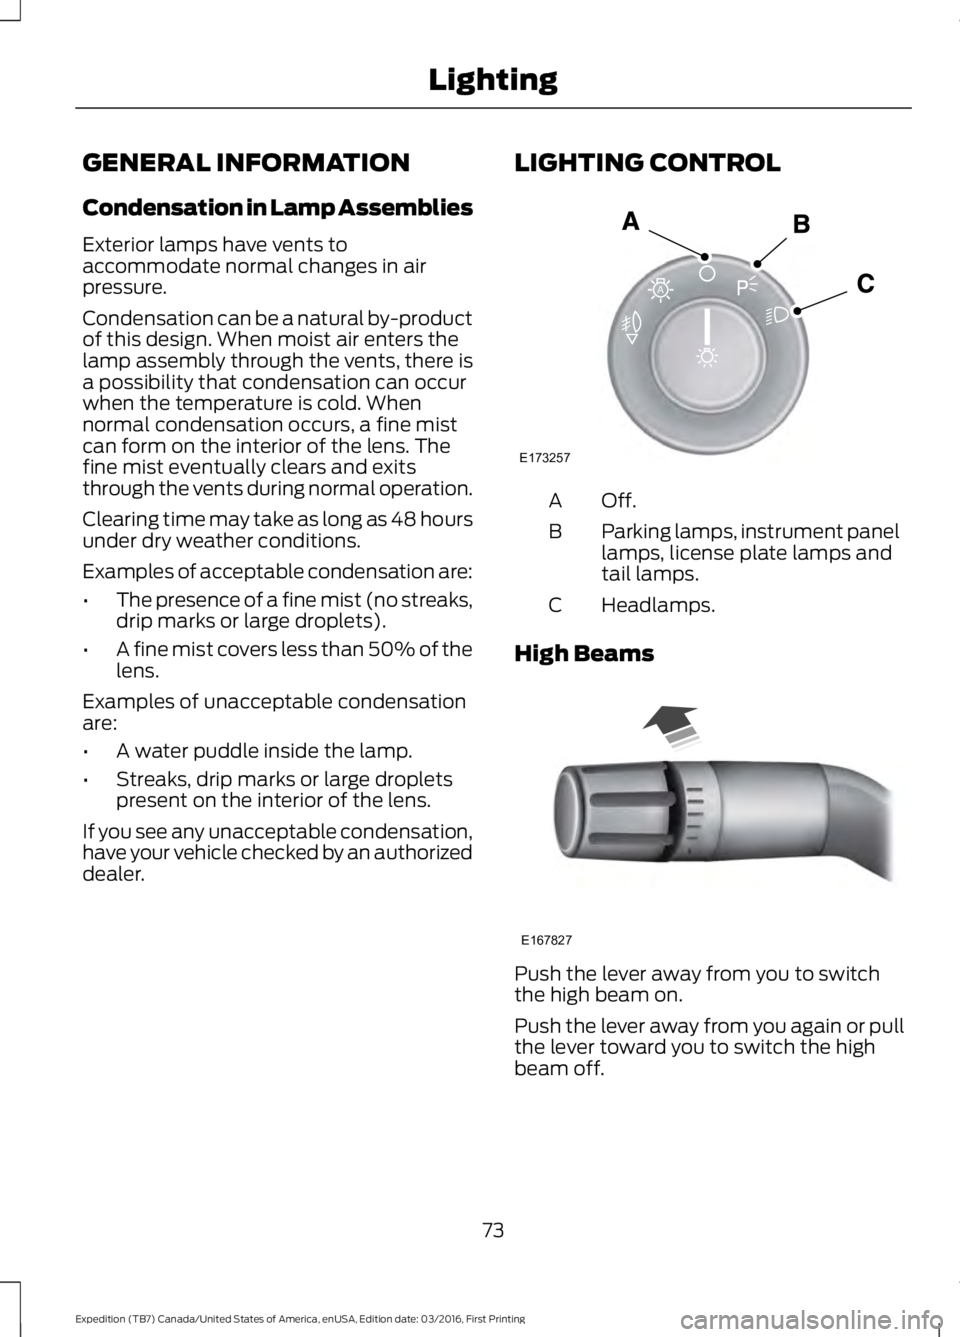
LIGHTING CONTROL
Off.A
Parking lamps, instrument panellamps, license plate lamps andtail lamps.
B
Headlamps.C
High Beams
Push the lever away from you to switchthe high beam on.
Push the lever away from you again or pullthe lever toward you to switch the highbeam off.
73
Expedition (TB7) Canada/United States of America, enUSA, Edition date: 03/2016, First Printing
LightingE173257
A E167827
Page 77 of 500

Headlamp Flasher
Slightly pull the lever toward you andrelease it to flash the headlamps.
AUTOLAMPS (If Equipped)
WARNING
The autolamps switch position maynot activate the headlamps in all lowvisibility conditions, such as daytimefog. Make sure the headlamps areswitched to auto or on, as appropriate,during all low visibility conditions. Failureto do so may result in a crash.
When the lighting control is in theautolamps position, the headlampsautomatically turn on in low light situationsor when the wipers activate.
If equipped, the following also activatewhen the lighting control is in theautolamps position and you switch themon in the information display:
•Configurable daytime running lamps.
•Automatic high beam control.
•Adaptive headlamp control.
The headlamps remain on for a period oftime after you switch the ignition off. Usethe information display controls to adjustthe period of time that the headlampsremain on. See Information Displays(page 91).
Note:With the headlamps in theautolamps position, you cannot switch thehigh beam headlamps on until theautolamps system turns the low beamheadlamps on.
Windshield Wiper ActivatedHeadlamps
The windshield wiper activated headlampsturn on within 10 seconds when you switchthe windshield wipers on and the lightingcontrol is in the autolamps position. Theyturn off approximately 60 seconds afteryou switch the windshield wipers off.
The headlamps do not turn on by wiperactivation:
•During a mist wipe.
•When the wipers are on to clear washerfluid during a wash condition.
•If the wipers are in intermittent mode.
Note:If you switch autolamps andautowipers on, the headlamps willautomatically turn on when the windshieldwipers continuously operate.
74
Expedition (TB7) Canada/United States of America, enUSA, Edition date: 03/2016, First Printing
LightingE163268 E173258
A
Page 79 of 500

3. The transmission is not in park (P) forvehicles with automatic transmissionsor the parking brake is released forvehicles with manual transmissions.
4.The lighting control is in the autolampsposition.
5. The headlamps are off.
The other lighting control switch positionsdo not activate the daytime running lamps,and you can use them to temporarilyoverride autolamp control.
When switched off in the informationdisplay, the daytime running lamps are offin all lighting control switch positions.
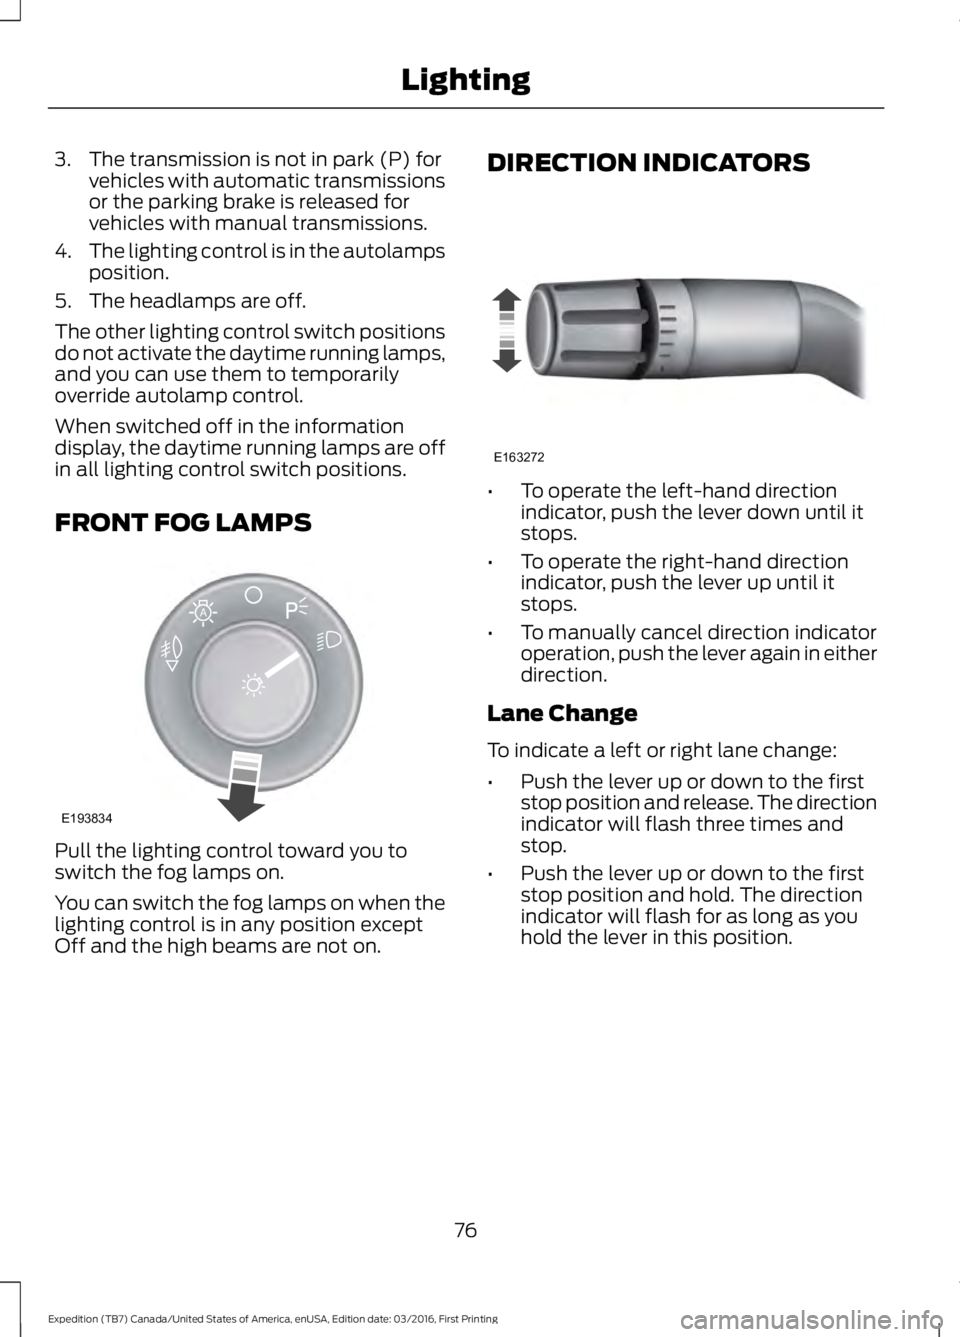
FRONT FOG LAMPS
Pull the lighting control toward you toswitch the fog lamps on.
You can switch the fog lamps on when thelighting control is in any position exceptOff and the high beams are not on.
DIRECTION INDICATORS
•To operate the left-hand directionindicator, push the lever down until itstops.
•To operate the right-hand directionindicator, push the lever up until itstops.
•To manually cancel direction indicatoroperation, push the lever again in eitherdirection.
Lane Change
To indicate a left or right lane change:
•Push the lever up or down to the firststop position and release. The directionindicator will flash three times andstop.
•Push the lever up or down to the firststop position and hold. The directionindicator will flash for as long as youhold the lever in this position.
76
Expedition (TB7) Canada/United States of America, enUSA, Edition date: 03/2016, First Printing
LightingE193834
A E163272