2017 FORD EXPEDITION EL engine oil
[x] Cancel search: engine oilPage 160 of 500
an emission control device or prevent itfrom working. Information about yourvehicle’s emission system is on the VehicleEmission Control Information Decallocated on or near the engine. This decalalso lists engine displacement.
Please consult your warranty informationfor complete details.
On-Board Diagnostics (OBD-II)
Your vehicle has a computer known as theon-board diagnostics system (OBD-II) thatmonitors the engine’s emission controlsystem. The system protects theenvironment by making sure that yourvehicle continues to meet governmentemission standards. The OBD-II systemalso assists a service technician in properlyservicing your vehicle.
When the service engine soonindicator illuminates, the OBD-IIsystem has detected amalfunction. Temporary malfunctions maycause the service engine soon indicator toilluminate. Examples are:
1. Your vehicle has run out of fuel—theengine may misfire or run poorly.
2. Poor fuel quality or water in thefuel—the engine may misfire or runpoorly.
3. The fuel fill inlet may not have closedproperly. See Refueling (page 152).
4. Driving through deep water—theelectrical system may be wet.
You can correct these temporarymalfunctions by filling the fuel tank withgood quality fuel, properly closing the fuelfill inlet or letting the electrical system dryout. After three driving cycles without theseor any other temporary malfunctions
present, the service engine soon indicatorshould stay off the next time you start theengine. A driving cycle consists of a coldengine startup followed by mixed city andhighway driving. No additional vehicleservice is required.
If the service engine soon indicator remainson, have your vehicle serviced at the firstavailable opportunity. Although somemalfunctions detected by the OBD-II maynot have symptoms that are apparent,continued driving with the service enginesoon indicator on can result in increasedemissions, lower fuel economy, reducedengine and transmission smoothness andlead to more costly repairs.
Readiness for Inspection andMaintenance (I/M) Testing
Some state and provincial and localgovernments may haveInspection/Maintenance (I/M) programsto inspect the emission control equipmenton your vehicle. Failure to pass thisinspection could prevent you from gettinga vehicle registration.
If the service engine soonindicator is on or the bulb doesnot work, your vehicle may needservice. See On-Board Diagnostics.
Your vehicle may not pass the I/M test ifthe service engine soon indicator is on ornot working properly (bulb is burned out),or if the OBD-II system has determinedthat some of the emission control systemshave not been properly checked. In thiscase, the vehicle is not ready for I/Mtesting.
If the vehicle’s engine or transmission hasjust been serviced, or the battery hasrecently run down or been replaced, theOBD-II system may indicate that thevehicle is not ready for I/M testing. Todetermine if the vehicle is ready for I/Mtesting, turn the ignition key to the on
157
Expedition (TB7) Canada/United States of America, enUSA, Edition date: 03/2016, First Printing
Fuel and Refueling
Page 221 of 500
BREAKING-IN
You need to break in new tires forapproximately 300 miles (480kilometers). During this time, your vehiclemay exhibit some unusual drivingcharacteristics.
Avoid driving too fast during the first 1000miles (1600 kilometers). Vary your speedfrequently and change up through thegears early. Do not labor the engine.
Do not tow during the first 1000 miles(1600 kilometers).
REDUCED ENGINE
PERFORMANCE
WARNING
Continued operation will increase theengine temperature and cause theengine to shut down completely.
If the engine coolant temperature gaugeneedle moves to the upper limit position,the engine is overheating. See Gauges(page 84).
You must only drive your vehicle for a shortdistance if the engine overheats. Thedistance you can travel depends onambient temperature, vehicle load andterrain. The engine will continue to operatewith limited power for a short time.
If the engine temperature continues to rise,the fuel supply to the engine will reduce.The air conditioning will switch off and theengine cooling fan will operate continually.
1.Reduce your speed gradually and stopyour vehicle as soon as it is safe to doso.
2. Switch the engine off immediately toprevent severe engine damage.
3. Wait for the engine to cool down.
4. Check the coolant level. See EngineCoolant Check (page 247).
5. Have your vehicle checked by anauthorized dealer as soon as possible.
ECONOMICAL DRIVING
Fuel economy is affected by several thingssuch as how you drive, the conditions youdrive under and how you maintain yourvehicle.
There are some things to keep in mind thatmay improve your fuel economy:
•Accelerate and slow down in a smooth,moderate fashion.
•Drive at steady speeds.
•Anticipate stops; slowing down mayeliminate the need to stop.
•Combine errands and minimizestop-and-go driving (When runningerrands, go to the furthest destinationfirst and then work your way backhome).
•Close the windows for high-speeddriving.
•Drive at reasonable speeds.
•Keep the tires properly inflated and useonly the recommended size.
•Use the recommended engine oil.
•Perform all regularly scheduledmaintenance.
There are also some things you may wantto avoid doing because they reduce yourfuel economy:
•Avoid sudden or hard accelerations.
•Avoid revving the engine before turningoff the car.
•Avoid long idle periods.
•Do not warm up your vehicle on coldmornings.
•Reduce the use of air conditioning andheat.
218
Expedition (TB7) Canada/United States of America, enUSA, Edition date: 03/2016, First Printing
Driving Hints
Page 248 of 500
Engine oil filler cap. See Engine Oil Check (page 245).C.
Engine oil dipstick. See Engine Oil Dipstick (page 245).D.
Brake fluid reservoir. See Brake Fluid Check (page 252).E.
Engine coolant reservoir. See Engine Coolant Check (page 247).F.
Air filter assembly. See Changing the Engine Air Filter (page 262).G.
Power distribution box. See Fuses (page 233).H.
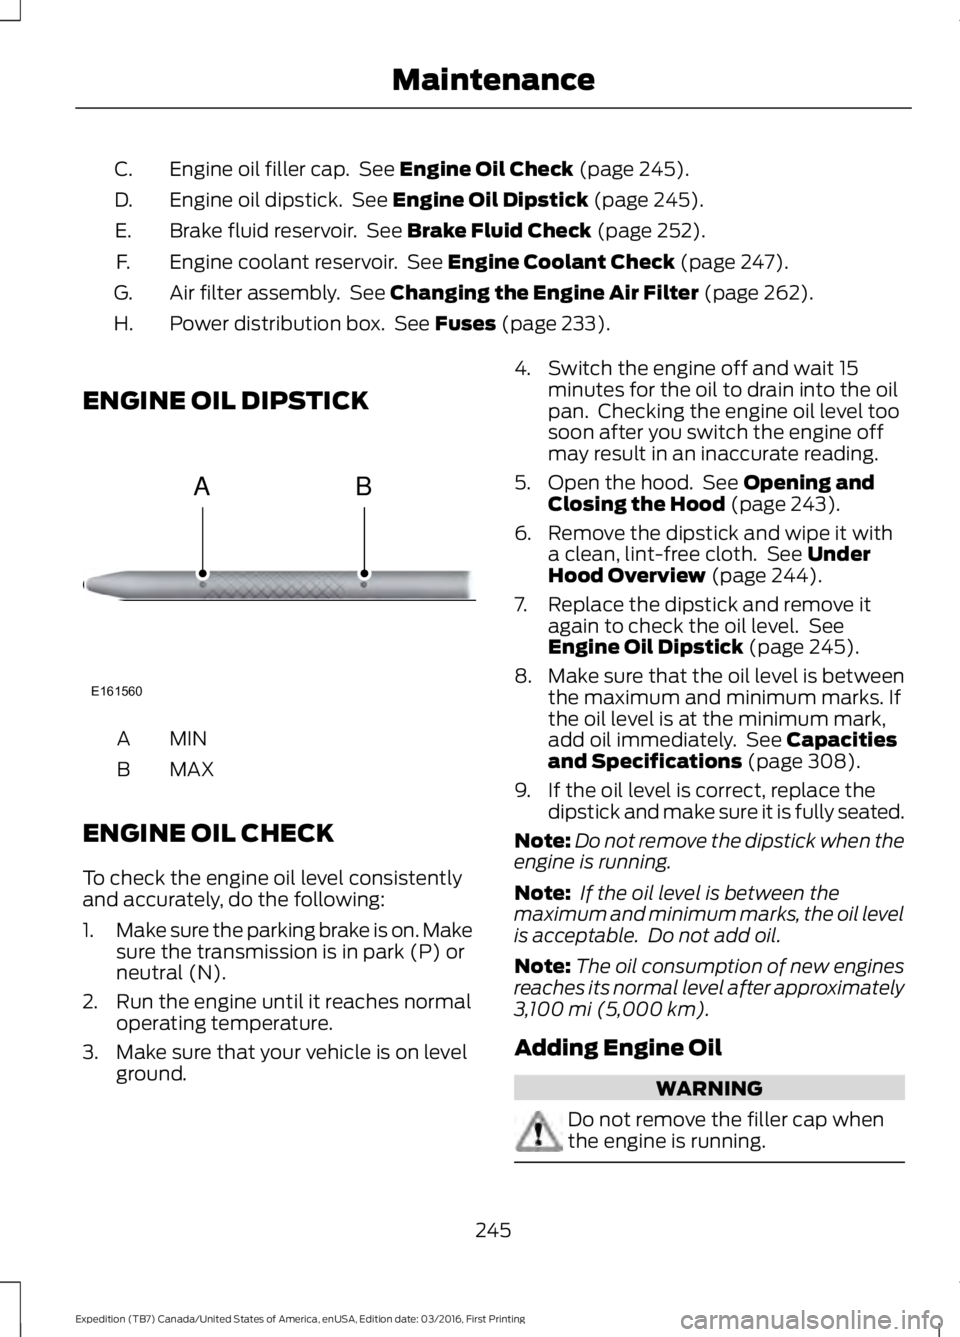
ENGINE OIL DIPSTICK
MINA
MAXB
ENGINE OIL CHECK
To check the engine oil level consistentlyand accurately, do the following:
1.Make sure the parking brake is on. Makesure the transmission is in park (P) orneutral (N).
2. Run the engine until it reaches normaloperating temperature.
3. Make sure that your vehicle is on levelground.
4. Switch the engine off and wait 15minutes for the oil to drain into the oilpan. Checking the engine oil level toosoon after you switch the engine offmay result in an inaccurate reading.
5. Open the hood. See Opening andClosing the Hood (page 243).
6. Remove the dipstick and wipe it witha clean, lint-free cloth. See UnderHood Overview (page 244).
7. Replace the dipstick and remove itagain to check the oil level. SeeEngine Oil Dipstick (page 245).
8.Make sure that the oil level is betweenthe maximum and minimum marks. Ifthe oil level is at the minimum mark,add oil immediately. See Capacitiesand Specifications (page 308).
9. If the oil level is correct, replace thedipstick and make sure it is fully seated.
Note:Do not remove the dipstick when theengine is running.
Note: If the oil level is between themaximum and minimum marks, the oil levelis acceptable. Do not add oil.
Note:The oil consumption of new enginesreaches its normal level after approximately3,100 mi (5,000 km).
Adding Engine Oil
WARNING
Do not remove the filler cap whenthe engine is running.
245
Expedition (TB7) Canada/United States of America, enUSA, Edition date: 03/2016, First Printing
MaintenanceE161560
AB
Page 249 of 500
Do not use supplemental engine oiladditives because they are unnecessaryand could lead to engine damage that maynot be covered by the vehicle Warranty.
Only use oils certified for gasoline enginesby the American Petroleum Institute (API).An oil with this trademark symbolconforms to the current engine andemission system protection standards andfuel economy requirements of theInternational Lubricants SpecificationAdvisory Committee (ILSAC).
To top up the engine oil level do thefollowing:
1. Clean the area surrounding the engineoil filler cap before you remove it.
2. Remove the engine oil filler cap. SeeUnder Hood Overview (page 244).Turn it counterclockwise and removeit.
3. Add engine oil that meets Fordspecifications. See Capacities andSpecifications (page 308). You mayhave to use a funnel to pour the engineoil into the opening.
4. Recheck the oil level.
5. If the oil level is correct, replace thedipstick and make sure it is fully seated.
6. Replace the engine oil filler cap. Turnit clockwise until you feel a strongresistance.
Note: Do not add oil further than themaximum mark. Oil levels above themaximum mark may cause engine damage.
Note:Make sure you install the oil filler capcorrectly.
Note:Soak up any spillage with anabsorbent cloth immediately.
OIL CHANGE INDICATOR
RESET
Use the information display controls onthe steering wheel to reset the oil changeindicator.
From the main menu scroll to:
Action and descriptionMessage
Press the right arrow button,then from this menu scrollto the following message.
Settings
Press the right arrow button,then from this menu scrollto the following message.
Vehicle
Press the right arrow button,then from this menu scrollto the following message.
Oil Life
Press and hold the OKbutton until the instrumentcluster displays thefollowing message.
Hold OK toReset
Reset Successful
When the oil change indic-ator resets the instrumentcluster displays 100%.
Remaining Life
{00}%
246
Expedition (TB7) Canada/United States of America, enUSA, Edition date: 03/2016, First Printing
MaintenanceE142732
Page 270 of 500

•Never wash or rinse any ignition coil,spark plug wire or spark plug well, orthe area in and around these locations.
•Cover the battery, power distributionbox, and air filter assembly to preventwater damage when cleaning theengine.
CLEANING THE WINDOWS AND
WIPER BLADES
Car wash chemicals and environmentalfallout can result in windshield and wiperblade contamination. Dirty windshield andwipers will result in poor windshield wiperoperation. Keep the windshield and wiperblades clean to maintain windshield wiperperformance.
To clean the windshield and wiper blades:
•Clean the windshield with anon-abrasive glass cleaner. Whencleaning the interior of the windshield,avoid getting any glass cleaner on theinstrument panel or door panels. Wipeany glass cleaner off these surfacesimmediately.
•For windshields contaminated withtree sap, chemicals, wax or bugs, cleanthe entire windshield using steel wool(no greater than 0000 grade) in acircular motion and rinse with water.
•Clean the wiper blades with isopropylrubbing alcohol or windshield washerconcentrate.
Note: Do not use razor blades or othersharp objects to clean or remove decalsfrom the inside of the heated rear window.The vehicle warranty does not coverdamage caused to the heated rear windowgrid lines.
CLEANING THE INTERIOR
WARNINGS
Do not use cleaning solvents, bleachor dye on the vehicle’s safety belts,as these actions may weaken thebelt webbing.
On vehicles equipped withseat-mounted airbags, do not usechemical solvents or strongdetergents. Such products couldcontaminate the side airbag system andaffect performance of the side airbag in acollision.
For fabric, carpets, cloth seats, safety beltsand seats equipped with side airbags:
•Remove dust and loose dirt with avacuum cleaner.
•Remove light stains and soil withMotorcraft Professional StrengthCarpet & Upholstery Cleaner.
•If grease or tar is present on thematerial, spot-clean the area first withMotorcraft Spot and Stain Remover. InCanada, use Motorcraft Multi-PurposeCleaner.
•If a ring forms on the fabric after spotcleaning, clean the entire areaimmediately (but do not oversaturate)or the ring will set.
•Do not use household cleaningproducts or glass cleaners, which canstain and discolor the fabric and affectthe flame retardant abilities of the seatmaterials.
267
Expedition (TB7) Canada/United States of America, enUSA, Edition date: 03/2016, First Printing
Vehicle Care
Page 273 of 500
REPAIRING MINOR PAINT
DAMAGE
Authorized dealers have touch-up paint tomatch your vehicle’s color. Your vehiclecolor code is printed on a sticker on thefront, left-hand side door jamb. Take yourcolor code to your authorized dealer tomake sure you get the correct color.
Before repairing minor paint damage, usea cleaner such as Motorcraft Bug and TarRemover to remove particles such as birddroppings, tree sap, insect deposits, tarspots, road salt and industrial fallout.
Always read the instructions before usingcleaning products.
CLEANING THE ALLOY
WHEELS
Note:Do not apply a cleaning chemical towarm or hot wheel rims and covers.
Note:Some automatic car washes maycause damage to the finish on your wheelrims and covers.
Note:Industrial-strength or heavy-dutycleaners in combination with brush agitationto remove brake dust and dirt, could wearaway the clear coat finish over a period time.
Note:Do not use hydrofluoric acid-basedor high caustic-based wheel cleaners, steelwool, fuels or strong household detergents.
Note:If you intend parking your vehicle foran extended period after cleaning thewheels with a wheel cleaner, drive yourvehicle for a few minutes before doing so.This will reduce the risk of increasedcorrosion of the brake discs.
Alloy wheels and wheel covers are coatedwith a clear coat paint finish. To maintaintheir condition we recommend that you:
•Clean the wheels weekly usingMotorcraft Wheel and Tire Cleaner.Apply using manufacturer'sinstructions.
•Use a sponge to remove heavydeposits of dirt and brake dustaccumulation.
•Rinse thoroughly with a strong streamof water when you have completed thecleaning process.
•To remove tar and grease, useMotorcraft Bug and Tar Remover.
VEHICLE STORAGE
If you plan on storing your vehicle for 30days or more, read the followingmaintenance recommendations to makesure your vehicle stays in good operatingcondition.
We engineer and test all motor vehiclesand their components for reliable, regulardriving. Under various conditions,long-term storage may lead to degradedengine performance or failure unless youuse specific precautions to preserve enginecomponents.
General
•Store all vehicles in a dry, ventilatedplace.
•Protect from sunlight, if possible.
•If vehicles are stored outside, theyrequire regular maintenance to protectagainst rust and damage.
Body
•Wash your vehicle thoroughly toremove dirt, grease, oil, tar or mud fromexterior surfaces, rear-wheel housingand the underside of front fenders.
•Periodically wash your vehicle if it isstored in exposed locations.
270
Expedition (TB7) Canada/United States of America, enUSA, Edition date: 03/2016, First Printing
Vehicle Care
Page 274 of 500

•Touch-up exposed or primed metal toprevent rust.
•Cover chrome and stainless steel partswith a thick coat of auto wax to preventdiscoloration. Re-wax as necessarywhen you wash your vehicle.
•Lubricate all hood, door and luggagecompartment hinges and latches witha light grade oil.
•Cover interior trim to prevent fading.
•Keep all rubber parts free from oil andsolvents.
Engine
•Change the engine oil and filter prior tostorage because used engine oilcontains contaminates which maycause engine damage.
•Start the engine every 15 days for aminimum of 15 minutes. Run at fast idlewith the climate controls set to defrostuntil the engine reaches normaloperating temperature.
•With your foot on the brake, shiftthrough all the gears while the engineis running.
•We recommend that you change theengine oil before you use your vehicleagain.
Fuel system
•Fill the fuel tank with high-quality fueluntil the first automatic shutoff of thefuel pump nozzle.
Cooling system
•Protect against freezing temperatures.
•When removing your vehicle fromstorage, check coolant fluid level.Confirm that there are no coolingsystem leaks and that fluid is at therecommended level.
Battery
•Check and recharge as necessary. Keepconnections clean.
•If storing your vehicle for more than 30days without recharging the battery,we recommend that you disconnectthe battery cables to maintain batterycharge for quick starting.
Note:It is necessary to reset memoryfeatures if battery cables are disconnected.
Brakes
•Make sure the brakes and parking brakerelease fully.
Tires
•Maintain recommended air pressure.
Miscellaneous
•Make sure all linkages, cables, leversand pins under your vehicle are coveredwith grease to prevent rust.
•Move vehicles at least 25 ft (7.5 m)every 15 days to lubricate working partsand prevent corrosion.
Removing Vehicle From Storage
When your vehicle is ready to come out ofstorage, do the following:
•Wash your vehicle to remove any dirtor grease film build-up on windowsurfaces.
•Check windshield wipers for anydeterioration.
•Check under the hood for any foreignmaterial that may have collectedduring storage such as mice or squirrelnests.
•Check the exhaust for any foreignmaterial that may have collectedduring storage.
271
Expedition (TB7) Canada/United States of America, enUSA, Edition date: 03/2016, First Printing
Vehicle Care
Page 307 of 500
ENGINE SPECIFICATIONS
3.5L EcoboostEngine
214Cubic inches
1-4-2-5-3-6Firing order
Coil on plugIgnition system
10.0:1Compression ratio
0.030 in (0.75 mm) - 0.033 in (0.85 mm)Spark plug gap
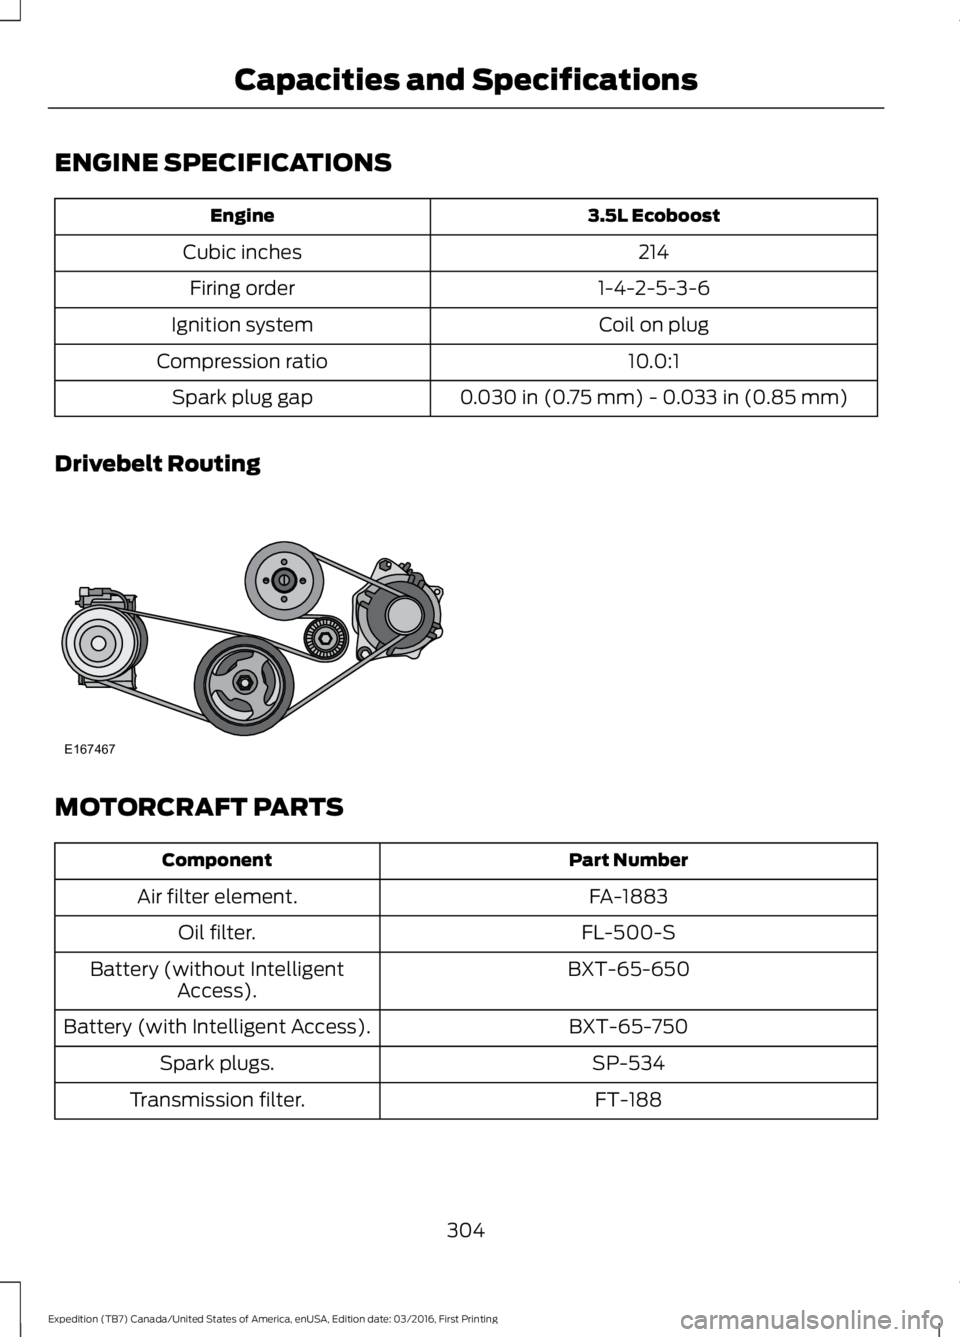
Drivebelt Routing
MOTORCRAFT PARTS
Part NumberComponent
FA-1883Air filter element.
FL-500-SOil filter.
BXT-65-650Battery (without IntelligentAccess).
BXT-65-750Battery (with Intelligent Access).
SP-534Spark plugs.
FT-188Transmission filter.
304
Expedition (TB7) Canada/United States of America, enUSA, Edition date: 03/2016, First Printing
Capacities and SpecificationsE167467