2017 FIAT TIPO 5DOORS STATION WAGON steering
[x] Cancel search: steeringPage 145 of 264

at the same time slowly rotate the
screw anticlockwise, until resistance is
encountered (do not overtighten);
slowly release the screw;
opening is indicated by the entire
screw head coming out of its housing;
remove cover 2, sliding it upwards
on the side guides, as indicated in the
figure.
The number identifying the electrical
component corresponding to each fuse
is shown on the cover.
Once the fuse has been replaced,
proceed as follows:
correctly refit the cover 2 in the side
guides of the casing;
slide it down completely from the
top;
fully tighten screw 1 using the
screwdriver provided;
at the same time slowly rotate the
screw clockwise, until resistance is
encountered (do not overtighten);
slowly release the screw;
closure is indicated by the securing
of the entire screw head in its housing.
DASHBOARD FUSE BOX
Left-hand drive version
The fuse box fig. 164 is located to the
left side of the steering column. To
access the fuses, remove the snap
cover showed in fig. 163, pulling
towards yourself.
Right hand drive version
The control unit fig. 164 is located to
the left side under the dashboard.
To access the control unit, remove the
glove compartment using device 1
fig. 165.
16208036J0006EM
16306106J0005EM
16408036J0009EM
143
Page 147 of 264

ENGINE COMPARTMENT CONTROL UNIT
fig. 161
USERSFUSE AMPERE
Two-tone horn F10 15
Heater mirrors F88 7.5
Heated rear window F20 30
Active Grille Shutter F84 5
DASHBOARD FUSE BOX
fig. 164
USERSFUSE AMPERE
Front electric window (driver side) F47 25
Front electric window (passenger side) F48 25
Supply forUconnect
™system, Climate Control system, EOBD
system, USB/AUX port, steering wheel controls.F36 15
Dead Lock device (Driver side door unlocking for
versions/markets, where provided)/Door unlocking/Central
locking/Electric tailgate unlockingF38 20
Windscreen washer pump F43 20
Rear left electric window F33 25
Rear right electric window F34 25
145
Page 161 of 264
TOWING THE
VEHICLE
ATTACHING THE TOW
RING
149) 150) 151)
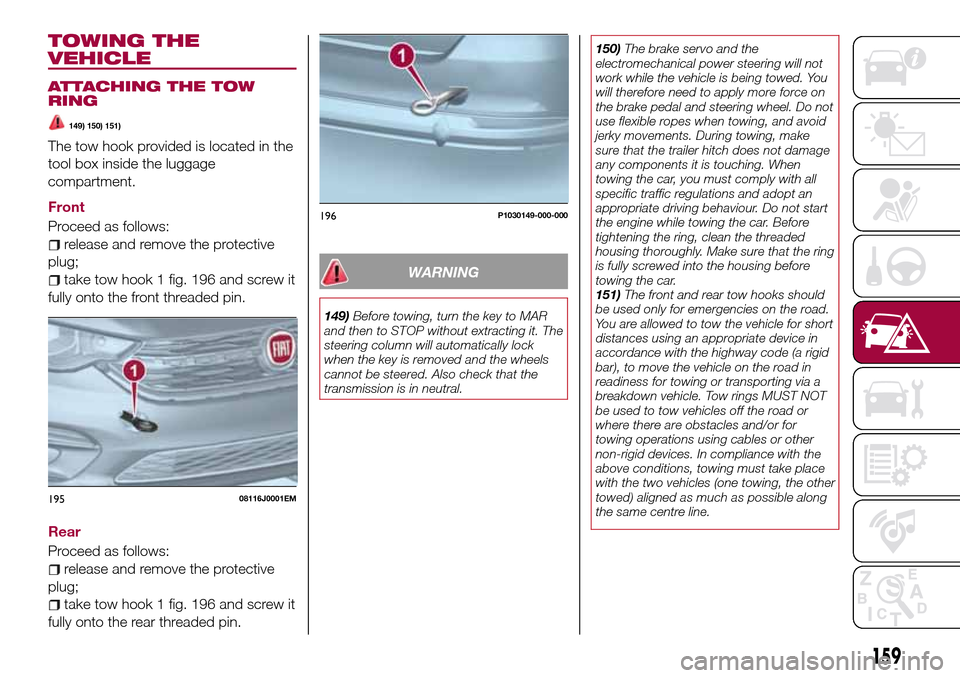
The tow hook provided is located in the
tool box inside the luggage
compartment.
Front
Proceed as follows:
release and remove the protective
plug;
take tow hook 1 fig. 196 and screw it
fully onto the front threaded pin.
Rear
Proceed as follows:
release and remove the protective
plug;
take tow hook 1 fig. 196 and screw it
fully onto the rear threaded pin.
WARNING
149)Before towing, turn the key to MAR
and then to STOP without extracting it. The
steering column will automatically lock
when the key is removed and the wheels
cannot be steered. Also check that the
transmission is in neutral.150)The brake servo and the
electromechanical power steering will not
work while the vehicle is being towed. You
will therefore need to apply more force on
the brake pedal and steering wheel. Do not
use flexible ropes when towing, and avoid
jerky movements. During towing, make
sure that the trailer hitch does not damage
any components it is touching. When
towing the car, you must comply with all
specific traffic regulations and adopt an
appropriate driving behaviour. Do not start
the engine while towing the car. Before
tightening the ring, clean the threaded
housing thoroughly. Make sure that the ring
is fully screwed into the housing before
towing the car.
151)The front and rear tow hooks should
be used only for emergencies on the road.
You are allowed to tow the vehicle for short
distances using an appropriate device in
accordance with the highway code (a rigid
bar), to move the vehicle on the road in
readiness for towing or transporting via a
breakdown vehicle. Tow rings MUST NOT
be used to tow vehicles off the road or
where there are obstacles and/or for
towing operations using cables or other
non-rigid devices. In compliance with the
above conditions, towing must take place
with the two vehicles (one towing, the other
towed) aligned as much as possible along
the same centre line.
19508116J0001EM
196P1030149-000-000
159
Page 178 of 264
USEFUL ADVICE FOR
EXTENDING THE LIFE OF
YOUR BATTERY
Useful advice for extending the life
of your battery
To avoid draining your battery and
make it last longer, observe the
following instructions:
when you park the car, ensure that
the doors, tailgate and bonnet are
closed properly, to prevent any lights
from remaining on inside the
passenger's compartment;
switch off all roof lights inside the car:
the car is however equipped with a
system which switches all internal lights
off automatically;
do not keep accessories (e.g. radio,
hazard warning lights, etc.) switched on
for a long time when the engine is not
running;
before performing any operation on
the electrical system, disconnect the
negative battery cable.
If, after purchasing the vehicle, you wish
to install electrical accessories which
require permanent electrical supply (e.g.
alarm, etc.) or accessories which
influence the electrical supply
requirements, contact a Fiat Dealership,
whose qualified staff will evaluate the
overall electrical consumption.
70)
IMPORTANT After the battery is
disconnected, the steering must be
initialised. The
warning light on the
instrument panel (or symbol on the
display) switches on to indicate this. To
carry out this procedure, simply turn the
steering wheel all the way from one end
to the other or drive in a straight line for
about a hundred metres.
IMPORTANT If the charge level remains
under 50% for a long time, the battery
is damaged by sulphation, reducing its
capacity and efficiency at start-up. The
battery is also more prone to the risk of
freezing (at temperatures as high as
-10°C). Refer to the "Vehicle inactivity"
paragraph in "Starting and driving"
chapter if the vehicle is left parked for a
long time.
WARNING
152)Never smoke while working in the
engine compartment: gas and inflammable
vapours may be present, with the risk of
fire.
153)Be very careful when working in the
engine compartment when the engine is
hot: you may get burned. Do not get too
close to the radiator cooling fan: the
electric fan may start; danger of injury.
Scarves, ties and other loose clothing
might be pulled by moving parts.154)If the engine oil is being topped up,
wait for the engine to cool down before
loosening the filler cap, particularly for
vehicles with aluminium cap (where
provided). WARNING: risk of burns!
155)The cooling system is pressurised. If
the cap needs replacing, do so with
another original or the effectiveness of the
system may be compromised. Do not
remove the reservoir plug when the engine
is hot: you risk scalding yourself.
156)Do not travel if the windscreen
washer reservoir is empty: using the
windscreen washer is essential for
improving visibility. Repeated operation of
the system without fluid could damage or
cause rapid deterioration of some system
components.
157)Some commercial additives for
windscreen washer fluid are flammable.
The engine compartment contains hot
components which may start a fire.
158)Brake fluid is poisonous and highly
corrosive. In the event of accidental
contact, immediately wash the affected
parts with water and mild soap. Then rinse
thoroughly. Call a doctor immediately if
swallowed.
159)The symbol, on the brake fluid
container indicates if a brake fluid is
synthetic or mineral-based. Use of mineral
type fluids will damage the special rubber
seals of the braking system beyond repair.
160)Battery fluid is poisonous and
corrosive. Avoid contact with the skin and
eyes. Keep open flames away from the
battery and do not use objects that might
create sparks: risk of explosion and fire.
161)Using the battery with insufficient fluid
irreparably damages the battery and may
cause an explosion.
176
SERVICING AND CARE
Page 218 of 264
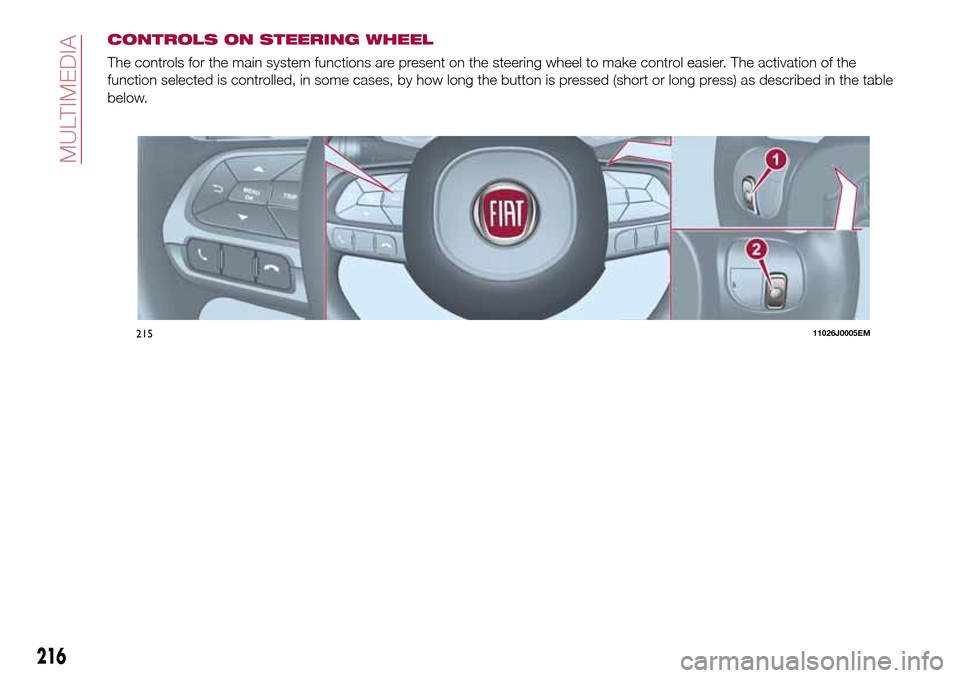
CONTROLS ON STEERING WHEEL
The controls for the main system functions are present on the steering wheel to make control easier. The activation of the
function selected is controlled, in some cases, by how long the button is pressed (short or long press) as described in the table
below.
21511026J0005EM
216
MULTIMEDIA
Page 219 of 264
STEERING WHEEL CONTROL SUMMARY TABLE
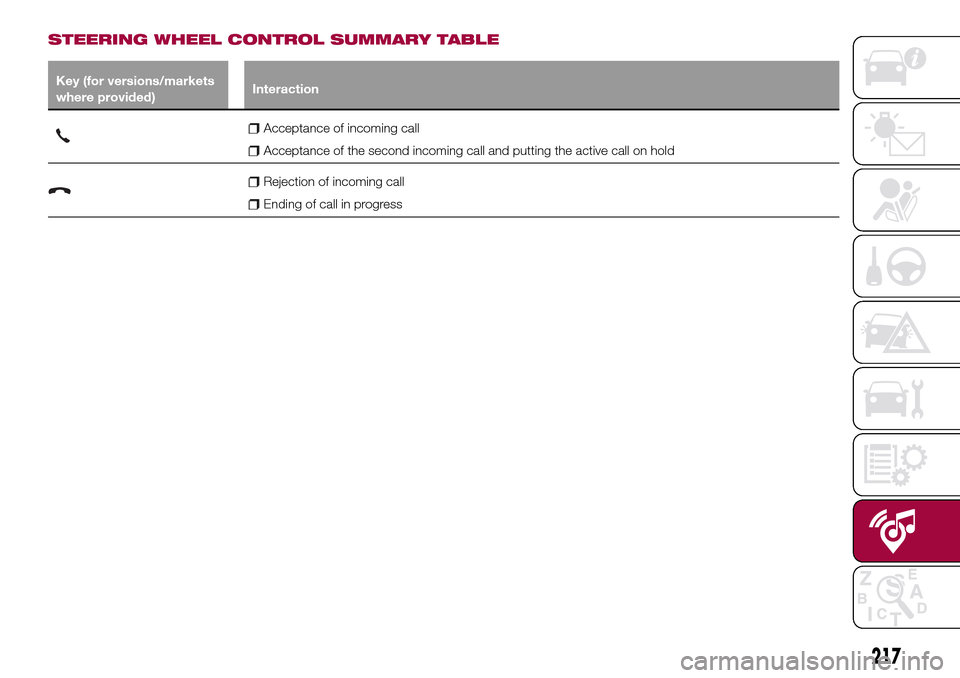
Key (for versions/markets
where provided)Interaction
Acceptance of incoming call
Acceptance of the second incoming call and putting the active call on hold
Rejection of incoming call
Ending of call in progress
217
Page 220 of 264
CONTROLS BEHIND THE STEERING WHEEL
Buttons Interaction
Button 1 (steering wheel left side)
Upper button
Brief button press: search for next radio station or selection of USB/iPod next
track.
Long button press: scan of higher frequencies until released/fast forward of
USB/iPod track.
Central buttonWith each press it scrolls through sources AM, FM, USB/iPod, AUX. Only the
available sources will be selected.
Lower button
Brief button press: search for previous radio station or selection of USB/iPod next
track.
Long button press: scan of lower frequencies until released/fast forward of
USB/iPod track.
Button 2 (steering wheel right side)
Upper buttonIncreasing volume
Brief button press: single volume increase
Long button press: fast volume increase
Central button Activation/deactivation of Mute function
Lower buttonDecreasing volume
Brief button press: single volume decrease
Long button press: fast volume decrease
218
MULTIMEDIA
Page 221 of 264
SWITCHING THE SYSTEM
ON/OFF
The system is switched on/off by
pressing the
button/knob.
Turn the button/knob clockwise to
increase the radio volume or
anticlockwise to decrease it. The
electronic volume adjustment control
rotates continuously (360°) in both
directions, without stop positions.
RADIO (TUNER) MODE
The system is equipped with the
following tuners: AM, FM and DAB (for
versions/markets, where provided).
Radio mode selection
Press the RADIO button on the front
panel to activate radio mode.
Selecting a frequency band
The different tuning modes can be
selected by pressing the RADIO button
on the front panel.
Indications on display
After the desired radio station is
selected on the display, the following
information is shown (INFO mode
activated):
In the upper part: the preset station, the
time and the other active radio settings
are highlighted.
In the central part: the name of the
current station, the frequency and theradio text information (if any) are
highlighted.
FM station list
Press the BROWSE ENTER
button/knob to display the complete list
of the FM stations that can be received.
AM/FM radio station storage
The preset stations are available in all
system modes and are selected by
touching one of the presetting buttons
1-2-3-4-5-6on the front panel. If you
are tuned to a radio station that you
wish to store, hold down the button on
the display which corresponds to the
desired preset until an acoustic
confirmation signal is emitted.
AM/FM radio station selection
To search for the desired radio station
press the
orbutton or use the
wheel of the steering wheel controls, or
turn the "BROWSE ENTER" knob.
Previous/next radio station search
Briefly press the
orbutton:
when the button is released the
previous or the next radio station is
displayed.Previous/next radio station fast
search
Hold down the
orbutton to
start the fast search: when the button is
released, the first tunable radio is
played.
MEDIA MODE
Interaction modes for AUX, USB/iPod
operation.
Audio source selection
To select the desired audio source
among those available: AUX o
USB/iPod, press theMEDIAbutton.
WARNING Some multimedia player
devices may not be compatible with the
Uconnect™system.
Track change (next/previous)
Briefly press the
button to play the
next track or briefly press the
button to return to the beginning
of the selected track or to the beginning
of the previous track if this has been
played for less than 3 seconds.
Fast forward/rewind through tracks
Press and hold down the
button to
fast forward the selected track or keep
the
button pressed to fast rewind
the track.
Track selection (browse)
Use this function to scroll through and
select the tracks on the active device.
219