2017 FIAT TIPO 5DOORS STATION WAGON parking brake
[x] Cancel search: parking brakePage 150 of 264

CHANGING A WHEEL
JACK
Please note that:
the jack weight is 2.15 kg;
the jack cannot be repaired and in
the event of a fault it must be replaced
by another genuine one;
No tool other than its cranking device
may be fitted on the jack.
Servicing
Prevent any dirt from depositing on
the "worm screw";
Keep the "worm screw" lubricated;
Never modify the jack.
Conditions for non-use
Temperatures below −40°C;
On sandy or muddy ground;
On uneven ground;
On steep roads;
In extreme weather conditions:
thunderstorms, typhoons, hurricanes,
blizzards, storms, etc.
In direct contact with the engine or
for repairs under the vehicle;
On boats.
CHANGING PROCEDURE
138) 139) 140) 141) 142)
58) 59)
Proceed as follows:
stop the car in a position that is not
dangerous for oncoming traffic where
you can change the wheel safely. The
ground must be flat and sufficiently
compact;
stop the engine, engage the hazard
warning lights and the parking brake;
engage first gear or reverse;
wear the reflective safety jacket
before getting out of the car (anyway
comply with the laws in force in the
country you are driving in);
open the luggage compartment and
if there is a cargo box (for TIPO 5DOOR
version only), remove it as described in
the “Cargo box” paragraph in the
“Getting to know the car” chapter (for
petrol and diesel versions only);
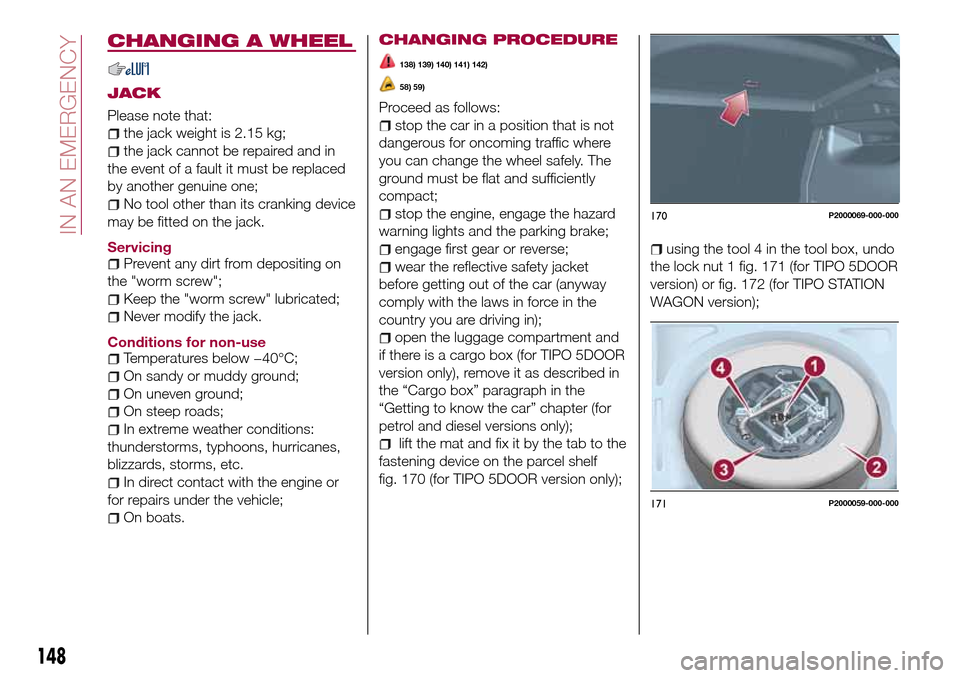
lift the mat and fix it by the tab to the
fastening device on the parcel shelf
fig. 170 (for TIPO 5DOOR version only);
using the tool 4 in the tool box, undo
the lock nut 1 fig. 171 (for TIPO 5DOOR
version) or fig. 172 (for TIPO STATION
WAGON version);
170P2000069-000-000
171P2000059-000-000
148
IN AN EMERGENCY
Page 155 of 264

The Fix&Go Automatic kit also includes:
one tank 1 fig. 187 containing the
sealing fluid, provided with: filler tube
2 and adhesive label 3 with the writing
"Max. 80 km/h”, to be attached in a
position easily visible to the driver (eg.
on the dashboard) after repairing the
tyre;
compressor 4 complete with
pressure gauge and connectors;
an instruction leaflet, to refer to for
prompt and correct use and that must
be then given to the personnel dealing
with the tyre treated with sealant;
a pair of gloves located in the side
compartment of the compressor;
some adaptors, for inflating different
elements.
TYRE REPAIRING AND
PRESSURE RESTORING
PROCEDURE
143)
60) 61)
Proceed as follows:
place the vehicle in a safe and
suitable area, engaging the parking
brake. Take the kit from the specific
compartment. Remove the adhesive
label of speed 3 fig. 187 and apply it in
a visible position. Wear the protective
gloves provided. Remove the cap from
the valve of the punctured tyre and
connect and firmly tighten the
transparent tube of the sealing fluid 1
fig. 188;
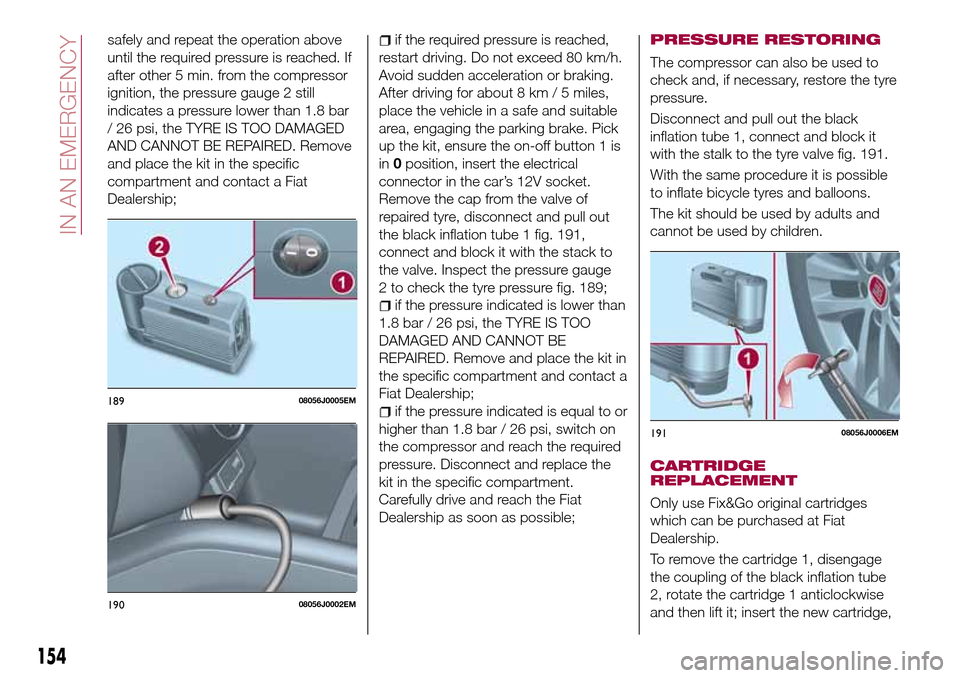
ensure that the on-off button 1
fig. 189 is in0(OFF) position. If
provided, open the cover of the
compressor 4 fig. 187 and insert the
electrical connector in the car’s 12V
socket fig. 190, start the car engine;
activate the compressor moving
on-off 1 button toI(ON) position
fig. 189. When the pressure gauge
2 shows the car’s required pressure
(see section “Wheels” under “Technical
data” chapter), switch off the
compressor moving on-off button 1 to
0position. If after 5 minutes from the
compressor ignition, the pressure
gauge 2 indicates a pressure less than
1.8 bar / 26 psi, switch off the
compressor, disconnect the sealing
fluid tube from the tyre valve, re-screw
the valve cap and move the car about
10 meters to allow the distribution of
sealing fluid in the tyre. Stop the car
186PGL000026
18708056J0003EM
18808056J0004EM
153
Page 156 of 264

safely and repeat the operation above
until the required pressure is reached. If
after other 5 min. from the compressor
ignition, the pressure gauge 2 still
indicates a pressure lower than 1.8 bar
/ 26 psi, the TYRE IS TOO DAMAGED
AND CANNOT BE REPAIRED. Remove
and place the kit in the specific
compartment and contact a Fiat
Dealership;if the required pressure is reached,
restart driving. Do not exceed 80 km/h.
Avoid sudden acceleration or braking.
After driving for about 8 km / 5 miles,
place the vehicle in a safe and suitable
area, engaging the parking brake. Pick
up the kit, ensure the on-off button 1 is
in0position, insert the electrical
connector in the car’s 12V socket.
Remove the cap from the valve of
repaired tyre, disconnect and pull out
the black inflation tube 1 fig. 191,
connect and block it with the stack to
the valve. Inspect the pressure gauge
2 to check the tyre pressure fig. 189;
if the pressure indicated is lower than
1.8 bar / 26 psi, the TYRE IS TOO
DAMAGED AND CANNOT BE
REPAIRED. Remove and place the kit in
the specific compartment and contact a
Fiat Dealership;
if the pressure indicated is equal to or
higher than 1.8 bar / 26 psi, switch on
the compressor and reach the required
pressure. Disconnect and replace the
kit in the specific compartment.
Carefully drive and reach the Fiat
Dealership as soon as possible;
PRESSURE RESTORING
The compressor can also be used to
check and, if necessary, restore the tyre
pressure.
Disconnect and pull out the black
inflation tube 1, connect and block it
with the stalk to the tyre valve fig. 191.
With the same procedure it is possible
to inflate bicycle tyres and balloons.
The kit should be used by adults and
cannot be used by children.
CARTRIDGE
REPLACEMENT
Only use Fix&Go original cartridges
which can be purchased at Fiat
Dealership.
To remove the cartridge 1, disengage
the coupling of the black inflation tube
2, rotate the cartridge 1 anticlockwise
and then lift it; insert the new cartridge,
18908056J0005EM
19008056J0002EM
19108056J0006EM
154
IN AN EMERGENCY
Page 247 of 264

provided): this function can be used to
select the "readiness" of the Brake
Control system to intervene, according
to the distance from the obstacle. The
options available are "Near", "Med",
"Far".
“Park Assist"(for versions/markets,
where provided): this function can be
used to select the type of warning
provided by the Park Assist system.
The options available are:
- “Warning Only”
- “Warning + image”
“Front Park Assist”
The options available are: "Low",
"Medium", "High".
“Rear Park Assist”
The options available are: "Low",
"Medium", "High".
"Rear View Camera Delay" (where
provided): permits a delay in the
disappearance of images from the
camera when reverse is disengaged.
“Active Rear View Camera
Guidelines”(where provided): activates
dynamic grids that indicate the
trajectory of the vehicle on the display.
"Rain sensor"(where provided): this
function can be used to activate/
deactivate the automatic operation of
the wipers in the event of rain.
NAVIGATION(Uconnect™ 7" HD Nav LIVE only)
Press the "Nav" button to show the
navigation map on the display.
NOTE: The navigation system volume
can only be adjusted during navigation
when the system provides voice
indications.
Main navigation menu
In the map display or navigation view,
tap the main menu button to open the
menu fig. 220 and fig. 221:
“Search”: select this button to
search for an address, a place
or a point of interest, then plan
a route to the location.
“Current route”: select this
button to cancel or change the
planned route.
“My places”: select this button
to create a collection of useful
or favourite addresses. The
following items are always
available in "My places":
“Home” and “Recent
destinations”.
“Parking”: select this button to
search for car parks.
“Weather”: select this button to
receive weather service
information.
NOTE The “Weather” function is only
active if TomTom Services are activated.
Otherwise, the button will appear
greyed out (and the function will not be
available).
“Petrol station”: select this
button to search for service
stations.
“TomTom services”: select this
button to access the following
services (available on
subscription): “Traffic”, “Speed
cameras”, “Weather”, “Online
search”.
"Report safety camera": tap on
this button to report a new
speed camera location.
NOTE The “Report safety camera”
function is only active if TomTom
Services are activated. Otherwise, the
button will appear greyed out (and the
function will not be available).
Select this button to open the
"Settings" menu;
245
Page 260 of 264

identification data plate.......187
Ignition device...............12
Important information and
recommendations..........248
Interior lights................26
Interiors (cleaning)............185
ISOFIX child restraint system
(installation)...............92
iTPMS (indirect Tyre Pressure
Monitoring System)..........80
Jump starting..............155
Keys.....................11
key with remote control.......11
Lifting the vehicle............182
Light beam direction...........40
Light bulbs
types of bulbs............133
LPG filter...................46
LPG System functional diagram....44
Luggage Compartment.........35
Luggage compartment
(extension)................17
Luggage covering curtain (TIPO
STATION WAGON version)......37
Main beam headlights..........24
Main Beam Headlights (bulb
replacement)..............135
Main menu.................55
Manual climate control..........29
Media mode...............240Multi-Functional Reconfigurable
Display - Right hand drive
version..................53
Multimedia
Uconnect™ LIVE Services .229 ,243
Number plate lights (bulb
replacement)..............141
Occupant protection systems.....83
Paintwork (cleaning and
maintenance).............183
Parking Brake...............110
Parking lights................23
Parking sensors.............123
Parking the vehicle...........110
Passive/active safety (LPG
system)..................42
PBA (system)................74
Performance (top speed)........205
Periodic checks (scheduled
servicing)................169
Pre-tensioners...............86
Load limiters..............87
Prescriptions for handling the
vehicle at the end of its life.....209
Radio mode...............240
Rain sensor.................27
Rear seats..................17
Rear view camera............125
Rear View Camera............125
Rear view mirrors.............22Reconfigurable Multifunction
Display..................51
Refuelling.................199
Refuelling procedure..........129
Emergency refuelling........129
Refuelling the vehicle..........128
Replacing a bulb.............132
Replacing an external bulb......135
Rims and tyres (dimensions)......191
Roof rack/ski rack.............41
SBR (Seat Belt Reminder).......85
SBR (Seat Belt Reminder) system.......................85
Scheduled servicing...........161
Scheduled Servicing Plan.......162
Screen wiper/washer...........26
Smart washing function.......27
Seat belts..................83
Seats.....................16
Servicing procedures..........178
Side bag..................105
Side direction indicators (bulb
replacement)..............136
Sideboards (TIPO STATION
WAGON version)............39
Snow chains...............182
Speed Limiter...............113
SRS (supplementary restraint
system).................101
Starting the engine...........109
Steering lock................13
INDEX