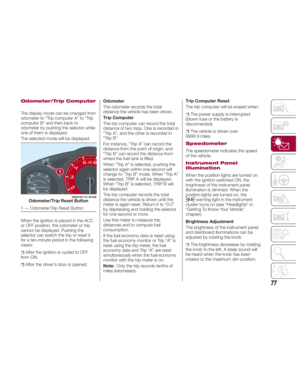
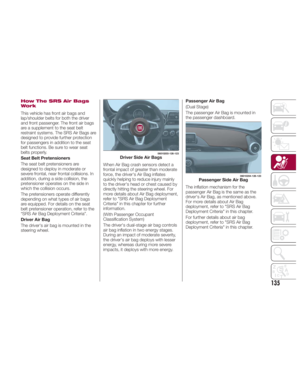
Page 65 of 292

The overhead light turns on for about
15 seconds when the ignition is
switched OFF with the overhead light
switch in the door position.
The overhead light turns off immediately
in the following cases:
The ignition is switched ON and both
doors are closed.
The driver's door is locked.
Battery Saver
If any door is left open with the
overhead light switch in the door
position or the trunk lid is left open, the
overhead light or trunk light turns off
after about 30 minutes to prevent
discharge of the battery.
To prevent discharge of the battery, if
the interior lights remain on (the interior
light switch is in the on position), they
will turn off automatically under the
following conditions:
No operations are done for about
30 minutes after the ignition is switched
OFF.
The button on the key fob is
pushed, or the request switch located
on the exterior door handle is pushed to
lock the doors (vehicles with the
advanced keyless function) after the
ignition is switched OFF.
In addition, if the following operations
are performed after turning the interior
lights off, they will turn on again if: The ignition is switched to a position
other than OFF.
A door is opened.
A door is unlocked.
The operation of the illuminated entry
system can be changed through the
Connect system.
Accessory Socket
The accessory socket is located deep
in the back of the footwell on the
passenger side.
Only use genuine FCA accessories or
the equivalent requiring no greater than
12V (120 W, 10A).
The ignition must be placed in ACC or
ON.
To prevent accessory socket damage
or electrical failure, pay attention to the
following:
Do not use accessories that require
more than 12V (120 W, 10A). Do not use accessories that are not
genuine FCA accessories or the
equivalent.
Close the cover when the accessory
socket is not in use to prevent foreign
objects and liquids from getting into the
accessory socket.
Correctly insert the plug into the
accessory socket.
Do not insert the cigarette lighter into
the accessory socket.
Noise may occur on the audio
playback depending on the device
connected to the accessory socket.
Depending on the device connected
to the accessory socket, the vehicle's
electrical system may be affected,
which could cause the warning light to
illuminate. Disconnect the connected
device and make sure that the problem
is resolved. If the problem is resolved,
disconnect the device from the socket
and switch the ignition off. If the
problem is not resolved, contact an
authorized dealer.
Note: To prevent discharging of the
battery, do not use the socket for long
periods with the engine off or idling. 06040400-L12-002AB
Accessory Socket
63
Page 66 of 292

Warning!To avoid serious injury or death:
Only devices designed for use in this
type of outlet should be inserted into any
12 Volt outlet.
Do not touch with wet hands.
Close the lid when not in use and while
driving the vehicle.
If this outlet is mishandled, it may cause
an electric shock and failure.
Cupholders — If Equipped
Cupholders are available and can be
inserted in the center console on the
passenger side and the rear area of the
center console. Warning!Never use a cup holder to hold hot liquids
while the vehicle is moving. Using a cup
holder to hold hot liquids while the vehicle
is moving is dangerous. If the contents
spill, you could be burned.
Caution!Do not place plastic bottles without
caps in the cup holders. Otherwise, the
contents may spill while the vehicle is being
driven.
Do not place excessive weight on the
cup holders such as by resting your hands
or elbows on them. Otherwise, the cup
holders could be damaged.
If a passenger is present, install the front
cup holder to the rear console. Otherwise,
a knee might hit it and cause the contents
to spill.
Removing Cup Holders
Use both hands when removing the
cup holder. Installing Cupholders
When installing a cupholder, insert it
firmly into the installation hole and make
sure that it is secured in place.06040500L21002
Cupholders
1 — Front Cup Holder
2 — Rear Cup Holder (If Equipped) 06040500-J12AEC1-001
Removing Cupholders
64
GETTING TO KNOW YOUR VEHICLE
Page 67 of 292
The front cupholder can be removed
and installed to the rear console. The rear cupholder is designed for use
on the rear console and cannot be
installed to the front side. Windblocker
This windblocker reduces rear wind
coming into the cabin when driving with
the convertible top down.06040500-J12AEC2-001
Installing Cupholders 06040500-L25-002
Correct Cupholder Placement 06040500-L26-001
Incorrect Cupholder Placement 06041000-12A-003AB
Windblocker
65
Page 68 of 292

TRUNK LID Opening
Warning!Before opening the trunk lid, remove any
snow and ice accumulation on it.
Otherwise, the trunk lid could close under
the weight of the snow and ice resulting in
injury.
Be careful when opening/closing the
trunk lid during strong winds. If a strong
gust blows against the trunk lid, it could
close suddenly resulting in injury.
Fully open the trunk lid and make sure
that it stays open. If the trunk lid is only
opened partially, it could slam shut by
vibration or wind gusts resulting in injury.
When loading or unloading luggage in
the trunk, turn off the engine. Otherwise,
you could get burned by the heat of the
exhaust gas. Using The Remote Release Button
— If Equipped
The remote release button function can
be disabled by locking the doors using
the key fob, emergency key, or a
request switch on the exterior door
handle to prevent an intruder in the
vehicle from opening the trunk lid.
To enable the remote release button
operation, unlock the doors by using
the key fob, emergency key, request
switch on the exterior door handle, or
place the ignition in the ON position.
Note: The remote release button
cannot be disabled by locking the
doors using the door-lock
switch/door-lock knob. Using The Electric Trunk Lid
Opener
With the remote release button: a trunk
lid can also be opened while the key
fob is being carried.
Push the electric trunk lid button and
raise the trunk lid when the latch
releases.
Without the remote release button:
unlock the doors and trunk lid, then
push the electric trunk lid opener and
raise it when the latch releases. 04030201-R12-001
Interior Trunk Lid Release Button 04030201-12A-001
Electric Trunk Release Button
66
GETTING TO KNOW YOUR VEHICLE
Page 69 of 292

With The Advanced Keyless Entry
Function
A locked trunk lid can also be opened
while the key fob is being carried. When
opening the trunk lid with the doors
locked, it may require a few seconds for
the trunk lid latch to release after the
electric trunk lid opener is pushed.
The trunk lid can be closed when the
doors are locked with the key fob left in
the vehicle. However, to prevent locking
the key fob in the vehicle, the trunk lid
can be opened by pushing the electric
trunk lid opener. If the trunk lid cannot
be opened despite doing this
procedure, push the electric trunk lid
opener to fully open the trunk lid after
pushing the trunk lid completely closed.
If the vehicle battery is discharged or
there is a malfunction in the electrical
system and the trunk lid cannot be
unlocked, the trunk lid can be opened
by performing the emergency
procedure.
When Trunk Lid Cannot
Be Opened
If the battery is discharged, the trunk lid
cannot be unlocked and opened. In this
case, the trunk can be unlocked by
taking care of the discharged battery
situation.
If the trunk lid cannot be unlocked even
if the discharged battery situation has
been resolved, the electrical system
may have a malfunction. Proceed as follows:
1. Close the convertible top and
remove the windblocker.
2. Remove the fasteners on the right
side of the vehicle.
3. Partially peel back the cover on the
right side of the vehicle. 4. Turn and loosen the cap screws until
the screws start to spin free.
Note: Do not pull the screw when
pulling the cap. Otherwise, the screw
may fall off and become lost.
Refer to “Trunk Emergency Release”
located in “Getting To Know Your
Vehicle” for further information.
Closing
1. Use both hands to push the trunk lid
down until the lock snaps shut. Do not
slam it.
2. Pull up on the trunk lid to make sure
it is secure. 08080100-125-002
Remove Windblocker 08080100-121-004
Remove Fasteners 08080100-122-001
Cover Removal
67
Page 70 of 292

TRUNK EMERGENCY
RELEASE As a security measure, a trunk internal
emergency release lever is built into the
rear tail panel. In the event of an adult
or child being locked inside the trunk,
the trunk can be simply opened by
pulling down the lever and open the
trunk lid. After performing this
emergency measure, contact an
authorized dealer as soon as possible. Trunk Safety Warning
Warning!Do not allow children to have access to the
trunk, either by climbing into the trunk from
outside, or through the inside of the
vehicle. Always close the trunk lid when
your vehicle is unattended. Once in the
trunk, young children may not be able to
escape, even if they entered through the
rear seat. If trapped in the trunk, children
can die from suffocation or heat stroke.
HOOD Opening The Hood
To open the hood, proceed as follows:
1. With the vehicle in PARK, pull the
release handle located to the left of the
steering wheel, below the instrument
panel.
2. Move to the outside of the vehicle
and insert your hand into the hood
opening, then slide the latch lever to the
right, and lift up the hood.08080100-123-004
Trunk Emergency Release 07030201-L12-001
Releasing The Hood Latch
1 — Hood Release Handle
68
GETTING TO KNOW YOUR VEHICLE
Page 71 of 292

3. Pull up the support rod from the clip,
and insert it into the support rod hole
indicated by the arrow to hold the hood
open. Closing The Hood
To close the hood, proceed as follows:
1. Check under the hood area to make
certain all filler caps are in place and all
loose items (e.g. tools, oil containers,
etc.) have been removed.
2. Lift the hood with one hand, and
with the other hand grasp the padded
area on the support rod.
3. Secure the support rod into the rod
clip.
4. Verify that the support rod is
secured in the clip before closing the
hood.
5. Lower the hood slowly to a height of
about 8 inches (20 cm) above its closed
position and then let it drop. Warning!Be sure the hood is fully latched before
driving your vehicle. If the hood is not fully
latched, it could open when the vehicle is
in motion and block your vision. Failure to
follow this warning could result in serious
injury or death.
Caution!To prevent possible damage, do not slam
the hood to close it. Lower hood to
approximately 8 inches (20 cm) and drop
the hood to close. Make sure hood is fully
closed for both latches. Never drive vehicle
unless hood is fully closed, with both
latches engaged.07030201-122-001AB
Sliding The Latch Lever To The
Right
2 — Latch Lever 07030201-130-888
Support Rod Location
3 — Support Rod 07030201-123-002
Inserting Support Rod Into Hole
4 — Support Rod Hole
69
Page 72 of 292

CONVERTIBLE TOP
(SOFT TOP) Lowering The
Convertible Top
Warning!Do not sit on the folded convertible top,
otherwise the convertible top could be
damaged or you may fall off and be injured.
To lower the convertible top, Proceed
as follows:
1. Make sure the parking brake is
applied and the engine is OFF.
2. Make sure there are no objects
which have been placed in the area
where the convertible top is to be
retracted.
3. Push forward on the release latch.
There is a red indicator showing that
the latch is open. 4. With the lock release latch pushed
forward (red indicator visible), pull the
top latch handle rearward to unlock it.
5. Remove the striker from the anchor. Note: The power windows will go
down automatically when the
convertible top is opened. If the power
windows do not go down automatically,
fully open the windows using the power
window switch located on the doors. 04110102-L36-006
Lock Release Latch
1 — Release Latch Closed
2 — Release Latch Open 04110102-L21-001
Pulling The Top Latch Handle
Rearward
3 — Latch Release Handle 04110102-L22-002
Removing Striker From Anchor
4 — Striker
5 — Anchor
70
GETTING TO KNOW YOUR VEHICLE