2017 FIAT FIORINO technical data
[x] Cancel search: technical dataPage 30 of 272

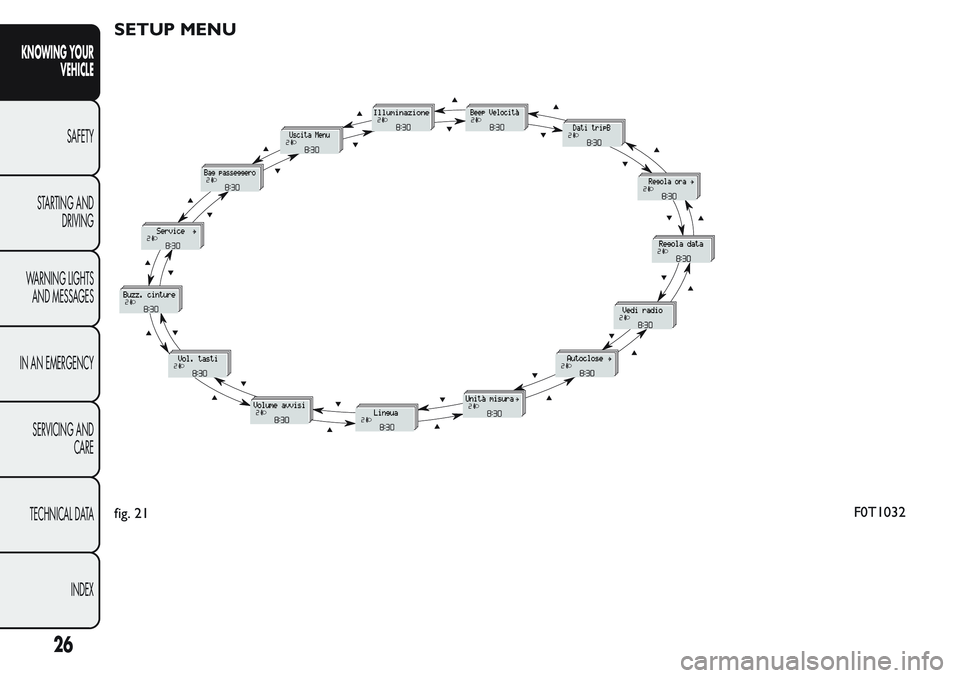
SETUP MENU
fig. 21F0T1032
26
KNOWING YOUR
VEHICLE
SAFETY
STARTING AND
DRIVING
WARNING LIGHTS
AND MESSAGES
IN AN EMERGENCY
SERVICING AND
CARE
TECHNICAL DATA
INDEX
Page 31 of 272

Setup menu functions
The fig. 21 menu comprises a series of functions
arranged in a circular way, which can be selected
through the
andbuttons to access the
different selection operations and settings (setup)
given in the following paragraphs. A submenu is
provided for some items (Setting the clock and Set
units).
The set-up menu is activated by pressing theSET
button briefly.
Single presses of the
orbuttons permit
navigation through the setup menu options.
Operating modes are different according to the
characteristics of the option selected.
Selecting an option from the main menu
without a submenu:
press theSET
button briefly to select the main
menu setting you wish to change;
- press the
orbuttons (with a single press)
to select the new setting;
press theSET
button briefly to save the new
setting and go back to the previous main menu
option.
Selecting an option from the main menu with
a submenu:
briefly press theSET
button to display the first
submenu option;
- press the
orbuttons (with a single press)
to scroll through all submenu options;press theSET
button briefly to select the
displayed submenu option and to open the relevant
settings menu;
- press the
orbuttons (with a single press)
to choose the new setting for this submenu option;
press theSET
button briefly to store the new
setting and go back to the previous submenu option.
Selecting “Date” and “Set Clock”:
- press theSET
button briefly to select the first
value to be changed (e.g. hours / minutes or year /
month / day).
- press the
orbuttons (with a single press)
to select the new setting;
- press theSET
button briefly to store the new
setting and at the same time go to the next set-up
menu option. If the processed option is the last one,
the system brings you back to the previously selected
option of the menu.
Hold down the SET
button:
- to exit the set-up menu if you are in the main
menu;
- to exit the main menu if you are in another point of
the menu (e.g.: at submenu option setting level, at
submenu level or at main menu option setting level);
- to save only the changes already stored by the
user (and confirmed by pressing theSET
button).
The set-up menu page is timed. When the menu is
exited due to the expiry of the time allowed, only
27
KNOWING YOUR
VEHICLE
SAFETY
STARTING AND
DRIVING
WARNING LIGHTS
AND MESSAGES
IN AN EMERGENCY
SERVICING AND
CARE
TECHNICAL DATA
INDEX
Page 32 of 272

the changes already stored by the user (and
confirmed by pressing theSET
button briefly)
will be saved.
From the standard screen, press theSET
button
briefly to start browsing.
Press the
orbuttons to navigate within the
menu.
NoteOnly the reduced menu can be accessed while
the vehicle is moving for safety reasons ("Speed
Beep" setting). Stop the vehicle to access the full
menu.
Adjusting the vehicle interior lighting
This function is available with the dipped beam
headlights on to adjust brightness of the instrument
panel, buttons and radio display.
To adjust the light intensity, proceed as follows:
press the SETbutton briefly to make
the display flash the previously set level;
press theorbutton to set the required
brightness level;
press the SETbutton briefly to go back to the
menu screen or hold the button down to go back
to the standard screen without saving.
Speed limit (Speed Beep)
This function makes it possible to set the vehicle
speed limit (km/h or mph). When this limit isexceeded the driver is immediately alerted (see
“Warning lights and messages” section).
To set the desired speed limit, proceed as follows:
- press theSET
button briefly, the display will
show the wording (Speed Beep);
- press the
orbutton to select speed limit
activation (On) or deactivation (Off );
- if the function is on, press
orbutton to
select the desired speed limit and then pressSET
to confirm.
NoteSetting is possible between 30 and 200 km/h,
or 20 and 125 mph, according to the previously
set unit. See the "Setting the unit of measurement
(Measurement unit)" paragraph described below. The
setting will increase/decrease by 5 units each time
button
/is pressed. Hold down the/
button to automatically increase/decrease the
setting rapidly. Complete the adjustment with single
presses of the button when you approach the desired
value.
- press theSET
button briefly to go back to the
menu screen or hold the button down to go back
to the standard screen without saving.
To cancel the setting, proceed as follows:
- press theSET
button briefly to make the
display flash (On);
- press button
, (Off ) will flash on the display;
- press theSET
button briefly to go back to the
menu screen or hold the button down to go back
to the standard screen without saving.
28
KNOWING YOUR
VEHICLE
SAFETY
STARTING AND
DRIVING
WARNING LIGHTS
AND MESSAGES
IN AN EMERGENCY
SERVICING AND
CARE
TECHNICAL DATA
INDEX
Page 33 of 272

Trip B On/Off (Trip B data)
This function can be used to activate (On) or
deactivate (Off ) the Trip B display (partial trip).
For more information see the "Trip computer"
paragraph.
Proceed as follows to switch the function on/off:
- briefly press theSET
button to make the
display flash (On) or (Off ) according to what was
previously set;
- press button
orto select;
- press theSET
button briefly to go back to the
menu screen or hold the button down to go back
to the standard screen without saving.
Setting the clock (Set time)
This function allows the adjustment of the clock
through two submenus: Time and Format.
To carry out the adjustment, proceed as follows:
- press theSET
button briefly and the two
submenus "Time" and "Format" will be displayed;
- press the
orbutton to switch between the
two submenus;
- once you have selected a submenu, pressSET
briefly;
- when you select "Time", pressing theSET
button briefly makes the "hours" flash on the
display;
- press the
orbutton to adjust;- press theSET
button briefly: "minutes" starts
flashing on the display;
- press the
orbutton to adjust;
When you select "Format": briefly pressing theSET
button makes the display mode flash on the
display;
- press button
orto select "24h" or "12h"
mode.
When you have made the required settings, press the
SET
button briefly to go back to the submenu
screen or hold the button down to go back to
the main menu screen without saving.
- press theSET
button again to return to the
standard screen or to the main menu according
to where you are in the menu.
Setting the date (Set Date)
This function allows updating of the date (day -
month - year).
Proceed as follows to update:
- press theSET
button briefly: "day" (dd) starts
flashing on the display;
- press the
orbutton to adjust;
- press theSET
button briefly: "month" starts
flashing on the display (mm);
- press the
orbutton to adjust;
- press theSET
button briefly: "year" starts
flashing on the display (yyyy);
- press the
orbutton to adjust.
29
KNOWING YOUR
VEHICLE
SAFETY
STARTING AND
DRIVING
WARNING LIGHTS
AND MESSAGES
IN AN EMERGENCY
SERVICING AND
CARE
TECHNICAL DATA
INDEX
Page 34 of 272

NoteThe setting will increase or decrease by one
unit each time the
orbutton is pressed.
Keeping the button pressed causes an automatic
rapid value increase/decrease. Complete the
adjustment with single presses of the button when
you approach the desired value.
- press theSET
button briefly to go back to the
menu screen or hold the button down to go back
to the standard screen without saving.
Audio information (See radio)
This function is used to display radio information.
- Radio: selected radio station frequency or RDS
message, automatic tuning activation or AutoSTore;
- Audio CD, MP3 CDs: track number;
- CD Changer: CD number and track number;
To show the sound system information on
the display (On) or clear it (Off ), proceed as follows:
- briefly press theSET
button to make the
display flash (On) or (Off ) according to what was
previously set;
- press button
orto select;
- press theSET
button briefly to go back to the
menu screen or hold the button down to go back
to the standard screen without saving.Automatic central locking with vehicle
moving (Autoclose)
After activation (On), this function allows the
automatic locking of the doors when the speed
exceeds 20 km/h.
Proceed as follows to activate (On) or deactivate
(Off ) this function:
- press theSET
button briefly to display a
submenu;
- briefly press theSET
button to make the
display flash (On) or (Off ) according to what was
previously set;
- press button
orto select;
briefly press theSET
button to return to the
submenu screen or hold the button down to return
to the main menu screen without saving;
- press theSET
button again to return to the
standard screen or to the main menu according
to where you are in the menu.
Setting the unit of measurement
This function allows the setting of a unit of
measurement via three submenus: Distance,
Consumption and Temperature.
To set the desired unit of measurement, proceed as
follows:
- briefly press theSET
button to display the
three submenus;
30
KNOWING YOUR
VEHICLE
SAFETY
STARTING AND
DRIVING
WARNING LIGHTS
AND MESSAGES
IN AN EMERGENCY
SERVICING AND
CARE
TECHNICAL DATA
INDEX
Page 35 of 272

- press buttonorto navigate through the
three submenus;
- once you have selected the submenu to be changed,
press theSET
button briefly;
- if you enter the "Distances" submenu, pressing the
SET
button briefly makes the display show
"km" or "mi" (depending on the previous setting);
- press button
orto select;
- if you enter the "Consumption" submenu, pressing
theSET
button briefly makes the display show
"km/l", "l/100km" or "mpg" (depending on the
previous setting);
If the set distance unit is "km", the display enables
setting of the fuel consumption unit (km/l or
l/100km).
If the set distance unit is "mi", the display shows the
amount of fuel consumed in "mpg".
- press button
orto select;
- when you enter the “Temperature” submenu,
pressing theSET
button briefly makes “°C” or
“°F” appear on the display depending on the previous
setting;
- press button
orto select;
When you have made the required settings, press the
SET
button briefly to go back to the submenu
screen or hold the button down to go back to
the main menu screen without saving.
- press theSET
button again to return to the
standard screen or to the main menu according
to where you are in the menu.Selecting the language (Language)
Messages on the display can be shown in the
following languages: Italian, German, English, Spanish,
French, Portuguese, Turkish and Dutch.
To set the desired language, proceed as follows:
briefly press theSET
button, the previously set
"language" starts flashing on the display;
- press button
orto select;
- press theSET
button briefly to go back to the
menu screen or hold the button down to go back
to the standard screen without saving.
Adjust the failure/warning buzzer volume
(Buzzer Volume)
With this function the volume of the buzzer which
accompanies the display of any failure/warning can be
adjusted according to 8 levels.
To set the desired volume, proceed as follows:
- briefly press theSET
button, the previously set
volume “level” will flash on the display;
- press the
orbutton to adjust;
- press theSET
button briefly to go back to the
menu screen or hold the button down to go back
to the standard screen without saving.
Adjusting the button volume (Button Vol.)
This function is used to set the volume of the
acoustic signal accompanying the activation of the
SET
,andbuttons through 8 levels.
31
KNOWING YOUR
VEHICLE
SAFETY
STARTING AND
DRIVING
WARNING LIGHTS
AND MESSAGES
IN AN EMERGENCY
SERVICING AND
CARE
TECHNICAL DATA
INDEX
Page 36 of 272

To set the desired volume, proceed as follows:
- briefly press theSET
button, the previously set
volume “level” will flash on the display;
- press the
orbutton to adjust;
- press theSET
button briefly to go back to the
menu screen or hold the button down to go back
to the standard screen without saving.
Reactivation of buzzer for S.B.R. signal (Belt
buzzer)
This function can be displayed only after a Fiat
Dealership has deactivated the SBR system (see "SBR
system" in the "Safety" section).
Scheduled Servicing (Service)
Using this function you can display information about
the mileage intervals for vehicle servicing.
To consult the information, proceed as follows:
- press theSET
button briefly: the display will
show when servicing is due in km or mi according to
the previous setting (see paragraph "Units of
measurement");
- briefly press theSET
button to go back to the
menu screen or hold the button down to go back
to the standard screen.NoteThe "Scheduled Servicing Plan" includes vehicle
maintenance at fixed intervals, refer to the
"Maintenance and care" chapter. The indication of
the "Service" function will appear automatically, with
the key in MAR position, starting from 2,000 km
(or 1,240 mi) and will be displayed every 200 km (or
124 mi).
Below 200 km servicing indications are more
frequent. The display will be in km or miles according
to the unit of measurement set. When the next
service is close, when the ignition is turned ON the
word "Service" appears in the display followed by
the remaining number of kilometres/miles. Go to a
Fiat Dealership, where the "Scheduled Service Plan"
operations will be performed and the message
will be reset.
Passenger airbag and side bag activation/
deactivation (Passenger bag)
(for versions/markets, where provided)
This function allows the passenger side airbag to be
activated/deactivated.
Proceed as follows:- press the SETbutton and, after the display
shows the message (Passenger bag: Off ) (to
deactivate) or the message (Passenger Bag: On)
(to activate) by pressing the
andbuttons,
press the SET
button again;
the confirmation request message will appear on
the display;
32
KNOWING YOUR
VEHICLE
SAFETY
STARTING AND
DRIVING
WARNING LIGHTS
AND MESSAGES
IN AN EMERGENCY
SERVICING AND
CARE
TECHNICAL DATA
INDEX
Page 37 of 272

press buttonsorto select (Yes)
(confirming activation/deactivation) or (No) (to
abort);
press the SETbutton button briefly: a message
confirming the selection will be displayed and you
will return to the menu screen or, pressing the
button for longer, you will return to the standard
screen without saving.
Exit Menu
This is the last function that closes the cycle of
settings listed in the menu screen.
Pressing theSET
button briefly will return the
display to the standard screen without storing.
Press button
to return to the first menu item on
the display (Speed Beep).
TRIP COMPUTER
General features
The Trip computer is used to display information on
vehicle operation when the ignition key is turned
to MAR. This function allows you to define two
separate trips, called "Trip A" and "Trip B", for
monitoring the "complete mission" (journey) of the
vehicle in a reciprocally independent manner. Both
functions can be reset (start of a new journey).
“Trip A” is used to display the values relating to:
Outside temperature (for Natural Power vehicles
equipped with temperature sensor)
Range
Distance travelled
Average consumption
Current consumption
Average speed
Travel time (driving time).
"Trip B", available on multifunction display only, is
used to display the values relating to:
Distance travelled B
Average consumption B
Average speed B
Travel time B (driving time).
33
KNOWING YOUR
VEHICLE
SAFETY
STARTING AND
DRIVING
WARNING LIGHTS
AND MESSAGES
IN AN EMERGENCY
SERVICING AND
CARE
TECHNICAL DATA
INDEX