2017 FIAT 500L LIVING belt
[x] Cancel search: beltPage 14 of 240
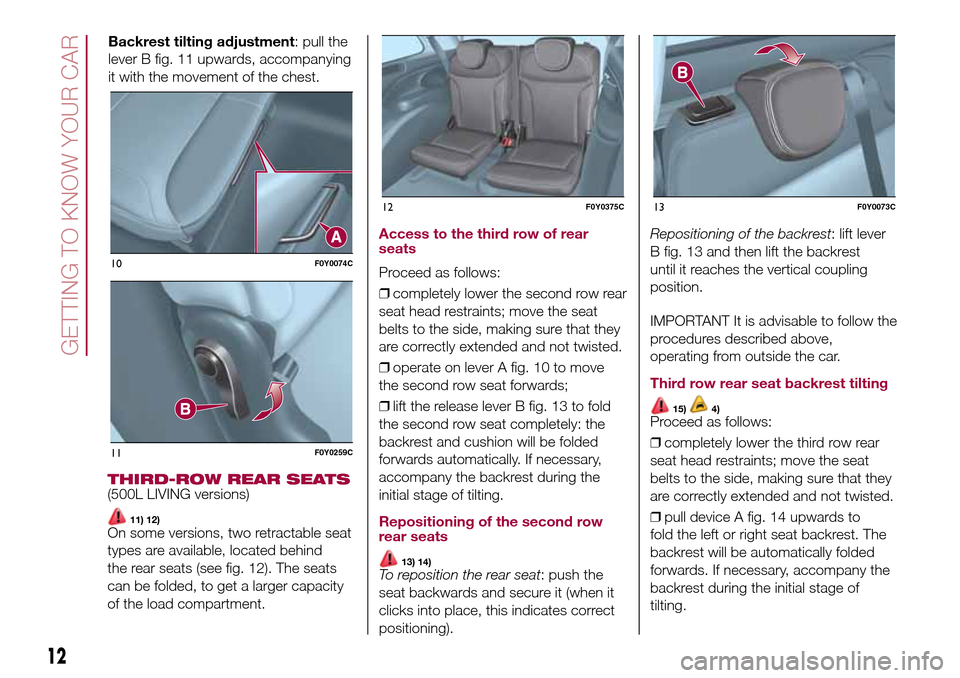
THIRD-ROW REAR SEATS(500L LIVING versions)
11) 12)On some versions, two retractable seat
types are available, located behind
the rear seats (see fig. 12). The seats
can be folded, to get a larger capacity
of the load compartment.
Access to the third row of rear
seats
Proceed as follows:
❒completely lower the second row rear
seat head restraints; move the seat
belts to the side, making sure that they
are correctly extended and not twisted.
❒operate on lever A fig. 10 to move
the second row seat forwards;
❒lift the release lever B fig. 13 to fold
the second row seat completely: the
backrest and cushion will be folded
forwards automatically. If necessary,
accompany the backrest during the
initial stage of tilting.
Repositioning of the second row
rear seats
13) 14)To reposition the rear seat: push the
seat backwards and secure it (when it
clicks into place, this indicates correct
positioning).Repositioning of the backrest: lift lever
B fig. 13 and then lift the backrest
until it reaches the vertical coupling
position.
IMPORTANT It is advisable to follow the
procedures described above,
operating from outside the car.
Third row rear seat backrest tilting
15)4)Proceed as follows:
❒completely lower the third row rear
seat head restraints; move the seat
belts to the side, making sure that they
are correctly extended and not twisted.
❒pull device A fig. 14 upwards to
fold the left or right seat backrest. The
backrest will be automatically folded
forwards. If necessary, accompany the
backrest during the initial stage of
tilting.
10F0Y0074C
11F0Y0259C
12F0Y0375C13F0Y0073C
12
GETTING TO KNOW YOUR CAR
Backrest tilting adjustment: pull the
lever B fig. 11 upwards, accompanying
it with the movement of the chest.
Page 33 of 240
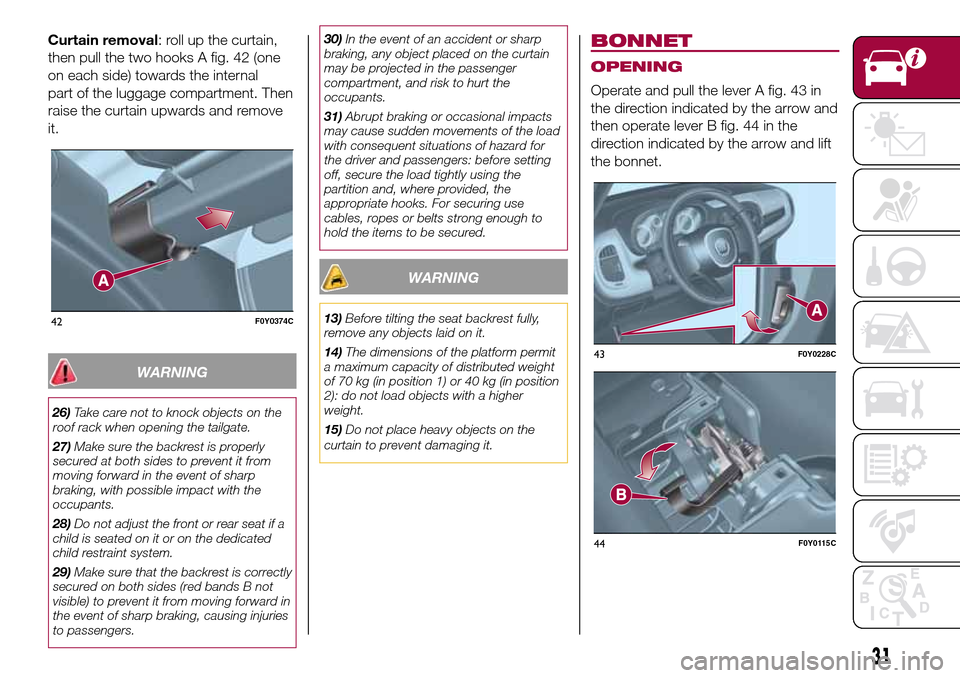
Curtain removal: roll up the curtain,
then pull the two hooks A fig. 42 (one
on each side) towards the internal
part of the luggage compartment. Then
raise the curtain upwards and remove
it.
WARNING
26)Take care not to knock objects on the
roof rack when opening the tailgate.
27)Make sure the backrest is properly
secured at both sides to prevent it from
moving forward in the event of sharp
braking, with possible impact with the
occupants.
28)Do not adjust the front or rear seat if a
child is seated on it or on the dedicated
child restraint system.
29)Make sure that the backrest is correctly
secured on both sides (red bands B not
visible) to prevent it from moving forward in
the event of sharp braking, causing injuries
to passengers.30)In the event of an accident or sharp
braking, any object placed on the curtain
may be projected in the passenger
compartment, and risk to hurt the
occupants.
31)Abrupt braking or occasional impacts
may cause sudden movements of the load
with consequent situations of hazard for
the driver and passengers: before setting
off, secure the load tightly using the
partition and, where provided, the
appropriate hooks. For securing use
cables, ropes or belts strong enough to
hold the items to be secured.
WARNING
13)Before tilting the seat backrest fully,
remove any objects laid on it.
14)The dimensions of the platform permit
a maximum capacity of distributed weight
of 70 kg (in position 1) or 40 kg (in position
2): do not load objects with a higher
weight.
15)Do not place heavy objects on the
curtain to prevent damaging it.
BONNET
OPENING
Operate and pull the lever A fig. 43 in
the direction indicated by the arrow and
then operate lever B fig. 44 in the
direction indicated by the arrow and lift
the bonnet.
42F0Y0374C
43F0Y0228C
44F0Y0115C
31
Page 45 of 240
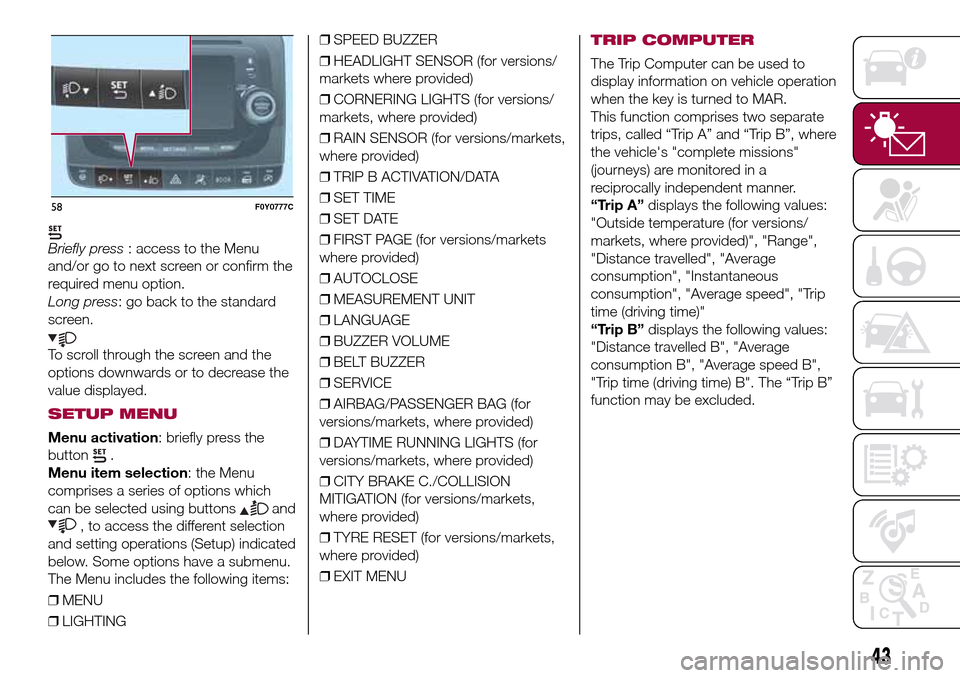
Briefly press: access to the Menu
and/or go to next screen or confirm the
required menu option.
Long press: go back to the standard
screen.
To scroll through the screen and the
options downwards or to decrease the
value displayed.
SETUP MENU
Menu activation: briefly press the
button
.
Menu item selection: the Menu
comprises a series of options which
can be selected using buttons
and
, to access the different selection
and setting operations (Setup) indicated
below. Some options have a submenu.
The Menu includes the following items:
❒MENU
❒LIGHTING❒SPEED BUZZER
❒HEADLIGHT SENSOR (for versions/
markets where provided)
❒CORNERING LIGHTS (for versions/
markets, where provided)
❒RAIN SENSOR (for versions/markets,
where provided)
❒TRIP B ACTIVATION/DATA
❒SET TIME
❒SET DATE
❒FIRST PAGE (for versions/markets
where provided)
❒AUTOCLOSE
❒MEASUREMENT UNIT
❒LANGUAGE
❒BUZZER VOLUME
❒BELT BUZZER
❒SERVICE
❒AIRBAG/PASSENGER BAG (for
versions/markets, where provided)
❒DAYTIME RUNNING LIGHTS (for
versions/markets, where provided)
❒CITY BRAKE C./COLLISION
MITIGATION (for versions/markets,
where provided)
❒TYRE RESET (for versions/markets,
where provided)
❒EXIT MENU
TRIP COMPUTER
The Trip Computer can be used to
display information on vehicle operation
when the key is turned to MAR.
This function comprises two separate
trips, called “Trip A” and “Trip B”, where
the vehicle's "complete missions"
(journeys) are monitored in a
reciprocally independent manner.
“Trip A”displays the following values:
"Outside temperature (for versions/
markets, where provided)", "Range",
"Distance travelled", "Average
consumption", "Instantaneous
consumption", "Average speed", "Trip
time (driving time)"
“Trip B”displays the following values:
"Distance travelled B", "Average
consumption B", "Average speed B",
"Trip time (driving time) B". The “Trip B”
function may be excluded.
58F0Y0777C
43
Page 49 of 240
Warning light What it means
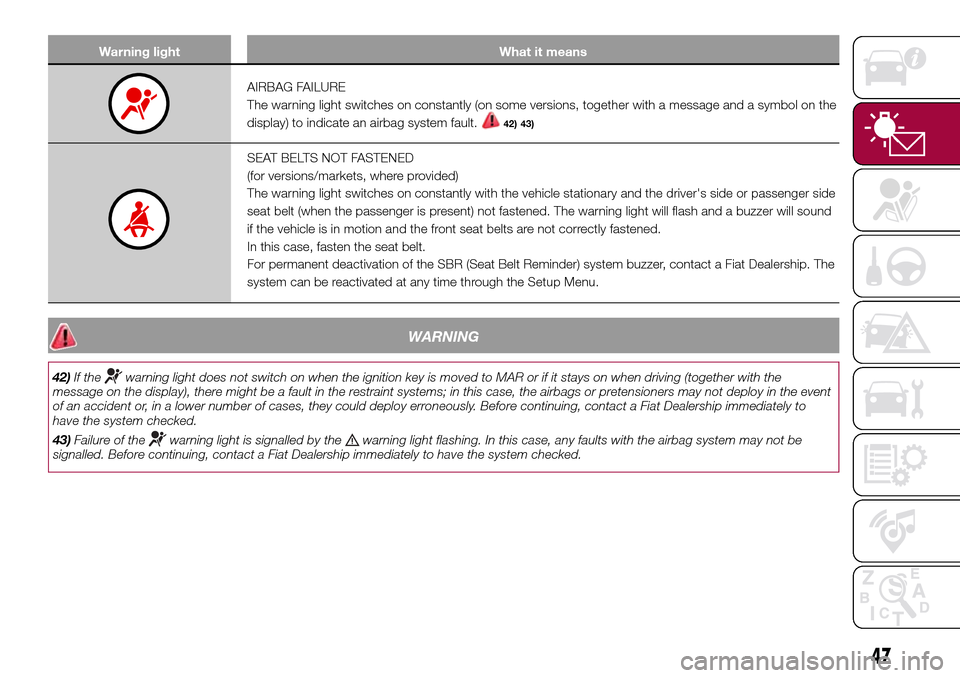
AIRBAG FAILURE
The warning light switches on constantly (on some versions, together with a message and a symbol on the
display) to indicate an airbag system fault.
42) 43)
SEAT BELTS NOT FASTENED
(for versions/markets, where provided)
The warning light switches on constantly with the vehicle stationary and the driver's side or passenger side
seat belt (when the passenger is present) not fastened. The warning light will flash and a buzzer will sound
if the vehicle is in motion and the front seat belts are not correctly fastened.
In this case, fasten the seat belt.
For permanent deactivation of the SBR (Seat Belt Reminder) system buzzer, contact a Fiat Dealership. The
system can be reactivated at any time through the Setup Menu.
WARNING
42)If thewarning light does not switch on when the ignition key is moved to MAR or if it stays on when driving (together with the
message on the display), there might be a fault in the restraint systems; in this case, the airbags or pretensioners may not deploy in the event
of an accident or, in a lower number of cases, they could deploy erroneously. Before continuing, contact a Fiat Dealership immediately to
have the system checked.
43)Failure of the
warning light is signalled by thewarning light flashing. In this case, any faults with the airbag system may not be
signalled. Before continuing, contact a Fiat Dealership immediately to have the system checked.
47
Page 66 of 240
SAFETY
The chapter that you are about to read
is very important: it describes the
safety systems with which the vehicle is
equipped and provides instructions on
how to use them correctly.ACTIVE SAFETY SYSTEMS ............ 65
DRIVING ASSISTANCE SYSTEMS .. 67
OCCUPANT PROTECTION
SYSTEMS ....................................... 71
SEAT BELTS ................................... 72
SBR (SEAT BELT REMINDER)
SYSTEM ......................................... 73
PRETENSIONERS........................... 74
CHILD PROTECTION SYSTEMS ..... 76
SUPPLEMENTARY RESTRAINT
SYSTEM (SRS) - AIRBAG................ 86
64
SAFETY
Page 70 of 240
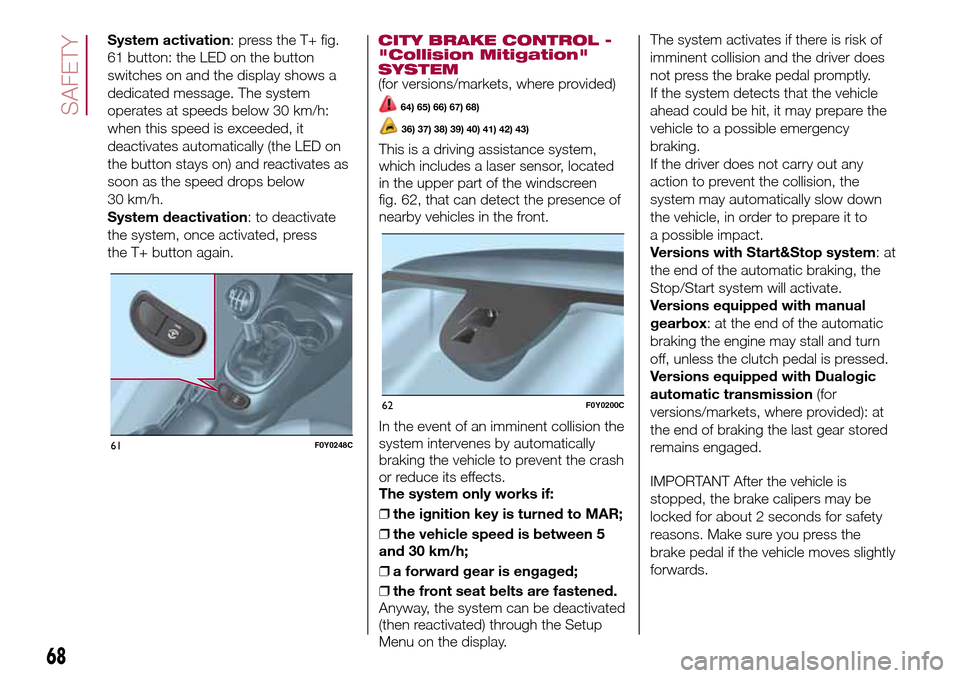
System activation: press the T+ fig.
61 button: the LED on the button
switches on and the display shows a
dedicated message. The system
operates at speeds below 30 km/h:
when this speed is exceeded, it
deactivates automatically (the LED on
the button stays on) and reactivates as
soon as the speed drops below
30 km/h.
System deactivation: to deactivate
the system, once activated, press
the T+ button again.CITY BRAKE CONTROL -
"Collision Mitigation"
SYSTEM
(for versions/markets, where provided)
64) 65) 66) 67) 68)
36) 37) 38) 39) 40) 41) 42) 43)
This is a driving assistance system,
which includes a laser sensor, located
in the upper part of the windscreen
fig. 62, that can detect the presence of
nearby vehicles in the front.
In the event of an imminent collision the
system intervenes by automatically
braking the vehicle to prevent the crash
or reduce its effects.
The system only works if:
❒the ignition key is turned to MAR;
❒the vehicle speed is between 5
and 30 km/h;
❒a forward gear is engaged;
❒the front seat belts are fastened.
Anyway, the system can be deactivated
(then reactivated) through the Setup
Menu on the display.The system activates if there is risk of
imminent collision and the driver does
not press the brake pedal promptly.
If the system detects that the vehicle
ahead could be hit, it may prepare the
vehicle to a possible emergency
braking.
If the driver does not carry out any
action to prevent the collision, the
system may automatically slow down
the vehicle, in order to prepare it to
a possible impact.
Versions with Start&Stop system:at
the end of the automatic braking, the
Stop/Start system will activate.
Versions equipped with manual
gearbox: at the end of the automatic
braking the engine may stall and turn
off, unless the clutch pedal is pressed.
Versions equipped with Dualogic
automatic transmission(for
versions/markets, where provided): at
the end of braking the last gear stored
remains engaged.
IMPORTANT After the vehicle is
stopped, the brake calipers may be
locked for about 2 seconds for safety
reasons. Make sure you press the
brake pedal if the vehicle moves slightly
forwards.
61F0Y0248C
62F0Y0200C
68
SAFETY
Page 73 of 240
37)Sensor operation may also be
compromised by the presence of dust,
condensation, dirt or ice on the
windscreen, by traffic conditions (e.g.
vehicles that are driving not aligned with
yours, vehicles driving in a transverse
or opposite way on the same lane, bend
with a small radius of curvature), by road
surface conditions and by driving
conditions (e.g. off-road driving). Make sure
the windscreen is always clean. Use
specific detergents and clean cloths to
avoid scratching the windscreen. The
sensor operation may also be limited or
absent in some driving, traffic and road
surface conditions.
38)Projecting loads on the roof of the
vehicle may interfere with the correct
operation of the sensor. Before starting
make sure the load is correctly positioned,
in order not to cover the sensor operating
range.
39)If the windscreen must be replaced
due to scratches, chipping or breakage,
contact exclusively a Fiat Dealership.
Do not replace the windscreen on your
own, risk of malfunction! It is advisable to
replace the windscreen if it is damaged
in the area of the laser sensor.
40)Do not tamper with nor operate on the
laser sensor. Do not close the openings
in the aesthetic cover located under the
interior rear view mirror. In the event of
a sensor failure, contact a Fiat Dealership.
41)If you are driving on roads close to
trees with protruding branches it is
advisable to deactivate the system to
prevent the branches at the height of the
bonnet or the windscreen from interfering
with the system.42)Do not cover the operating range of the
sensor with stickers or other objects. Also
pay attention to other objects on the
bonnet (e.g. a layer of snow) and make
sure they do not interfere with the light
emitted by the laser.
43)If a trailer or a vehicle is towed, the
system must be deactivated with the
display Setup Menu.
44)If the system signals a pressure
decrease on a specific tyre, it is
recommended to check the pressure on all
four tyres.
45)iTPMS does not relieve the driver from
the obligation to check the tyre pressure
every month; it is not to be considered
a system to replace maintenance or a
safety system.
46)The iTPMS cannot indicate sudden tyre
pressure drops (for example when a tyre
bursts). In this case, stop the vehicle,
braking with caution and avoiding abrupt
steering.
47)The iTPMS only warns that the tyre
pressure is low: it is not able to inflate
them.
48)Insufficient tyre inflation increases fuel
consumption, reduces the tread duration
and may affect the capacity to drive safely.
49)Tyre pressure must be checked with
tyres cold. Should it become necessary for
whatever reason to check pressure with
warm tyres, do not reduce pressure even
though it is higher than the prescribed
value, but repeat the check when tyres are
cold.OCCUPANT
PROTECTION
SYSTEMS
The most important safety equipment
of the vehicle comprise the following
protection systems:
❒seat belts;
❒SBR (Seat Belt Reminder) system;
❒head restraints;
❒child restraint systems;
❒front airbags and side bags.
Read the information given the
following pages with the utmost care. It
is of fundamental importance that the
protection systems are used in the
correct way to guarantee the maximum
possible safety level for the driver and
the passengers.
For the description of the head restraint
adjustment see paragraph "Head
restraints" in chapter "Knowing your
vehicle".
71
Page 74 of 240
SEAT BELTS
69) 70)
USING THE SEAT BELTS
The driver is responsible for respecting,
and ensuring that all the other
occupants of the vehicle also respect,
the local laws in force in relation to
the use of the seat belts.
Always fasten the seat belts before
setting off.
The seat belt should be worn keeping
the torso straight and rested against
the backrest.
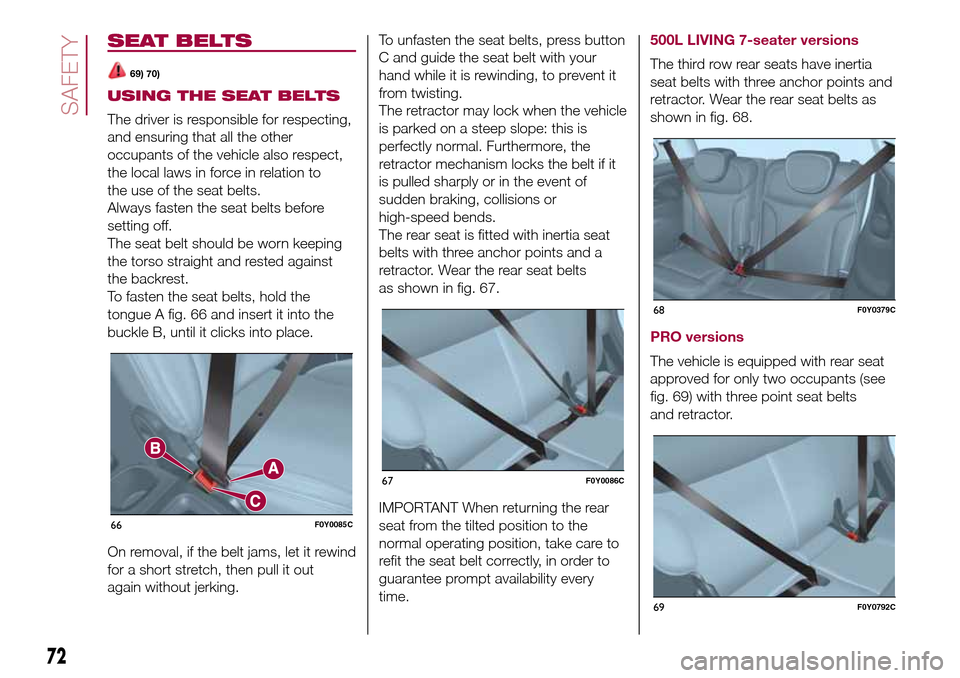
To fasten the seat belts, hold the
tongue A fig. 66 and insert it into the
buckle B, until it clicks into place.
On removal, if the belt jams, let it rewind
for a short stretch, then pull it out
again without jerking.To unfasten the seat belts, press button
C and guide the seat belt with your
hand while it is rewinding, to prevent it
from twisting.
The retractor may lock when the vehicle
is parked on a steep slope: this is
perfectly normal. Furthermore, the
retractor mechanism locks the belt if it
is pulled sharply or in the event of
sudden braking, collisions or
high-speed bends.
The rear seat is fitted with inertia seat
belts with three anchor points and a
retractor. Wear the rear seat belts
as shown in fig. 67.
IMPORTANT When returning the rear
seat from the tilted position to the
normal operating position, take care to
refit the seat belt correctly, in order to
guarantee prompt availability every
time.
500L LIVING 7-seater versions
The third row rear seats have inertia
seat belts with three anchor points and
retractor. Wear the rear seat belts as
shown in fig. 68.
PRO versions
The vehicle is equipped with rear seat
approved for only two occupants (see
fig. 69) with three point seat belts
and retractor.
66F0Y0085C
67F0Y0086C
68F0Y0379C
69F0Y0792C
72
SAFETY