Page 148 of 240
1.4 16V 95 HP versions
A. Engine oil dipstick – B. Engine oil cap/filler – C. Engine coolant – D. Windscreen/rear window washer fluid – E. Brake fluid – F. Battery
145F0Y0181C
146
SERVICING AND MAINTENANCE
Page 149 of 240
1.4 16V 120 HP versions
A. Engine oil dipstick – B. Engine oil cap/filler – C. Engine coolant – D. Windscreen/rear window washer fluid – E. Brake fluid – F. Battery
146F0Y0399C
147
Page 150 of 240
1.3 16V MultiJet versions
A. Engine oil dipstick – B. Engine oil cap/filler – C. Engine coolant – D. Windscreen/rear window washer fluid – E. Brake fluid – F. Battery
147F0Y0182C
148
SERVICING AND MAINTENANCE
Page 151 of 240
1.6 16V 105 HP MultiJet versions
A. Engine oil dipstick – B. Engine oil cap/filler – C. Engine coolant – D. Windscreen/rear window washer fluid – E. Brake fluid – F. Battery
148F0Y0314C
149
Page 152 of 240
1.6 16V 120 HP MultiJet versions
A. Engine oil dipstick – B. Engine oil cap/filler – C. Engine coolant – D. Windscreen/rear window washer fluid – E. Brake fluid – F. Battery
149F0Y0413C
150
SERVICING AND MAINTENANCE
Page 153 of 240

ENGINE OIL
150)70) 71)4)
Check that the oil level is between the
MIN and MAX references on the
dipstick A. If the oil level is near or even
under the MIN mark, add oil using the
filler B to reach the MAX mark. Take out
the engine oil dipstick A, clean it with
a lint-free cloth and reinsert it. Extract
the engine oil dipstick again and check
that the level is between the MIN and
MAX marks on the dipstick. On 0.9
TwinAir Turbo 105 HP versions,
unscrew the cap, clean the dipstick
with a lint-free cloth, reinsert the
dipstick and screw the cap back on.
Unscrew the cap again and check that
the engine oil level is between the
MIN and MAX marks on the dipstick.
Engine oil consumption: the
maximum engine oil consumption is
usually 400 grams every 1000 km.
During the initial period of use the
engine oil consumption conditions
should be considered as having
stabilised after the first 5000 - 6000 k m .
ENGINE COOLANT
151)72)If the level is too low, unscrew the cap
of reservoir C and add the fluid
described in the "Technical
Specifications" chapter.
WINDSCREEN/REAR
WINDOW WASHER FLUID
152) 153)
If the level is too low, lift reservoir cap D
and add the fluid described in the
"Technical Specifications" chapter.
IMPORTANT The headlight washer
system will not operate when the fluid
level is low, even though the
windscreen/rear window washer
continues to operate. On some
versions there is a reference notch on
the dipstick: ONLY the windscreen/rear
window washer operates with the
level below this reference.
BRAKE FLUID
154) 155)73)
Check that the fluid is at the max. level.
If the fluid level in the reservoir is too
low, undo reservoir cap E and add the
fluid described in the "Technical
Specifications" chapter.
DUALOGIC GEARBOX
CONTROL OIL
5)The gearbox control oil level should only
be checked at a Fiat Dealership.
BATTERY
156) 157) 158) 159)6)
The battery does not require the
electrolyte to be topped up with distilled
water. A periodic check carried out at
a Fiat Dealership is, however, necessary
to check efficiency.
IMPORTANT After the battery is
disconnected, the steering must be
initialised. The
warning light on the
instrument panel switches on to
indicate this. To carry out this
procedure turn the steering wheel all
the way from one end to the other
or drive in a straight line for about a
hundred metres.
IMPORTANT If the charge level remains
under 50% for a long time, the battery
is damaged by sulphation, reducing
its capacity and efficiency at start-up.
151
Page 157 of 240

WINDSCREEN/REAR
WINDOW WIPER
162)75)
REPLACING THE
WINDSCREEN WIPER
BLADES
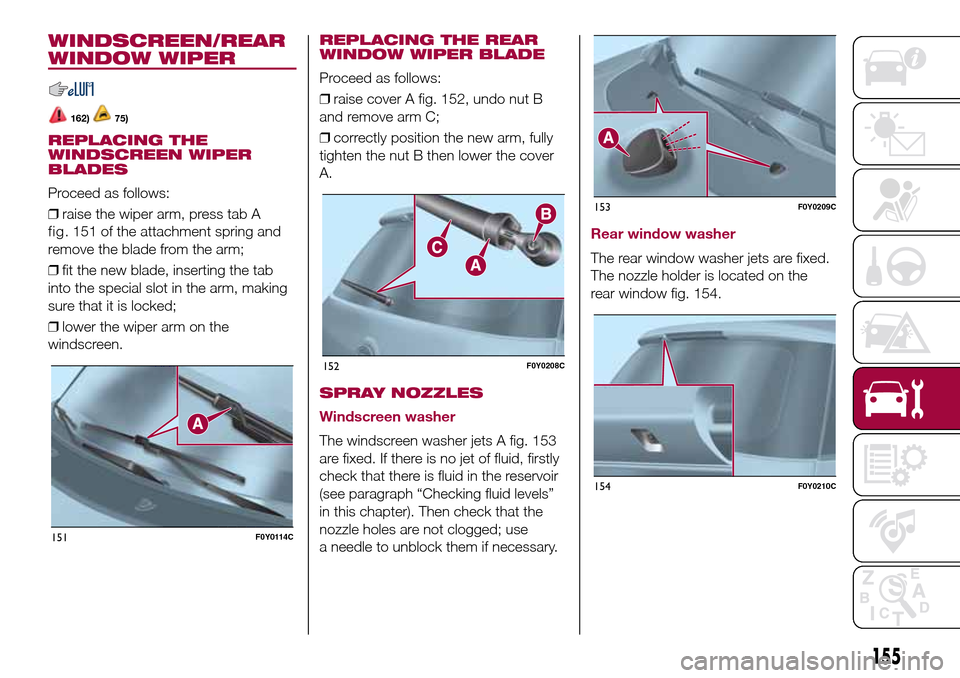
Proceed as follows:
❒raise the wiper arm, press tab A
remove the blade from the arm;
❒fit the new blade, inserting the tab
into the special slot in the arm, making
sure that it is locked;
❒lower the wiper arm on the
windscreen.
REPLACING THE REAR
WINDOW WIPER BLADE
Proceed as follows:
❒raise cover A fig. 152, undo nut B
and remove arm C;
❒correctly position the new arm, fully
tighten the nut B then lower the cover
A.
SPRAY NOZZLES
Windscreen washer
The windscreen washer jets A fig. 153
are fixed. If there is no jet of fluid, firstly
check that there is fluid in the reservoir
(see paragraph “Checking fluid levels”
in this chapter). Then check that the
nozzle holes are not clogged; use
a needle to unblock them if necessary.
Rear window washer
The rear window washer jets are fixed.
The nozzle holder is located on the
rear window fig. 154.
151F0Y0114C
152F0Y0208C
153F0Y0209C
154F0Y0210C
155
fig. 151 of theattachment spring and
Page 158 of 240
WARNING
75)Do not operate the windscreen wiper
with the blades lifted from the windscreen.
LIFTING THE
VEHICLE
If the car needs to be lifted, go to a Fiat
Dealership which is equipped with
arm hoists or workshop lifts.
WARNING
163)The vehicle must only be raised
laterally by placing the ends of the arms or
workshop lift in the areas shown in fig.
155 and in fig. 156 (for lifting the rear side).
WARNING
76)Take special care when positioning the
arm lifts or the workshop lift in order not
to damage the aerodynamic spoilers and
the side skirts, if any.
155F0Y0266C
156F0Y0333C
156
SERVICING AND MAINTENANCE
WARNING
162)Driving with worn windscreen/rear
window wiper blades is a serious hazard,
because visibility is reduced in bad
weather.