2017 FIAT 500L LIVING window
[x] Cancel search: windowPage 24 of 240
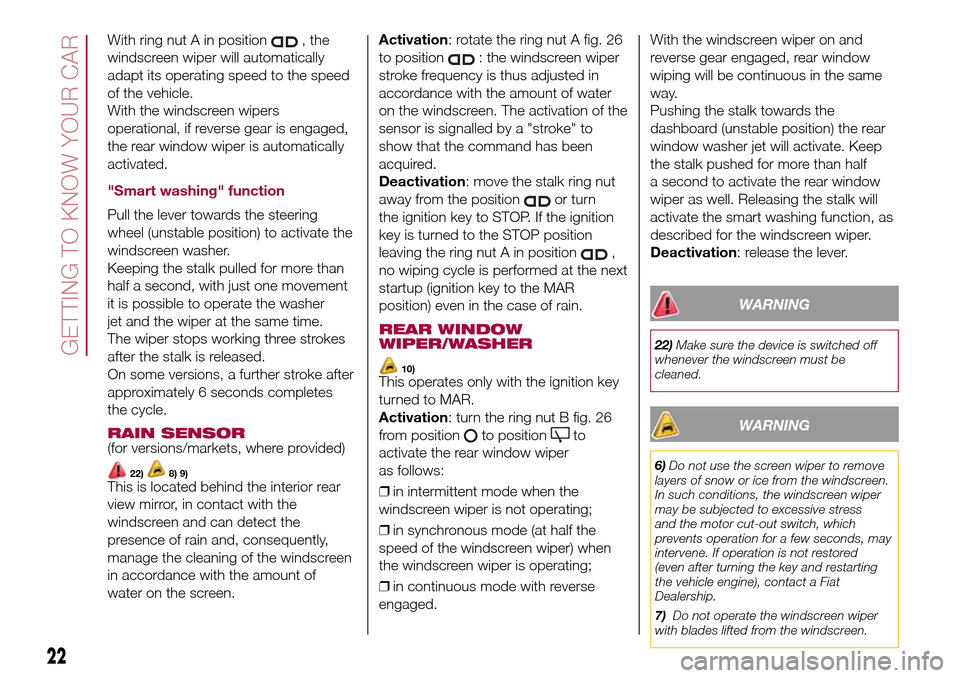
With ring nut A in position, the
windscreen wiper will automatically
adapt its operating speed to the speed
of the vehicle.
With the windscreen wipers
operational, if reverse gear is engaged,
the rear window wiper is automatically
activated.
"Smart washing" function
Pull the lever towards the steering
wheel (unstable position) to activate the
windscreen washer.
Keeping the stalk pulled for more than
half a second, with just one movement
it is possible to operate the washer
jet and the wiper at the same time.
The wiper stops working three strokes
after the stalk is released.
On some versions, a further stroke after
approximately 6 seconds completes
the cycle.
RAIN SENSOR(for versions/markets, where provided)
22)8) 9)This is located behind the interior rear
view mirror, in contact with the
windscreen and can detect the
presence of rain and, consequently,
manage the cleaning of the windscreen
in accordance with the amount of
water on the screen.Activation: rotate the ring nut A fig. 26
to position
: the windscreen wiper
stroke frequency is thus adjusted in
accordance with the amount of water
on the windscreen. The activation of the
sensor is signalled by a "stroke" to
show that the command has been
acquired.
Deactivation: move the stalk ring nut
away from the position
or turn
the ignition key to STOP. If the ignition
key is turned to the STOP position
leaving the ring nut A in position
,
no wiping cycle is performed at the next
startup (ignition key to the MAR
position) even in the case of rain.
REAR WINDOW
WIPER/WASHER
10)This operates only with the ignition key
turned to MAR.
Activation: turn the ring nut B fig. 26
from position
to positionto
activate the rear window wiper
as follows:
❒in intermittent mode when the
windscreen wiper is not operating;
❒in synchronous mode (at half the
speed of the windscreen wiper) when
the windscreen wiper is operating;
❒in continuous mode with reverse
engaged.With the windscreen wiper on and
reverse gear engaged, rear window
wiping will be continuous in the same
way.
Pushing the stalk towards the
dashboard (unstable position) the rear
window washer jet will activate. Keep
the stalk pushed for more than half
a second to activate the rear window
wiper as well. Releasing the stalk will
activate the smart washing function, as
described for the windscreen wiper.
Deactivation: release the lever.
WARNING
22)Make sure the device is switched off
whenever the windscreen must be
cleaned.
WARNING
6)Do not use the screen wiper to remove
layers of snow or ice from the windscreen.
In such conditions, the windscreen wiper
may be subjected to excessive stress
and the motor cut-out switch, which
prevents operation for a few seconds, may
intervene. If operation is not restored
(even after turning the key and restarting
the vehicle engine), contact a Fiat
Dealership.
7)Do not operate the windscreen wiper
with blades lifted from the windscreen.
22
GETTING TO KNOW YOUR CAR
Page 25 of 240
8)Do not activate the rain sensor while
washing the vehicle in an automatic
washing system.
9)If ice is found on the windscreen, make
sure that the device was disconnected
properly.
10)Do not use the rear window wiper to
remove layers of snow or ice. In such
conditions, the wiper may be subjected to
excessive stress and the motor cut-out
switch, which prevents operation for a few
seconds, may intervene. If operation is
not subsequently restored, contact a Fiat
Dealership.ROOF LIGHTS
FRONT ROOF LIGHT
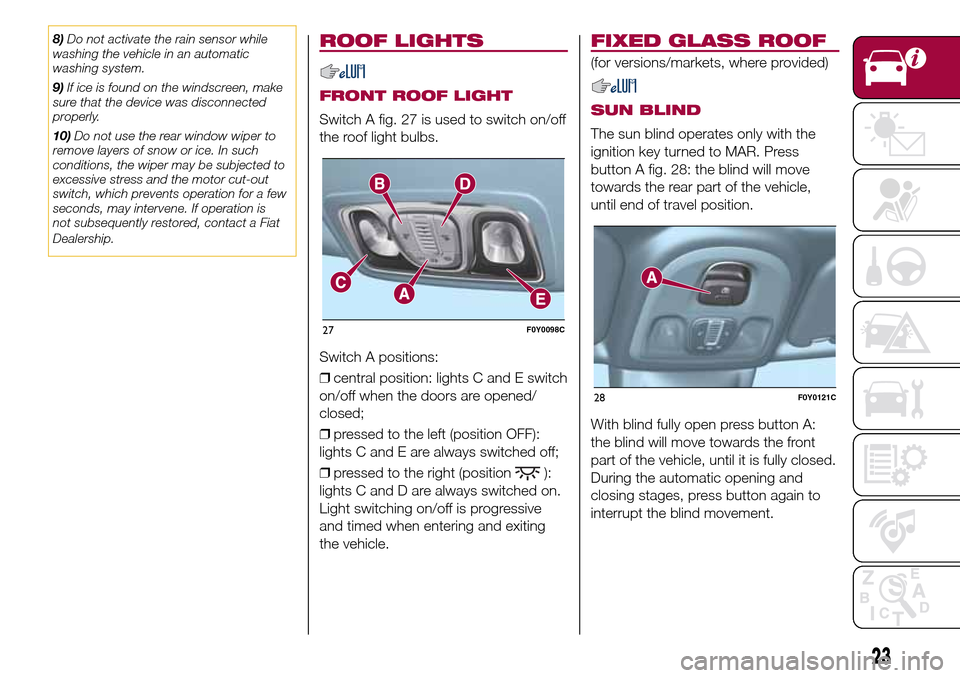
Switch A fig. 27 is used to switch on/off
the roof light bulbs.
Switch A positions:
❒central position: lights C and E switch
on/off when the doors are opened/
closed;
❒pressed to the left (position OFF):
lights C and E are always switched off;
❒pressed to the right (position
):
lights C and D are always switched on.
Light switching on/off is progressive
and timed when entering and exiting
the vehicle.
FIXED GLASS ROOF
(for versions/markets, where provided)
SUN BLIND
The sun blind operates only with the
ignition key turned to MAR. Press
button A fig. 28: the blind will move
towards the rear part of the vehicle,
until end of travel position.
With blind fully open press button A:
the blind will move towards the front
part of the vehicle, until it is fully closed.
During the automatic opening and
closing stages, press button again to
interrupt the blind movement.
27F0Y0098C
28F0Y0121C
23
Page 26 of 240
EMERGENCY OPERATION
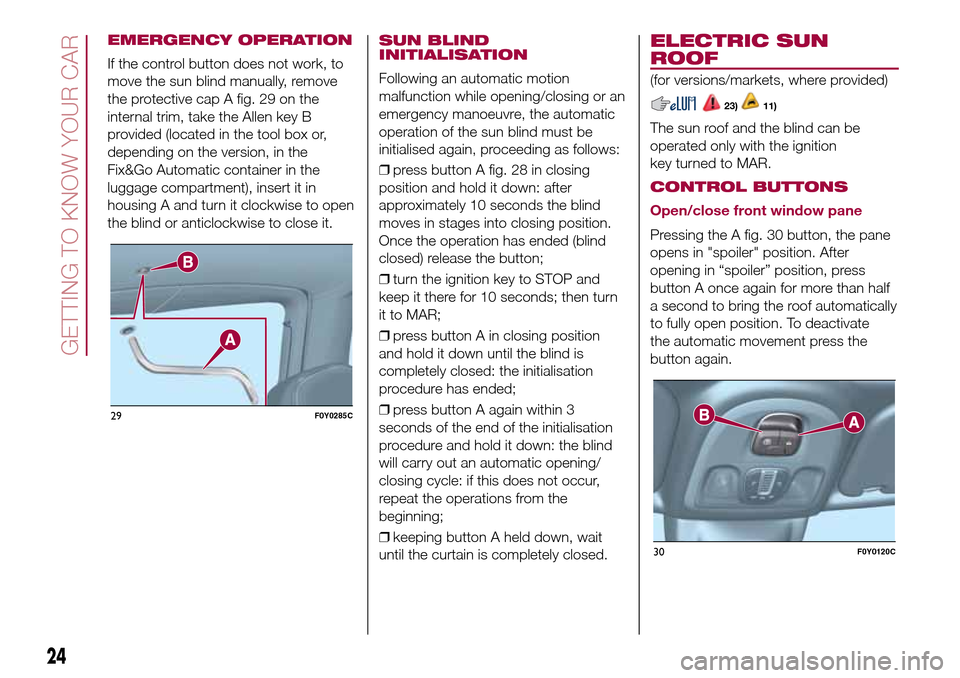
If the control button does not work, to
move the sun blind manually, remove
the protective cap A fig. 29 on the
internal trim, take the Allen key B
provided (located in the tool box or,
depending on the version, in the
Fix&Go Automatic container in the
luggage compartment), insert it in
housing A and turn it clockwise to open
the blind or anticlockwise to close it.
SUN BLIND
INITIALISATION
Following an automatic motion
malfunction while opening/closing or an
emergency manoeuvre, the automatic
operation of the sun blind must be
initialised again, proceeding as follows:
❒press button A fig. 28 in closing
position and hold it down: after
approximately 10 seconds the blind
moves in stages into closing position.
Once the operation has ended (blind
closed) release the button;
❒turn the ignition key to STOP and
keep it there for 10 seconds; then turn
it to MAR;
❒press button A in closing position
and hold it down until the blind is
completely closed: the initialisation
procedure has ended;
❒press button A again within 3
seconds of the end of the initialisation
procedure and hold it down: the blind
will carry out an automatic opening/
closing cycle: if this does not occur,
repeat the operations from the
beginning;
❒keeping button A held down, wait
until the curtain is completely closed.
ELECTRIC SUN
ROOF
(for versions/markets, where provided)
23)11)
The sun roof and the blind can be
operated only with the ignition
key turned to MAR.
CONTROL BUTTONS
Open/close front window pane
Pressing the A fig. 30 button, the pane
opens in "spoiler" position. After
opening in “spoiler” position, press
button A once again for more than half
a second to bring the roof automatically
to fully open position. To deactivate
the automatic movement press the
button again.
29F0Y0285C
30F0Y0120C
24
GETTING TO KNOW YOUR CAR
Page 30 of 240
ELECTRIC WINDOWS
25)
OPERATION
These operate when the ignition key is
turned to MAR and for about 3 minutes
after turning the key to STOP or
removing it unless one of the front
doors is open.
DRIVE SIDE FRONT
DOOR CONTROLS
Versions with 4 electric windows
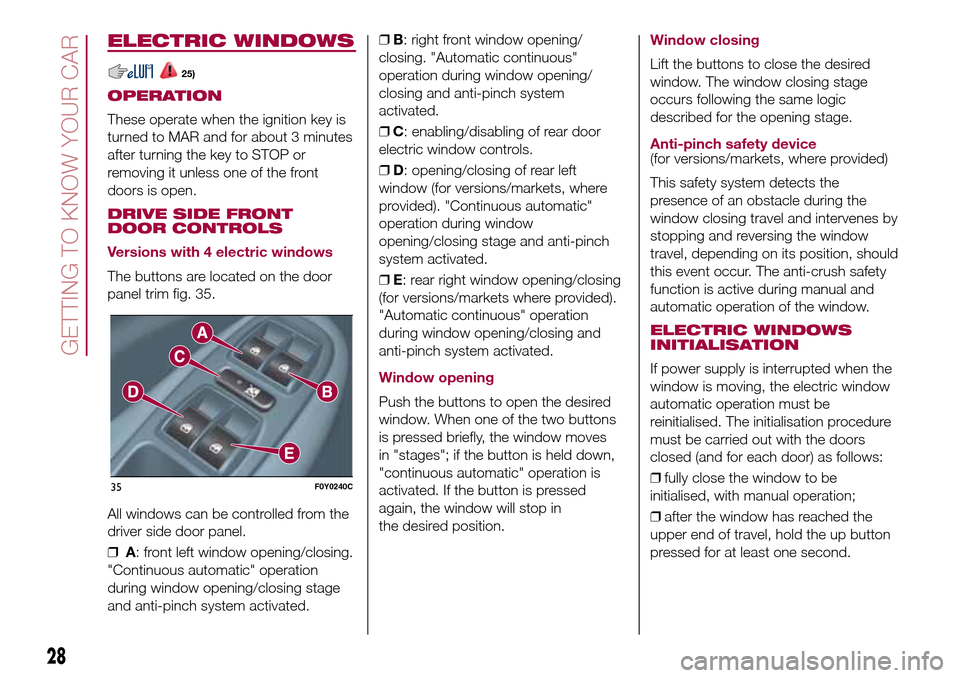
The buttons are located on the door
panel trim fig. 35.
All windows can be controlled from the
driver side door panel.
❒A: front left window opening/closing.
"Continuous automatic" operation
during window opening/closing stage
and anti-pinch system activated.❒B: right front window opening/
closing. "Automatic continuous"
operation during window opening/
closing and anti-pinch system
activated.
❒C: enabling/disabling of rear door
electric window controls.
❒D: opening/closing of rear left
window (for versions/markets, where
provided). "Continuous automatic"
operation during window
opening/closing stage and anti-pinch
system activated.
❒E: rear right window opening/closing
(for versions/markets where provided).
"Automatic continuous" operation
during window opening/closing and
anti-pinch system activated.
Window opening
Push the buttons to open the desired
window. When one of the two buttons
is pressed briefly, the window moves
in "stages"; if the button is held down,
"continuous automatic" operation is
activated. If the button is pressed
again, the window will stop in
the desired position.
Window closing
Lift the buttons to close the desired
window. The window closing stage
occurs following the same logic
described for the opening stage.
Anti-pinch safety device(for versions/markets, where provided)
This safety system detects the
presence of an obstacle during the
window closing travel and intervenes by
stopping and reversing the window
travel, depending on its position, should
this event occur. The anti-crush safety
function is active during manual and
automatic operation of the window.
ELECTRIC WINDOWS
INITIALISATION
If power supply is interrupted when the
window is moving, the electric window
automatic operation must be
reinitialised. The initialisation procedure
must be carried out with the doors
closed (and for each door) as follows:
❒fully close the window to be
initialised, with manual operation;
❒after the window has reached the
upper end of travel, hold the up button
pressed for at least one second.
35F0Y0240C
28
GETTING TO KNOW YOUR CAR
Page 31 of 240
WARNING
25)Improper use of the electric windows
can be dangerous. Before and during
operation, always check that passengers
are not exposed to the risk of being injured
either directly by the moving windows or
through objects getting caught or struck by
them. When leaving the vehicle, always
remove the ignition key to avoid the risk of
injury of people still on board due to
accidental operation of the electric
windows.
LUGGAGE
COMPARTMENT
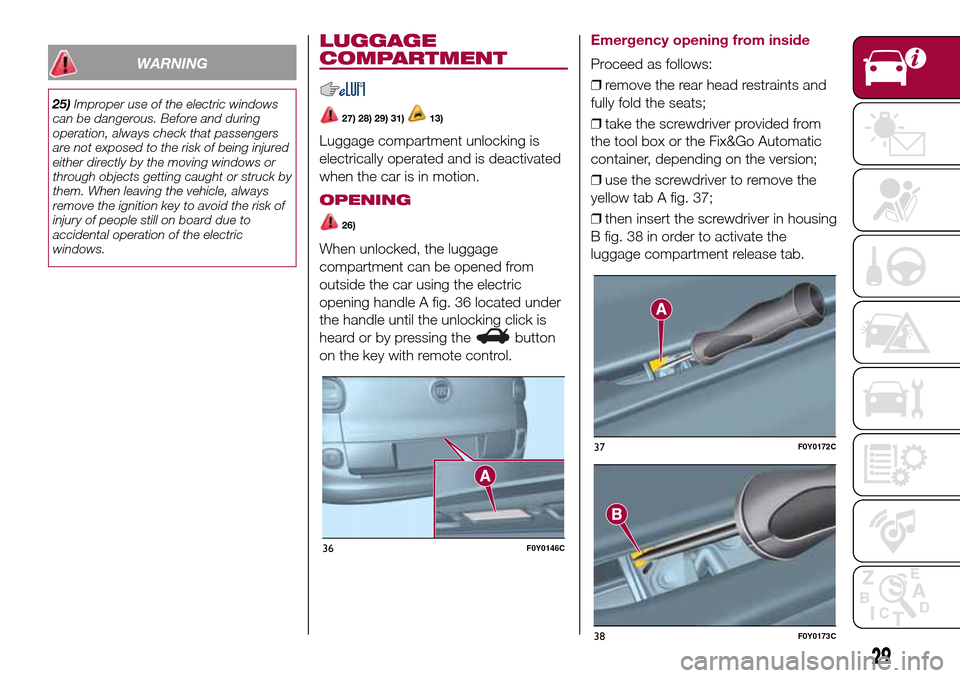
27) 28) 29) 31)13)
Luggage compartment unlocking is
electrically operated and is deactivated
when the car is in motion.
OPENING
26)
When unlocked, the luggage
compartment can be opened from
outside the car using the electric
opening handle A fig. 36 located under
the handle until the unlocking click is
heard or by pressing the
button
on the key with remote control.
Emergency opening from inside
Proceed as follows:
❒remove the rear head restraints and
fully fold the seats;
❒take the screwdriver provided from
the tool box or the Fix&Go Automatic
container, depending on the version;
❒use the screwdriver to remove the
yellow tab A fig. 37;
❒then insert the screwdriver in housing
B fig. 38 in order to activate the
luggage compartment release tab.
36F0Y0146C
37F0Y0172C
38F0Y0173C
29
Page 54 of 240
Warning light What it means
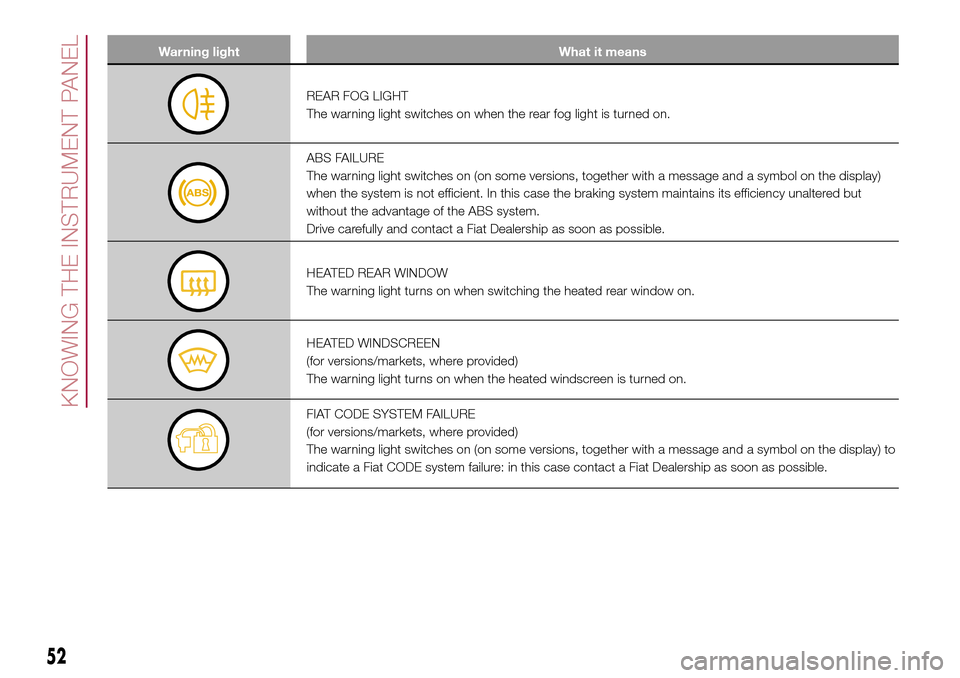
REAR FOG LIGHT
The warning light switches on when the rear fog light is turned on.
ABS FAILURE
The warning light switches on (on some versions, together with a message and a symbol on the display)
when the system is not efficient. In this case the braking system maintains its efficiency unaltered but
without the advantage of the ABS system.
Drive carefully and contact a Fiat Dealership as soon as possible.
HEATED REAR WINDOW
The warning light turns on when switching the heated rear window on.
HEATED WINDSCREEN
(for versions/markets, where provided)
The warning light turns on when the heated windscreen is turned on.
FIAT CODE SYSTEM FAILURE
(for versions/markets, where provided)
The warning light switches on (on some versions, together with a message and a symbol on the display) to
indicate a Fiat CODE system failure: in this case contact a Fiat Dealership as soon as possible.
52
KNOWING THE INSTRUMENT PANEL
Page 88 of 240
82)Always make sure that the chest
section of the seat belt does not pass
under the arms or behind the back of the
child. In the event of an accident the seat
belt will not be able to secure the child,
with the risk of injury, including fatal injury.
Therefore the child must always wear
the seat belt correctly.
83)Do not use the same lower anchorage
to install more than one child restraint
system.
84)If a Universal ISOFIX child restraint
system is not fixed to all three anchorages,
it will not be able to protect the child
correctly. In a crash, the child could be
seriously or fatally injured.
85)Fit the child restraint system only when
the vehicle is stationary. The child restraint
system is correctly fixed to the brackets
when you hear the click. Follow the
instructions for assembly, disassembly and
positioning that the Manufacturer must
supply with the child restraint system.SUPPLEMENTARY
RESTRAINT SYSTEM
(SRS) - AIRBAG
The vehicle is equipped with:
❒front driver airbag;
❒front passenger airbag;
❒driver knee bag (for versions/
markets, where provided);
❒front side bags for pelvis, chest and
shoulder protection of driver and
passenger (for versions/markets, where
provided);
❒side bags for head protection of front
seat passengers and rear side seat
passengers (window bag).
FRONT AIRBAGS
The front driver/passenger airbags and
the driver's knee bag (for versions/
markets, where provided) protect the
front seat occupants in the event of
frontal impacts of medium/high severity,
by placing the bag between the
occupant and the steering wheel or
dashboard.
Therefore non-activation in other types
of collisions (side collisions, rear shunts,
roll-overs, etc.) is not a system
malfunction.Driver and passenger front airbags are
not a replacement of but
complementary to the seat belts, which
should always be worn, as specified
by law in Europe and most non-
European countries.
In the event of impact, those not
wearing a seat belt are projected
forwards and may come into contact
with the bag which is still inflating. The
protection offered by the bag is
compromised in these circumstances.
The front airbags may not activate in
the case of a frontal impact against
highly deformable objects not involving
the front surface of the vehicle (e.g.
wing collision against guard rail) or in
the case of the vehicle wedging under
other vehicles or protective barriers
(e.g. under trucks or guard rails).
Failure to activate in the conditions
described above is due to the fact that
they may not provide any additional
protection compared with seat belts, so
their activation would be inappropriate.
In these cases, non-deployment does
not indicate a system malfunction.
86
SAFETY
Page 92 of 240
SIDE BAGS
To help increase occupants protection
in the event of certain side impact
collisions, the car is equipped with
seat-mounted side bags (for
versions/markets, where provided) and
window bag.
Side bags(for versions/markets, where provided)
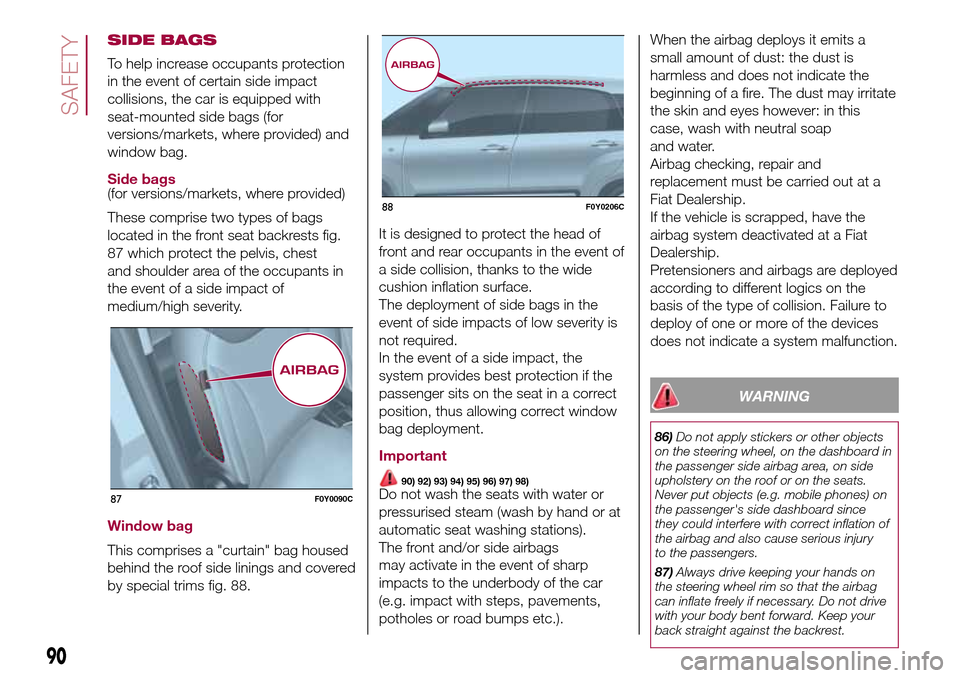
These comprise two types of bags
located in the front seat backrests fig.
87 which protect the pelvis, chest
and shoulder area of the occupants in
the event of a side impact of
medium/high severity.
Window bag
This comprises a "curtain" bag housed
behind the roof side linings and covered
by special trims fig. 88.It is designed to protect the head of
front and rear occupants in the event of
a side collision, thanks to the wide
cushion inflation surface.
The deployment of side bags in the
event of side impacts of low severity is
not required.
In the event of a side impact, the
system provides best protection if the
passenger sits on the seat in a correct
position, thus allowing correct window
bag deployment.
Important
90) 92) 93) 94) 95) 96) 97) 98)Do not wash the seats with water or
pressurised steam (wash by hand or at
automatic seat washing stations).
The front and/or side airbags
may activate in the event of sharp
impacts to the underbody of the car
(e.g. impact with steps, pavements,
potholes or road bumps etc.).When the airbag deploys it emits a
small amount of dust: the dust is
harmless and does not indicate the
beginning of a fire. The dust may irritate
the skin and eyes however: in this
case, wash with neutral soap
and water.
Airbag checking, repair and
replacement must be carried out at a
Fiat Dealership.
If the vehicle is scrapped, have the
airbag system deactivated at a Fiat
Dealership.
Pretensioners and airbags are deployed
according to different logics on the
basis of the type of collision. Failure to
deploy of one or more of the devices
does not indicate a system malfunction.
WARNING
86)Do not apply stickers or other objects
on the steering wheel, on the dashboard in
the passenger side airbag area, on side
upholstery on the roof or on the seats.
Never put objects (e.g. mobile phones) on
the passenger's side dashboard since
they could interfere with correct inflation of
the airbag and also cause serious injury
to the passengers.
87)Always drive keeping your hands on
the steering wheel rim so that the airbag
can inflate freely if necessary. Do not drive
with your body bent forward. Keep your
back straight against the backrest.
87F0Y0090C
88F0Y0206C
90
SAFETY