2017 FIAT 500L LIVING stop start
[x] Cancel search: stop startPage 101 of 240
107)Before opening the bonnet, make
sure that the engine is off and that the
ignition key is in the STOP position. Always
refer to the plate inside the bonnet. We
recommend that you remove the key from
the ignition if other people remain in the
vehicle. Exit from the car only after having
removed the ignition key or having rotated
it to the STOP position. During refuelling,
make sure that the engine is off and that
the ignition key is in the STOP position.
WARNING
58)If climate comfort is to be favoured, the
Stop/Start system can be disabled, for a
continuous operation of the climate control
system.
CRUISE CONTROL
(constant speed
regulator)
(for versions/markets, where provided)
108) 109)
DESCRIPTION
This is an electronically controlled
driving assistance device that allows
the desired car speed to be maintained,
without having to press the accelerator
pedal.
This device can be used at a speed
above 30 km/h on long stretches of dry,
straight roads with few variations (e.g.
motorways).
The use of this device on extra-urban
roads with traffic is not therefore
recommended. Do not use the device
in town.
ACTIVATING THE DEVICE
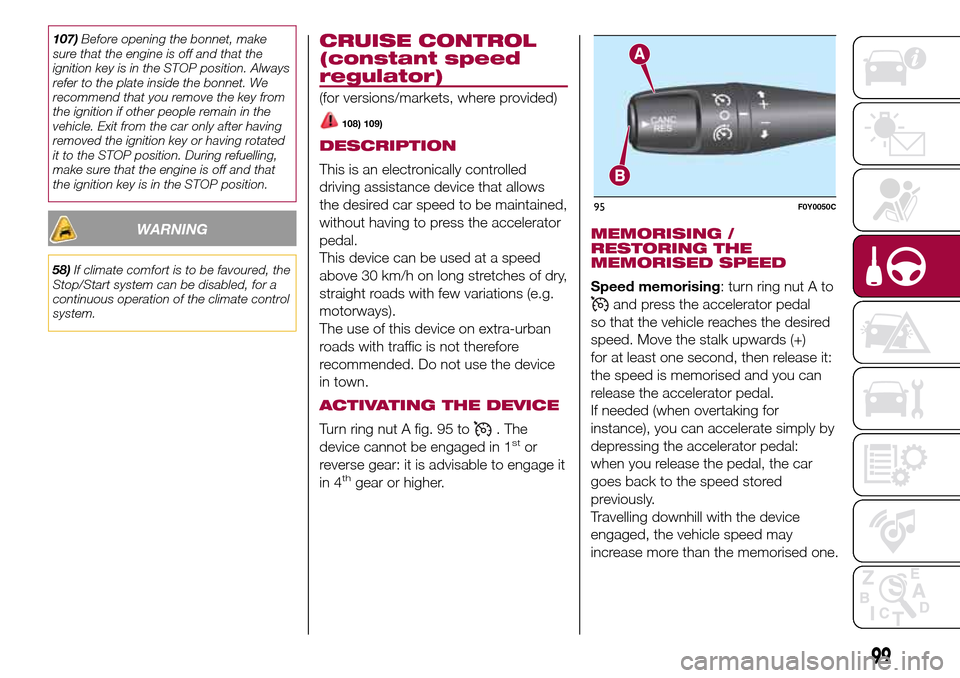
Turn ring nut A fig. 95 to. The
device cannot be engaged in 1stor
reverse gear: it is advisable to engage it
in 4
thgear or higher.
MEMORISING /
RESTORING THE
MEMORISED SPEED
Speed memorising: turn ring nut A to
and press the accelerator pedal
so that the vehicle reaches the desired
speed. Move the stalk upwards (+)
for at least one second, then release it:
the speed is memorised and you can
release the accelerator pedal.
If needed (when overtaking for
instance), you can accelerate simply by
depressing the accelerator pedal:
when you release the pedal, the car
goes back to the speed stored
previously.
Travelling downhill with the device
engaged, the vehicle speed may
increase more than the memorised one.
95F0Y0050C
99
Page 107 of 240
In addition to the electrical branches,
the car's electrical system can be
connected only to the supply cable for
an electric brake and to the cable for an
internal trailer light, though not more
than 15 W. To connect, use the preset
control unit with a battery cable with
cross-section no less than 2.5 mm
2.
IMPORTANT The use of auxiliary loads
other than external lights (electric brake,
winch, etc.) must occur with engine
running.
IMPORTANT To install a tow hook
contact a Fiat Dealership.
WARNING
112)The ABS with which the vehicle is
equipped will not control the braking
system of the trailer. Take particular care
when travelling on slippery roads.
113)Never modify the braking system of
the vehicle to control the trailer brake. The
trailer braking system must be fully
independent of the vehicle’s hydraulic
system.
114)After fitting, fixing screw holes must
be sealed to prevent an exhaust gas inlet.
REFUELLING THE
VEHICLE
115) 116) 117)61)
During refuelling, switch the engine off,
engage the handbrake, turn the ignition
key to STOP and do not smoke.
PETROL ENGINES
Use unleaded petrol only, with octane
number (RON) no lower than 95.
DIESEL ENGINES
Only use Diesel for motor vehicles (EN
590 specification).
When using or parking the car for a
long time in the mountains or cold
areas, it is advisable to refuel using
locally available diesel. In this case, it is
also advisable to keep the tank over
50% full.
REFUELLING
PROCEDURE
Diesel and petrol versions
Proceed as follows:
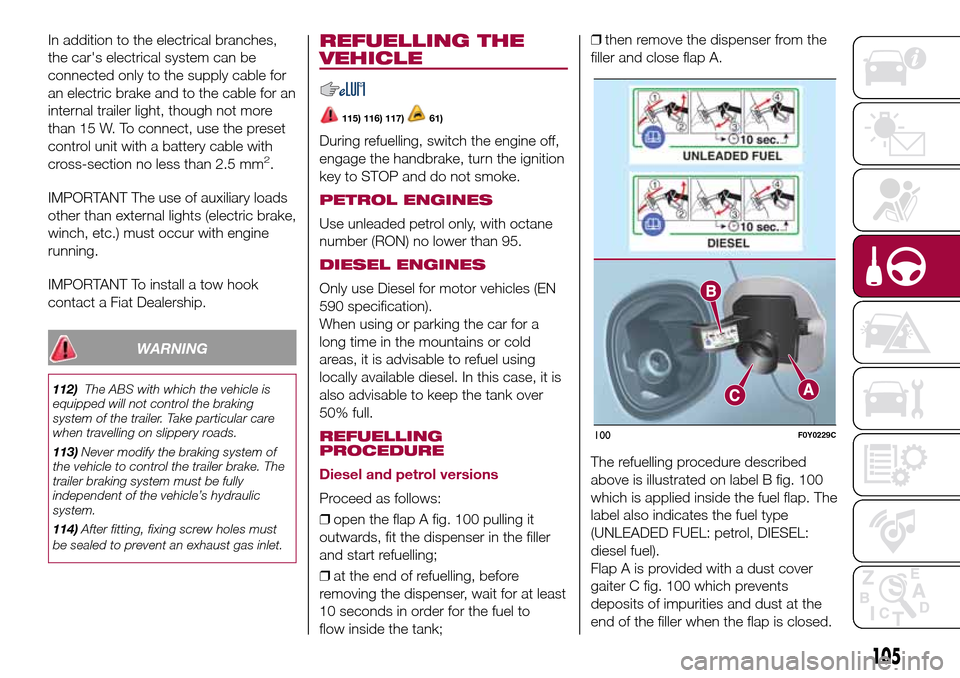
❒open the flap A fig. 100 pulling it
outwards, fit the dispenser in the filler
and start refuelling;
❒at the end of refuelling, before
removing the dispenser, wait for at least
10 seconds in order for the fuel to
flow inside the tank;❒then remove the dispenser from the
filler and close flap A.
The refuelling procedure described
above is illustrated on label B fig. 100
which is applied inside the fuel flap. The
label also indicates the fuel type
(UNLEADED FUEL: petrol, DIESEL:
diesel fuel).
Flap A is provided with a dust cover
gaiter C fig. 100 which prevents
deposits of impurities and dust at the
end of the filler when the flap is closed.
100F0Y0229C
105
Page 116 of 240
❒instruction booklet to be used for
prompt and correct use of the kit and
then to be handed to the personnel
charged with handling the treated tyre;
❒a pair of protective gloves located
in the side compartment of the
compressor;
❒adapters for inflating different
elements.
IMPORTANT The sealing fluid is
effective with external temperatures of
between –20°C and +50°C. The sealing
fluid has an expiry date.
INFLATION PROCEDURE
Proceed as follows:
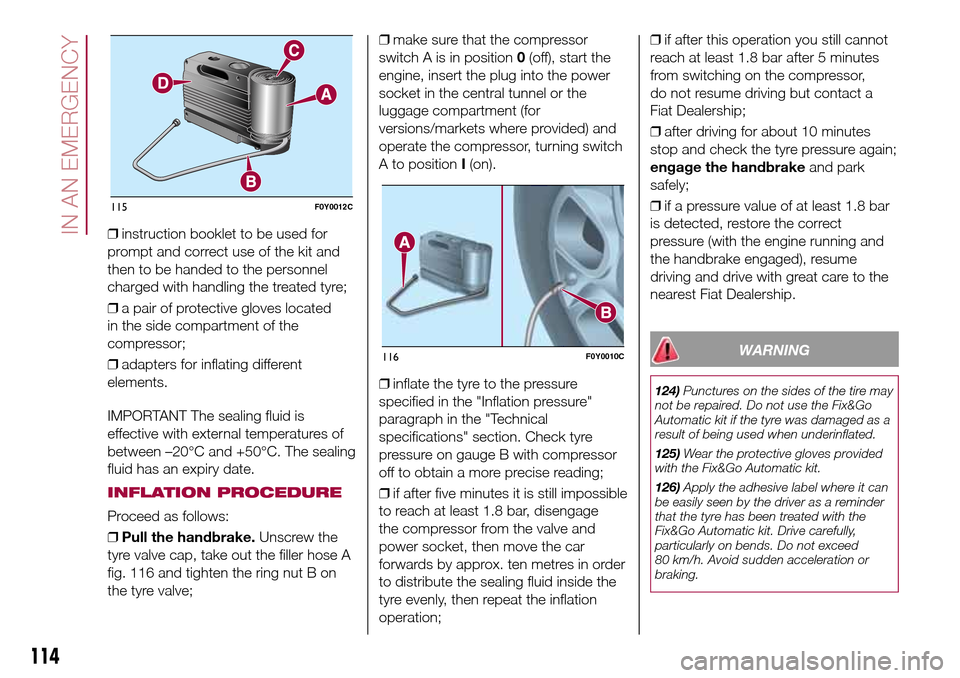
❒Pull the handbrake.Unscrew the
tyre valve cap, take out the filler hose A
fig. 116 and tighten the ring nut B on
the tyre valve;❒make sure that the compressor
switch A is in position0(off), start the
engine, insert the plug into the power
socket in the central tunnel or the
luggage compartment (for
versions/markets where provided) and
operate the compressor, turning switch
A to positionI(on).
❒inflate the tyre to the pressure
specified in the "Inflation pressure"
paragraph in the "Technical
specifications" section. Check tyre
pressure on gauge B with compressor
off to obtain a more precise reading;
❒if after five minutes it is still impossible
to reach at least 1.8 bar, disengage
the compressor from the valve and
power socket, then move the car
forwards by approx. ten metres in order
to distribute the sealing fluid inside the
tyre evenly, then repeat the inflation
operation;❒if after this operation you still cannot
reach at least 1.8 bar after 5 minutes
from switching on the compressor,
do not resume driving but contact a
Fiat Dealership;
❒after driving for about 10 minutes
stop and check the tyre pressure again;
engage the handbrakeand park
safely;
❒if a pressure value of at least 1.8 bar
is detected, restore the correct
pressure (with the engine running and
the handbrake engaged), resume
driving and drive with great care to the
nearest Fiat Dealership.
WARNING
124)Punctures on the sides of the tire may
not be repaired. Do not use the Fix&Go
Automatic kit if the tyre was damaged as a
result of being used when underinflated.
125)Wear the protective gloves provided
with the Fix&Go Automatic kit.
126)Apply the adhesive label where it can
be easily seen by the driver as a reminder
that the tyre has been treated with the
Fix&Go Automatic kit. Drive carefully,
particularly on bends. Do not exceed
80 km/h. Avoid sudden acceleration or
braking.
115F0Y0012C
116F0Y0010C
114
IN AN EMERGENCY
Page 130 of 240
JUMP STARTING
If the battery is flat, a jump starting can
be performed using the battery and
the cables of another vehicle, or using a
booster battery.
IMPORTANT
When a booster battery is used, comply
with the utilisation and precaution
instructions specified by the producer.
Do not use the booster battery or
any other source of external supply with
a voltage above 12 V: the battery, the
starter, the alternator and the electrical
system of the vehicle could be
damaged.
Do not attempt jump starting if the
battery is frozen. The battery could
break and explode!
PREPARATION TO JUMP
STARTING
140) 141) 142)68)
IMPORTANT The positive terminal (+) of
the battery is shielded by a protective
cover. Lift the cover to access the
positive terminal.
Proceed as follows:
❒engage the handbrake, move the
Dualogic gear lever to P (Park) or,
for versions with manual gearbox, to
neutral and bring the ignition key to
STOP;❒switch off all the other electrical
devices in the vehicle;
❒if another vehicle is ready for jump
starting, park the vehicle within the
reach of the cables to be used for
starting, operate the handbrake and
make sure that the ignition is
deactivated.
IMPORTANT Avoid contact between
the two vehicles since this could cause
a connection to earth and may result
in serious injury to any people nearby.
PROCEDURE FOR JUMP
STARTING
IMPORTANT If the procedure below is
carried out incorrectly, it can cause
severe injury to people or damage the
recharging system of one or both
vehicles. Carefully follow the
instructions given below.
Cable connection
Proceed as follows to carry out a jump
starting:
❒connect one end of the cable used
for positive (+) to the positive terminal
(+) of the vehicle with flat battery;
❒connect the other end of the cable
used for positive (+) to the positive
terminal (+) of the auxiliary battery;❒connect one end of the cable used
for negative (–) to the negative terminal
(–) of the auxiliary battery;
❒connect the other end of the cable
used for negative (–) to an engine earth
(the visible metal part of the vehicle
engine with flat battery) away from the
battery and the fuel injection system;
❒start the vehicle engine with the
auxiliary battery, let it run for a
few minutes at idling. Start the engine
of the vehicle with flat battery.
Cable disconnection
Once the engine has been started,
remove the cables proceeding as
follows:
❒disconnect the end of the cable used
for negative (–) from the engine earth
of the vehicle with flat battery;
❒disconnect the other end of the cable
used for negative (–) from the negative
terminal (–) of the auxiliary battery;
❒disconnect the end of the cable used
for positive (+) from the positive terminal
(+) of the auxiliary battery;
❒disconnect one end of the cable
used for positive (+) from the positive
terminal (+) of the vehicle with flat
battery.
128
IN AN EMERGENCY
Page 131 of 240
If it is often necessary to perform a
jump starting, have the vehicle battery
and the recharging system checked
by a Fiat Dealership.
IMPORTANT Any accessories (e.g.
mobile phones, etc.) connected to the
vehicle power sockets draw current
even if they are not used. These
devices, if left connected too much time
with engine off, may cause the battery
to drain with following reduction of
its life and/or failure to start the engine.
WARNING
140)Do not get too close to the radiator
cooling fan: the electric fan may start;
danger of injury. Scarves, ties and other
loose clothing may be pulled by moving
parts.
141)Remove any metal objects (e.g. rings,
watches, bracelets), that might cause an
accidental electrical contact and cause
serious injury.
142)Batteries contain acid which may burn
skin and eyes. Batteries produce
hydrogen, which is easily flammable and
explosive. Thus keep away flames or
devices which may cause sparks.
WARNING
68)Do not connect the cable to the
negative terminal (–) of the flat battery. The
following spark could lead to battery
explosion and cause serious harm. Only
use the specific earth point; do not use any
other exposed metallic part.
FUEL CUT-OFF
SYSTEM
143)This intervenes in the event of an
impact causing:
❒the interruption of the fuel supply with
the engine consequently cutting out
❒the automatic unlocking of the doors
❒the automatic switching on of the
interior lights
❒the switching on of the hazard
warning lights.
On some versions, the intervention of
the system is indicated by a message
shown on the display.
IMPORTANT Carefully check the car for
fuel leaks, for instance in the engine
compartment, under the car or near the
tank area. After a collision, turn the
ignition key to STOP to prevent the
battery from running down.
To restore the correct operation of the
car, proceed as follows:
❒turn the ignition key to the MAR
position;
❒activate the right direction indicator
and then stop it;
❒activate the left direction indicator
and then stop it;
❒activate the right direction indicator
and then stop it;
129
Page 133 of 240
146)Whilst towing, remember that the
assistance of the brake servo and the
electric power steering is not available,
therefore greater force needs to be exerted
on the brake pedal and more effort is
required on the steering wheel. Do not use
flexible cables when towing and avoid
jerky movements. Make sure not to
damage parts in contact with the car while
towing. When towing the car, you must
comply with all specific traffic regulations,
both in terms of the towing device and
behaviour on the road. Do not start the
engine while being towed.
131
147)The front and rear tow hooks should
be used only for emergencies on the road.
The car may be towed for short distances
when a dedicated device is used in
compliance with the Highway Code (rigid
bar), and in order to move the vehicle
on the road in preparation for towing or
transport via a tow truck (on the Trekking
versions do NOT use the rear tow hook for
transport on a tow truck: use the front
tow hook). Tow hooks MUST NOT be used
to tow vehicles off the road or where there
are obstacles and/or for towing operations
using ropes or other non-rigid devices.
Respecting the above conditions, towing
must take place with two vehicles (one
towing, the other towed) aligned as much
as possible along the same centre line.WARNING
144)Before starting towing operations,
turn the ignition key to MAR and then
to STOP, without extracting it. The steering
column will automatically lock when the
key is removed, making it impossible
to turn the wheels.
145)Before tightening the ring, clean the
threaded housing thoroughly. Make sure
that the tow ring is fully fastened in the
housing before towing the vehicle.
Page 155 of 240
6)Batteries contain substances which are
very dangerous for the environment. For
battery replacement, contact a Fiat
Dealership.BATTERY
RECHARGING
160) 161)
IMPORTANT After turning the ignition
key to STOP and having closed the
driver side door, wait at least one
minute before disconnecting the
electrical supply from the battery. When
reconnecting the electrical supply to
the battery, make sure that the ignition
device is in the STOP position and
the driver side door is closed.
IMPORTANT Charging should be slow
at a low ampere rating for
approximately 24 hours. Charging for a
longer time may damage the battery.IMPORTANT Make sure that the cables
of the electrical system are correctly
reconnected to the battery, i.e. the
positive cable (+) to the positive
terminal and the negative cable (–) to
the negative terminal. The battery
terminals are marked with the positive
(+) and negative (–) symbols, and are
shown on the battery cover. The battery
terminals must also be corrosion-free
and firmly secured to the terminals. If a
"quick-type" battery charger is used
with the battery fitted on the vehicle,
before connecting it disconnect both
cables of the battery itself. Do not use a
"quick-type" battery charger to provide
the starting voltage.
IMPORTANT The battery recharging
procedure is given as information only.
You are advised to contact a Fiat
Dealership to have this operation
carried out.
153
Page 156 of 240
❒when finished, turn the charger off
before disconnecting the battery;
❒reconnect the negative battery
terminal.
VERSIONS WITH
Stop/Start SYSTEM
(for versions/markets, where provided)
To recharge, proceed as follows:
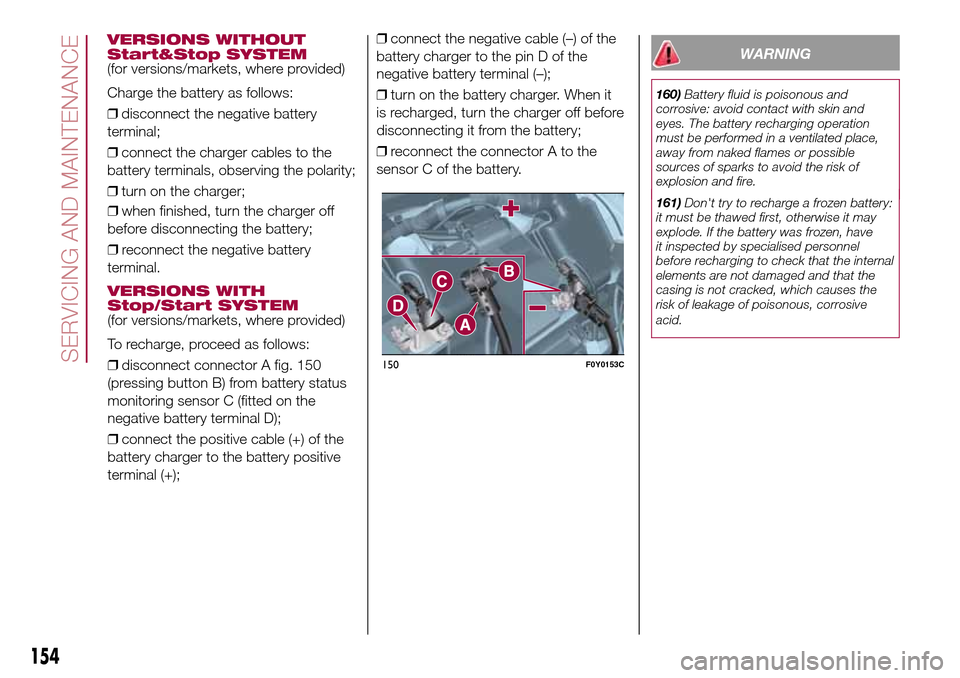
❒disconnect connector A fig. 150
(pressing button B) from battery status
monitoring sensor C (fitted on the
negative battery terminal D);
❒connect the positive cable (+) of the
battery charger to the battery positive
terminal (+);❒connect the negative cable (–) of the
battery charger to the pin D of the
negative battery terminal (–);
❒turn on the battery charger. When it
is recharged, turn the charger off before
disconnecting it from the battery;
❒reconnect the connector A to the
sensor C of the battery.
WARNING
160)Battery fluid is poisonous and
corrosive: avoid contact with skin and
eyes. The battery recharging operation
must be performed in a ventilated place,
away from naked flames or possible
sources of sparks to avoid the risk of
explosion and fire.
161)Don't try to recharge a frozen battery:
it must be thawed first, otherwise it may
explode. If the battery was frozen, have
it inspected by specialised personnel
before recharging to check that the internal
elements are not damaged and that the
casing is not cracked, which causes the
risk of leakage of poisonous, corrosive
acid.
150F0Y0153C
154
SERVICING AND MAINTENANCE
VERSIONS WITHOUT
Start&Stop SYSTEM
(for versions/markets, where provided)
Charge the battery as follows:
❒disconnect the negative battery
terminal;
❒connect the charger cables to the
battery terminals, observing the polarity;
❒turn on the charger;