2017 FIAT 124 SPIDER lights
[x] Cancel search: lightsPage 129 of 300
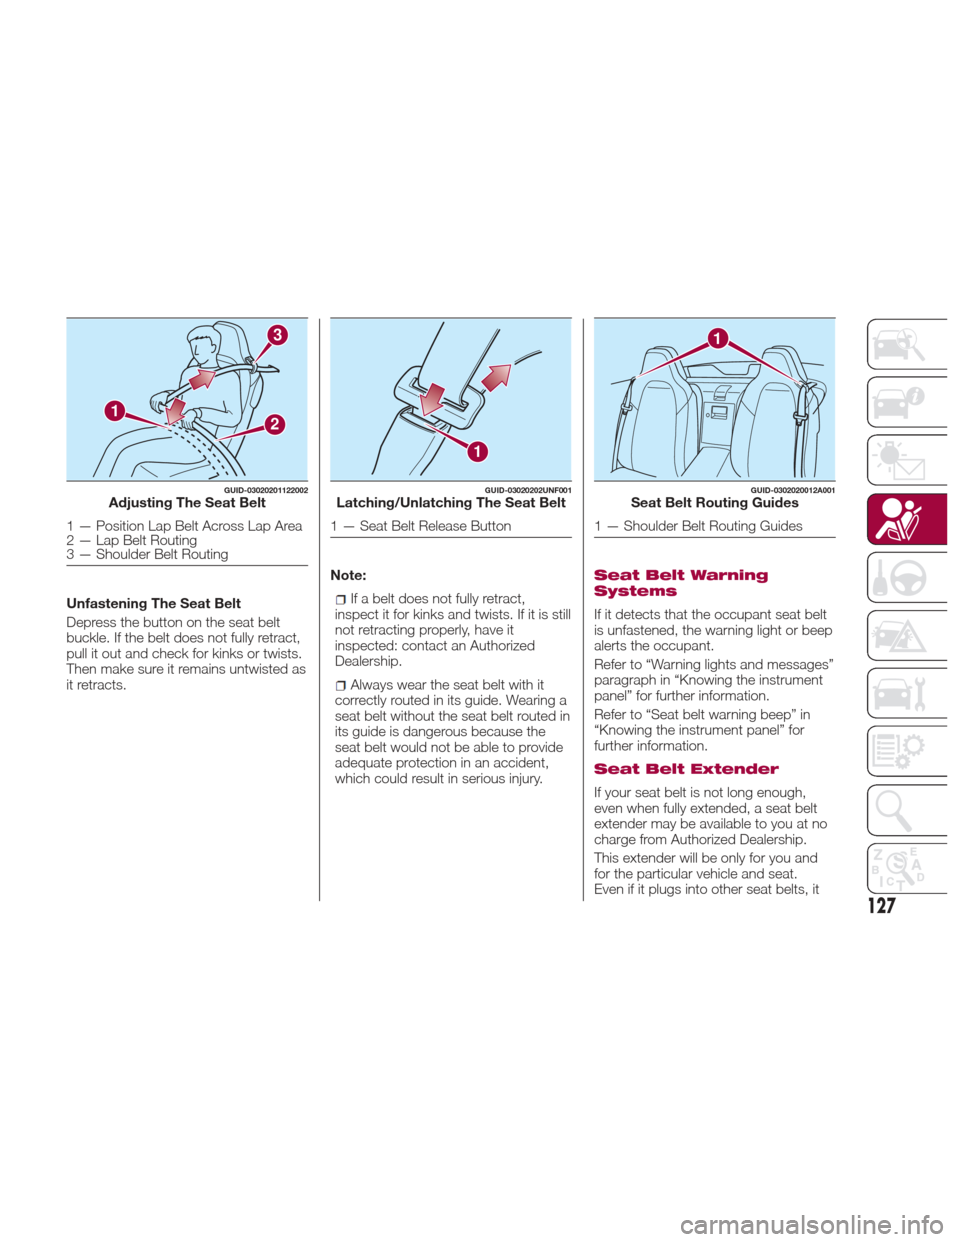
Unfastening The Seat Belt
Depress the button on the seat belt
buckle. If the belt does not fully retract,
pull it out and check for kinks or twists.
Then make sure it remains untwisted as
it retracts.Note:If a belt does not fully retract,
inspect it for kinks and twists. If it is still
not retracting properly, have it
inspected: contact an Authorized
Dealership.
Always wear the seat belt with it
correctly routed in its guide. Wearing a
seat belt without the seat belt routed in
its guide is dangerous because the
seat belt would not be able to provide
adequate protection in an accident,
which could result in serious injury.
Seat Belt Warning
Systems
If it detects that the occupant seat belt
is unfastened, the warning light or beep
alerts the occupant.
Refer to “Warning lights and messages”
paragraph in “Knowing the instrument
panel” for further information.
Refer to “Seat belt warning beep” in
“Knowing the instrument panel” for
further information.
Seat Belt Extender
If your seat belt is not long enough,
even when fully extended, a seat belt
extender may be available to you at no
charge from Authorized Dealership.
This extender will be only for you and
for the particular vehicle and seat.
Even if it plugs into other seat belts, it
1
3
2
GUID-03020201122002Adjusting The Seat Belt
1 — Position Lap Belt Across Lap Area
2 — Lap Belt Routing
3 — Shoulder Belt Routing
1
GUID-03020202UNF001Latching/Unlatching The Seat Belt
1 — Seat Belt Release Button
1
GUID-0302020012A001Seat Belt Routing Guides
1 — Shoulder Belt Routing Guides
127
Page 131 of 300

pretensioner operates on the side in
which the collision occurs. The
pretensioners operate differently
depending on what types of air bags
are equipped. For details on the seat
belt pretensioner operation, refer to the
“SRS Air Bag Deployment Criteria”
paragraph in this chapter.
When a collision is detected, the
pretensioners deploy simultaneously
with the air bags. For deployment
details, refer to the “SRS Air Bag
Deployment Criteria” paragraph in this
chapter.
The seat belt retractors remove slack
quickly as the air bags are expanding.
Any time the air bags and seat belt
pretensioners have fired they must be
replaced.
A system malfunction or operation
conditions are indicated by a warning.
Referto“WarningLightsAnd
Messages” and “Warning Sound Is
Activated” paragraph in “Knowing The
Instrument Panel” chapter.
With Passenger Occupant
Classification System
In addition, the pretensioner system for
the passenger, like the front and side
passenger Air Bag, is designed to only
deploy when the passenger occupant
classification sensor detects a
passenger sitting on the passenger's
seat.Note:
These devices are not a substitute
for proper seat belt placement by the
occupant. The seat belt still must be
worn snugly and positioned properly.
The pretensioners are triggered by
the Occupant Restraint Controller
(ORC). Like the air bags, the
pretensioners are single use items. A
deployed pretensioner or a deployed
air bag must be replaced immediately.
Load Limiter
The load limiting system releases belt
webbing in a controlled manner to
reduce belt force on the occupant's
chest.
While the most severe load on a seat
belt occurs in frontal collisions, the load
limiter has an automatic mechanical
function and can activate in any
accident mode with sufficient occupant
movement.
Even if the pretensioners have not fired,
the load limiting function must be
checked by an authorized dealer.
CHILD RESTRAINT
PRECAUTIONS
Child Restraints
FCA strongly urges the use of
child-restraint systems for children small
enough to use them.
FCA recommends use of a genuine
child-restraint system or one that
complies with regulation. If you would
like to purchase a FCA genuine
child-restraint system, please contact a
Authorized Dealership.
Check your local and state or provincial
laws for specific requirements regarding
the safety of children riding in your
vehicle.
Whatever child-restraint system you
consider, please pick the appropriate
one for the age and size of the child,
obey the law and follow the instructions
that come with the individual
child-restraint system.
A child who has outgrown
child-restraint systems should use seat
belts, both lap and shoulder. If the
shoulder belt crosses the neck or face,
move the child closer to the centre of
the vehicle.
A rear-facing child-restraint system
should NEVER be used on the
passenger seat with the Air Bag system
activated. In the event of an impact the
Air Bag activation may cause fatal
injuries to the transported child.
129
Page 141 of 300
Warning Light/Beep
A system malfunction or operation
conditions are indicated by a warning.
Refer to “Warning lights and messages”
paragraph in “Knowing your instrument
panel” chapter for further information.
Passenger Side Front Air Bag And
Child Restraint Systems
Rearward-facing child restraint systems
mustNEVER be fitted on the front seat
with an active passenger side air bag
since in the event of an impact the air
bag activation may cause fatal injuries
to the transported child.
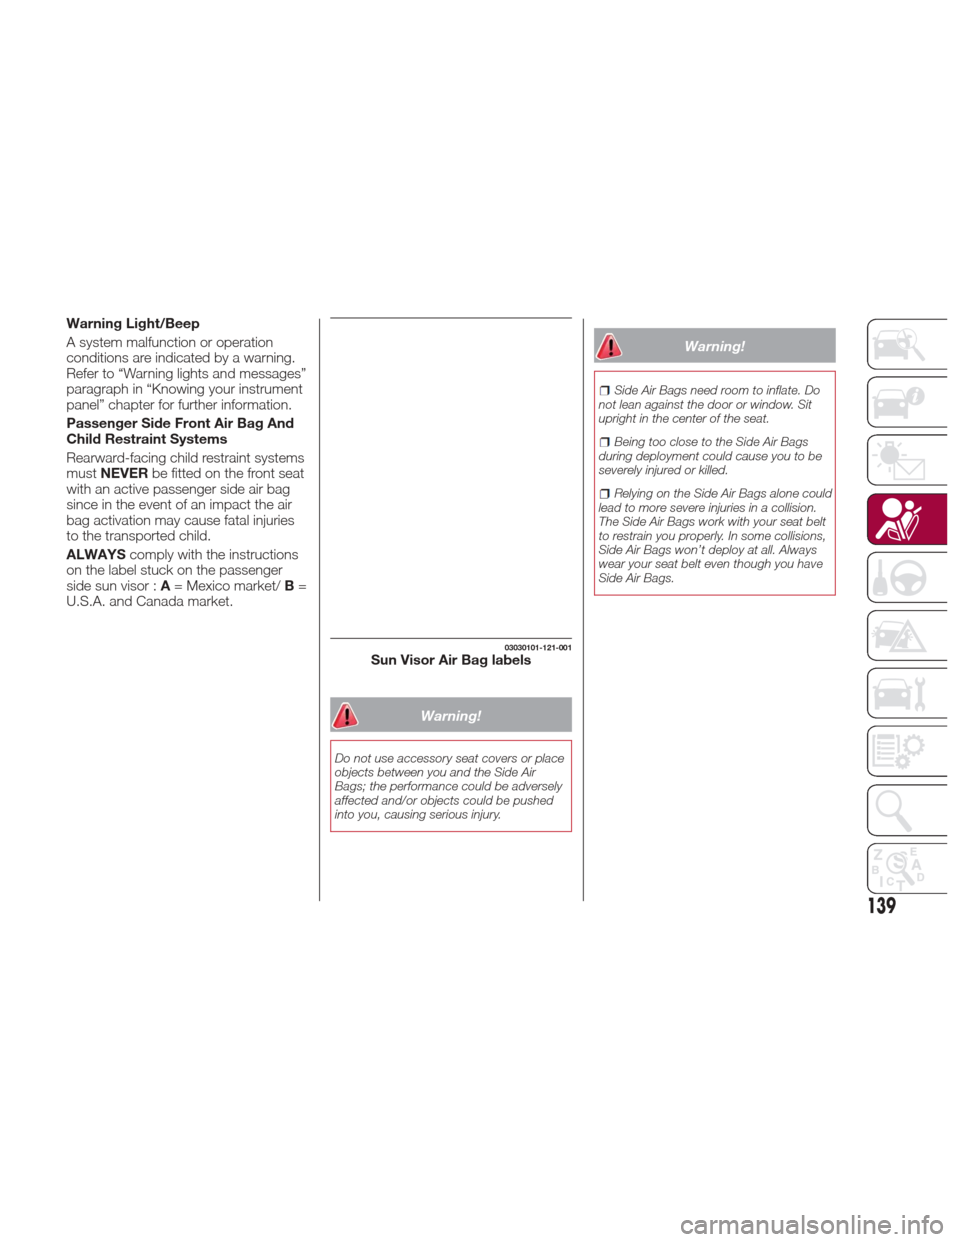
ALWAYS comply with the instructions
on the label stuck on the passenger
side sun visor : A= Mexico market/ B=
U.S.A. and Canada market.
Warning!
Do not use accessory seat covers or place
objects between you and the Side Air
Bags; the performance could be adversely
affected and/or objects could be pushed
into you, causing serious injury.
Warning!
Side Air Bags need room to inflate. Do
not lean against the door or window. Sit
upright in the center of the seat.
Being too close to the Side Air Bags
during deployment could cause you to be
severely injured or killed.
Relying on the Side Air Bags alone could
lead to more severe injuries in a collision.
The Side Air Bags work with your seat belt
to restrain you properly. In some collisions,
Side Air Bags won’t deploy at all. Always
wear your seat belt even though you have
Side Air Bags.
03030101-121-001Sun Visor Air Bag labels
139
Page 145 of 300

This system shuts off the passenger
front and side Air Bags and seat belt
pretensioner system, so make sure the
passenger Air Bag deactivation
indicator light turns on.
The air bag/seat belt pretensioner
system warning light flashes and the
passenger Air Bag deactivation
indicator light illuminates if the sensors
have a possible malfunction. If this
happens, the passenger front and side
Air Bags and seat belt pretensioner
system will not deploy.
Note:If a passenger is seated as
shown in the following figure the
passenger occupant classification
sensor cannot detect a passenger
sitting on the passenger's seat correctly
and the deployment/non-deployment of
the Air Bags cannot be controlled as
indicated in the passenger Air Bag
deactivation indicator light on/off
condition chart.
Warning!
If a child restraint system, child, small
teenager or adult in the front passenger
seat is seated improperly, the occupant
may provide an output signal to the
occupant classification sensor that is
different from the occupant’s properly
seated weight input. This may result in
serious injury or death in a collision.
Passenger Air Bag Deactivation
Indicator Lights
These indicator lights turn on to remind
you that the passenger front and side
Air Bags and seat belt pretensioner will
or will not deploy during a collision. Note:
The system requires about
10 seconds to alternate between
turning the passenger front and side
Air Bags and seat belt pretensioner
system on or off.
The passenger air bag deactivation
indicator light may turn on repeatedly if
luggage or other items are put on the
passenger seat, or if the temperature
of the vehicle's interior changes
suddenly.
The passenger air bag deactivation
indicator light may turn on for
10 seconds if the electrostatic capacity
on the passenger seat changes.
The air bag/seat belt pretensioner
system warning light might turn on if
the passenger seat receives a severe
impact.
03040702-12A-001Passenger Not Sitting Correct
GUID-06070400567567Passenger Air Bag Deactivated
143
Page 151 of 300
STARTING THE
ENGINE
Starting The Engine
Before starting the engine, adjust the
seat, the interior rear view mirrors, the
door mirrors and fasten the seat belt
correctly.
Warning!
When leaving the vehicle, always remove
the key fob from the vehicle and lock your
vehicle.
Never leave children alone in a vehicle,
or with access to an unlocked vehicle.
Allowing children to be in a vehicle
unattended is dangerous for a number of
reasons. A child or others could be
seriously or fatally injured. Children should
be warned not to touch the parking brake,
brake pedal or the transmission gear
selector.
Do not leave the key fob in or near the
vehicle, or in a location accessible to
children, and do not leave the ignition of a
vehicle equipped with Advanced Keyless
Entry in the ACC or ON/RUN mode. A child
could operate power windows, other
controls, or move the vehicle.
Do not leave children or animals inside
parked vehicles in hot weather. Interior heat
build-up may cause serious injury or death.
Never press the accelerator pedal for
starting the engine.
Models Equipped With A
Manual Transmission
Proceed as follows:
1. Engage the parking brake and place
the gear selector in NEUTRAL.
2. Place the start button in the ACC
mode.
3. Fully depress the clutch pedal
without touching the accelerator.
4. Place the start button in the ON
mode, push and release it as soon as
the engine starts. If the engine does not
start within 10 seconds, push the start
button to OFF mode and wait for
10-15 seconds before repeating the
starting procedure.
Models Equipped With
An Automatic
Transmission
Proceed as follows:
1. Engage the parking brake and place
the gear selector to P (PARK) or N
(NEUTRAL).
2. Fully depress the brake pedal
without touching the accelerator.
3. Place the start button in the ACC
mode. 4. Place the start button in the ON
mode, push and release it as soon as
the engine starts. If the engine does not
start within 10 seconds, push the start
button to OFF mode and wait for
10-15 seconds before repeating the
starting procedure.
Cold Weather Operation
Regarding Cold Start Disable
When the ambient temperature is
extremely low, the engine may not
crank even when the engine starting
procedure is performed. At this time,
the Cold Start Disable Indicator light in
the instrument cluster flashes. However,
this does not indicate a problem.
Perform the necessary procedures (see
“Warning lights And Messages”
paragraph in “Getting To Know Your
Instrument Panel” chapter).
Regarding Ice Breaker
When the ambient temperature is low,
the start of cranking may be delayed
after engine starting procedure is
performed. At this time, the Cold Start
Disable Indicator light in the instrument
cluster illumintes. However, this does
not indicate a problem.
Refer to your authorized dealer
regarding other related parts which are
to be input such as function name,
operating scenario (condition) of each
function, indicator operation, and user
operation/procedure information.
149
Page 153 of 300
Warning!
Riding the brakes can lead to brake
failure and possibly a collision. Driving with
your foot resting or riding on the brake
pedal can result in abnormally high brake
temperatures, excessive lining wear, and
possible brake damage. You would not
have your full braking capacity in an
emergency.
Driving a vehicle with the “Brake
Warning Light” on is dangerous. A
significant decrease in braking performance
or vehicle stability during braking may
occur. It will take you longer to stop the
vehicle or will make your vehicle harder to
control. You could have a collision. Have
the vehicle checked immediately.
Caution!
Wear shoes appropriate for driving in order
to avoid your shoe contacting the brake
pedal when depressing the accelerator
pedal.
Parking Brake
Note: Driving with the parking brake on
will cause excessive wear of the brake
parts.
Warning!
Never leave children alone in a vehicle,
or with access to an unlocked vehicle.
Allowing children to be in a vehicle
unattended is dangerous for a number of
reasons. A child or others could be
seriously or fatally injured. Children should
be warned not to touch the park brake,
brake pedal or the gear selector.
Do not leave the key fob in or near the
vehicle or in a location accessible to
children. A child could operate power
windows, other controls, or move the
vehicle.
Be sure the park brake is fully
disengaged before driving; failure to do so
can lead to brake failure and a collision.
Always fully apply the park brake when
leaving your vehicle, or it may roll and
cause damage or injury. Also be certain to
leave a manual transmission in REVERSE
(R) or FIRST (1st) gear. Failure to do so may
allow the vehicle to roll and cause damage
or injury.
Setting the Parking Brake
Depress the brake pedal and then firmly
pull the parking brake lever fully
upwards with sufficient force to hold the
vehicle in a stationary position. Releasing the Parking Brake
Depress the brake pedal and pull the
parking brake lever upwards, then
press the release button. While holding
the button, lower the parking brake
lever all the way down to the released
position.
Warning Light
The warning light turns on when the
system has a malfunction. Refer to
“Warning Lights And Messages”
paragraph in “Getting to Know Your
Instrument Panel” chapter.
Brake Pad Wear Indicator
When the disc brake pads become
worn, the built-in wear indicators
contact the rotors. This causes a
screeching noise to warn that the pads
05050102-12A-001Parking Brake
1 — Parking Brake Lever
2 — Parking Brake Release Button
151
Page 170 of 300
Caution!
Do not apply excessive force to the
camera. You could alter the position and
angle of the camera. Do not disassemble,
modify or remove it as this could
compromise the seal.
The camera’s cover is made of plastic.
Do not apply degreasers, organic solvents,
wax or glass polish to the camera’s cover.
If some substance ends up on the cover,
clean it off immediately with a soft cloth.
Do not rub the cover too much, nor
polish it with abrasive compounds or hard
brushes. The cover could be damaged and
create image problems.
If the vehicle has been involved in a
frontal, lateral or rear collision, the rear
parking camera’s alignment (location or
installation angle) may have been altered.
Contact a Authorized Dealer.
If the display shows "no video signal",
there may be a problem with the camera.
Contact an Authorized Dealer.
Display
Note: The images on the display can
show a situation that differs from the
actual view.
The field of view varies depending on
the vehicle and the road conditions. The
field of view is limited. Objects below
the bumper or around its ends may not
be displayed. The distance displayed by the image
differs from the real one as the rear
parking camera is equipped with a
special lens.
The camera could capture any
non-standard accessories installed on
the vehicle. Do not install non-standard
accessories that could interfere with the
camera’s view, such as lights or
reflectors.
GUID-07080913987987Camera View
1 — Rear Bumper
2 — Blocked Area
GUID-07080913988988Camera Field Of View
168
STARTING AND OPERATING
Page 186 of 300

IN CASE OF EMERGENCY
HAZARD WARNING LIGHTS . . . .185
REPLACING A BULB..........185
REPLACING FUSES ..........196
CHANGINGAWHEEL ........204
TIRE SERVICE KIT ...........209
JUMPSTARTING............218
OVERHEATING .............220
TOWINGTHEVEHICLE........221
184
IN CASE OF EMERGENCY