Page 140 of 530
Universal commands are available at all times. Local
commands are available if the supported radio mode is
active.
Changing The Volume
1. Start a dialogue by pushing the Voice Commandbut-
ton.
2. Say a command (e.g., “Help”).
3. Use the ON/OFF VOLUME rotary knob to adjust the volume to a comfortable level while the Voice Com-
mand system is speaking. Please note the volume set-
ting for Voice Command is different than the audio
system.
Main Menu
Start a dialogue by pushing the Voice Commandbut-
ton. You may say “Main Menu” to switch to the main
menu.
In this mode, you can say the following commands:
• “Radio AM” (to switch to the radio AM mode)
• “Radio FM” (to switch to radio FM mode) •
“Sat” (to switch to Satellite radio mode)
• “Disc” (to switch to the disc mode)
• “USB” (to switch to USB mode)
• “Bluetooth Streaming” (to switch to Bluetooth Stream-
ing mode)
• “Memo” (to switch to the memo recorder)
• “System Setup” (to switch to system setup)
Radio AM
To switch to the AM band, say “AM” or “Radio AM.” In
this mode, you may say the following commands:
•“Frequency #” (to change the frequency)
• “Next Station” (to select the next station)
• “Previous Station” (to select the previous station)
• “Radio Menu” (to switch to the radio menu)
• “Main Menu” (to switch to the main menu)
138 UNDERSTANDING THE FEATURES OF YOUR VEHICLE
Page 142 of 530
Bluetooth Streaming (BT) Mode
To switch to Bluetooth Streaming (BT) mode, say
“Bluetooth Streaming.” In this mode, you may say the
following commands:
•“Play” (to play the current track)
• “Pause” (to pause the current track)
• “Next Track” (to play the next track)
• “Previous Track” (to play the previous track)
Memo Mode
To switch to the voice recorder mode, say “Memo.” In this
mode, you may say the following commands:
•“New Memo” (to record a new memo) — During the
recording, you may push the Voice Command
but-
ton to stop recording. You proceed by saying one of
the following commands:
– “Save” (to save the memo)
– “Continue” (to continue recording)
– “Delete” (to delete the recording) •
“Play Memos” (to play previously recorded memos) —
During the playback you may push the Voice Command
button to stop playing memos. You proceed by
saying one of the following commands:
– “Repeat” (to repeat a memo)
– “Next” (to play the next memo)
– “Previous” (to play the previous memo)
– “Delete” (to delete a memo)
– “Delete All” (to delete all memos)
Setup
To switch to system setup, you may say one of the
following:
• “Change to setup”
• “Switch to system setup”
• “Main menu setup”
• “Switch to setup”
140 UNDERSTANDING THE FEATURES OF YOUR VEHICLE
Page 235 of 530
UNDERSTANDING YOUR INSTRUMENT PANEL
CONTENTS
�INSTRUMENT PANEL FEATURES ...........236
� INSTRUMENT CLUSTER ..................237
� WARNING AND INDICATOR LIGHTS ........241
▫ Red Telltale Indicator Lights ...............242
▫ Yellow Telltale Indicator Lights .............249
▫ Green Telltale Indicator Lights ..............256
▫ Blue Telltale Indicator Lights ...............257
▫ White Telltale Indicator Lights ..............258
� INSTRUMENT CLUSTER DISPLAY— IF
EQUIPPED ............................259
▫ Instrument Cluster Display ................260
▫ Oil Change Required ....................263
▫ Fuel Economy ........................ .264
▫ Vehicle Speed ........................ .265▫
Trip Info ............................ .265
▫ Tire Pressure ..........................266
▫ Units ............................... .266
▫ Vehicle Info (Customer Information Features) . . .266
▫ Messages # .......................... .266
▫ Compass / Temperature Display ...........267
▫ Turn Menu Off ........................ .269
▫ Customer-Programmable Features
(System Setup) ........................269
� CYBERSECURITY ........................274
� RADIO 430/430N CD/DVD/HDD/NAV — IF
EQUIPPED ............................275
▫ Operating Instructions (Voice Command System) —
If Equipped .......................... .2754
Page 236 of 530
▫Operating Instructions (Uconnect Phone) — If
Equipped ............................275
� RADIO 130 ............................276
▫ Operating Instructions — Radio Mode .......276
▫ Operation Instructions — CD MODE For CD And
MP3 Audio Play .......................278
▫ Notes On Playing MP3 Files ...............280
▫ Operation Instructions — Auxiliary Mode .....282
� RADIO 130 WITH SATELLITE RADIO ........283
▫ Operating Instructions — Radio Mode ........283
▫ Operation Instructions — CD MODE For CD And
MP3 Audio Play ........................288
▫ Notes On Playing MP3 Files ...............289
▫ LIST Button — CD Mode For MP3 Play .......291
▫ INFO Button — CD Mode For MP3 Play ......292
▫ Uconnect (Satellite Radio) — If Equipped .....292
▫ Operating Instructions (Uconnect Phone) — If
Equipped ............................295 �
IPOD/USB/MP3 CONTROL — IF EQUIPPED . . .295
▫ Connecting The iPod Or External USB Device . . .296
▫ Using This Feature ..................... .296
▫ Controlling The iPod Or External USB Device Using
Radio Buttons ........................ .297
▫ Play Mode ............................297
▫ List Or Browse Mode ....................298
▫ Bluetooth Streaming Audio (BTSA) ..........300
� UCONNECT MULTIMEDIA — VIDEO
ENTERTAINMENT SYSTEM (VES) — IF
EQUIPPED ............................300
▫ Getting Started ........................301
▫ Play Video Games ..................... .301
▫ Play A DVD Using The Touchscreen Radio . . . .303
▫ Play A DVD Using The VES Player — If
Equipped ............................304
▫ VES
Remote Control — If Equipped .........306
▫ Remote Control Storage ..................308
234 UNDERSTANDING YOUR INSTRUMENT PANEL
Page 259 of 530
Front Fog Indicator Light — If Equipped
Green TelltaleLight What It Means
Front Fog Indicator Light — If Equipped
This indicator will illuminate when the front fog lights are on.
Blue Telltale Indicator Lights
High Beam Indicator Light
Blue Telltale
Light What It Means
High Beam Indicator Light
This indicator shows that the high beam headlights are on. Push the multifunction control lever
away from you to switch the headlights to high beam. Pull the lever toward you to switch the
headlights back to low beam. Pull the lever toward you for a temporary high beam on,
�flash to
pass� scenario.
4
UNDERSTANDING YOUR INSTRUMENT PANEL 257
Page 288 of 530
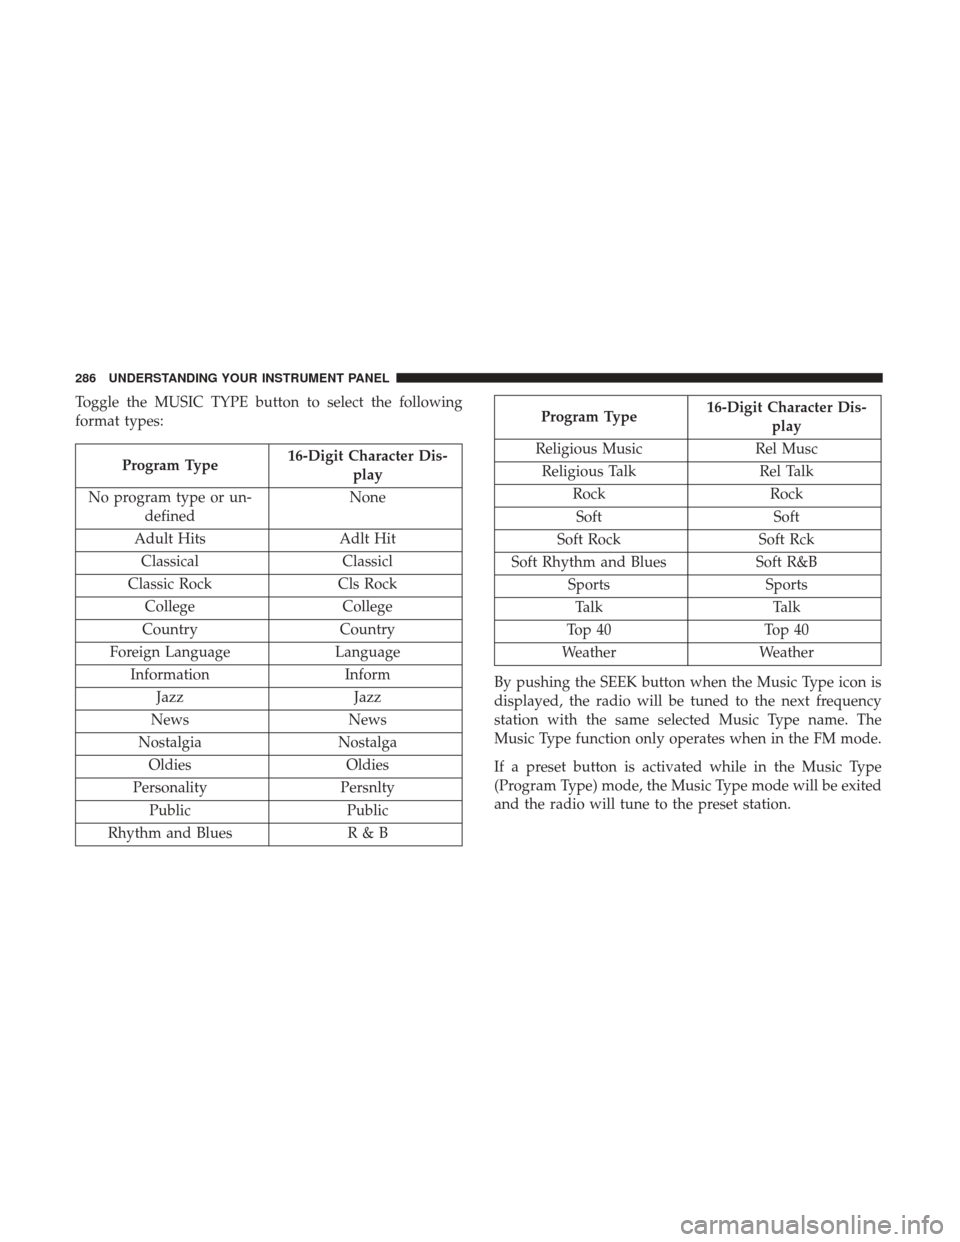
Toggle the MUSIC TYPE button to select the following
format types:
Program Type16-Digit Character Dis-
play
No program type or un- defined None
Adult Hits Adlt Hit
Classical Classicl
Classic Rock Cls Rock
College College
Country Country
Foreign Language Language
Information Inform
Jazz Jazz
News News
Nostalgia Nostalga
Oldies Oldies
Personality Persnlty
Public Public
Rhythm and Blues R & B
Program Type16-Digit Character Dis-
play
Religious Music Rel Musc
Religious Talk Rel Talk
Rock Rock
Soft Soft
Soft Rock Soft Rck
Soft Rhythm and Blues Soft R&B
Sports Sports
Talk Talk
Top 40 Top 40
Weather Weather
By pushing the SEEK button when the Music Type icon is
displayed, the radio will be tuned to the next frequency
station with the same selected Music Type name. The
Music Type function only operates when in the FM mode.
If a preset button is activated while in the Music Type
(Program Type) mode, the Music Type mode will be exited
and the radio will tune to the preset station.
286 UNDERSTANDING YOUR INSTRUMENT PANEL
Page 302 of 530
Bluetooth Streaming Audio (BTSA)
Music can be streamed from your cellular phone to the
Uconnect phone system.
Refer to the Uconnect Owner ’s Manual Supplement for
further information on Bluetooth connectivity.
Controlling BTSA Using Radio Buttons
To enter BTSA mode, push either “AUX” button on the
radio or push the VR
button and say “Bluetooth
Streaming Audio.”
Play Mode
When switched to BTSA mode, some audio devices can
start playing music over the vehicle’s audio system, but
some devices require the music to be initiated on the device
first, then it will get streamed to the Uconnect phone
system. Seven devices can be paired to the Uconnect phone
system, but just one can be selected and played.
Selecting A Different Audio Device
1. Push the Phonebutton to begin.
2. After the �Ready�prompt and following the beep, say
�Setup�, then say �Select Audio Devices.� 3. Say the name of the audio device or ask the Uconnect
phone system to list the audio devices.
Next Track
Use the SEEK UP button, or push the VRbutton on the
radio and say “Next Track,” to jump to the next music
track on your cellular phone.
Previous Track
Use the SEEK DOWN button, or push the VRbutton on
the radio and say “Previous Track,” to jump to the
previous music track on your cellular phone.
Browse
Browsing is not available on a Bluetooth Streaming Audio
(BTSA) device. Only the current song that is playing will
display info.
UCONNECT MULTIMEDIA — VIDEO
ENTERTAINMENT SYSTEM (VES) — IF EQUIPPED
Your rear seat Video Entertainment System (VES) is de-
signed to give your family years of enjoyment. You can
play your favorite CDs or DVDs, listen to audio over the
300 UNDERSTANDING YOUR INSTRUMENT PANEL
Page 489 of 530
Cavity Cartridge FuseMini-FuseDescription
J11 30 Amp Pink –Power Sliding Door Module/Anti–Theft Module
– If Equipped
J12 30 Amp Pink –HVAC Rear Blower, Radiator Fan Motor
J13 60 Amp Yellow –Ignition Off Draw (IOD) – Main
J14 40 Amp Green –Rear Window Defogger
J15 40 Amp Green – Front Blower
J17 40 Amp Green –Starter Solenoid
J18 20 Amp Blue –Powertrain Control Module Trans Range
J19 60 Amp Yellow – Radiator Fan
J20 30 Amp Pink –Front Wiper LO/HI
J21 20 Amp Blue –Front/Rear Washer
J22 25 Amp Clear –Sunroof Module
M1 –15 Amp Blue Rear Center Brake Lamp/Brake Switch
M2 –20 Amp Yellow Front Fog Lamps
M3 –20 Amp Yellow Vacuum Pump Motor
M5 –25 Amp Clear Inverter
M6 –20 Amp Yellow Power Outlet #1 (ACC), Rain Sensor, Cigar
Lighter (Instrument Panel or with Console Rear)
M7 –20 Amp Yellow Power Outlet #2 (BATT/ACC SELECT) – Center
Seat or with Console Rear
7
MAINTAINING YOUR VEHICLE 487