Page 243 of 527

241
C4-Picasso-II_en_Chap06_securite_ed02-2016
Airbags
System designed to contribute towards
improving the safety of the occupants (with
the exception of the rear centre passenger)
in the event of violent collisions. The airbags
supplement the action of the force-limiting
seat belts (with the exception of the rear centre
passenger).
If a collision occurs, the electronic detectors
record and analyse the front and side impacts
sustained in the impact detection zones:
-
i
n the case of a serious impact, the airbags
are deployed instantly and contribute
towards better protection of the occupants
of the vehicle (with the exception of the
rear centre passenger); immediately after
the impact, the airbags deflate rapidly so
that they do not hinder visibility or the exit
of the occupants,
-
i
n the case of a minor or rear impact or in
certain roll-over conditions, the airbags
may not be deployed; the seat belt
alone contributes towards ensuring your
protection in these situations.
The airbags do not operate when the
ignition is switched off.
This equipment will only deploy once.
If a second impact occurs (during the
same or a subsequent accident), the
airbag will not be deployed again. Deployment of one or more of the
airbags is accompanied by a slight
emission of smoke and a noise, due
to the activation of the pyrotechnic
cartridge incorporated in the system.
This smoke is not harmful, but sensitive
individuals may experience slight
irritation.
The noise of detonation related to the
deployment of one or more airbags may
result in a slight loss of hearing for a
short time.
A.
F
ront impact zone.
B.
S
ide impact zone.Impact detection zones
6
Safety
Page 268 of 527
266
C4-Picasso-II_en_Chap07_info-pratiques_ed02-2016
Very cold climate screen(s)*
Removable protective screens which prevent the accumulation of snow at the radiator cooling fan.
Depending on version, you will have one or two screens.
F
O
ffer up the corresponding very cold
climate screen to the upper or lower
section of the front bumper.
F
P
ress around the edge of each screen to
engage its fixing clips one by one.
F
U
se a screwdriver as a lever to release the
fixing clips in turn on each screen.
Do not forget to remove the very cold climate
screen(s) when:
-
t
he ambient temperature exceeds 10 °C,
-
tow
ing,
-
d
riving at speeds above 75 mph (120
k
m/h).
Removal Fitting
360 Vision system
The pre-cut zone must be removed
before fitting the screen to the front
bumper, to allow operation of the
camera.
When the very cold climate screen
is fitted, the image provided by the
camera is slightly different.
*
Depending on the country of sale.
Practical information
Page 270 of 527

268
C4-Picasso-II_en_Chap07_info-pratiques_ed02-2016
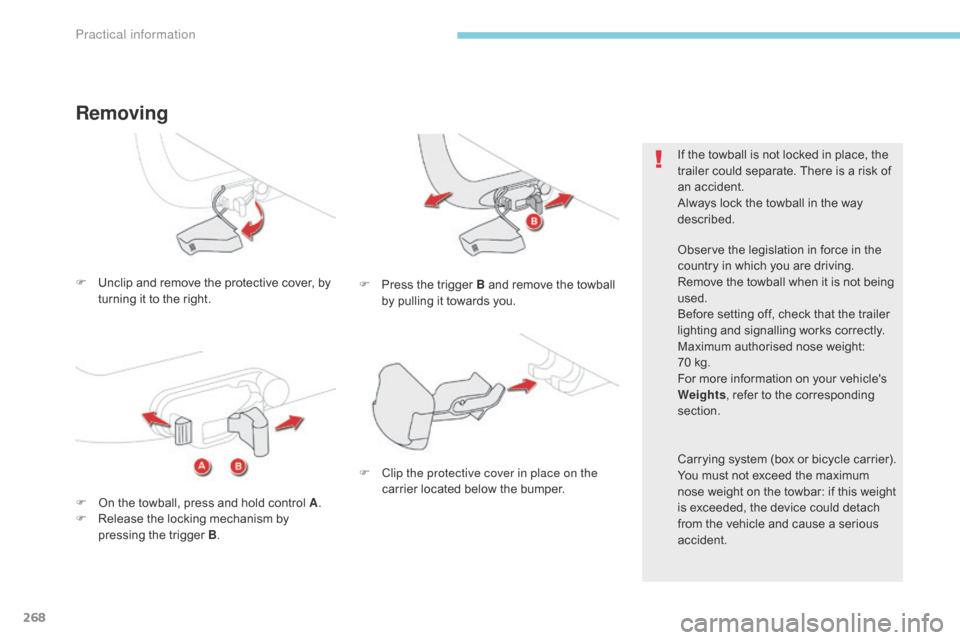
F Unclip and remove the protective cover, by turning it to the right.
Removing
F Press the trigger B and remove the towball by pulling it towards you.
F
O
n the towball, press and hold control A .
F
R
elease the locking mechanism by
pressing the trigger B . If the towball is not locked in place, the
trailer could separate. There is a risk of
an accident.
Always lock the towball in the way
described.
Observe the legislation in force in the
country in which you are driving.
Remove the towball when it is not being
used.
Before setting off, check that the trailer
lighting and signalling works correctly.
Maximum authorised nose weight:
70
kg.
For more information on your vehicle's
Weights , refer to the corresponding
section.
Carrying system (box or bicycle carrier).
You must not exceed the maximum
nose weight on the towbar: if this weight
is exceeded, the device could detach
from the vehicle and cause a serious
accident.
F
C
lip the protective cover in place on the
carrier located below the bumper.
Practical information
Page 283 of 527

281
C4-Picasso-II_en_Chap07_info-pratiques_ed02-2016
Brake wear depends on the style
of driving, particularly in the case
of vehicles used in town, over short
distances. It may be necessary to have
the condition of the brakes checked,
even between vehicle services.
Brake pads
For information on checking brake
disc wear, contact a CITROËN dealer
or a qualified workshop.
Brake disc wear
Only use products recommended by
CITROËN or products of equivalent
quality and specification.
In order to optimise the operation of
units as important as those in the
braking system, CITROËN selects and
offers very specific products.
After washing the vehicle, dampness,
or in wintry conditions, ice can form
on the brake discs and pads: braking
efficiency may be reduced. Make light
brake applications to dry and defrost
the brakes.
Electric parking brake
For more information, refer to the "Electric
parking brake - Operating faults " section.
This system does not require any
routine servicing. However, in the
event of a problem, have the system
checked by a CITROËN dealer or a
qualified workshop.
Manual gearbox
The gearbox does not require any
maintenance (no oil change).
Refer to the manufacturer's service
schedule for the checking interval for
this component.
Automatic gearbox
The gearbox does not require any
maintenance (no oil change).
Refer to the manufacturer's service
schedule for details of the level
checking interval for this component.
To avoid damaging the electrical units,
never use a high pressure jet wash in
the engine compartment.
Unless there is a leak in the circuit, a drop in
the brake fluid level indicates that the brake
pads are worn.
7
Practical information
Page 286 of 527

284
C4-Picasso-II_en_Chap07_info-pratiques_ed02-2016
Recommendations on storage
AdBlue® freezes at about -11°C and
deteriorates above 25°C. It is recommended
that bottles be stored in a cool area and
protected from direct sunlight.
Under these conditions, the fluid can be kept
for at least a year.
If the additive has frozen, it can be used once it
has completely thawed out.
Procedure
Before topping-up, ensure that the vehicle is
parked on a flat and level sur face.
In wintry conditions, ensure that the
temperature of the vehicle is above -11°C.
Other wise, by freezing, the AdBlue
® cannot
be poured into its tank. Park your vehicle in a
warmer area for a few hours to allow the top-up
to be carried out.
F
P
ress the START/STOP button to switch
off the engine. F
F or access to the AdBlue® tank, raise the
boot floor, or on 7-seat versions, unfold the
right hand seat in the third row.
Never store bottles of AdBlue
® in your
vehicle.
F
W
ithout pressing, turn the black cap a
quarter turn anti-clockwise and lift it off.
F
T
urn the blue cap a 6
th of a turn anti-
clockwise.
F
L
ift off the cap.
F
O
btain a bottle of AdBlue
®. After first
checking the use-by date, read carefully
the instructions on use on the label before
pouring the contents of the bottle into your
vehicle's AdBlue
® tank.
Practical information
Page 306 of 527

304
C4-Picasso-II_en_Chap08_en-cas-panne_ed02-2016
Changing a bulb
For H7 type bulbs with lugs... take care
to observe their correct installation
so as to ensure the best lighting
performance.
Risk of electrocution
Xenon bulbs (D5S-25W) must be
replaced by a CITROËN dealer or a
qualified workshop.
Front lamps
1. Directional dipped beam headlamps (D5S-25W).
2.
M
ain beam headlamps (H7-55W).
3.
D
aytime running lamps / sidelamps
(
6 light emitting diodes - LEDs).
4.
D
irection indicators
(
6 light emittng diodes - LEDs).
5.
F
ront foglamps (H11-55W). 1. D
ipped beam headlamps (H7-55W).
2. M ain beam headlamps (H7-55W).
3.
D
aytime running lamps/sidelamps
(
4 light emitting diodes - LEDs).
4.
D
irection indicators (PW Y24W).
5.
F
oglamps (H11-55W).In some weather conditions (e.g. low
temperature or humidity), the presence
of misting on the internal sur face of the
glass of the headlamps and rear lamps
is normal; it disappears after the lamps
have been on for a few minutes.
Light- emitting diodes - LEDs
For replacement, contact a CITROËN dealer or
qualified workshop.
Model with xenon headlamps Model with halogen headlamps
In the event of a breakdown
Page 309 of 527
307
C4-Picasso-II_en_Chap08_en-cas-panne_ed02-2016
The direction indicator bulb is located below
the front lamp.
F
T
urn the bulb holder a quarter turn anti-
clockwise.
F
R
emove the bulb holder.
F
C
hange the failed bulb.
For reassembly, carry out these operations in
reverse order.
Direction indicators Front foglamps
F Unclip the finisher by pulling at the top.
F
R emove the two screws to remove the unit.
F
T
urn the bulb holder a quarter turn.
F
R
emove the bulb holder.
F
C
hange the failed bulb.
For reassembly, carry out these operations in
reverse order, pressing on the finisher to refit it.
Faster flashing of a direction indicator
warning lamp (left or right) indicates a
failed bulb on that side.
Direction indicators
(light- emitting diodes - LED)
For the replacement of this type of lamp,
contact a CITROËN dealer or a qualified
workshop.
8
In the event of a breakdown
Page 310 of 527
308
C4-Picasso-II_en_Chap08_en-cas-panne_ed02-2016
You should contact a CITROËN dealer or a
qualified workshop for the replacement of the
light-emitting diode - LED.
Door mirror spotlamps
Integrated direction indicator
side repeaters
You should contact a CITROËN dealer or a
qualified workshop for the replacement of these
bulbs.1.
D
irection indicators (PY21W amber).
2.
S
idelamps / foglamps (P21/5W).
Rear lamps
Light-emitting diodes -
LEDs
For replacement, contact a CITROËN
dealer or qualified workshop.
3.
B
rake lamps / sidelamps (light-emitting
diodes - LEDs).
4. R
eversing lamps (W16W).
5.
D
irection indicators (PY21W).
Model with LED lamps3. Sidelamps (5W5).
4. B rake lamps (P21/ W).
5.
D
irection indicators (W Y16W).
6.
R
eversing lamps (W16W).
Model with conventional bulb lamps
In the event of a breakdown