Page 43 of 774
41
Use this button to confirm.
Use this button to quit.
Use the buttons on either side of the touch
screen for access to the menus, then press the
virtual buttons in the touch screen.
Menus
Driving
.
Allows certain functions to be switched
on and off and their settings adjusted.
Telephone.
Radio Media
.
Connected navigation . Settings
.
Allows configuration of the display
and the system.
Connectivity .
Adjust volume/Mute.
On/Off.
Touch screen
As a safety measure, the driver must
only carry out operations requiring
sustained attention with the vehicle
stationary. For more information on the touch
screen, refer to the Audio and
telematics section.
1
Instruments
Page 46 of 774
44
With the touch screen
Setting the time and date
F Select "Setting the time- date ".
F
P
ress on Settings
for acces to
the different menus.
F
M
odify the settings in the associated
" Date " or "Time " fields then press on
" Confirm ".
F
P
ress on " Confirm" to save and
quit.
F
Sel
ect "
OPTIONS ".
F
Sel
ect the " Date" or "Time " tab. You can choose to synchronise the
time and date with the GPS navigation
system (if fitted to your vehicle) so
that these settings are adjusted
automatically.
With the audio system
F Press the MENU
button for access to the
main menu .
F
P
ress the " 7" or " 8" button to select the
Personalisation-configuration menu,
then confirm by pressing the " OK" button.
F
P
ress the " 5" or " 6" and " 7" or " 8" buttons
to set the date and time, then confirm by
pressing the " OK" button.
F
P
ress the " 5" or " 6" button to select the
Display configuration menu then confirm
by pressing the " OK" button.
Instruments
Page 220 of 774

218
1. On.
2. Off (long press).
3.
Br
ightness adjustment.
4.
D
isplay height adjustment.
Once the system has been activated, the
following information is grouped together in the
head-up display:
A.
T
he speed of your vehicle.
B.
C
ruise control/speed limiter information.
C.
I
f your vehicle is so equipped, inter-vehicle
distance information, automatic emergency
braking alerts and navigation instructions.
D.
I
f your vehicle is so equipped, speed limit
information.
System which projects various information onto
a smoked blade in the driver's field of vision so
that they do not have to take their eyes off the
road.
Buttons
Displays during operationHead-up display
For more information on Navigation ,
refer to the Audio and telematics
section. F
W
ith the engine running, press button 1 to
activate the system and deploy the blade.
Activation / Deactivation
F Press and hold button 2 to deactivate the system and retract
the blade.
The activated/deactivated state is saved and
retained on restarting the engine.
Driving
Page 223 of 774

221
Speed limit recognition
This system allows the speed limit detected by
the camera to be displayed in the instrument
panel.
Specific speed limits, such as those for heavy
goods vehicles, are not displayed.
The display of the speed limit in the instrument
panel is updated as you pass a speed limit sign
intended for cars (light vehicles).
Principles
Depending on equipment, the
system takes account of speed limit
information from the navigation system
mapping.
The units for the speed limits (mph or
km/h) depend on the country you are
driving in.
It should be taken into account so that
you observe the speed limit.
For the system to operate correctly
when you change country, the units for
speed in the instrument panel must be
those for the country you are driving in. Depending on equipment, using a camera at
the top of the windscreen, this system detects
and reads speed limit and end of speed limit
signs.
Depending on equipment, the system takes
account of the camera and information from the
navigation system mapping.
To maintain correct operation of the
system: regularly clean the area in front
of the camera. The automatic reading of road signs is a
driving assistance system and does not
always display speed limits correctly.
The speed limit signs present on the
road always take priority over the
display by the system.
The system cannot in any
circumstances replace the need for
vigilance on the part of the driver.
The driver must observe the driving
regulations and must adapt the speed
of the vehicle to suit the weather and
traffic.
It is possible for the system to not
display the speed limit if it does not
detect a speed limit sign within a preset
period.
The system is designed to detect signs
that conform to the Vienna Convention
on road signs.
For the speed limit information given
by the navigation system to be correct,
your mapping software must be
regularly updated.
6
Driving
Page 270 of 774

268
By visiting a CITROËN dealer, you can
also obtain products for cleaning and
maintenance (exterior and interior) -
including ecological products in the
"TECHNATURE" range, topping-up
products (screenwash...), touch-up pens
and paint aerosols for the exact colour
of your vehicle, refills (cartridge for the
temporary puncture repair kit...), ...
"Multimedia"
Smartphone support, table support or semi-
integral navigation support, range of audio
systems and portable navigation systems,
driving recorder, Bluetooth hands-free kit, DVD
player, multimedia support, driving aids, vehicle
tracking system, ...For any work on your vehicle, use
a qualified workshop that has the
technical information, skills and
equipment required, all of which a
CITROËN dealer is able to provide.Roof bars / Roof rack
To fit the transverse roof bars, use the fixing
points provided for this purpose:
F
o
pen the fixing covers on each bar,
F
p
ut each fixing in place and lock them on
the roof one by one,
F
e
nsure that roof bars are correctly fitted (by
shaking them),
F
c
lose the fixing covers on each bar.
The bars can be interchanged and are
adaptable to each pair of fixing points. To fit a roof rack, use the fixing points provided
for this purpose:
F
p
lace the roof rack on the roof aligned with
the fixing points and secure each one in
turn,
F
e
nsure that roof rack is correctly fitted (by
shaking it).
Be sure to refer to national legislation in
order to comply with the regulations for
transporting objects that are longer than
the vehicle. Maximum authorised weight on each
fixing point
, for a loading height not
exceeding 40 cm: 25 kg.
Maximum weight by vehicle size:
-
c
ompact (L1) with 8 fixing points:
200 kg
-
s
tandard (L2) and long (L3) with
10
fixing points: 250 kg
If the height exceeds 40 cm, adapt the
speed of the vehicle to the profile of the
road to avoid damaging the roof rack
or roof bars and the fixing points on the
roof.
Practical information
Page 315 of 774

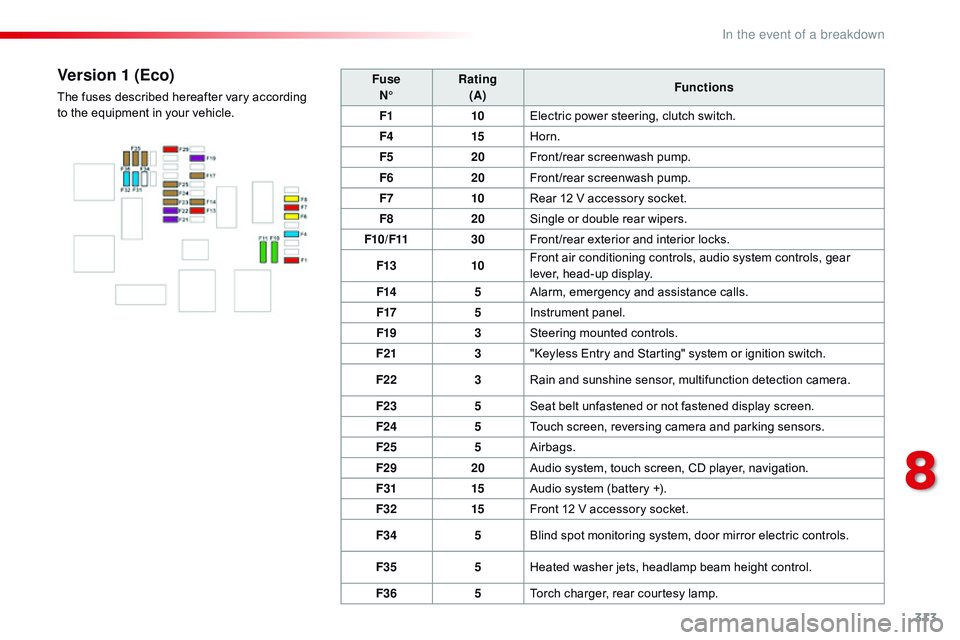
313
FuseN° Rating
(A) Functions
F1 10Electric power steering, clutch switch.
F4 15Horn.
F5 20Front/rear screenwash pump.
F6 20Front/rear screenwash pump.
F7 10Rear 12 V accessory socket.
F8 20Single or double rear wipers.
F10/F11 30Front /rear exterior and interior locks.
F13 10Front air conditioning controls, audio system controls, gear
lever, head-up display.
F14 5Alarm, emergency and assistance calls.
F17 5Instrument panel.
F19 3Steering mounted controls.
F21 3"Keyless Entry and Starting" system or ignition switch.
F22 3Rain and sunshine sensor, multifunction detection camera.
F23 5Seat belt unfastened or not fastened display screen.
F24 5Touch screen, reversing camera and parking sensors.
F25 5Airbags.
F29 20Audio system, touch screen, CD player, navigation.
F31 15Audio system (battery +).
F32 15Front 12 V accessory socket.
F34 5Blind spot monitoring system, door mirror electric controls.
F35 5Heated washer jets, headlamp beam height control.
F36 5Torch charger, rear courtesy lamp.Version 1 (Eco)
The fuses described hereafter vary according
to the equipment in your vehicle.
8
In the event of a breakdown
Page 316 of 774

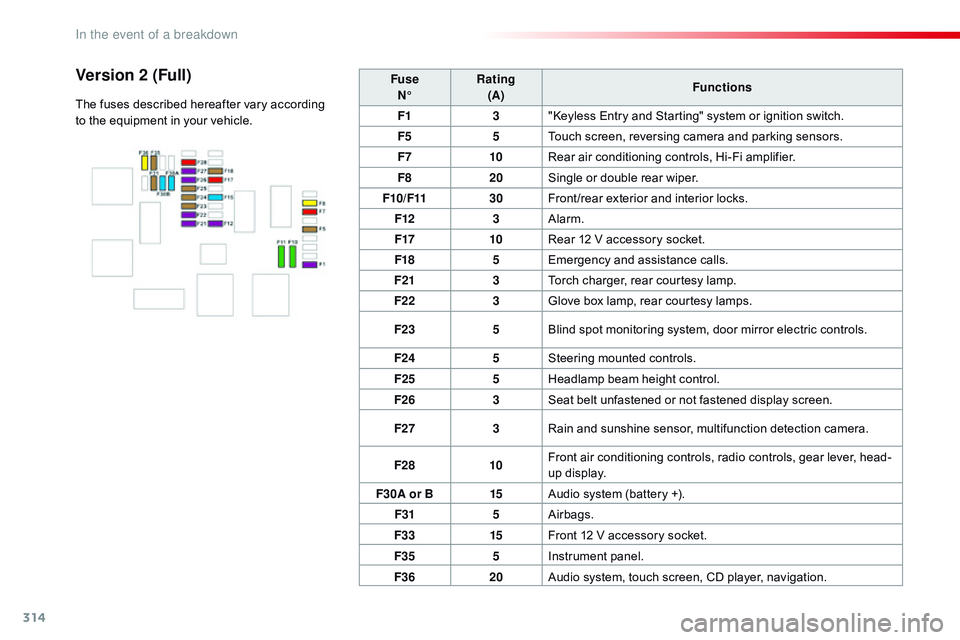
314
FuseN° Rating
(A) Functions
F1 3"Keyless Entry and Starting" system or ignition switch.
F5 5Touch screen, reversing camera and parking sensors.
F7 10Rear air conditioning controls, Hi-Fi amplifier.
F8 20Single or double rear wiper.
F10/F11 30Front /rear exterior and interior locks.
F12 3Alarm.
F17 10Rear 12 V accessory socket.
F18 5Emergency and assistance calls.
F21 3Torch charger, rear courtesy lamp.
F22 3Glove box lamp, rear courtesy lamps.
F23 5Blind spot monitoring system, door mirror electric controls.
F24 5Steering mounted controls.
F25 5Headlamp beam height control.
F26 3Seat belt unfastened or not fastened display screen.
F27 3Rain and sunshine sensor, multifunction detection camera.
F28 10Front air conditioning controls, radio controls, gear lever, head-
up display.
F30A or B 15Audio system (battery +).
F31 5Airbags.
F33 15Front 12 V accessory socket.
F35 5Instrument panel.
F36 20Audio system, touch screen, CD player, navigation.Version 2 (Full)
The fuses described hereafter vary according
to the equipment in your vehicle.
In the event of a breakdown
Page 333 of 774
331
CITROËN Connect Nav
GPS satellite navigation - Connectivity - Multimedia audio - Bluetooth® telephone
Contents
First steps
3 32
Steering mounted controls
3
34
Menus
335
V
oice commands
3
36
Navigation
3
42
Connected navigation
3
58
Connectivity
3
68
Radio Media
3
78
Telephone
3
90
Settings
4
02
Frequently asked questions
4
12
The system is protected in such a way that it will only operate in
your vehicle.
The link below gives access to OSS (Open Source Software)
codes for the system.
http://www.psa-peugeot-citroen.com/oss As a safety measure and because it requires sustained attention
by the driver, the pairing of a Bluetooth mobile telephone with
the Bluetooth hands-free system of your audio system must be
done with the vehicle stationary
and the ignition on.
The display of the energy economy mode message signals that
a change to standby is imminent. For more information on the
Energy economy mode refer to the corresponding section.
.
Audio and Telematics