Page 76 of 368

74
Rear seatsBench seat with fixed one-piece cushion and split backrest (left-hand 2/3, right-hand 1/3) which can be folded individually to adapt the load space in the boot.
Folding the backrestRepositioning the seat backrest
F Move the corresponding front seat for ward if necessary.
F
P
lace the head restraints in the low
position (see "Rear head restraints").
F
P
ress control 1 for wards to release the
seat backrest 2 .
F
F
old the backrest 2 on to the cushion. F
S
traighten the seat backrest 2
and secure it.
F
C
heck that the red indicator, located next to
the control 1 , is no longer visible.
When repositioning the seat backrests, they
can be locked in one of two different positions,
depending on the speed at which the operation
is carried out:
-
i
f done quickly, the backrest returns to its
original position 1,
-
i
f done slowly, the backrest goes into the
vertical position 2 .
To go from position 2 to position 1 , simply
release the backrest and push it until it locks
in place.
Ease of use and comfort
Page 78 of 368
76
Mirrors
Adjustment
Adjustment is possible when the ignition switch
is in the "ON" or "ACC" position.
F
M
ove control A to the right or to the left to
select the corresponding mirror.
F
M
ove control B in all four directions to
adjust.
F
R
eturn control A to the central position.
Each fitted with an adjustable mirror glass
permitting the lateral rearward vision necessary
for overtaking or parking. They can also be
folded for parking in confined spaces.
Demisting - Defrosting
Door mirrors
If your vehicle is fitted with heated
mirrors, the demisting-defrosting
operates with the engine running, by
switching on the heated rear screen.
For more information on Demisting-
defrosting the rear screen , refer to the
corresponding section.
The objects observed are, in reality,
closer than they appear.
Take this into account in order to
correctly judge the distance of vehicles
approaching from behind.
Ease of use and comfort
Page 95 of 368

93
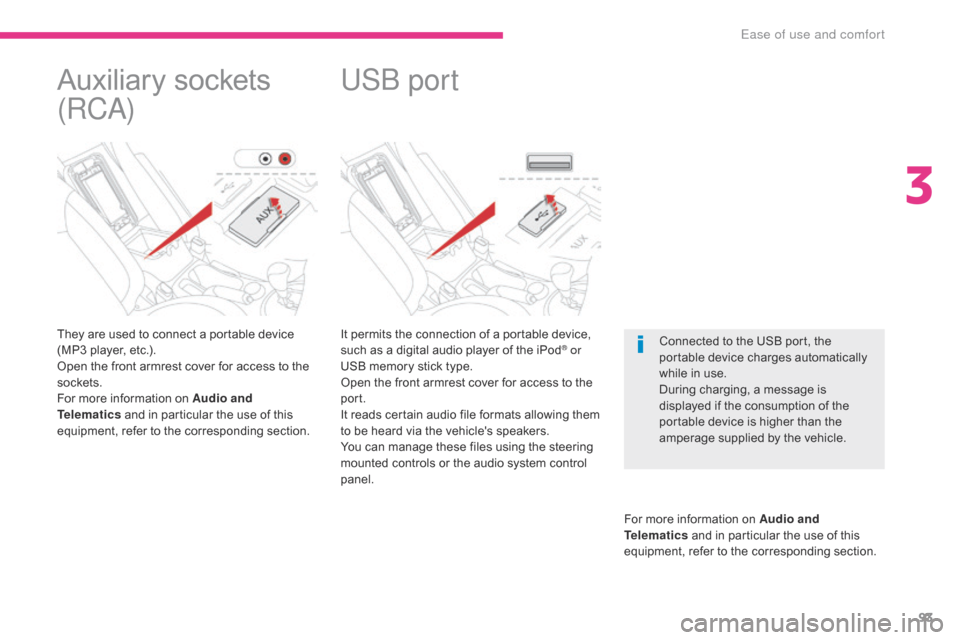
It permits the connection of a portable device,
such as a digital audio player of the iPod® or
USB memory stick type.
Open the front armrest cover for access to the
port.
It reads certain audio file formats allowing them
to be heard via the vehicle's speakers.
You can manage these files using the steering
mounted controls or the audio system control
panel.
For more information on Audio and
Telematics and in particular the use of this
equipment, refer to the corresponding section.
USB port
Connected to the USB port, the
portable device charges automatically
while in use.
During charging, a message is
displayed if the consumption of the
portable device is higher than the
amperage supplied by the vehicle.
Auxiliary sockets
(RCA)
They are used to connect a portable device
(MP3 player, etc.).
Open the front armrest cover for access to the
sockets.
For more information on Audio and
Telematics and in particular the use of this
equipment, refer to the corresponding section.
3
Ease of use and comfort
Page 100 of 368

98
Starting - switching off the engine with the key
- Position 1: LOCK The steering is locked.
-
P
osition 2: ACC
T
he accessories (radio, 12 V socket, etc.)
can be used.
-
P
osition 3: ON
I
gnition on.
-
P
osition 4: S TA R T
S
tarting the engine.
Ignition switch
If you use accessories for a prolonged
period (with the key in position 2
(ACC) ), you risk discharging the battery.
Starting your vehicle will then no longer
be possible. Ta k e c a r e .
For more information on the Automatic
power cut-off to accessories , refer to
the corresponding section.
Key in ignition
A buzzer sounds on opening the
driver's door, if the key has been left in
the ignition.
F
I
nsert the key in the ignition switch.
F
T
urn the key to position
2 (ACC) and unlock
the steering column, by turning the wheel
s li g ht l y.
F
P
ress and hold the brake pedal.
F
F
ully depress the clutch pedal (vehicles
fitted with a manual gearbox).
F
P
ut the gear lever into neutral (vehicles
fitted with a manual gearbox), or into
position P (vehicles fitted with a CVT
gearbox).
F
O
perate the starter by turning the key to
position 4 (S TA R T ) .
F
O
nce the engine is running, release
the
key.
T
he key returns automatically to
position
3
(ON)
.
Starting using the key Switching off
F Immobilise the vehicle.
F
P ut the gear lever into neutral (vehicles fitted
with a manual gearbox), or into position P
(vehicles fitted with a CVT gearbox).
F
W
hile pressing the key, turn it to
position
1 (LOCK).
F
R
emove the key from the ignition switch.
F
L
ock the steering column.Never attach a heavy object to the key
or to the remote control key: by weighing
down on the shaft of the key when it is in
the ignition switch, it could cause a fault.
Furthermore, a heavy or sharp object
could hinder the deployment of the knee
airbag or be projected and cause serious
injuries in the event of deployment of the
knee airbag.
For Diesel vehicles, when the engine
is cold, wait with the ignition switch
in position 3 (ON) until the preheater
warning lamp goes off, before turning
the key to position 4 (S TA R T ) .
The warning lamp does not come on
when the engine is hot. Switching off the engine leads to a loss
of braking assistance.
Driving
Page 101 of 368

99
Changing the vehicle's
mode
With the electronic key inside the vehicle ; each
press on the "START/STOP " button, with no
action on the pedals , changes the vehicle's
mode:
F
F
irst press (ACC mode), the button's
warning lamp comes on in orange.
T
he accessories (audio system,
12
V socket, etc.) can be used.
F
S
econd press (ON mode), the button's
warning lamp comes on in green.
S
witching on the ignition.
F
T
hird press (OFF mode), the warning lamp
in the button goes off. If you use the accessories for a
prolonged period with the ignition
switch in position 2 (ACC)
, you risk
discharging the battery. Starting your
vehicle will then no longer be possible.
Ta k e c a r e .
For more information on the Automatic
power cut-off to accessories , refer to
the corresponding section.
Starting - switching off the engine with the Keyless Entry and
Starting system
If the warning lamp flashes orange,
contact a CITROËN dealer or a
qualified workshop as soon as possible.
F
P
ress and release the
" START/STOP " button.
F
W
ith the electronic key inside the vehicle,
depress the clutch pedal fully on vehicles
with a manual gearbox or press the brake
pedal on vehicles with a CVT gearbox.
Starting using the
electronic key
For vehicles fitted with a manual gearbox, put
the gear lever in neutral.
For vehicles fitted with a CVT gearbox, put the
gear lever in P .
4
Driving
Page 106 of 368

104
Gear efficiency indicator*System which reduces fuel consumption by advising the driver to change gear on vehicles fitted with a manual gearbox.
Operation
* Depending on engine.-
f
or a change up,
In the case of driving which makes
particular demands on the per formance
of the engine (eft.g. firm pressure on
the accelerator pedal when overtaking),
the system will not recommend a gear
change.
The system never suggests engaging
reverse gear.
The system intervenes only when driving
economically.
Depending on the driving situation and your
vehicle's equipment, the system may advise
you to skip one or more gears. You can
follow this instruction without engaging the
intermediate gears.
The gear recommendations should not
be considered compulsory. In fact, the
configuration of the road, the amount of traffic
and safety remain determining factors when
choosing the best gear. Therefore, the driver
remains responsible for deciding whether or not
to follow the advice given by the system.
This function cannot be deactivated. A symbol appears in the instrument panel
when the system suggests changing to a more
suitable gear:
or
-
f
or a change down.
Driving
Page 116 of 368

114
The tyre under-inflation detection
system is an aid to driving which does
not replace the need for vigilance on
the part of the driver.
Under-inflation detection
System which continuously and automatically checks the pressures of the four tyres after switching on the ignition.
A pressure sensor is located in the valve of each tyre (except the spare wheel).
The system triggers an alert if a drop in pressure is detected in one or more tyres, compared to the reference pressure registered in the system. This
reference pressure must be reinitialised every time the tyre pressures are adjusted or a wheel changed.
The system operates on condition that the sensor identifiers have first been memorised in the system by a CITROËN dealer or a qualified workshop.
You can memorise two sets of tyres (e.g. wheels with "standard" tyres and wheels with "winter" tyres).Driving with under-inflated tyres
increases fuel consumption.This system does not avoid the need
to check the tyre pressures regularly
(including the spare wheel) and before
a long journey.
Driving with under-inflated tyres
adversely affects road holding,
extends braking distances and causes
premature tyre wear, particularly under
arduous conditions (vehicle loaded,
high speed, long journey).
The tyre pressures for your vehicle can
be found on the tyre pressure label.
For more information on Identification
markings
, refer to the corresponding
section.
The tyre pressures must be checked
when the tyres are cold (vehicle
stopped for 1 hour or after driving for
less then 6 miles (10 km) at moderate
speed). Other wise, add 0.3 bar to the
values indicated on the label.
Driving
Page 119 of 368

117
Managing sets of tyres
If you have had a second set of tyres registered
by a CITROËN dealer or a qualified workshop,
every time you change the set of tyres (fitting
a set of winter tyres, for example), you must
select the set you have just fitted in the
configuration menu.After fitting the new set of tyres, you
should check and adjust the tyre
pressures to the values specified on the
tyre pressure label.
For more information on Identification
markings and in particular the
tyre pressure label, refer to the
corresponding section. Selection of the other set of tyres is done via
the menu screen, with the ignition on and the
vehicle stationary.
F
P
ress several times on the INFO button to
select the menu for managing sets of tyres
(located in menu 3/3) .
F Press and hold the INFO button for at least
3 seconds to change successively from
set of tyres 1 to set of tyres 2 or the other
way round. The system automatically reinitialises
the reference pressure based on the
pressure in the new set (the under-
inflation detection warning lamp flashes
during the operation).
4
Driving