Page 185 of 368

183
Checking levels
Take care when working under the bonnet, as certain areas of the engine may be extremely hot (risk of burns) and the cooling fan could start at
any time (even with the ignition off).
Oil level
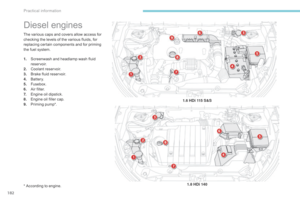
The check of the level is done with
the dipstick, located under the
bonnet. Refer to the description of
your engine compartment for the
position of the dipstick.Engine oil change
Refer to the manufacturer's service schedule
for details of the interval for this operation.
In order to maintain the reliability of the engine
and emission control system, never use
additives in the engine oil.
Oil specification
The oil must be the correct grade for your
engine and conform to the manufacturer's
recommendations.
Check all of these levels regularly, in line with the manufacturer's service schedule. Top them up if necessary, unless other wise indicated.
If a level drops significantly, have the corresponding system checked by a CITROËN dealer or a qualified workshop.
Dipstick
There are two marks on the dipstick:
A = maximum
If the level is above this
mark, contact a CITROËN
dealer or a qualified
workshop.
B = minimum
Top up the level through the
oil filler orifice, using the
correct grade of oil for your
engine. The level must never
be below this mark.
This check will only be correct if the vehicle is
on level ground and the engine has been off for
more than 30 minutes.
It is normal to top up the oil level between
two services (or oil changes). CITROËN
recommends that you check the level, and top
up if necessary, every 3 000 miles (5 000 km).
After topping up the oil, the check when
switching on the ignition with the oil level
indicator in the instrument panel is not valid
during the 30 minutes after topping up.
7
Practical information
Page 186 of 368

184
Coolant level
The coolant level should be between
the two marks.When the engine is warm, the temperature of
the coolant is regulated by the fan.
As the cooling system is pressurised when the
engine is warm, wait at least one hour after
switching off the engine before carrying out
any
work.
To avoid any risk of scalding, unscrew the cap
by two turns to allow the pressure to drop.
When the pressure has dropped, remove the
cap and top up the level.Fluid specification
The coolant must conform to the
manufacturer's recommendations.
The brake fluid level should be close
to the "MA X" mark. If it is not, check
the brake pad wear.
Brake fluid level
Changing the fluid
Refer to the manufacturer's service schedule
for details of the interval for this operation.
Fluid specification
The brake fluid must conform to the
manufacturer's recommendations.
The cooling fan may star t after switching
off the engine: take care with ar ticles and
clothing that might become caught by the
fan blades.
To ensure that this measurement is reliable, the vehicle
must be parked on level ground with the engine cold.
Practical information
Page 187 of 368

185
Avoid prolonged contact of used oil or
fluids with the skin.
Most of these fluids are harmful to
health or indeed very corrosive.
Do not discard used oil or fluids into
sewers or onto the ground.
Take used oil to a CITROËN dealer or
a qualified workshop (France) or to an
authorised waste disposal site.
Used products
To p p i n g u p
The reservoir must be topped up without delay
by a CITROËN dealer or a qualified workshop.
Additive level (1.6 HDi 115 Diesel
versions with particle filter)
The additive reservoir low level is indicated by
the display of this message.
Fluid specification
For optimum cleaning, this fluid must not be
topped up with or replaced with plain water.
Screenwash and headlamp
wash fluid
To check or top up the fluid, stop the
vehicle, apply the parking brake and
switch off the engine.
F
O
pen the bonnet and secure it with the
st ay.
F
O
pen the filler cap for the screenwash
reservoir.
F
C
heck the level using the gauge, then top
up if necessary.
F
R
efit the cap on the reservoir and close
the
bonnet. In wintry conditions, the use of fluid with
an ethyl alcohol or methanol base is
recommended.
7
Practical information
Page 188 of 368

186
Checking components
12 V battery
Electrolyte level
For access to the 12 V Battery, refer
to the corresponding section. Refer to the manufacturer's
service schedule for details of the
replacement intervals for these
components.
Air filter and passenger compartment filter
Replace the oil filter each time the
engine oil is changed.
Refer to the manufacturer's
service schedule for details of
the replacement interval for this
component.
Oil filter
If necessary, top up using distilled water,
removing the battery cap from each cell.
Check the electrolyte level at least once
a
month.
When carrying out work on the 12 V Battery,
refer to the corresponding section for
details of the precautions to be taken before
disconnecting the battery and following its
reconnection.
Unless other wise indicated, check these components in accordance with the manufacturer's service schedule and according to your engine.
Other wise, have them checked by a CITROËN dealer or a qualified workshop.
The electrolyte level must be between the
"LOWER LEVEL" and "UPPER LEVEL" marks.
Depending on the environment (e.g. dusty
atmosphere) and the use of the vehicle
(e.g. city driving), replace them twice as often
if necessary
.
A clogged passenger compartment filter may
have an adverse effect on the per formance
of the air conditioning system and generate
undesirable odours.
Practical information
Page 189 of 368

187
Manual gearbox
For servicing of the gearbox, refer to
the manufacturer's service schedule
for details of the interval for checking
this component.
"CVT" gearbox
For servicing of the "CVT" gearbox,
refer to the manufacturer's service
schedule for details of the interval for
checking this component.
Particle filter (Diesel)
The start of saturation of the particle filter is
indicated by the temporary illumination of this
warning lamp, accompanied by a message in
the instrument panel screen.As soon as the traffic conditions permit,
regenerate the filter by driving at a
speed of at least 25 mph (40 km/h) for
about 20 minutes (with the 1.6 litre HDi
engine, the minimum speed is 37 mph
(60 km/h)).
If the warning lamp stays on, this
indicates a low additive level.
For more information on Checking
levels
and the Diesel additive level in
particular, refer to the corresponding
section.
On a new vehicle, the first particle
filter regeneration operations may be
accompanied by a "burning" smell,
which is per fectly normal.
Following prolonged operation of the
vehicle at very low speed or at idle,
you may, in exceptional circumstances,
notice the emission of water vapour at
the exhaust on acceleration. This does
not affect the behaviour of the vehicle
or the environment.
7
Practical information
Page 190 of 368

188
Brake wear depends on the style
of driving, particularly in the case
of vehicles used in town, over short
distances. It may be necessary to have
the condition of the brakes checked,
even between vehicle services.
Brake pads
For information on checking brake
disc wear, contact a CITROËN dealer
or a qualified workshop.
Brake disc wearParking brake
If excessive travel or a loss of
effectiveness of this system is
noticed, the parking brake must be
checked, even between two services.
Only use products recommended by
CITROËN or products of equivalent
quality and specification.
In order to optimise the operation of
units as important as those in the
braking system, CITROËN selects and
offers very specific products.
After washing the vehicle, dampness,
or in wintry conditions, ice can form
on the brake discs and pads: braking
efficiency may be reduced. Make light
brake applications to dry and defrost
the brakes.
Checking this system must be done by a
CITROËN dealer or a qualified workshop.
Unless there is a leak in the circuit, a drop in
the brake fluid level indicates that the brake
pads are worn.
Practical information
Page 191 of 368

189
This kit is installed in the boot under the floor. Complete system consisting of a compressor and a sealant cartridge which permits the temporary
repair of a tyre so that you can drive to the nearest garage.
It is designed to repair most punctures which could affect the tyre, located on the tyre tread or
shoulder.
Temporary puncture repair kit
Access to the kit
For access to it:
F O pen the boot.
F
L
ift and remove the floor.
F
T
ake out the kit. The vehicle's electric system allows the
connection of the compressor for long
enough to inflate a tyre after a puncture
repair.
Composition of the kit
1. 12 V compressor with integral pressure gauge, to measure and adjust the tyre
pressure.
As the compressor is not sealed, keep it
away from sand, dust and water.
The puncture repair kit cannot be used
in the following circumstances:
-
t
he use-by date for the sealant
cartridge has been exceeded (see
the label on the cartridge),
-
m
ore than one tyre is punctured
whereas you have just one sealant
cartridge supplied with the kit,
-
t
he hole in the tyre exceeds 4 mm
in diameter,
-
t
he puncture is on the sidewall of
the tyre,
-
y
ou have continued to drive with a
flat tyre,
-
t
he bead of the tyre is detached
from the wheel rim,
-
t
he wheel rim is damaged.
8
In the event of a breakdown
Page 192 of 368

190
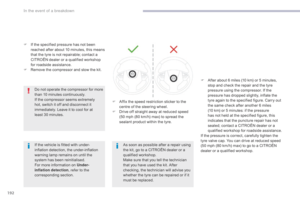
After repairing the tyre, the speed
restriction sticker should be affixed
to the centre of the vehicle's steering
wheel to remind you that this wheel
must only be used temporarily.
Do not exceed a speed of 50 mph
(80 km/h) when driving with a tyre
repaired using this type of kit.
Repair procedure
F Stop the vehicle in as safe a location as possible and on a level and stable sur face.
E
nsure that the tyre valve is not at the
bottom of the wheel, in contact with the
ground.
F
A
pply the parking brake.
F
P
lace the gear lever in position R for
vehicles with a manual gearbox, or in
position P for vehicles with a CVT gearbox.
F
S
witch off the ignition.
2.
S
ealant cartridge for the temporary repair
of a tyre.
3.
R
eplacement valve core.
4.
V
alve core removal/fitting tool.
5.
I
njection end-piece.
6.
S
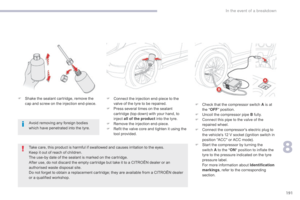
peed restriction sticker. F
R
emove the valve cap for the tyre to be
repaired and keep it in a clean place.
At temperatures below 0°C, the
sealant product may thicken. Warm
the cartridge inside the vehicle before
using it.
F
T
urn the valve core tool around, insert it
in the valve and unscrew and remove the
valve core.
K
eep the valve core in a clean place.
F
I
nsert the tyre valve core removal tool into
the valve and press on the tool to exhaust
all of the air from the tyre.
In the event of a breakdown