Page 177 of 368

175
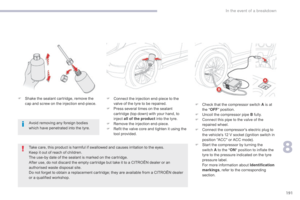
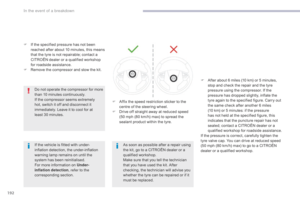
For more information on snow chains,
contact a CITROËN dealer or a
qualified workshop.
Snow chains
In wintry conditions, snow chains improve traction as well as the behaviour of the vehicle when
braking.
Advice on installation
F If you have to fit the chains during a journey, stop the vehicle on a flat sur face
on the side of the road.
F
A
pply the parking brake and position any
wheel chocks to prevent movement of
your
vehicle.
F
F
it the chains following the instructions
provided by the manufacturer.
F
M
ove off gently and drive for a few
moments, without exceeding 30 mph
(50 km/h).
F
S
top your vehicle and check that the snow
chains are correctly tightened.
The snow chains must be fitted only
to the front wheels. They must never
be fitted to "space-saver" type spare
wheels.
Take account of the legislation in force
in your country on the use of snow
chains and the maximum running speed
authorised.
Avoid driving with snow chains on roads
that have been cleared of snow, to
avoid damaging your vehicle's tyres and
the road sur face. If your vehicle is fitted
with alloy wheels, check that no part of
the chain or its fixings is in contact with
the wheel rim.Use only chains designed for fitment to the type
of road wheels on your vehicle:
Original equipment tyre size Maximum link size
215/70 R16 12 mm
225/55 R18
It is strongly recommended that before
you leave, you practise fitting the snow
chains on a level and dry sur face.
7
Practical information
Page 178 of 368
176
Removing a front or rear
wiper blade
F Raise the corresponding wiper arm.
F R emove the wiper blade, sliding it towards
the outside.
Changing a wiper
blade
Fitting a front or rear wiper
blade
F At the front, check the size of the wiper blade as the shorter blade is fitted on the
right-hand side of the vehicle.
F
P
ut the corresponding new wiper blade in
place and fix it.
F
F
old down the wiper arm carefully.
Automatic power cut-off to accessories
After the engine has stopped, when the
ignition switch is in the "ACC" position
(or the vehicle in "ACC" mode) you
can still use functions such as the audio
equipment, windscreen wipers, dipped beam
headlamps,
courtesy lamps, etc. for about
thirty
m
inutes.Cutting off
Once the thirty minutes have expired, the
power supply to the accessories will be
automatically cut off.
Restoring power
The power supply will be restored the next time
the ignition is switched on.
Practical information
Page 179 of 368

177
Towing a trailer, a caravan, etc.
We recommend the use of genuine
CITROËN towbars and their harnesses
that have been tested and approved
from the design stage of your vehicle
and that the fitting of the towbar is
entrusted to a CITROËN dealer or a
qualified workshop.
If the towbar is not fitted by a
CITROËN dealer, it is imperative that
it is fitted following the manufacturer's
instructions.
Your vehicle is primarily designed for
transporting people and luggage, but it may
also be used for towing a trailer.
Driving with a trailer subjects the towing vehicle
to more significant stress and its driver must be
particularly careful.
For more advice on driving when towing, refer
to the corresponding section.
For more information on Petrol weights
or
Diesel weights and in particular the towed
loads which apply to your vehicle, refer to the
corresponding section.
Take care to comply with the gross train
weights indicated on the registration certificate
or in the technical data for your vehicle.
7
Practical information
Page 180 of 368

178
Advice on driving when towing
Distribution of loads
F Distribute the load in the trailer so that the heaviest items are as close as possible to
the axle and the nose weight approaches
the maximum permitted without
exceeding
it.
Air density decreases with altitude,
thus
reducing engine per formance. Above
1
000 metres, the maximum towing load must
be reduced by 10
% of the GTW and so on for
every 1
000 metres of altitude.
For more information on Petrol weights or
Diesel weights and in particular the towed
loads which apply to your vehicle, refer to the
corresponding section.
Side wind
F Take into account the increased sensitivity to side wind.
Cooling
Towing a trailer on a slope increases the
temperature of the coolant.
As the fan is electrically controlled, its cooling
capacity is not dependent on the engine speed.
F
T
o lower the engine speed, reduce your
speed.
The maximum towed load on a long slope
depends on the gradient and the exterior
temperature.
In all cases, pay attention to the coolant
temperature.
F
I
f this message is displayed, stop your
vehicle as soon as it is safe to do so.
Braking
Towing a trailer increases the braking distance.
To limit heat build-up in the brakes, use of the
engine brake is recommended.
Ty r e s
F Check the tyre pressures of the towing vehicle and of the trailer, observing the
recommended pressures.
Lighting
F Check the lighting and signalling on the trailer and the adjustment of the vehicle's
headlamps.
For more information on Headlamp
adjustment , refer to the corresponding
section.
If the message flashes slowly, wait for the
engine to cool before topping up the level, if
necessary.
If the message flashes rapidly, contact a
CITROËN dealer or a qualified workshop
without delay.
The rear parking sensors will be
deactivated automatically when a
genuine CITROËN towbar is used.
Practical information
Page 181 of 368

179
Fitting roof bars
The transverse roof bars are fitted to the longitudinal bars at the 8 fixing points masked by covers.
Using a small screwdriver, remove the 8 covers on the inner faces of the longitudinal bars.
The transverse bars are fitted directly to the roof of the vehicle, at the 4 anchorage points masked
by covers.
Slide the covers towards the front of the vehicle to remove them.
Retain the protective covers.
After removing the roof bars, the protective covers should be refitted:
F
i
nsert the fixing tongues into the apertures then slide the covers towards the rear of the vehicle. The body sill finishers should not be
used as a step when fitting roof bars.Use accessories recommended by
CITROËN and follow the accessory
manufacturer's fitting instructions.
Maximum authorised weight on the roof
bars, for a loading height not exceeding
40
cm (except bicycle carriers): 80 kg.
If the height exceeds 40 cm, adapt the
speed of the vehicle to the condition of
the road, to avoid damaging the roof
bars and the fixings on the roof.
Please refer to national legislation to
comply with the regulations regarding
the transportation of objects which are
longer than the vehicle.
For reasons of safety and to avoid damaging the roof, it is essential to use transverse bars that are
approved for your vehicle.
Vehicles fitted with longitudinal bars
Vehicles not fitted with longitudinal bars
7
Practical information
Page 182 of 368

180
Bonnet
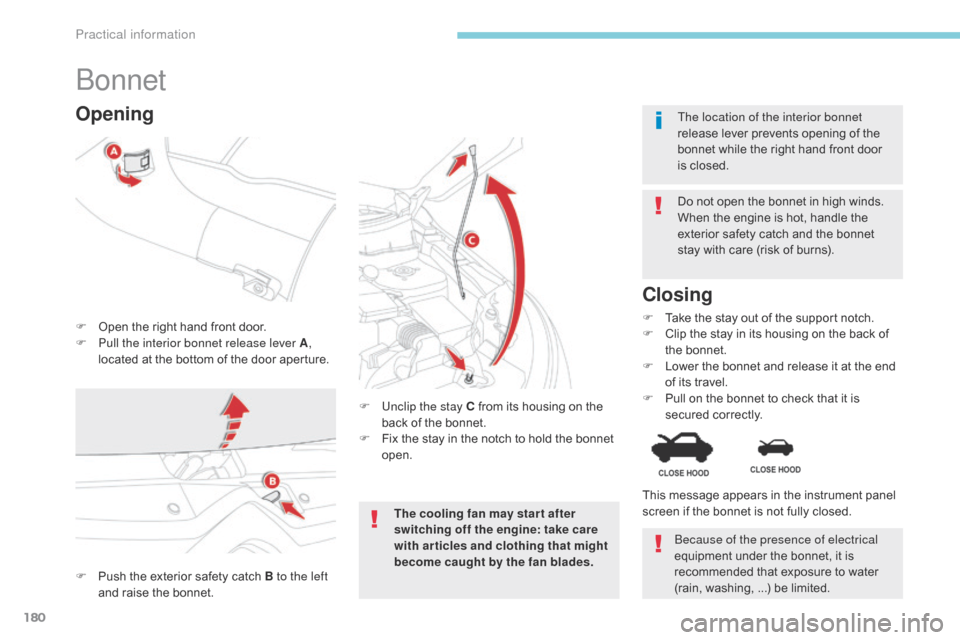
F Open the right hand front door.
F P ull the interior bonnet release lever A ,
located at the bottom of the door aperture. Do not open the bonnet in high winds.
When the engine is hot, handle the
exterior safety catch and the bonnet
stay with care (risk of burns).
F
U
nclip the stay C from its housing on the
back of the bonnet.
F
F
ix the stay in the notch to hold the bonnet
open.
Closing
F Take the stay out of the support notch.
F C lip the stay in its housing on the back of
the bonnet.
F
L
ower the bonnet and release it at the end
of its travel.
F
P
ull on the bonnet to check that it is
secured correctly. The location of the interior bonnet
release lever prevents opening of the
bonnet while the right hand front door
is closed.
Opening
F Push the exterior safety catch B to the left
and raise the bonnet. This message appears in the instrument panel
screen if the bonnet is not fully closed.
The cooling fan may star t after
switching off the engine: take care
with articles and clothing that might
become caught by the fan blades.
Because of the presence of electrical
equipment under the bonnet, it is
recommended that exposure to water
(rain, washing, ...) be limited.
Practical information
Page 183 of 368
181
Access for checking the levels of the various
fluids and the replacement of certain
components.
Petrol engines
1. Screenwash and headlamp wash fluid reservoir.
2.
C
oolant header tank.
3.
B
rake fluid reservoir.
4.
B
attery.
5.
F
usebox.
6.
A
ir filter.
7.
E
ngine oil dipstick.
8.
E
ngine oil filler cap. 1.6 litre 115
2.0 litre 150
7
Practical information
Page 184 of 368
182
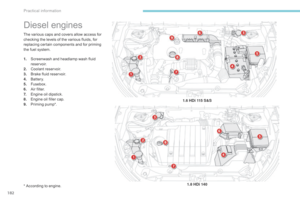
The various caps and covers allow access for
checking the levels of the various fluids, for
replacing certain components and for priming
the fuel system.
Diesel engines
1. Screenwash and headlamp wash fluid reservoir.
2.
C
oolant reservoir.
3.
B
rake fluid reservoir.
4.
B
attery.
5.
F
usebox.
6.
A
ir filter.
7.
E
ngine oil dipstick.
8.
E
ngine oil filler cap.
9.
P
riming pump*. 1.6
HDi 115 S&S
1.8 HDi 140
* According to engine.
Practical information