Page 57 of 308

55
F Press and hold the front of button A without going beyond the point of resistance; the
blind closes and stops when you release the
button.
Anti-pinch system
If the blind encounters an obstacle when
closing, the movement is automatically
reversed.
Reinitialisation
Following reconnection of the battery or in the
event of a fault or jerky movement of the blind,
the blind must be reinitialised:
F
p
ress the rear of button A until the blind is
fully open,
F
p
ress and hold the rear of button A again for
at least 3
seconds.
During simultaneous closing of the
sunroof and the blind, if the blind catches
up with the sunroof, the blind then
suspends its movement and automatically
resumes when the sunroof stops. Never leave the electronic key inside the
vehicle if you get out of the vehicle, even
for a short time.
If something is trapped when closing the
sunroof or blind, you should reverse the
movement of the sunroof or blind. To do
this, press the control button in question.
The driver must ensure that passengers
use the sunroof and blind correctly.
Be particularly aware of children when
operating the sunroof or blind.
Electric windows
Manual operation
To open or close the window, press or pull
the switch, without going past the point of
resistance. The window stops as soon as the
switch is released.
Automatic operation of the
front electric windows
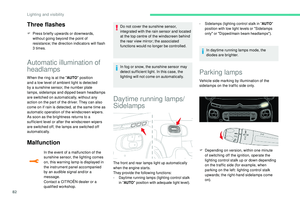
To open or close the window, press or pull the
switch fully, beyond the resistance point: the
window opens or closes completely when the
switch is released. Pressing the switch again
stops the movement of the window.
The electric window switches remain
operational for approximately one minute
after the key has been removed.
Once this time has elapsed, the electric
windows will not operate. To reactivate
them, switch the ignition on again.
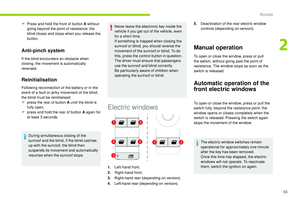
1. Left-hand front.
2. Right-hand front.
3. Right-hand rear (depending on version).
4. Left-hand rear (depending on version). 5.
Deactivation of the rear electric window
controls (depending on version).
2
Access
Page 58 of 308

56
Anti-pinch function of the
front electric windows
When the window rises and meets an obstacle,
it stops and immediately partially lowers again.
In the event of unwanted opening of the window
during automatic closing, press the switch until
the window opens completely, then pull the
switch immediately until the window closes.
Continue to hold the switch for approximately
one second after the window has closed.
The anti-pinch safety function is not active
during this system activation operation.
Deactivating the rear
electric windows
(depending on version)
For the safety of your children, press switch 5
to prevent operation of the windows of the rear
doors, irrespective of their position.
When the indicator is on, the rear controls are
inhibited. When the indicator is off, the rear
controls are active.
Reinitialisation the front
electric windows
Following reconnection of the battery, the anti-
pinch safety function must be reinitialised.
The anti-pinch safety function is not active
during these operations:
-
b
ring the window down completely, then
bring it back up. It will go up by a few
centimetres with each press. Per form the
operation again until the window is fully
closed,
-
c
ontinue to pull the switch upwards for at
least one second after reaching the window
closed position.
Always remove the key when leaving the
vehicle, even for a short time.
In the event of contact during operation
of the windows, you must reverse the
movement of the window. To do this, press
the switch concerned.
When operating the passenger electric
window switches, the driver must ensure
that no-one is preventing correct closing
of the windows.
The driver must ensure that the
passengers use the electric windows
c o r r e c t l y.
Be aware of children when operating the
windows.
Access
Page 59 of 308
57
Front seats
For safety reasons, the driver's seat must
only be adjusted when the vehicle is
stationary.
Correct driving position
Before taking to the road and to make the most
of the ergonomic layout of the instruments and
controls, carry out these adjustments in the
following order:
-
h
eight of the head restraint,
-
b
ackrest angle,
-
sea
t cushion height,
-
l
ongitudinal position of the seat,
-
hei
ght and reach of the steering wheel,
-
i
nterior and door mirrors.
Once these adjustments have been made,
check the instrument panel can be viewed
correctly from your driving position.
Settings
Longitudinal
F Raise the control A and slide the seat forwards or backwards.
Driver's seat backrest angle
F Turn the knob B to adjust the backrest.
3
Ease of use and comfort
Page 60 of 308

58
Height
(driver only)
F Pull the control C upwards to raise the seat or push it downwards to lower it, as many
times as required, to obtain the desired
position.
Passenger seat backrest angle
F Turn the knob B or pull control B up to adjust the backrest.
When the backrest is correctly inclined, release
the control.
To prevent the backrest from suddenly
folding for wards and hitting you, hold the
backrest with your back or hand while you
move the control.
Before moving the seat backwards,
ensure that there is no object or person in
the way, preventing full travel of the seat.
There is a risk of trapping or pinching
passengers if present in the rear seats
or jamming the seat if large objects are
placed on the floor behind the seat.
Passenger seat backrest
table position
Check that no object, either on or
underneath the seat, could hinder its
movement.
F
P
lace the head restraint in the low position.
F
P
ull control B fully for wards and tilt the
backrest forwards.
To return to the normal position, guide the
backrest backwards until it locks into place.
This position, together with that of the rear
seats, allows you to transport long objects
inside the vehicle.
Ease of use and comfort
Page 61 of 308

59
Before moving the seat backwards,
ensure that there is nothing that might
prevent the full travel of the seat.
When the front passenger seat is fully
folded, only the outer rear seat behind the
driver can be occupied by a passenger.
Do not place hard, heavy or sharp objects
in the centre of the folded backrest to
ensure that you do not damage rear lining
behind the backrest.
When sharp deceleration occurs, objects
placed on the folded backrest can turn into
dangerous projectiles.Front head restraints
Height adjustment
The adjustment is correct when the upper
edge of the head restraint is level with the
top of the head.
Removing a head restraint
F Pull the head restraint up as far as it will go.
F P ress the lug A to release the head restraint
and remove it completely.
F
S
tow the head restraint securely.
Refitting a head restraint
F Introduce the head restraint rods into the guides in the seat backrest.
F
P
ush the head restraint down as far as it will go.
F
P
ress the lug A to free the head restraint and
push it down.
F
A
djust the height of the head restraint.
Never drive with the head restraints
removed; they should be in place and
correctly adjusted for the occupant of the
seat.
Heated seats
Upward:
F p ull the head restraint up to the desired
position; the head restraint can be felt to
click into position.
Downward:
F
p
ress the lug A and push the head restraint
down to the desired position.
3
Ease of use and comfort
Page 62 of 308

60
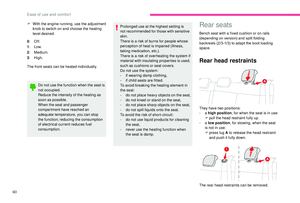
F With the engine running, use the adjustment knob to switch on and choose the heating
level desired:
0 : Of f.
1 : Low.
2 : Medium.
3 : High.
The front seats can be heated individually.
Do not use the function when the seat is
not occupied.
Reduce the intensity of the heating as
soon as possible.
When the seat and passenger
compartment have reached an
adequate temperature, you can stop
the function; reducing the consumption
of electrical current reduces fuel
consumption. Prolonged use at the highest setting is
not recommended for those with sensitive
skin.
There is a risk of burns for people whose
perception of heat is impaired (illness,
taking medication, etc.).
There is a risk of overheating the system if
material with insulating properties is used,
such as cushions or seat covers.
Do not use the system:
-
i
f wearing damp clothing,
-
i
f child seats are fitted.
To avoid breaking the heating element in
the seat:
-
d
o not place heavy objects on the seat,
-
d
o not kneel or stand on the seat,
-
d
o not place sharp objects on the seat,
-
d
o not spill liquids onto the seat.
To avoid the risk of short-circuit:
-
d
o not use liquid products for cleaning
the seat,
-
n
ever use the heating function when
the seat is damp.Rear seats
Bench seat with a fixed cushion or on rails
(depending on version) and split folding
backrests (2/3 -1/3) to adapt the boot loading
space.
Rear head restraints
They have two positions:
- a high position , for when the seat is in use:
F
p
ull the head restraint fully up.
-
a low position , for stowing, when the seat
is not in use:
F
press lug A to release the head restraint
and push it fully down.
The rear head restraints can be removed.
Ease of use and comfort
Page 63 of 308

61
To remove a head restraint:
F r elease the backrest using the control 1 ,
F
t
ilt the backrest slightly for wards,
F
p
ull the head restraint as far up as it will go,
F
p
ress lug A to release the head restraint
and remove it completely,
F
s
tow the head restraint.
To refit a head restraint:
F
i
ntroduce the head restraint rods into the
guides in the corresponding seat backrest,
F
p
ush the head restraint down as far as it will
go,
F
p
ress lug A to release the head restraint
and then push the head restraint fully down.
Never drive with passengers seated at
the rear when the head restraints are
removed; they must be in place and in the
high position.
The head restraint for the centre seat
and those for the outer seats are not
interchangeable.
Longitudinal seat adjustment
(depending on version)
Adjusting the seats must only be done
with the vehicle stationary.
Each 2/3 -1/3 part can be adjusted individually. F
Ra
ise the control and slide the bench seat
forwards or backwards.
Adjusting the seat backrest
angle (depending on version)
Several adjustment positions are available.
F
M
ove the seat for ward.
F
P
ull the strap for ward then tilt the backrest
to the desired position. Sit in the seat to per form the adjustments.
Folding the backrests
Adjusting the seat backrests must only be
done with the vehicle stationary.
First steps:
F
l
ower the head restraints,
F
i
f necessary, move the front seats for ward,
F
p
ull the seats fully back (depending on
version),
F
c
heck that nothing and no-one might
inter fere with the folding of the backrests
(clothing, luggage, etc.),
F
c
heck that the outer seat belts are lying
flat against the backrests and placed in the
retaining hook.
3
Ease of use and comfort
Page 64 of 308

62
Depending on version, if you use the
strap, you do not need to guide backrest 3.
When the backrest is released, the red
indicator is visible in the release grip
(depending on version).
Returning the backrests to
their original position
First check that the outer seat belts are
lying vertically alongside the backrest
latching rings. Caution, a backrest that has not latched
correctly compromises the safety of
passengers in the event of sudden braking
or an accident.
The contents of the boot may be thrown
forward – Risk of serious injury!
F
O
perate backrest release grip 1 or pull strap
2 (depending on version).
F
G
uide backrest 3 down to the horizontal
position. F
P
ut backrest 3 in the upright position and
push firmly to latch it home.
F
C
heck that release grip 1 has properly
returned to its position and that the red
indicator is no longer visible (depending on
ve r s i o n).
F
E
nsure that the outer seat belts are not
trapped during the manoeuvre.
Steering wheel adjustment
F When stationary , pull the control lever to
release the adjustment mechanism.
F
A
djust the height and reach to suit your
driving position.
F
P
ush the control lever to lock the adjustment
mechanism.
As a safety measure, these adjustments
should only be carried out with the vehicle
stationary.
Ease of use and comfort