Page 145 of 174

143
Identification markingsVarious visible markings for the identification of your vehicle.
A.
S
er vice - Replacement
Parts identification plate.
This plate is riveted to the underside of the
bonnet. The original tyres fitted to the vehicle
may have a load index or speed rating
higher than those given on the label;
this has no effect on the inflation
pressures.
B. Tyre identification label.
This label is affixed to the driver's centre pillar.
It bears the following information:
-
t
he tyre pressures (in bars).
-
t
he tyre specification.
-
t
he type of tyre.C. Manufacturer's plate
.
This plate is riveted to the left-hand centre
pillar.
D. Vehicle identification number (VIN).
This number is engraved on the inner wheel
arch, inside the boot, right-hand side.
For information on fitting snow chains,
contact a CITROËN dealer or a
qualified workshop.
It bears in particular the following information:
-
t
he vehicle model.
-
t
he paint code.
-
t
he type, variant, version, etc.
9
Technical data
Page 146 of 174
144
Low tyre pressures increase your
vehicle's power consumption, therefore
reducing its range.
Checking tyre pressures
The tyre pressures should be checked when
cold at least monthly.
The pressures given on the label are valid
for cold tyres. If you have driven for more
than 10
minutes or for more than 6 miles
(10
kilometres) at more than 30 mph (50 km/h),
the tyres will be warm; in this case 0.3 bar
(30
kPa) should be added to the pressures
given on the label.
Never reduce the pressure of a warm
tyre.
Technical data
Page 147 of 174
145
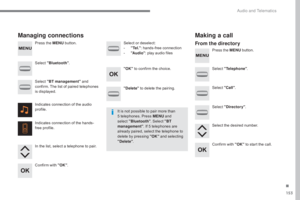
Audio system / Bluetooth®
Contents
First steps
1 46
Radio
14
7
Media
1
49
Telephone
1
52
Audio settings
1
55
Configuration
1
56
Screen menu map(s)
1
57
Frequently asked questions
1
58
As a safety measure, the driver must only carry out operations
which require prolonged attention while the vehicle is stationary.
When the engine is switched off and to prevent discharging of
the battery, the system switches off after activation of energy
economy mode.
After a battery disconnection, a code has to be entered for
operation of the audio system.
A maximum of five attempts are possible. For the last two
attempts,
a 15 minutes wait is imposed between each attempt.
Refer to the end of this document to find the label indicating this
code:
.
Audio and Telematics
Page 148 of 174

146
First steps
On / Off, volume adjustment.
Selection of the source:
Radio (FM1, FM2), CD, USB, AUX,
Streaming.
Telephone: accept an incoming call.
Telephone, continuous press: end
a call, access the calls log of the
telephone connected.Display the list of stations received,
the CD/USB tracks or folders.
Press and hold: update the list of
stations received. Automatic search for a lower radio
frequency.
Select the previous track for the CD
or USB source.
Navigation in a list.
Press and hold: rewind.Automatic search for a higher radio
frequency.
Select the next track for the CD or
USB source.
Navigation in a list.
Press and hold: fast for ward.
Adjust audio settings: sound
ambience, treble, bass, loudness,
distribution, left /right balance, front /
rear balance, automatic volume. Abandon the current operation.
Go up one level (menu or folder).Select one of the preset radio
stations.
Radio, press and hold: preset a radio
station.
Other than radio: see the
corresponding sections.
Eject CD. Open the main menu.
Audio and Telematics
Page 149 of 174

147
Radio
Presetting a station
Selecting a stationManaging a listEntering a frequency
Press SRC/TEL
several times in
succession to select the FM1 or FM2
radio band.
A continuous press on one of the
buttons presets the station being
listened to. The name of the station is
displayed accompanied by an audible
signal to confirm the preset.
Press a button to listen to the
corresponding preset station. Select "Radio"
.
Select "Write freq." .
Press + .
or press - to select the desired
frequency.
Press one of the buttons briefly to
change to the next or previous letter.
A continuous press on LIST
builds
or updates the list of stations; audio
reception is cut momentarily. Press LIST to display the list of
stations received in alphabetical
o r d e r.
Select the desired radio station by
pressing one of the buttons.
Confirm by pressing "OK" .
Confirm with "OK".
The exterior environment (hills, buildings,
tunnel, car park, below ground, etc.) may
prevent reception, even in RDS station
tracking mode. This phenomenon is
normal in the propagation of radio waves
and is in no way indicative of a fault with
the audio system. Press on MENU
.
.
Audio and Telematics
Page 150 of 174

148
Select "Radio". Select "Radio"
.
Select "Radio" .
Select or deselect "RDS" to switch
RDS on or off. Select or deselect "
TXT" to activate
or deactivate the display of "R ADIO
T E X T ".
Select or deselect " TA" to activate
or deactivate the reception of traffic
messages.
Confirm with "OK" to save the
setting. Confirm with "OK"
to save the
setting.
Confirm with "OK" to save the
setting.
Receiving TA messages
RDS Displaying "RADIO TEXT"
The TA (Traffic Announcement) function
gives priority to TA alert messages.
To operate, this function needs good
reception of a radio station transmitting
this type of message. When a traffic
report is transmitted, the current
audio source (Radio, CD, USB,
etc.)
is interrupted automatically to play the
TA message. Normal playback of the
audio source resumes at the end of the
transmission of the message.
RDS, if activated, enables you to continue
listening to the same station by automatic
retuning to alternative frequencies.
However, in certain conditions, coverage
of an RDS station may not be assured
throughout the country as radio stations
do not cover 100
% of the territory. This
explains the loss of reception of the
station during a journey. "R ADIO TEXT" is information
transmitted by the radio station related
to the current programme or song.
With source FM1 or FM2,
press
MENU . With the radio displayed on the
screen, press MENU
.
Press MENU .
Audio and Telematics
Page 151 of 174

149
Media
USB port
This unit comprises a USB port
and a Jack auxiliary socket,
depending on model.Connect a USB memory stick to the USB port
or connect a USB device to the USB port using
a suitable cable (not supplied).
The system constitutes playlists (in
temporary memory), whose creation
time can be from a few seconds to
several minutes at the first connection.
Limiting the number of non-music files
and the number of folders reduces this
waiting time. The playlists are updated
every time the ignition is switched off or
a USB memory stick is connected.
The lists are memorised: if there is no
change in the lists, the next loading
time will be shorter. Press SRC/TEL
repeatedly to
select " USB".
Press one of these buttons to select
the next or previous track in the list.
Press and hold one of these buttons
for fast for ward or rewind. Press one of these buttons to select
the next or previous folder in the
order chosen. Press LIST
to display the structure of
the folders in the compilation.
Select a line in the list.
Confirm with " OK".
Up a level in the menu.
Select "Media" .
Select the play mode: "Normal" ,
"Random" , "Random all" or
"Repeat" .
Select or deselect " TA"
to switch
traffic announcements on or off. Press MENU .
To protect the system, do not use a
USB hub.
.
Audio and Telematics
Page 152 of 174

150
Press the SRC/TEL button
repeatedly to select " CD".
Press one of these buttons to go to
the previous or next track in the list.
Press and hold one of these buttons
for fast for ward or back.
CD player
Insert a CD into the player, play starts
automatically.
Insert an MP3 compilation CD into the C D p layer.The audio system searches for audio tracks,
which can take from a few to several dozen
seconds before play starts.
Press one of these buttons to select
the previous or next folder according
to the category chosen. Press LIST
to display the folder
structure of the compilation.
Select a line in the list.
Confirm with " OK".
Return to the top level of the folder structure to
select the type of tracks.
-
B
y Folders (CD or USB): all folders
containing audio files recognised on the
peripheral device, in alphabetical order
without following the folder structure.
-
B
y Artist (USB only): all of the artist names
defined in the ID3 Tags, in alphabetical
o r d e r.
-
B
y Genre (USB only): all of the genres
defined in the ID3 Tags.
-
B
y Playlist (CD or USB): if playlists have
been saved. The audio system will only play files with
".mp3", ".wma" and ".wav" on a CD and can
also play files with ".ogg" extension only on
USB.
It is recommended that file names be of no
more than 20 characters and avoiding special
characters (e.g. " ?
; ù) so as to avoid any
problem reading or displaying the files.
In order to be able to play a recorded CDR or
CDRW, when recording it is preferable to select
standards ISO 9660 level 1. 2 or Joliet.
If the disc is recorded in another format, it may
not be played correctly.
It is recommended that the same recording
standard is always used for an individual disc,
with as low a speed as possible (4x maximum)
for optimum sound quality.
In the particular case of a multi-session CD, the
Joliet standard is recommended.
Information and advice
The playlists accepted on CD, MP3, iPod and
USB connection are types ".m3u" and ".wpl".
The number of files recognised is limited to
5,000 in 500 folders on a maximum of 8 levels.
Audio and Telematics