2017 CHEVROLET SONIC lock
[x] Cancel search: lockPage 270 of 342

Chevrolet Sonic Owner Manual (GMNA-Localizing-U.S./Canada-10122660) -2017 - crc - 5/13/16
Vehicle Care 269
1. Wheel Block (If Equipped)
2. Flat Tire
The following information explainshow to repair or change a tire.
Tire Changing
Removing the Spare Tire and
Tools
The compact spare tire and toolsare located in the storagecompartment in the rear of thevehicle. The jack and tools arestored below the spare tire.
1. Extension
2. Jack
3. Wheel Wrench
4. Strap
To a c c e s s t h e s p a r e t i r e a n d t o o l s :
1. Open the trunk or liftgate. SeeTr u n k ( S e d a n )041orLiftgate(Hatchback)043.
2. Lift the trim cover.
3. Turn the retainercounterclockwise and remove itfrom the compact spare.
4. Remove the compact sparetire. SeeCompact Spare Tire0274for more information.
5. Remove the jack and toolsfrom their container and placethem near the tire beingchanged.
Removing the Flat Tire and
Installing the Spare Tire
1. Do a safety check beforeproceeding. SeeIf a Tire GoesFlat0267.
Page 271 of 342
Chevrolet Sonic Owner Manual (GMNA-Localizing-U.S./Canada-10122660) -2017 - crc - 5/13/16
270 Vehicle Care
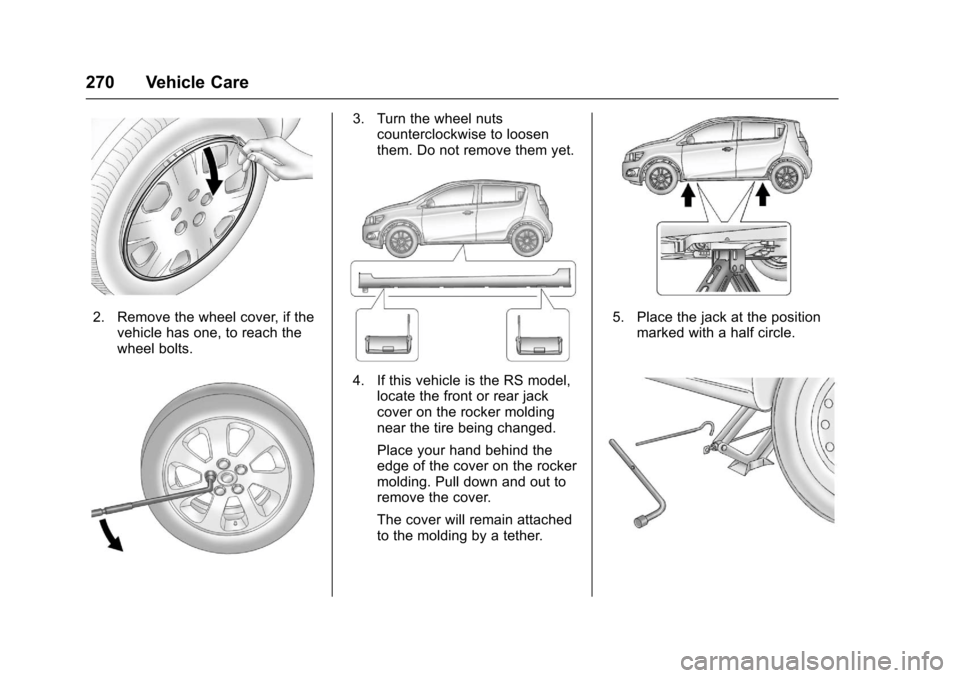
2. Remove the wheel cover, if thevehicle has one, to reach thewheel bolts.
3. Turn the wheel nutscounterclockwise to loosenthem. Do not remove them yet.
4. If this vehicle is the RS model,locate the front or rear jackcover on the rocker moldingnear the tire being changed.
Place your hand behind theedge of the cover on the rockermolding. Pull down and out toremove the cover.
The cover will remain attachedto the molding by a tether.
5. Place the jack at the positionmarked with a half circle.
Page 272 of 342
Chevrolet Sonic Owner Manual (GMNA-Localizing-U.S./Canada-10122660) -2017 - crc - 5/13/16
Vehicle Care 271
6. Insert the jack handle into thejack and the wheel wrenchonto the end of the jack handle.
7. Turn the wheel wrenchclockwise until the lift head isfirmly contacting the properlifting point nearest the flat tire.
{Warning
Getting under a vehicle when it is
lifted on a jack is dangerous.
If the vehicle slips off the jack,
you could be badly injured or
killed. Never get under a vehicle
when it is supported only by
ajack.
{Warning
Raising the vehicle with the jack
improperly positioned can
damage the vehicle and even
make the vehicle fall. To help
avoid personal injury and vehicle
(Continued)
Warning (Continued)
damage, be sure to fit the jack lift
head into the proper location
before raising the vehicle.
8. Turn the wheel wrenchclockwise to raise the vehicle.Raise the vehicle far enoughoff the ground so there isenough room for the compactspare tire to fit underneath thewheel well.
9. Turn the wheel nutscounterclockwise toremove them.
10. Remove the flat tire.
{Warning
Rust or dirt on a wheel, or on the
parts to which it is fastened, can
make wheel nuts become loose
after time. The wheel could come
off and cause an accident. When
changing a wheel, remove any
(Continued)
Warning (Continued)
rust or dirt from places where the
wheel attaches to the vehicle. In
an emergency, a cloth or a paper
towel can be used; however, use
ascraperorwirebrushlaterto
remove all rust or dirt.
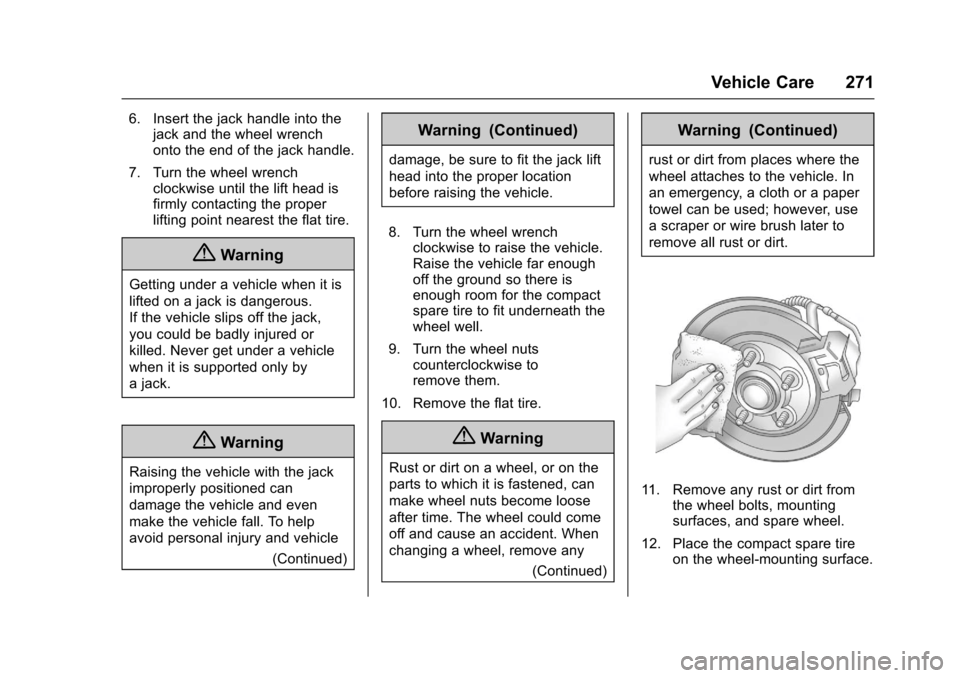
11 . R e m o v e a n y r u s t o r d i r t f r o mthe wheel bolts, mountingsurfaces, and spare wheel.
12. Place the compact spare tireon the wheel-mounting surface.
Page 273 of 342
Chevrolet Sonic Owner Manual (GMNA-Localizing-U.S./Canada-10122660) -2017 - crc - 5/13/16
272 Vehicle Care
{Warning
Never use oil or grease on bolts
or nuts because the nuts might
come loose. The vehicle's wheel
could fall off, causing a crash.
13. Reinstall the wheel nuts.Tighten each nut by hand untilthe wheel is held againstthe hub.
14. Lower the vehicle by turningthe wheel wrenchcounterclockwise. Lower thejack completely.
{Warning
Wheel nuts that are improperly or
incorrectly tightened can cause
the wheels to become loose or
come off. The wheel nuts should
be tightened with a torque wrench
to the proper torque specification
after replacing. Follow the torque
specification supplied by the
aftermarket manufacturer when
(Continued)
Warning (Continued)
using accessory locking wheel
nuts. SeeCapacities and
Specifications0304for original
equipment wheel nut torque
specifications.
Caution
Improperly tightened wheel nuts
can lead to brake pulsation and
rotor damage. To avoid expensive
brake repairs, evenly tighten the
wheel nuts in the proper
sequence and to the proper
torque specification. See
Capacities and Specifications
0304for the wheel nut torque
specification.
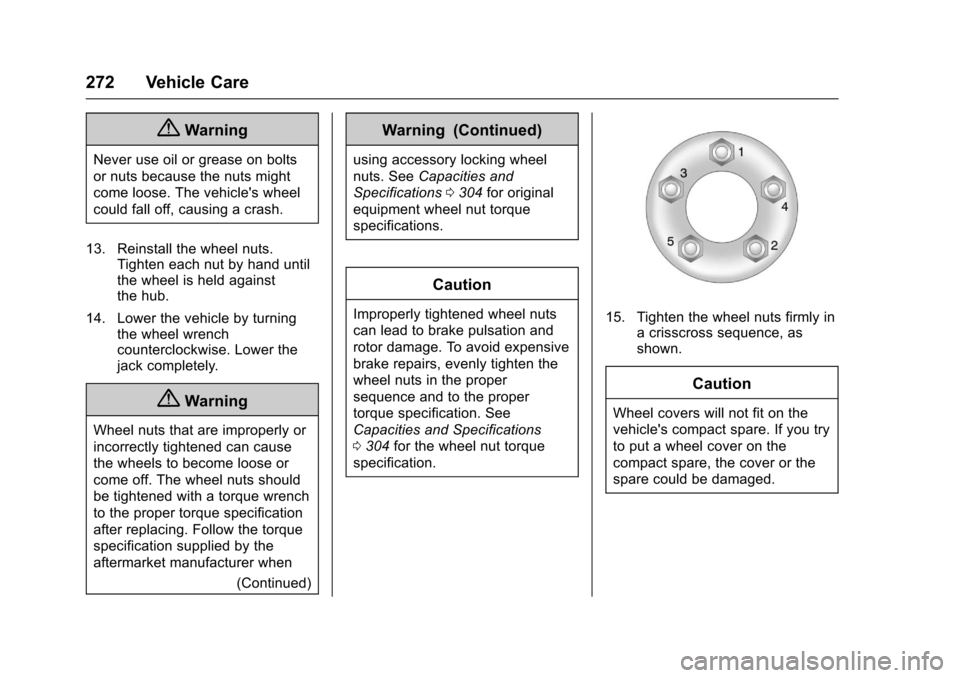
15. Tighten the wheel nuts firmly inacrisscrosssequence,asshown.
Caution
Wheel covers will not fit on the
vehicle's compact spare. If you try
to put a wheel cover on the
compact spare, the cover or the
spare could be damaged.
Page 277 of 342
Chevrolet Sonic Owner Manual (GMNA-Localizing-U.S./Canada-10122660) -2017 - crc - 5/13/16
276 Vehicle Care
The jump start negative post andpositive post are on the dischargedbattery on the driver side of thevehicle.
The jump start positive post andnegative post are on the battery ofthe vehicle providing the jump start.
The positive jump start connectionfor the discharged battery is under atrim cover. Open the cover toexpose the terminal.
1. Check the other vehicle.It must have a 12-volt batterywith a negative ground system.
Caution
If the other vehicle does not have
a12-voltsystemwithanegative
ground, both vehicles can be
damaged. Only use a vehicle that
has a 12-volt system with a
negative ground for jump starting.
2. Position the two vehicles sothat they are not touching.
3. Set the parking brake firmlyand put the shift lever inP(Park) with an automatictransmission, or Neutral with amanual transmission. SeeShifting Into Park (AutomaticTr a n s m i s s i o n )0187with anautomatic transmission, orParking0189with a manualtransmission.
Caution
If any accessories are left on or
plugged in during the jump
starting procedure, they could be
damaged. The repairs would not
be covered by the vehicle
warranty. Whenever possible, turn
off or unplug all accessories on
either vehicle when jump starting.
4. Turn the ignition to LOCK/OFF.Turn off all lights andaccessories in both vehicles,except the hazard warningflashers if needed.
{Warning
An electric fan can start up even
when the engine is not running
and can injure you. Keep hands,
clothing, and tools away from any
underhood electric fan.
{Warning
Using a match near a battery can
cause battery gas to explode.
People have been hurt doing this,
and some have been blinded.
Use a flashlight if you need more
light.
Battery fluid contains acid that
can burn you. Do not get it on
you. If you accidentally get it in
your eyes or on your skin, flush
the place with water and get
medical help immediately.
Page 280 of 342
Chevrolet Sonic Owner Manual (GMNA-Localizing-U.S./Canada-10122660) -2017 - crc - 5/13/16
Vehicle Care 279
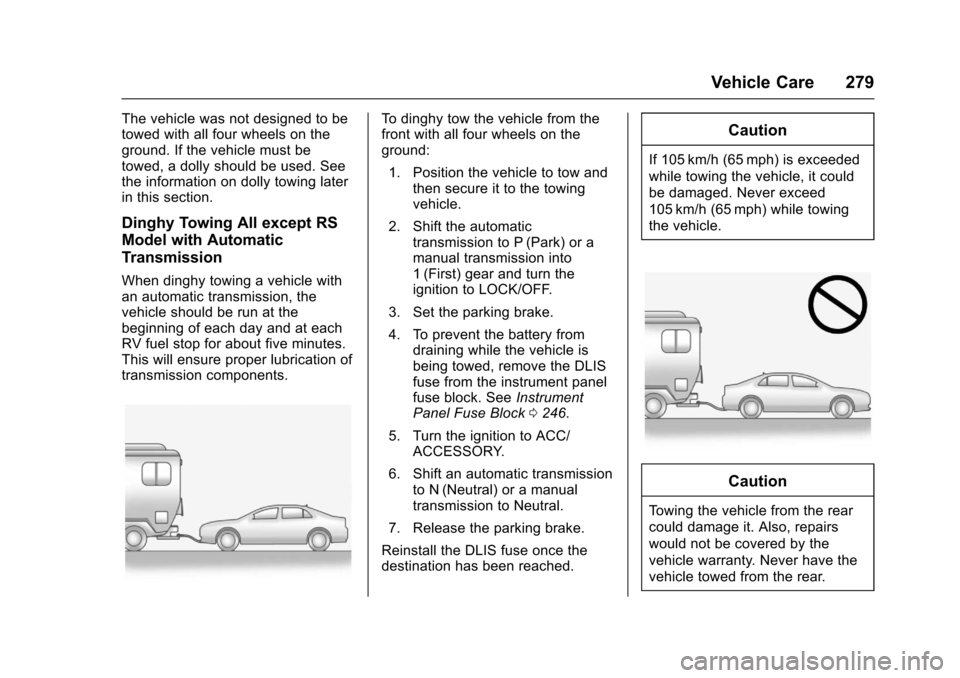
The vehicle was not designed to betowed with all four wheels on theground. If the vehicle must betowed, a dolly should be used. Seethe information on dolly towing laterin this section.
Dinghy Towing All except RS
Model with Automatic
Transmission
When dinghy towing a vehicle withan automatic transmission, thevehicle should be run at thebeginning of each day and at eachRV fuel stop for about five minutes.This will ensure proper lubrication oftransmission components.
To d i n g h y t o w t h e v e h i c l e f r o m t h efront with all four wheels on theground:
1. Position the vehicle to tow andthen secure it to the towingvehicle.
2. Shift the automatictransmission to P (Park) or amanual transmission into1(First) gear and turn theignition to LOCK/OFF.
3. Set the parking brake.
4. To prevent the battery fromdraining while the vehicle isbeing towed, remove the DLISfuse from the instrument panelfuse block. SeeInstrumentPanel Fuse Block0246.
5. Turn the ignition to ACC/ACCESSORY.
6. Shift an automatic transmissionto N (Neutral) or a manualtransmission to Neutral.
7. Release the parking brake.
Reinstall the DLIS fuse once thedestination has been reached.
Caution
If 105 km/h (65 mph) is exceeded
while towing the vehicle, it could
be damaged. Never exceed
105 km/h (65 mph) while towing
the vehicle.
Caution
To w i n g t h e v e h i c l e f r o m t h e r e a r
could damage it. Also, repairs
would not be covered by the
vehicle warranty. Never have the
vehicle towed from the rear.
Page 281 of 342
Chevrolet Sonic Owner Manual (GMNA-Localizing-U.S./Canada-10122660) -2017 - crc - 5/13/16
280 Vehicle Care
Dolly Towing from the Front
The vehicle can be towed from thefront using a dolly. To tow thevehicle using a dolly:
1. Attach the dolly to the towvehicle following the dollymanufacturer's instructions.
2. Drive the front wheels onto thedolly.
3. Put an automatic transmissionin P (Park) or a manualtransmission into 1 (First) gear.
4. Set the parking brake andremove the key.
5. Clamp the steering wheel in astraight-ahead position with aclamping device designed fortowing.
6. Secure the vehicle to the dolly.
7. Release the parking brake.
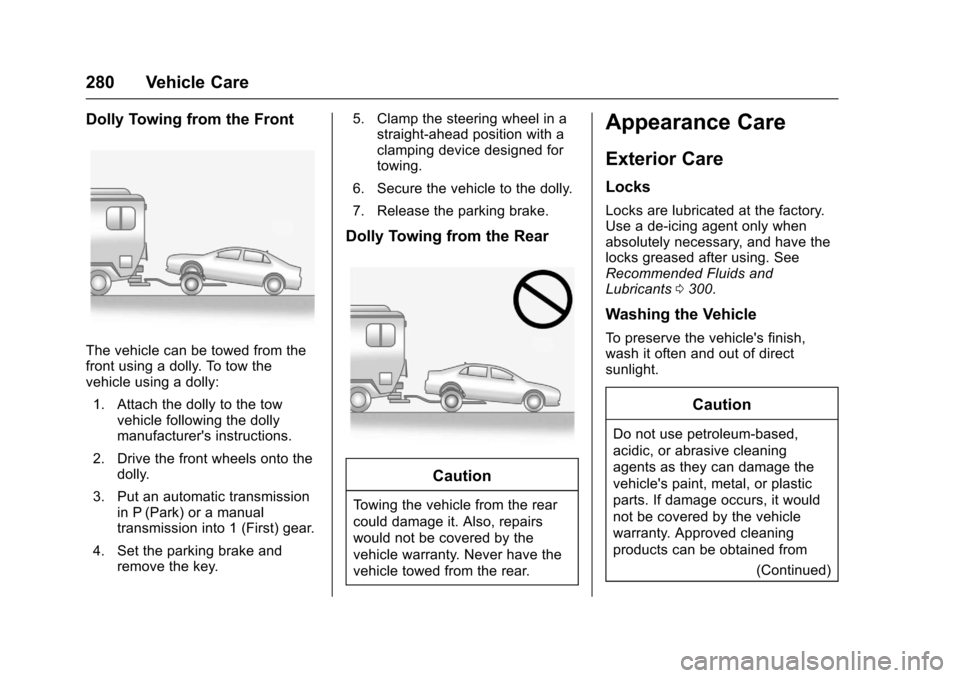
Dolly Towing from the Rear
Caution
To w i n g t h e v e h i c l e f r o m t h e r e a r
could damage it. Also, repairs
would not be covered by the
vehicle warranty. Never have the
vehicle towed from the rear.
Appearance Care
Exterior Care
Locks
Locks are lubricated at the factory.Use a de-icing agent only whenabsolutely necessary, and have thelocks greased after using. SeeRecommended Fluids andLubricants0300.
Washing the Vehicle
To p r e s e r v e t h e v e h i c l e ' s f i n i s h ,wash it often and out of directsunlight.
Caution
Do not use petroleum-based,
acidic, or abrasive cleaning
agents as they can damage the
vehicle's paint, metal, or plastic
parts. If damage occurs, it would
not be covered by the vehicle
warranty. Approved cleaning
products can be obtained from
(Continued)
Page 285 of 342
Chevrolet Sonic Owner Manual (GMNA-Localizing-U.S./Canada-10122660) -2017 - crc - 5/13/16
284 Vehicle Care
Caution
To a v o i d s u r f a c e d a m a g e , d o n o t
use strong soaps, chemicals,
abrasive polishes, cleaners,
brushes, or cleaners that contain
acid on aluminum or
chrome-plated wheels. Use only
approved cleaners. Also, never
drive a vehicle with aluminum or
chrome-plated wheels through an
automatic car wash that uses
silicone carbide tire cleaning
brushes. Damage could occur
and the repairs would not be
covered by the vehicle warranty.
Brake System
Visually inspect brake lines andhoses for proper hook-up, binding,leaks, cracks, chafing, etc. Inspectdisc brake pads for wear and rotorsfor surface condition. Inspect drumbrake linings/shoes for wear orcracks. Inspect all other brake parts.
Steering, Suspension, and
Chassis Components
Visually inspect steering,suspension, and chassiscomponents for damaged, loose,or missing parts or signs of wear atleast once a year.
Inspect power steering for properattachment, connections, binding,leaks, cracks, chafing, etc.
Visually check constant velocity jointboots and axle seals for leaks.
Body Component Lubrication
Lubricate all key lock cylinders,hood hinges, liftgate hinges, and thesteel fuel door hinges, unless thecomponents are plastic. Applyingsilicone grease on weatherstripswith a clean cloth will make themlast longer, seal better, and not stickor squeak.
Underbody Maintenance
At least twice a year, spring and fall,use plain water to flush anycorrosive materials from the
underbody. Take care to thoroughlyclean any areas where mud andother debris can collect.
Do not directly power wash thetransfer case and/or front/rear axleoutput seals. High pressure watercan overcome the seals andcontaminate the fluid. Contaminatedfluid will decrease the life of thetransfer case and/or axles andshould be replaced.
Sheet Metal Damage
If the vehicle is damaged andrequires sheet metal repair orreplacement, make sure the bodyrepair shop applies anti-corrosionmaterial to parts repaired orreplaced to restore corrosionprotection.
Original manufacturer replacementparts will provide the corrosionprotection while maintaining thevehicle warranty.
Finish Damage
Quickly repair minor chips andscratches with touch-up materialsavailable from your dealer to avoid