Page 240 of 342
Chevrolet Sonic Owner Manual (GMNA-Localizing-U.S./Canada-10122660) -2017 - crc - 5/13/16
Vehicle Care 239
8. Install the headlamp bulbaccess cover.
9. For the driver side bulb,replace the windshield washerbottle filler neck by turning itone-quarter turn clockwise intothe bottle.
Turn Signal Lamp
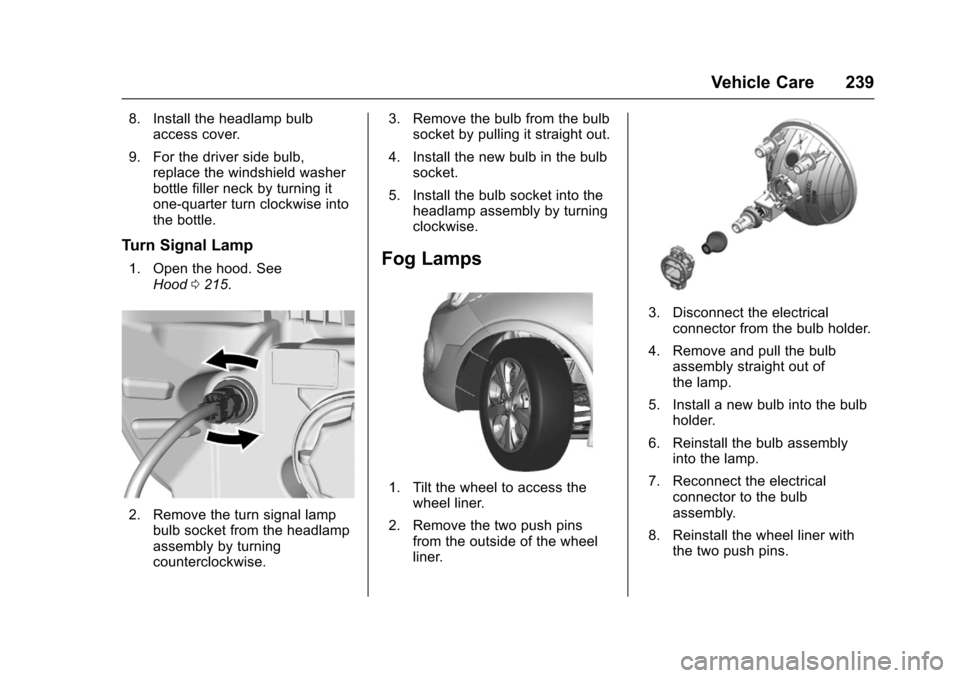
1. Open the hood. SeeHood0215.
2. Remove the turn signal lampbulb socket from the headlampassembly by turningcounterclockwise.
3. Remove the bulb from the bulbsocket by pulling it straight out.
4. Install the new bulb in the bulbsocket.
5. Install the bulb socket into theheadlamp assembly by turningclockwise.
Fog Lamps
1. Tilt the wheel to access thewheel liner.
2. Remove the two push pinsfrom the outside of the wheelliner.
3. Disconnect the electricalconnector from the bulb holder.
4. Remove and pull the bulbassembly straight out ofthe lamp.
5. Install a new bulb into the bulbholder.
6. Reinstall the bulb assemblyinto the lamp.
7. Reconnect the electricalconnector to the bulbassembly.
8. Reinstall the wheel liner withthe two push pins.
Page 241 of 342
Chevrolet Sonic Owner Manual (GMNA-Localizing-U.S./Canada-10122660) -2017 - crc - 5/13/16
240 Vehicle Care
Taillamps, Turn Signal,
Stoplamps, and Back-Up
Lamps
Sedan Taillamp Shown, Hatchback
Taillamp Similar
1. Back-up Lamp
2. Stoplamp/Taillamp
3. Turn Signal Lamp
4. Taillamp
To r e p l a c e o n e o f t h e s e b u l b s :
1. Open the trunk.
2. Remove the two screws, whichsecure the taillamp assembly.
3. Remove the taillamp assemblyby pulling it straight back untilthe two posts disengage fromthe grommets.
4. Remove the bulb socket fromthe taillamp assembly byturning it counterclockwise.
5. Remove the bulb by pulling itstraight out.
6. Install a new bulb into the bulbsocket.
7. Install the bulb socket into thetaillamp assembly by turning itclockwise.
8. Install the taillamp assemblyand tighten the two screws.
Page 242 of 342
Chevrolet Sonic Owner Manual (GMNA-Localizing-U.S./Canada-10122660) -2017 - crc - 5/13/16
Vehicle Care 241
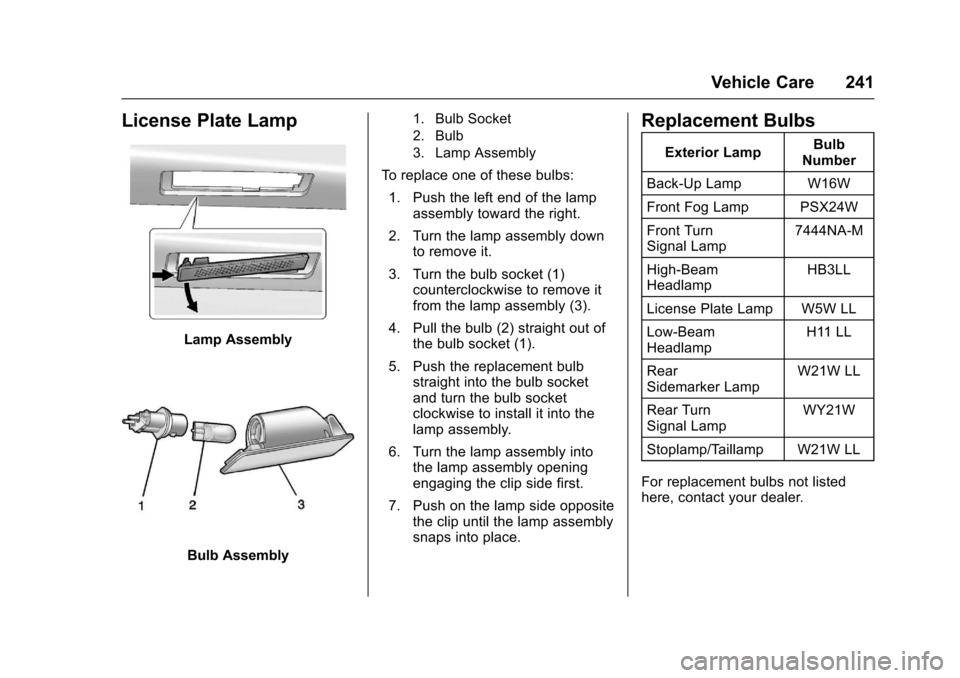
License Plate Lamp
Lamp Assembly
Bulb Assembly
1. Bulb Socket
2. Bulb
3. Lamp Assembly
To r e p l a c e o n e o f t h e s e b u l b s :
1. Push the left end of the lampassembly toward the right.
2. Turn the lamp assembly downto remove it.
3. Turn the bulb socket (1)counterclockwise to remove itfrom the lamp assembly (3).
4. Pull the bulb (2) straight out ofthe bulb socket (1).
5. Push the replacement bulbstraight into the bulb socketand turn the bulb socketclockwise to install it into thelamp assembly.
6. Turn the lamp assembly intothe lamp assembly openingengaging the clip side first.
7. Push on the lamp side oppositethe clip until the lamp assemblysnaps into place.
Replacement Bulbs
Exterior LampBulbNumber
Back-Up Lamp W16W
Front Fog Lamp PSX24W
Front TurnSignal Lamp7444NA-M
High-BeamHeadlampHB3LL
License Plate Lamp W5W LL
Low-BeamHeadlampH11 LL
RearSidemarker LampW21W LL
Rear TurnSignal LampWY21W
Stoplamp/Taillamp W21W LL
For replacement bulbs not listedhere, contact your dealer.
Page 244 of 342
Chevrolet Sonic Owner Manual (GMNA-Localizing-U.S./Canada-10122660) -2017 - crc - 5/13/16
Vehicle Care 243
Engine Compartment
Fuse Block
1.8L Engines
The engine compartment fuse blockis on the driver side of the vehicle,near the battery.
Caution
Spilling liquid on any electrical
component on the vehicle may
damage it. Always keep the
covers on any electrical
component.
To a c c e s s t h e f u s e s , p r e s s t h e c l i p stogether, and lift the cover. Toreinstall the cover, push the coveruntil it is secure.
The vehicle may not be equippedwith all of the fuses, relays, andfeatures shown.
Mini Fuses Usage
1ABSvalve
2Sunroof
4* Rear fog lamp
5OSRVM/Powerwindow switch
6Automaticoccupantsensing/ROS
7Passiveentry/Passive start
8RVC
10–/IBS
11 R e a r w i n d o wdefogger
12 ESCL
13*–/SAI valve
14 OSRVM HTD
15 Front heated seats
16 Fuel system controlmodule 1
Page 247 of 342
Chevrolet Sonic Owner Manual (GMNA-Localizing-U.S./Canada-10122660) -2017 - crc - 5/13/16
246 Vehicle Care
Mini Fuses Usage
36 Right high-beamheadlamp
*=Ifequipped
J-CaseFusesUsage
1Frontwipers
2ABSpump
3Blower
4Run/CrankIEC
5Powerseat
6CoolingfanK4
7CoolingfanK5
9EVP
10 Start
*=Ifequipped
Relays Usage
RLY 1 Front wiper control
RLY 2* Rear fog lamp
RLY 3 Front wiper speed
RLY 4 Rear defogger
Relays Usage
RLY 5 Run/Crank
RLY 9 Cooling fan K2
RLY 10 Cooling fan K3
RLY 11 P/T
RLY 12 Start
RLY 13 A/C clutch
RLY 14 High-beamheadlamps
RLY 15 Cooling fan K1
*=Ifequipped
Instrument Panel Fuse
Block
The instrument panel fuse block ison the underside of the driver sideinstrument panel.
Page 249 of 342
Chevrolet Sonic Owner Manual (GMNA-Localizing-U.S./Canada-10122660) -2017 - crc - 5/19/16
248 Vehicle Care
FusesUsage
IPC/AOS Instrument panelcluster/Automaticoccupant sensingdisplay
SPARE–
RUN RELAY Run relay
L/GATERELAYLiftgate relay
IRAP RELAY IRAP Relay
TRAILER2 Trailer hitch 2
CLOCK-SPRINGClock spring
HVAC2 HVAC 2
HTDSTR WHLHeated steeringwheel
SPARE–
S/ROOF SW Sunroof switch
CIGAR APO Cigar auxiliarypower outlet
FusesUsage
ESCL Electric steeringcolumn lock
RAP/ACCYRELAYRetainedaccessory power/Accessory Relay
PWR WNDWFRONTFront powerwindows
IRAP ACCY IRAP accessory
BATTCON-NECTOR
Battery connector
Wheels and Tires
Tires
Every new GM vehicle has
high-quality tires made by a
leading tire manufacturer. See
the warranty manual for
information regarding the tire
warranty and where to get
service. For additional
information refer to the tire
manufacturer.
{Warning
.Poorly maintained and
improperly used tires are
dangerous.
.Overloading the tires can
cause overheating as a
result of too much
flexing. There could be a
blowout and a serious
crash. SeeVehicle Load
Limits0178.
(Continued)
Page 265 of 342
Chevrolet Sonic Owner Manual (GMNA-Localizing-U.S./Canada-10122660) -2017 - crc - 5/13/16
264 Vehicle Care
{Warning
Using bias-ply tires on the
vehicle may cause the wheel
rim flanges to develop cracks
after many miles of driving.
Atireand/orwheelcouldfail
suddenly and cause a crash.
Use only radial-ply tires with
the wheels on the vehicle.
If the vehicle tires must be
replaced with a tire that does not
have a TPC Spec number, make
sure they are the same size,
load range, speed rating, and
construction (radial) as the
original tires.
Vehicles that have a tire
pressure monitoring system
could give an inaccurate
low-pressure warning if non-TPC
Spec rated tires are installed.
SeeTire Pressure Monitor
System0257.
The Tire and Loading
Information label indicates the
original equipment tires on the
vehicle. SeeVehicle Load
Limits0178.
Different Size Tires and
Wheels
If wheels or tires are installed thatare a different size than the originalequipment wheels and tires, vehicleperformance, including its braking,ride and handling characteristics,stability, and resistance to rollovermay be affected. If the vehicle haselectronic systems such as antilockbrakes, rollover airbags, tractioncontrol, electronic stability control,or All-Wheel Drive, the performanceof these systems can also beaffected.
{Warning
If different sized wheels are used,
there may not be an acceptable
level of performance and safety if
(Continued)
Warning (Continued)
tires not recommended for those
wheels are selected. This
increases the chance of a crash
and serious injury. Only use GM
specific wheel and tire systems
developed for the vehicle, and
have them properly installed by a
GM certified technician.
SeeBuying New Tires0263andAccessories andModifications0214.
Uniform Tire Quality
Grading
The following information relates
to the system developed by the
United States National Highway
Traffic Safety Administration
(NHTSA), which grades tires by
treadwear, traction, and
temperature performance. This
applies only to vehicles sold in
the United States. The grades
are molded on the sidewalls of
Page 269 of 342
Chevrolet Sonic Owner Manual (GMNA-Localizing-U.S./Canada-10122660) -2017 - crc - 5/13/16
268 Vehicle Care
{Warning
Driving on a flat tire will cause
permanent damage to the tire.
Re-inflating a tire after it has been
driven on while severely
underinflated or flat may cause a
blowout and a serious crash.
Never attempt to re-inflate a tire
that has been driven on while
severely underinflated or flat.
Have your dealer or an authorized
tire service center repair or
replace the flat tire as soon as
possible.
{Warning
Lifting a vehicle and getting under
it to do maintenance or repairs is
dangerous without the
appropriate safety equipment and
training. If a jack is provided with
the vehicle, it is designed only for
changing a flat tire. If it is used for
anything else, you or others could
(Continued)
Warning (Continued)
be badly injured or killed if the
vehicle slips off the jack. If a jack
is provided with the vehicle, only
use it for changing a flat tire.
If a tire goes flat, avoid further tireand wheel damage by driving slowlyto a level place, well off the road,if possible. Turn on the hazardwarning flashers. SeeHazardWarning Flashers0136.
{Warning
Changing a tire can be
dangerous. The vehicle can slip
off the jack and roll over or fall
causing injury or death. Find a
level place to change the tire. To
help prevent the vehicle from
moving:
1. Set the parking brake firmly.
(Continued)
Warning (Continued)
2. Put an automatictransmission in P (Park) or amanual transmission in1(First) or R(Reverse).
3. Turn off the engine and donot restart while the vehicleis raised.
4. Do not allow passengers toremain in the vehicle.
5. Place wheel blocks,if equipped, on both sides ofthe tire at the oppositecorner of the tire beingchanged.
When the vehicle has a flat tire (2),use the following example as aguide to assist in the placement ofthe wheel blocks (1), if equipped.