2017 CHEVROLET SONIC lock
[x] Cancel search: lockPage 213 of 342

Chevrolet Sonic Owner Manual (GMNA-Localizing-U.S./Canada-10122660) -2017 - crc - 5/13/16
212 Vehicle Care
Vehicle Care
General Information
General Information . . . . . . . . . . 213California Proposition65 Warning . . . . . . . . . . . . . . . . . 213California PerchlorateMaterials Requirements . . . . . 213Accessories andModifications . . . . . . . . . . . . . . . . 214
Vehicle Checks
Doing Your OwnService Work . . . . . . . . . . . . . . . 214Hood . . . . . . . . . . . . . . . . . . . . . . . . . 215Engine CompartmentOverview . . . . . . . . . . . . . . . . . . . . 217Engine Oil . . . . . . . . . . . . . . . . . . . . 220Engine Oil Life System . . . . . . . 222Automatic TransmissionFluid . . . . . . . . . . . . . . . . . . . . . . . . 223Manual Transmission Fluid . . . 224Hydraulic Clutch . . . . . . . . . . . . . . 224Engine Air Cleaner/Filter . . . . . . 224Cooling System . . . . . . . . . . . . . . 226Engine Coolant . . . . . . . . . . . . . . . 227Engine Overheating . . . . . . . . . . 230Washer Fluid . . . . . . . . . . . . . . . . . 231Brakes . . . . . . . . . . . . . . . . . . . . . . . 232Brake Fluid . . . . . . . . . . . . . . . . . . . 233
Battery - North America . . . . . . 234Starter Switch Check . . . . . . . . . 234Automatic Transmission ShiftLock Control FunctionCheck . . . . . . . . . . . . . . . . . . . . . . . 235Ignition Transmission LockCheck . . . . . . . . . . . . . . . . . . . . . . . 235Park Brake and P (Park)Mechanism Check . . . . . . . . . . 236Wiper Blade Replacement . . . . 236
Headlamp Aiming
Headlamp Aiming . . . . . . . . . . . . 237
Bulb Replacement
Bulb Replacement . . . . . . . . . . . . 238Halogen Bulbs . . . . . . . . . . . . . . . . 238Headlamps and Front TurnSignal . . . . . . . . . . . . . . . . . . . . . . . 238Fog Lamps . . . . . . . . . . . . . . . . . . . 239Ta i l l a m p s , T u r n S i g n a l ,Stoplamps, and Back-UpLamps . . . . . . . . . . . . . . . . . . . . . . 240License Plate Lamp . . . . . . . . . . 241Replacement Bulbs . . . . . . . . . . . 241
Electrical System
Electrical System Overload . . . 242Fuses and Circuit Breakers . . . 242Engine Compartment FuseBlock . . . . . . . . . . . . . . . . . . . . . . . . 243
Instrument Panel FuseBlock . . . . . . . . . . . . . . . . . . . . . . . . 246
Wheels and Tires
Tires . . . . . . . . . . . . . . . . . . . . . . . . . . 248All-Season Tires . . . . . . . . . . . . . . 249Winter Tires . . . . . . . . . . . . . . . . . . 249Summer Tires . . . . . . . . . . . . . . . . 250Tire Sidewall Labeling . . . . . . . . 250Tire Designations . . . . . . . . . . . . . 252Tire Terminology andDefinitions . . . . . . . . . . . . . . . . . . 253Tire Pressure . . . . . . . . . . . . . . . . . 256Tire Pressure MonitorSystem . . . . . . . . . . . . . . . . . . . . . . 257Tire Pressure MonitorOperation . . . . . . . . . . . . . . . . . . . 258Tire Inspection . . . . . . . . . . . . . . . . 260Tire Rotation . . . . . . . . . . . . . . . . . 261When It Is Time for NewTires . . . . . . . . . . . . . . . . . . . . . . . . 262Buying New Tires . . . . . . . . . . . . . 263Different Size Tires andWheels . . . . . . . . . . . . . . . . . . . . . . 264Uniform Tire QualityGrading . . . . . . . . . . . . . . . . . . . . . 264Wheel Alignment and TireBalance . . . . . . . . . . . . . . . . . . . . . 266Wheel Replacement . . . . . . . . . . 266Tire Chains . . . . . . . . . . . . . . . . . . . 267If a Tire Goes Flat . . . . . . . . . . . . 267
Page 215 of 342
Chevrolet Sonic Owner Manual (GMNA-Localizing-U.S./Canada-10122660) -2017 - crc - 5/13/16
214 Vehicle Care
Accessories and
Modifications
Adding non-dealer accessories ormaking modifications to the vehiclecan affect vehicle performance andsafety, including such things asairbags, braking, stability, ride andhandling, emissions systems,aerodynamics, durability, andelectronic systems like antilockbrakes, traction control, and stabilitycontrol. These accessories ormodifications could even causemalfunction or damage not coveredby the vehicle warranty.
Damage to suspension componentscaused by modifying vehicle heightoutside of factory settings will not becovered by the vehicle warranty.
Damage to vehicle componentsresulting from modifications or theinstallation or use of non-GMcertified parts, including controlmodule or software modifications, isnot covered under the terms of thevehicle warranty and may affectremaining warranty coverage foraffected parts.
GM Accessories are designed tocomplement and function with othersystems on the vehicle. See yourdealer to accessorize the vehicleusing genuine GM Accessoriesinstalled by a dealer technician.
Also, seeAdding Equipment to theAirbag-Equipped Vehicle075.
Vehicle Checks
Doing Your Own
Service Work
{Warning
It can be dangerous to work on
your vehicle if you do not have
the proper knowledge, service
manual, tools, or parts. Always
follow owner manual procedures
and consult the service manual
for your vehicle before doing any
service work.
If doing some of your own servicework, use the proper servicemanual. It tells you much moreabout how to service the vehiclethan this manual can. To order theproper service manual, seeServicePublications OrderingInformation0316.
This vehicle has an airbag system.Before attempting to do your ownservice work, seeServicing theAirbag-Equipped Vehicle075.
Page 219 of 342

Chevrolet Sonic Owner Manual (GMNA-Localizing-U.S./Canada-10122660) -2017 - crc - 5/13/16
218 Vehicle Care
1.Engine Air Cleaner/Filter0224.
2. Engine Oil Dipstick. SeeEngine Oil0220.
3. Engine Cooling Fan (Out ofView). SeeCoolingSystem0226.
4. Engine Oil Fill Cap. SeeEngine Oil0220.
5. Engine Coolant Surge Tankand Pressure Cap. SeeCooling System0226.
6. Brake/Clutch Fluid Reservoir.SeeBrake Fluid0233andHydraulic Clutch0224.
7.Battery - North America0234.
8. Windshield Washer FluidReservoir. SeeWasherFluid0231.
9.Engine Compartment FuseBlock0243.
Page 221 of 342
Chevrolet Sonic Owner Manual (GMNA-Localizing-U.S./Canada-10122660) -2017 - crc - 5/13/16
220 Vehicle Care
1.Engine Air Cleaner/Filter0224.
2. Engine Oil Dipstick. SeeEngine Oil0220.
3. Engine Cooling Fan (Out ofView). SeeCoolingSystem0226.
4. Engine Oil Fill Cap. SeeEngine Oil0220.
5. Engine Coolant Surge Tankand Pressure Cap. SeeCooling System0226.
6. Brake/Clutch Fluid Reservoir.SeeBrake Fluid0233andHydraulic Clutch0224.
7.Battery - North America0234.
8.Engine Compartment FuseBlock0243.
9. Windshield Washer FluidReservoir. SeeWasherFluid0231.
Engine Oil
To e n s u r e p r o p e r e n g i n eperformance and long life, carefulattention must be paid to engine oil.
Following these simple, butimportant steps will help protectyour investment:
.Use engine oil approved to theproper specification and of theproper viscosity grade. See“Selecting the Right Engine Oil”in this section.
.Check the engine oil levelregularly and maintain theproper oil level. See“CheckingEngine Oil”and“When to AddEngine Oil”in this section.
.Change the engine oil at theappropriate time. SeeEngine OilLife System0222.
.Always dispose of engine oilproperly. See“What to Do withUsed Oil”in this section.
If the engine oil pressure lightcomes on, check the engine oil levelright away. The oil pressure light ison the instrument cluster. SeeEngine Oil Pressure Light011 8.Check the engine oil level regularly;this is an added reminder.
Checking Engine Oil
Check the engine oil level regularly(every 650 km (400 mi), especiallyprior to a long trip. The engine oildipstick handle is a loop. SeeEngine Compartment Overview0217for the location.
{Warning
The engine oil dipstick handle
may be hot; it could burn you.
Use a towel or glove to touch the
dipstick handle.
If a low oil Driver Information Center(DIC) message displays, check theoil level.
Page 230 of 342
Chevrolet Sonic Owner Manual (GMNA-Localizing-U.S./Canada-10122660) -2017 - crc - 5/13/16
Vehicle Care 229
Caution
In cold weather, water can freeze
and crack the engine, radiator,
heater core, and other parts. Use
the recommended coolant and
the proper coolant mixture.
{Warning
Yo u c a n b e b u r n e d i f y o u s p i l l
coolant on hot engine parts.
Coolant contains ethylene glycol
and it will burn if the engine parts
are hot enough. Do not spill
coolant on a hot engine.
1.4L Engine Shown, 1.8L Engine
Similar
1. Remove the coolant surge tankpressure cap when the coolingsystem, including the coolantsurge tank pressure cap andupper radiator hose, is nolonger hot.
Turn the pressure cap slowlycounterclockwise aboutone-quarter of a turn. If youhear a hiss, wait for that tostop. This will allow anypressure still left to be ventedout the discharge hose.
2. Keep turning the pressure capslowly and remove it.
3. Fill the coolant surge tank withthe proper DEX-COOL coolantmixture to the indicatedlevel mark.
4. With the coolant surge tankpressure cap off, start theengine and let it run until youcan feel the upper radiatorhose getting hot. Watch out forthe engine cooling fan.
Page 236 of 342
Chevrolet Sonic Owner Manual (GMNA-Localizing-U.S./Canada-10122660) -2017 - crc - 5/13/16
Vehicle Care 235
3. For automatic transmissionvehicles, try to start the enginein each gear. The vehicleshould start only in P (Park) orN(Neutral). If the vehicle startsin any other position, contactyour dealer for service.
For manual transmissionvehicles, put the shift lever inNeutral, push the clutch pedaldown halfway, and try to startthe engine. The vehicle shouldstart only when the clutchpedal is pushed down all theway to the floor. If the vehiclestarts when the clutch pedal isnot pushed all the way down,contact your dealer for service.
Automatic Transmission
Shift Lock Control
Function Check
{Warning
When you are doing this
inspection, the vehicle could
move suddenly. If the vehicle
moves, you or others could be
injured.
1. Before starting this check, besure there is enough roomaround the vehicle. It should beparked on a level surface.
2. Apply the parking brake. Beready to apply the regularbrake immediately if the vehiclebegins to move.
3. With the engine off, turn theignition on, but do not start theengine. Without applying theregular brake, try to move theshift lever out of P (Park) withnormal effort. If the shift levermoves out of P (Park), contactyour dealer for service.
Ignition Transmission
Lock Check
While parked, and with the parkingbrake set, try to turn the ignition toLOCK/OFF in each shift leverposition.
.For automatic transmissionvehicles, the ignition should turnto LOCK/OFF only when theshift lever is in P (Park).
.For manual transmissionvehicles, the ignition should turnto LOCK/OFF only when theshift lever is in neutral.
On all vehicles, the ignition keyshould come out only in LOCK/OFF.
Contact your dealer if service isrequired.
Page 238 of 342
Chevrolet Sonic Owner Manual (GMNA-Localizing-U.S./Canada-10122660) -2017 - crc - 5/13/16
Vehicle Care 237
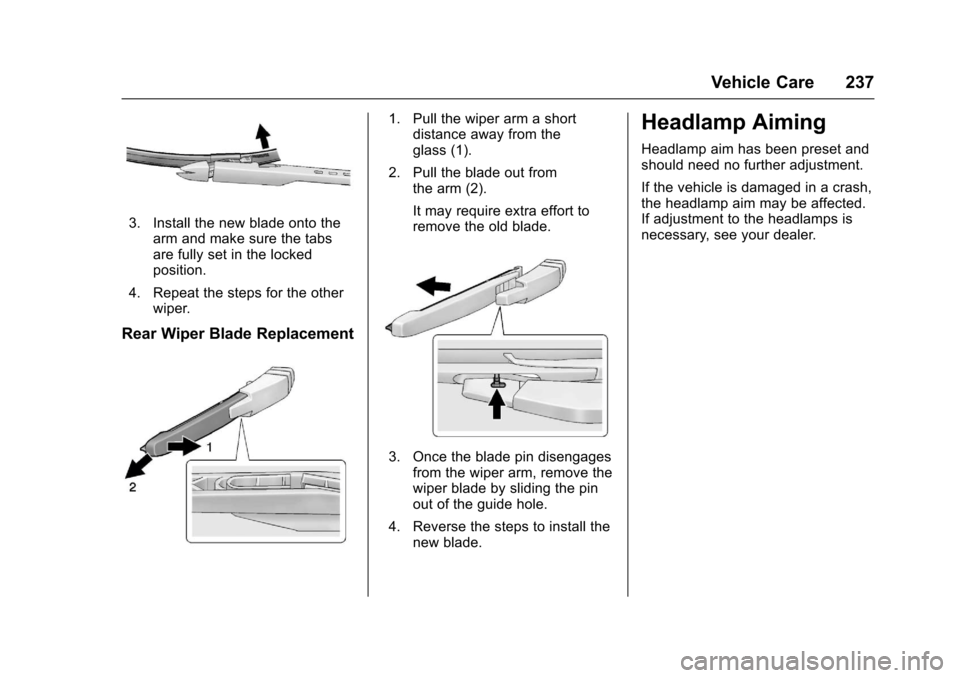
3. Install the new blade onto thearm and make sure the tabsare fully set in the lockedposition.
4. Repeat the steps for the otherwiper.
Rear Wiper Blade Replacement
1. Pull the wiper arm a shortdistance away from theglass (1).
2. Pull the blade out fromthe arm (2).
It may require extra effort toremove the old blade.
3. Once the blade pin disengagesfrom the wiper arm, remove thewiper blade by sliding the pinout of the guide hole.
4. Reverse the steps to install thenew blade.
Headlamp Aiming
Headlamp aim has been preset andshould need no further adjustment.
If the vehicle is damaged in a crash,the headlamp aim may be affected.If adjustment to the headlamps isnecessary, see your dealer.
Page 239 of 342
Chevrolet Sonic Owner Manual (GMNA-Localizing-U.S./Canada-10122660) -2017 - crc - 5/13/16
238 Vehicle Care
Bulb Replacement
For the proper type of replacementbulbs, seeReplacementBulbs0241.
For any bulb-changing procedurenot listed in this section, contactyour dealer.
Halogen Bulbs
{Warning
Halogen bulbs have pressurized
gas inside and can burst if you
drop or scratch the bulb. You or
others could be injured. Be sure
to read and follow the instructions
on the bulb package.
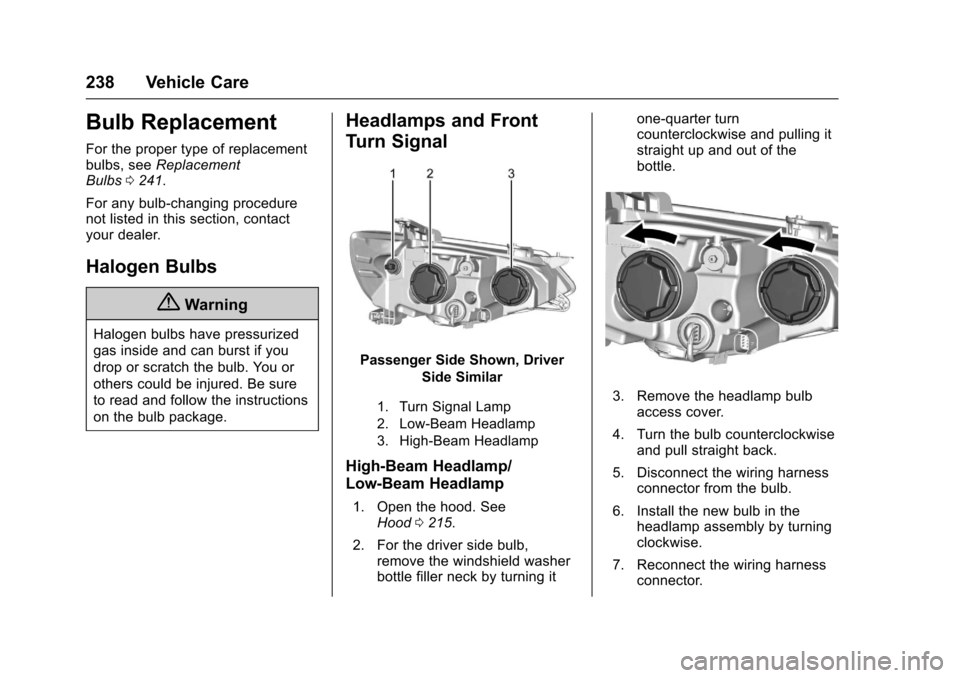
Headlamps and Front
Turn Signal
Passenger Side Shown, Driver
Side Similar
1. Turn Signal Lamp
2. Low-Beam Headlamp
3. High-Beam Headlamp
High-Beam Headlamp/
Low-Beam Headlamp
1. Open the hood. SeeHood0215.
2. For the driver side bulb,remove the windshield washerbottle filler neck by turning it
one-quarter turncounterclockwise and pulling itstraight up and out of thebottle.
3. Remove the headlamp bulbaccess cover.
4. Turn the bulb counterclockwiseand pull straight back.
5. Disconnect the wiring harnessconnector from the bulb.
6. Install the new bulb in theheadlamp assembly by turningclockwise.
7. Reconnect the wiring harnessconnector.