2017 CHEVROLET ORLANDO hood open
[x] Cancel search: hood openPage 34 of 372

Black plate (6,1)Chevrolet Orlando Owner Manual - 2013 - CRC - 6/5/12
2-6 Keys, Doors, and Windows
A maximum of two remote starts,
or a single start with an extension,
is allowed between ignition cycles.
The vehicle's ignition must be
turned on and then back off before
the remote start procedure can be
used again.
Canceling a Remote Start
To cancel a remote start, do one of
the following:
.Aim the RKE transmitter at the
vehicle and press and hold
/
until the parking lamps turn off.
.Turn on the hazard warning
flashers.
.Turn the vehicle on and then off.
Conditions in Which Remote Start
Will Not Work
The remote vehicle start feature will
not operate if:
.The key is in the ignition (key
access) or if the key is in the
vehicle (keyless access).
.The hood is not closed.
.The hazard warning flashers
are on.
.The malfunction indicator lamp
is on.
.The engine coolant temperature
is too high.
.The oil pressure is low.
.Two remote vehicle starts, or a
single remote start with an
extension, have already
been used.
.The vehicle is not in P (Park).
Door Locks
{WARNING
Unlocked doors can be
dangerous.
.Passengers, especially
children, can easily open the
doors and fall out of a moving
vehicle. The chance of being
thrown out of the vehicle in a (Continued)
WARNING (Continued)
crash is increased if the
doors are not locked. So, all
passengers should wear
safety belts properly and the
doors should be locked
whenever the vehicle is
driven.
.Young children who get into
unlocked vehicles may be
unable to get out. A child can
be overcome by extreme heat
and can suffer permanent
injuries or even death from
heat stroke. Always lock the
vehicle whenever leaving it.
.Outsiders can easily enter
through an unlocked door
when slowing or stopping the
vehicle. Lock the doors to
help prevent this from
happening.
Page 37 of 372
Black plate (9,1)Chevrolet Orlando Owner Manual - 2013 - CRC - 6/5/12
Keys, Doors, and Windows 2-9
Press the touch pad located in the
handle of the liftgate, above the
license plate, and lift up to open.
Do not press the touch pad while
closing the liftgate. This will cause
the liftgate to be unlatched.
Always close the liftgate before
driving.Vehicle Security
This vehicle has theft-deterrent
features; however, they do not make
the vehicle impossible to steal.
Vehicle Alarm System
This vehicle has a anti-theft alarm
system.
The LED light, instrument panel
near the windshield, indicates the
status of the system.
Arming the System
1. Close all doors, trunk, andliftgate.
2. Lock the vehicle using the transmitter or the power door
lock button with the door open.
The LED on the instrument
panel should come on and stay
on for about 30 seconds.
3. After 30 seconds, or if the
Q
button on the transmitter is
pressed again, the alarm system will arm, and the LED will begin
to slowly flash indicating the
alarm is operating.
If a door, the hood, or liftgate is
opened without first unlocking with
the transmitter, the turn signals will
flash and the horn will sound for
about 30 seconds. The alarm
system will then re-arm to monitor
for the next unauthorized event.
The theft-deterrent alarm system will
not activate if the doors are locked
with the key.
Disarming the System
To disarm the system, either unlock
the doors using the transmitter,
or start the vehicle.
To avoid setting off the alarm by
accident:
.Lock the vehicle with the
transmitter after all occupants
have left the vehicle and all
doors are closed.
Page 125 of 372
Black plate (25,1)Chevrolet Orlando Owner Manual - 2013 - CRC - 6/5/12
Instruments and Controls 5-25
Battery Voltage and
Charging Messages
BATTERY SAVER ACTIVE
This message displays when the
vehicle has detected that the battery
voltage is dropping beyond a
reasonable point. The battery saver
system starts reducing features of
the vehicle that may be noticed. At
the point that features are disabled,
this message displays. Turn off
unnecessary accessories to allow
the battery to recharge.
LOW BATTERY
This message is displayed when the
battery voltage is low. SeeBattery
on page 10‑21.
SERVICE BATTERY
CHARGING SYSTEM
This message is displayed when
there is a fault in the battery
charging system. Take the vehicle to
your dealer for service.
Brake System Messages
BRAKE FLUID LOW
This message is displayed when the
brake fluid level is low. See Brake
Fluid on page 10‑20.
RELEASE PARKING BRAKE
This message is displayed as a
reminder that the parking brake is
on. Release it before you attempt to
drive.
Compass Messages
CAL
This message is displayed when the
compass needs to be calibrated.
See Compass on page 5‑5.
– –
Two dashes will be displayed if the
compass needs service. See your
dealer for service.
Cruise Control Messages
APPLY BRAKE BEFORE
CRUISE
If this message displays when
attempting to activate cruise control,
apply the brake pedal and try again.
CRUISE SET TO XXX
This message displays when the
cruise control is set and shows the
speed it was set to. See Cruise
Control on page 9‑31.
Door Ajar Messages
DOOR(S) OPEN
A vehicle symbol will be displayed
on the DIC showing which door is
open along with this message.
Close the door completely.
HOOD OPEN
This message will display when the
hood is open. Close the hood
completely.
Page 180 of 372
Black plate (6,1)Chevrolet Orlando Owner Manual - 2013 - CRC - 6/5/12
8-6 Climate Controls
Air Vents
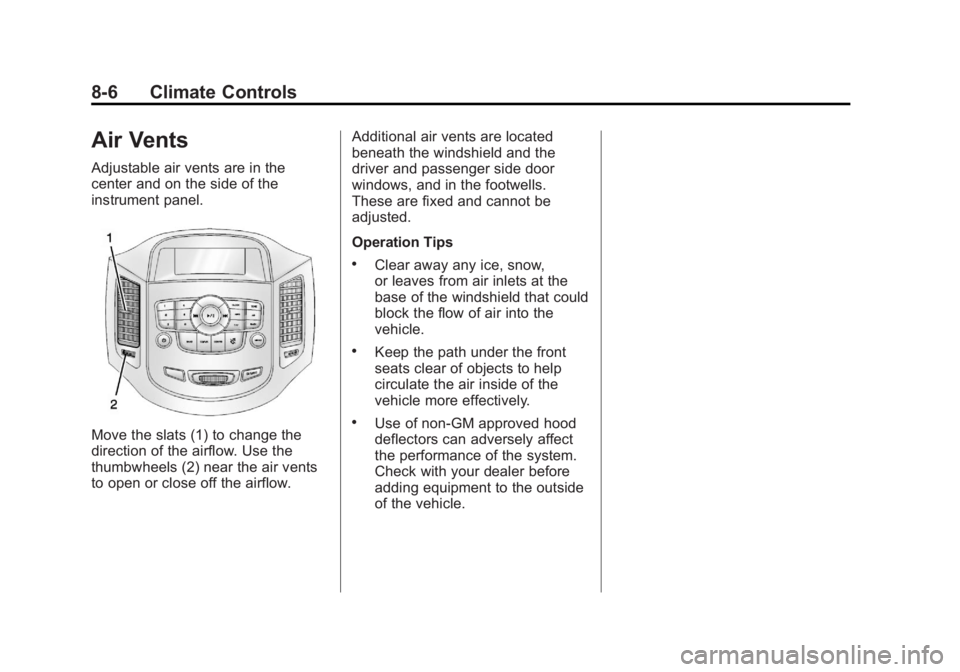
Adjustable air vents are in the
center and on the side of the
instrument panel.
Move the slats (1) to change the
direction of the airflow. Use the
thumbwheels (2) near the air vents
to open or close off the airflow.Additional air vents are located
beneath the windshield and the
driver and passenger side door
windows, and in the footwells.
These are fixed and cannot be
adjusted.
Operation Tips
.Clear away any ice, snow,
or leaves from air inlets at the
base of the windshield that could
block the flow of air into the
vehicle.
.Keep the path under the front
seats clear of objects to help
circulate the air inside of the
vehicle more effectively.
.Use of non-GM approved hood
deflectors can adversely affect
the performance of the system.
Check with your dealer before
adding equipment to the outside
of the vehicle.
Page 197 of 372

Black plate (17,1)Chevrolet Orlando Owner Manual - 2013 - CRC - 6/5/12
Driving and Operating 9-17
The vehicle has a
Computer-Controlled Cranking
System. This feature assists in
starting the engine and protects
components. If the ignition key is
turned to the START position,
and then released when the
engine begins cranking, the
engine will continue cranking for
a few seconds or until the
vehicle starts. If the engine does
not start and the key is held in
START for many seconds,
cranking will be stopped after
15 seconds to prevent cranking
motor damage. To prevent gear
damage, this system also
prevents cranking if the engine
is already running. Engine
cranking can be stopped by
turning the ignition switch to
ACC/ACCESSORY or
LOCK/OFF.Notice:
Cranking the engine for
long periods of time, by returning
the key to the START position
immediately after cranking has
ended, can overheat and damage
the cranking motor, and drain the
battery. Wait at least 15 seconds
between each try, to let the
cranking motor cool down.
2. If the engine does not start after
five to 10 seconds, especially in
very cold weather (below −18°C
or 0°F), it could be flooded with
too much gasoline. Try pushing
the accelerator pedal all the way
to the floor and holding it there
as you hold the key in START
for up to a maximum of
15 seconds. Wait at least
15 seconds between each try, to
allow the cranking motor to cool
down. When the engine starts,
let go of the key or button, and
the accelerator. If the vehicle
starts briefly but then stops
again, do the same thing. This
clears the extra gasoline from
the engine. Do not race the engine immediately after starting
it. Operate the engine and
transmission gently until the oil
warms up and lubricates all
moving parts.
Engine Heater
The engine heater can help in cold
weather conditions at or below
−18°C (0°F) for easier starting and
better fuel economy during engine
warm-up. Plug in the heater at least
four hours before starting the
vehicle. An internal thermostat in
the plug-end of the cord will prevent
engine heater operation at
temperatures above
−18°C (0°F).
To Use The Engine Heater
1. Turn off the engine.
2. Open the hood and unwrap the
electrical cord stored near the air
cleaner.
3. Plug it into a normal, grounded 110-volt AC outlet.
Page 218 of 372
Black plate (38,1)Chevrolet Orlando Owner Manual - 2013 - CRC - 6/5/12
9-38 Driving and Operating
Fuel
Use of the recommended fuel is an
important part of the proper
maintenance of this vehicle. To help
keep the engine clean and maintain
optimum vehicle performance, we
recommend the use of gasoline
advertised as TOP TIER Detergent
Gasoline.
Look for the TOP TIER label on the
fuel pump to ensure gasoline meets
enhanced detergency standards
developed by auto companies. A list
of marketers providing TOP TIER
Detergent Gasoline can be found at
www.toptiergas.com. TOP TIER
gasoline is only available in the U.S.
and Canada.
Recommended Fuel
Use regular unleaded gasoline with
a posted octane rating of 87 or
higher. If the octane rating is less
than 87, an audible knocking noise,
commonly referred to as spark
knock, might be heard when driving.
If this occurs, use a gasoline rated
at 87 octane or higher as soon as
possible. If heavy knocking is heard
when using gasoline rated at
87 octane or higher, the engine
needs service.
Gasoline Specifications
At a minimum, gasoline should
meet ASTM specification D 4814.
Some gasolines contain an
octane-enhancing additive called
methylcyclopentadienyl manganese
tricarbonyl (MMT). We recommend
against the use of gasolines
containing MMT. SeeFuel Additives
on page 9‑39 for additional
information.
California Fuel
Requirements
If the vehicle is certified to meet
California Emissions Standards, it is
designed to operate on fuels that
meet California specifications. See
the underhood emission control
label. If this fuel is not available in
states adopting California Emissions
Standards, the vehicle will operate
satisfactorily on fuels meeting
federal specifications, but emission
control system performance might
be affected. The malfunction
indicator lamp could turn on and the
Page 232 of 372
Black plate (4,1)Chevrolet Orlando Owner Manual - 2013 - CRC - 6/5/12
10-4 Vehicle Care
Vehicle Checks
Doing Your Own
Service Work
{WARNING
It can be dangerous to work on
your vehicle if you do not have
the proper knowledge, service
manual, tools, or parts. Always
follow owner manual procedures
and consult the service manual
for your vehicle before doing any
service work.
If doing some of your own service
work, use the proper service
manual. It tells you much more
about how to service the vehicle
than this manual can. To order the
proper service manual, see Service
Publications Ordering Information
on page 13‑11. This vehicle has an airbag system.
Before attempting to do your own
service work, see
Servicing the
Airbag-Equipped Vehicle on
page 3‑30.
Keep a record with all parts receipts
and list the mileage and the date of
any service work performed. See
Maintenance Records on
page 11‑14.
Notice: Even small amounts of
contamination can cause damage
to vehicle systems. Do not allow
contaminants to contact the
fluids, reservoir caps,
or dipsticks.
Hood
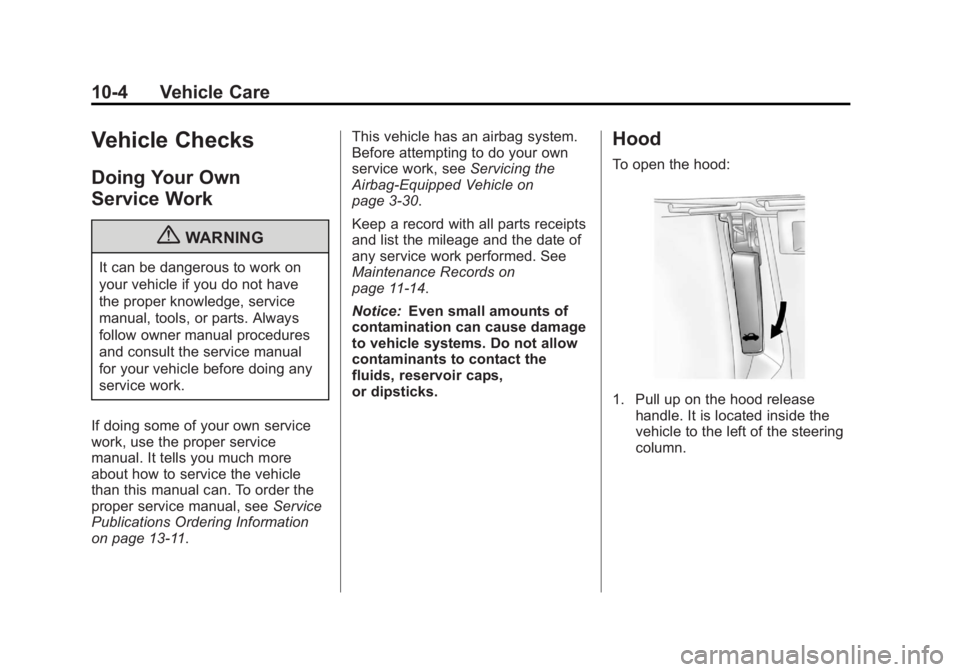
To open the hood:
1. Pull up on the hood release handle. It is located inside the
vehicle to the left of the steering
column.
Page 240 of 372
Black plate (12,1)Chevrolet Orlando Owner Manual - 2013 - CRC - 6/5/12
10-12 Vehicle Care
How to Inspect the Engine Air
Cleaner/Filter
To inspect the air cleaner/filter,
remove the filter from the vehicle
and lightly shake the filter to release
loose dust and dirt. If the filter
remains covered with dirt, a new
filter is required.
To inspect or replace the engine air
cleaner/filter:
1. Open the hood. SeeHood on
page 10‑4.
2. Locate the air filter housing on the passenger side of the engine
compartment. See Engine
Compartment Overview on
page 10‑6.
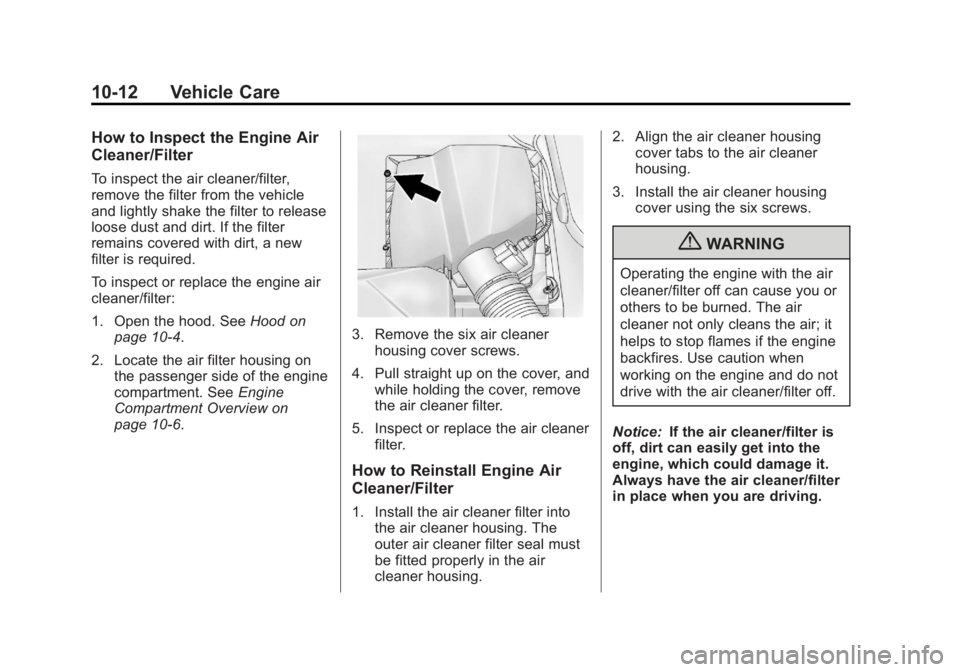
3. Remove the six air cleaner housing cover screws.
4. Pull straight up on the cover, and while holding the cover, remove
the air cleaner filter.
5. Inspect or replace the air cleaner filter.
How to Reinstall Engine Air
Cleaner/Filter
1. Install the air cleaner filter intothe air cleaner housing. The
outer air cleaner filter seal must
be fitted properly in the air
cleaner housing. 2. Align the air cleaner housing
cover tabs to the air cleaner
housing.
3. Install the air cleaner housing cover using the six screws.
{WARNING
Operating the engine with the air
cleaner/filter off can cause you or
others to be burned. The air
cleaner not only cleans the air; it
helps to stop flames if the engine
backfires. Use caution when
working on the engine and do not
drive with the air cleaner/filter off.
Notice: If the air cleaner/filter is
off, dirt can easily get into the
engine, which could damage it.
Always have the air cleaner/filter
in place when you are driving.