2017 CHEVROLET ORLANDO adding
[x] Cancel search: addingPage 47 of 372
Black plate (1,1)Chevrolet Orlando Owner Manual - 2013 - CRC - 6/5/12
Seats and Restraints 3-1
Seats and
Restraints
Head Restraints
Head Restraints . . . . . . . . . . . . . . . 3-2
Front Seats
Seat Adjustment . . . . . . . . . . . . . . 3-3
Power Seat Adjustment . . . . . . . 3-4
Reclining Seatbacks . . . . . . . . . . 3-4
Front Seat Armrest . . . . . . . . . . . . 3-6
Heated Front Seats . . . . . . . . . . . 3-6
Folding Seatback . . . . . . . . . . . . . 3-7
Rear Seats
Second Row Seats . . . . . . . . . . . 3-8
Third Row Seats . . . . . . . . . . . . . 3-12
Safety Belts
Safety Belts . . . . . . . . . . . . . . . . . . 3-15
How to Wear Safety BeltsProperly . . . . . . . . . . . . . . . . . . . . 3-16 Lap-Shoulder Belt . . . . . . . . . . . 3-17
Safety Belt Use During
Pregnancy . . . . . . . . . . . . . . . . . . 3-22
Safety Belt Extender . . . . . . . . . 3-22
Safety System Check . . . . . . . . 3-23
Safety Belt Care . . . . . . . . . . . . . 3-23
Replacing Safety Belt System Parts after a Crash . . . . . . . . . 3-23
Airbag System
Airbag System . . . . . . . . . . . . . . . 3-24
Where Are the Airbags? . . . . . 3-26
When Should an AirbagInflate? . . . . . . . . . . . . . . . . . . . . . 3-27
What Makes an Airbag Inflate? . . . . . . . . . . . . . . . . . . . . . 3-28
How Does an Airbag
Restrain? . . . . . . . . . . . . . . . . . . . 3-28
What Will You See after an Airbag Inflates? . . . . . . . . . . . . 3-29
Servicing the Airbag-Equipped Vehicle . . . . . . . . . . . . . . . . . . . . . 3-30 Adding Equipment to the
Airbag-Equipped Vehicle . . . 3-30
Airbag System Check . . . . . . . . 3-31
Replacing Airbag System Parts after a Crash . . . . . . . . . 3-31
Child Restraints
Older Children . . . . . . . . . . . . . . . 3-32
Infants and Young
Children . . . . . . . . . . . . . . . . . . . . 3-34
Child Restraint Systems . . . . . 3-36
Where to Put the Restraint . . . 3-38
Lower Anchors and Tethers for Children (LATCH
System) . . . . . . . . . . . . . . . . . . . . 3-39
Replacing LATCH System Parts After a Crash . . . . . . . . . 3-44
Securing Child Restraints (Rear Seat) . . . . . . . . . . . . . . . . . 3-44
Securing Child Restraints (Front Passenger Seat) . . . . 3-46
Page 76 of 372

Black plate (30,1)Chevrolet Orlando Owner Manual - 2013 - CRC - 6/5/12
3-30 Seats and Restraints
Additional windshield breakage may
also occur from the front outboard
passenger airbag.
.Airbags are designed to inflate
only once. After an airbag
inflates, you will need some new
parts for the airbag system.
If you do not get them, the
airbag system will not be there
to help protect you in another
crash. A new system will include
airbag modules and possibly
other parts. The service manual
for the vehicle covers the need
to replace other parts.
.The vehicle has a crash sensing
and diagnostic module which
records information after a
crash. SeeVehicle Data
Recording and Privacy on
page 13‑14 andEvent Data
Recorders on page 13‑14.
.Let only qualified technicians
work on the airbag systems.
Improper service can mean that an airbag system will not work
properly. See your dealer for
service.
Servicing the
Airbag-Equipped Vehicle
Airbags affect how the vehicle
should be serviced. There are parts
of the airbag system in several
places around the vehicle. Your
dealer and the service manual have
information about servicing the
vehicle and the airbag system. To
purchase a service manual, see
Service Publications Ordering
Information on page 13‑11.
{WARNING
For up to 10 seconds after the
vehicle is turned off and the
battery is disconnected, an airbag
can still inflate during improper
service. You can be injured if you
are close to an airbag when it
inflates. Avoid yellow connectors.
(Continued)
WARNING (Continued)
They are probably part of the
airbag system. Be sure to follow
proper service procedures, and
make sure the person performing
work for you is qualified to do so.
Adding Equipment to the
Airbag-Equipped Vehicle
Adding accessories that change the
vehicle's frame, bumper system,
height, front end or side sheet
metal, may keep the airbag system
from working properly. The
operation of the airbag system can
also be affected by changing or
moving any parts of the front seats,
safety belts, the airbag sensing and
diagnostic module, steering wheel,
instrument panel, roof-rail airbag
modules, ceiling headliner or pillar
garnish trim, overhead console,
front sensors, side impact sensors,
or airbag wiring.
Page 106 of 372

Black plate (6,1)Chevrolet Orlando Owner Manual - 2013 - CRC - 6/5/12
5-6 Instruments and Controls
Setting the 12/24 Hour Format
1. Press the CONFIG button andselect Time Settings.
2. Highlight 12/24 Hour Format.
3. Press the MENU knob to select the 12 hour or 24 hour display
format.
Power Outlets
The accessory power outlets can be
used to plug in electrical equipment,
such as a cell phone or MP3 player.
The vehicle has three accessory
power outlets: in front of the
cupholders, at the rear of the center
floor console and in the rear
cargo area.
Remove the cover to access, and
replace when not in use.
{WARNING
Power is always supplied to the
outlets. Do not leave electrical
equipment plugged in when the
vehicle is not in use because the
vehicle could catch fire and cause
injury or death.
Notice: Leaving electrical
equipment plugged in for an
extended period of time while the
vehicle is off will drain the
battery. Always unplug electrical
equipment when not in use and
do not plug in equipment that
exceeds the maximum 20 ampere
rating.
Certain accessory power plugs may
not be compatible with the
accessory power outlet and could
overload vehicle or adapter fuses.
If a problem is experienced, see
your dealer. When adding electrical equipment,
be sure to follow the proper
installation instructions included with
the equipment. See
Add-On
Electrical Equipment on page 9‑47.
Notice: Hanging heavy
equipment from the power outlet
can cause damage not covered
by the vehicle warranty. The
power outlets are designed for
accessory power plugs only, such
as cell phone charge cords.
Cigarette Lighter
For vehicles with a cigarette lighter,
it is located in the center floor
console.
The ignition must be turned to ACC/
ACCESSORY or ON/RUN.
To activate the cigarette lighter,
push it into the heating element and
let go. When the lighter is ready it
will pop back out.
Notice: Holding a cigarette lighter
in while it is heating does not let
the lighter back away from the
Page 129 of 372

Black plate (29,1)Chevrolet Orlando Owner Manual - 2013 - CRC - 6/5/12
Instruments and Controls 5-29
SERVICE VEHICLE SOON
This message displays if there is a
problem with the vehicle. Take the
vehicle to your dealer for service.
Starting the Vehicle
Messages
TURN STEERING WHEEL
TURN KEY OFF THEN ON
This message displays when the
steering column is locked. Try
turning the steering wheel while
turning the vehicle off and then back
on to unlock the steering column.
TURN STEERING WHEEL
START VEHICLE AGAIN
This message displays when you try
to start the vehicle, but the column
remains locked. Try turning the
steering wheel while starting the
vehicle to unlock the steering
column. If the vehicle still does not
start, turn the steering wheel the
other way, and try starting the
vehicle again.
Tire Messages
SERVICE TIRE MONITOR
SYSTEM
This message displays if there is a
problem with the Tire Pressure
Monitor System (TPMS). SeeTire
Pressure Monitor Operation on
page 10‑45 for more information.
TIRE LEARNING ACTIVE
This message displays when the
system is learning new tires. See
Tire Pressure Monitor Operation on
page 10‑45for more information.
TIRE PRESSURE LOW ADD
AIR TO TIRE
On vehicles with the Tire Pressure
Monitor System (TPMS), this
message displays when the
pressure in one or more of the
vehicle's tires is low.
There is also an icon with the
warning that will indicate the
location of the low tire. The low tire pressure warning light
will also come on. See
Tire
Pressure Light on page 5‑17.
If a tire pressure message appears
on the DIC, stop as soon as you
can. Inflate the tires by adding air
until the tire pressure is equal to the
values shown on the Tire and
Loading Information label. See Tires
on page 10‑37, Vehicle Load Limits
on page 9‑9, and Tire Pressure on
page 10‑43.
You can receive more than one tire
pressure message at a time. To
read the other messages that may
have been sent at the same time,
press the SET/CLR button. The DIC
also shows the tire pressure values.
See Driver Information Center (DIC)
on page 5‑21.
Transmission Messages
SERVICE TRANSMISSION
This message displays if there is a
problem with the transmission. See
your dealer.
Page 144 of 372

Black plate (2,1)Chevrolet Orlando Owner Manual - 2013 - CRC - 6/5/12
7-2 Infotainment System
To minimize taking your eyes off the
road while driving, do the following
while the vehicle is parked:
.Become familiar with the
operation and controls of the
audio system.
.Set up the tone, speaker
adjustments, and preset radio
stations.
For more information, see Defensive
Driving on page 9‑2. Notice:
Contact your dealer
before adding any equipment.
Adding audio or communication
equipment could interfere with
the operation of the engine, radio,
or other systems, and could
damage them. Follow federal
rules covering mobile radio and
telephone equipment.
The vehicle has Retained
Accessory Power (RAP). With RAP,
the audio system can be played
even after the ignition is turned off.
See Retained Accessory Power
(RAP) on page 9‑18 for more
information.
Theft-Deterrent Feature
The theft-deterrent feature works by
learning a portion of the Vehicle
Identification Number (VIN) to the
infotainment system. The
infotainment system does not
operate if it is stolen or moved to a
different vehicle.
Page 152 of 372
Black plate (10,1)Chevrolet Orlando Owner Manual - 2013 - CRC - 6/5/12
7-10 Infotainment System
SiriusXM Satellite Radio has a
wide variety of programming and
commercial-free music, coast to
coast, and in digital-quality sound.
A service fee is required to receive
the SiriusXM service. If SiriusXM
Service needs to be reactivated, the
radio will display "No Subscription
Please Renew" on channel XM1.
For more information, contact
SiriusXM at www.siriusxm.com or
call 1-866-635-2349 (U.S.) and
www.xmradio.ca or call
1-877-209-0079 (Canada).
Control Buttons
The buttons used to control the
SiriusXM radio are:
BAND:Press to turn the radio on
and choose between AM, FM,
and XM.
gorl: Press to go to the
previous or next channel. FAV:
Press to open the
favorites list.
1 to 6: Press to select a favorite.
MENU: Turn to select a channel.
INFO: Press to display additional
information that may be available
about the current song.
k(Play/Pause): Press to pause
time shifted content, if equipped.
Selecting the XM Band
Press the BAND button to choose
between the AM, FM, and XM
bands. The last channel played in
that band begins to play when that
band is selected.
XM Categories
XM channels are organized in
categories.
Removing or Adding Categories
Channels in a category that have
been removed can still be accessed
by using the
gorlbuttons,
or the MENU knob. To add or remove categories:
1. Press the CONFIG button.
2. Select Radio Settings.
3. Select XM Categories.
4. Turn the MENU knob to highlight
the category.
5. Press the MENU knob to remove or add the category.
Selecting an XM Channel
XM channels can be selected by
using
g,l, the MENU knob,
or the menu system.
Selecting a Channel Using
g
orl
.Press and releasegorlto
go to the previous or next
channel.
.Press and holdgorlto
scroll through the previous or
next channel until the channel is
reached.
Page 180 of 372
Black plate (6,1)Chevrolet Orlando Owner Manual - 2013 - CRC - 6/5/12
8-6 Climate Controls
Air Vents
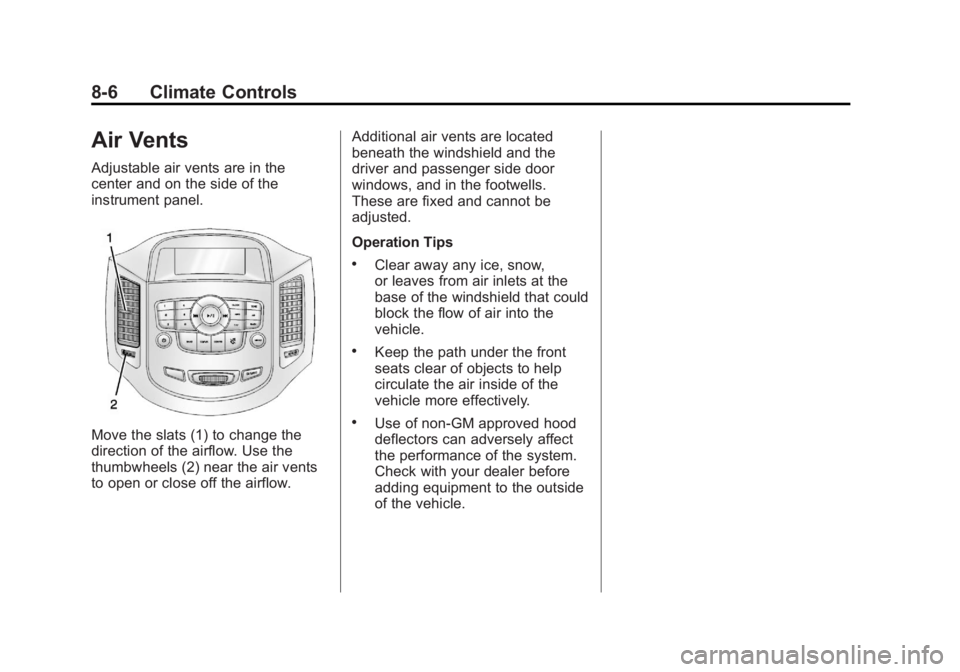
Adjustable air vents are in the
center and on the side of the
instrument panel.
Move the slats (1) to change the
direction of the airflow. Use the
thumbwheels (2) near the air vents
to open or close off the airflow.Additional air vents are located
beneath the windshield and the
driver and passenger side door
windows, and in the footwells.
These are fixed and cannot be
adjusted.
Operation Tips
.Clear away any ice, snow,
or leaves from air inlets at the
base of the windshield that could
block the flow of air into the
vehicle.
.Keep the path under the front
seats clear of objects to help
circulate the air inside of the
vehicle more effectively.
.Use of non-GM approved hood
deflectors can adversely affect
the performance of the system.
Check with your dealer before
adding equipment to the outside
of the vehicle.
Page 209 of 372
Black plate (29,1)Chevrolet Orlando Owner Manual - 2013 - CRC - 6/5/12
Driving and Operating 9-29
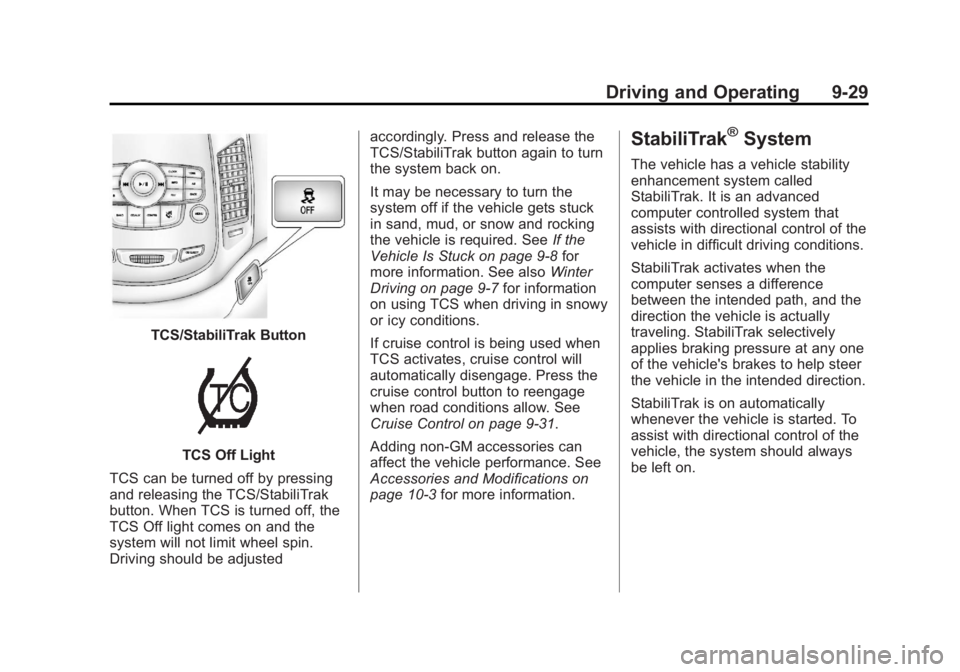
TCS/StabiliTrak Button
TCS Off Light
TCS can be turned off by pressing
and releasing the TCS/StabiliTrak
button. When TCS is turned off, the
TCS Off light comes on and the
system will not limit wheel spin.
Driving should be adjusted accordingly. Press and release the
TCS/StabiliTrak button again to turn
the system back on.
It may be necessary to turn the
system off if the vehicle gets stuck
in sand, mud, or snow and rocking
the vehicle is required. See
If the
Vehicle Is Stuck on page 9‑8 for
more information. See also Winter
Driving on page 9‑7 for information
on using TCS when driving in snowy
or icy conditions.
If cruise control is being used when
TCS activates, cruise control will
automatically disengage. Press the
cruise control button to reengage
when road conditions allow. See
Cruise Control on page 9‑31.
Adding non‐GM accessories can
affect the vehicle performance. See
Accessories and Modifications on
page 10‑3 for more information.
StabiliTrak®System
The vehicle has a vehicle stability
enhancement system called
StabiliTrak. It is an advanced
computer controlled system that
assists with directional control of the
vehicle in difficult driving conditions.
StabiliTrak activates when the
computer senses a difference
between the intended path, and the
direction the vehicle is actually
traveling. StabiliTrak selectively
applies braking pressure at any one
of the vehicle's brakes to help steer
the vehicle in the intended direction.
StabiliTrak is on automatically
whenever the vehicle is started. To
assist with directional control of the
vehicle, the system should always
be left on.