2017 CHEVROLET ORLANDO hood release
[x] Cancel search: hood releasePage 9 of 372

Black plate (3,1)Chevrolet Orlando Owner Manual - 2013 - CRC - 6/5/12
In Brief 1-3
1.Air Vents on page 8‑6.
2. Turn and Lane-Change Lever. See Turn and Lane-Change
Signals on page 6‑4.
Headlamp High/Low-Beam
Changer on page 6‑2.
3. Instrument Cluster on page 5‑8.
4. Windshield Wiper/Washer on
page 5‑3.
Rear Window Wiper/Washer on
page 5‑4.
5. Infotainment on page 7‑1.
6. Infotainment Display.
7. Light Sensor. See Automatic
Headlamp System on page 6‑3.
8. Instrument Panel Storage on
page 4‑1.
USB Port and Auxiliary Input
Jack (Inside Instrument Panel
Storage). See Auxiliary Devices
on page 7‑15
9. CD Player on page 7‑13. 10. TCS/StabiliTrak Button. See
StabiliTrak®System on
page 9‑29.
11. Exterior Lamp Controls on
page 6‑1.
Instrument Panel Illumination
Control on page 6‑6.
Front Fog Lamps on page 6‑5.
12. Hood Release. See Hood on
page 10‑4.
13. Front Storage on page 4‑1.
14. Data Link Connector (DLC) (Out of View). See Malfunction
Indicator Lamp on page 5‑12.
15. Cruise Control on page 9‑31.
16. Steering Wheel Adjustment on
page 5‑2.
17. Horn on page 5‑3.
18. Steering Wheel Controls on
page 5‑3.
19. Power Door Locks on
page 2‑7. 20.
Heated Front Seats on
page 3‑6 (If Equipped).
21. Climate Control Systems on
page 8‑1.
Automatic Climate Control
System on page 8‑3.
22. Shift Lever. See Automatic
Transmission on page 9‑21 or
Manual Transmission on
page 9‑24.
23. Parking Brake on page 9‑27.
24. Power Outlets on page 5‑6.
25. Hazard Warning Flashers on
page 6‑4.
26. Passenger Safety Belt Reminder Light. See Safety
Belt Reminders on page 5‑10.
Page 125 of 372
Black plate (25,1)Chevrolet Orlando Owner Manual - 2013 - CRC - 6/5/12
Instruments and Controls 5-25
Battery Voltage and
Charging Messages
BATTERY SAVER ACTIVE
This message displays when the
vehicle has detected that the battery
voltage is dropping beyond a
reasonable point. The battery saver
system starts reducing features of
the vehicle that may be noticed. At
the point that features are disabled,
this message displays. Turn off
unnecessary accessories to allow
the battery to recharge.
LOW BATTERY
This message is displayed when the
battery voltage is low. SeeBattery
on page 10‑21.
SERVICE BATTERY
CHARGING SYSTEM
This message is displayed when
there is a fault in the battery
charging system. Take the vehicle to
your dealer for service.
Brake System Messages
BRAKE FLUID LOW
This message is displayed when the
brake fluid level is low. See Brake
Fluid on page 10‑20.
RELEASE PARKING BRAKE
This message is displayed as a
reminder that the parking brake is
on. Release it before you attempt to
drive.
Compass Messages
CAL
This message is displayed when the
compass needs to be calibrated.
See Compass on page 5‑5.
– –
Two dashes will be displayed if the
compass needs service. See your
dealer for service.
Cruise Control Messages
APPLY BRAKE BEFORE
CRUISE
If this message displays when
attempting to activate cruise control,
apply the brake pedal and try again.
CRUISE SET TO XXX
This message displays when the
cruise control is set and shows the
speed it was set to. See Cruise
Control on page 9‑31.
Door Ajar Messages
DOOR(S) OPEN
A vehicle symbol will be displayed
on the DIC showing which door is
open along with this message.
Close the door completely.
HOOD OPEN
This message will display when the
hood is open. Close the hood
completely.
Page 197 of 372

Black plate (17,1)Chevrolet Orlando Owner Manual - 2013 - CRC - 6/5/12
Driving and Operating 9-17
The vehicle has a
Computer-Controlled Cranking
System. This feature assists in
starting the engine and protects
components. If the ignition key is
turned to the START position,
and then released when the
engine begins cranking, the
engine will continue cranking for
a few seconds or until the
vehicle starts. If the engine does
not start and the key is held in
START for many seconds,
cranking will be stopped after
15 seconds to prevent cranking
motor damage. To prevent gear
damage, this system also
prevents cranking if the engine
is already running. Engine
cranking can be stopped by
turning the ignition switch to
ACC/ACCESSORY or
LOCK/OFF.Notice:
Cranking the engine for
long periods of time, by returning
the key to the START position
immediately after cranking has
ended, can overheat and damage
the cranking motor, and drain the
battery. Wait at least 15 seconds
between each try, to let the
cranking motor cool down.
2. If the engine does not start after
five to 10 seconds, especially in
very cold weather (below −18°C
or 0°F), it could be flooded with
too much gasoline. Try pushing
the accelerator pedal all the way
to the floor and holding it there
as you hold the key in START
for up to a maximum of
15 seconds. Wait at least
15 seconds between each try, to
allow the cranking motor to cool
down. When the engine starts,
let go of the key or button, and
the accelerator. If the vehicle
starts briefly but then stops
again, do the same thing. This
clears the extra gasoline from
the engine. Do not race the engine immediately after starting
it. Operate the engine and
transmission gently until the oil
warms up and lubricates all
moving parts.
Engine Heater
The engine heater can help in cold
weather conditions at or below
−18°C (0°F) for easier starting and
better fuel economy during engine
warm-up. Plug in the heater at least
four hours before starting the
vehicle. An internal thermostat in
the plug-end of the cord will prevent
engine heater operation at
temperatures above
−18°C (0°F).
To Use The Engine Heater
1. Turn off the engine.
2. Open the hood and unwrap the
electrical cord stored near the air
cleaner.
3. Plug it into a normal, grounded 110-volt AC outlet.
Page 232 of 372
Black plate (4,1)Chevrolet Orlando Owner Manual - 2013 - CRC - 6/5/12
10-4 Vehicle Care
Vehicle Checks
Doing Your Own
Service Work
{WARNING
It can be dangerous to work on
your vehicle if you do not have
the proper knowledge, service
manual, tools, or parts. Always
follow owner manual procedures
and consult the service manual
for your vehicle before doing any
service work.
If doing some of your own service
work, use the proper service
manual. It tells you much more
about how to service the vehicle
than this manual can. To order the
proper service manual, see Service
Publications Ordering Information
on page 13‑11. This vehicle has an airbag system.
Before attempting to do your own
service work, see
Servicing the
Airbag-Equipped Vehicle on
page 3‑30.
Keep a record with all parts receipts
and list the mileage and the date of
any service work performed. See
Maintenance Records on
page 11‑14.
Notice: Even small amounts of
contamination can cause damage
to vehicle systems. Do not allow
contaminants to contact the
fluids, reservoir caps,
or dipsticks.
Hood
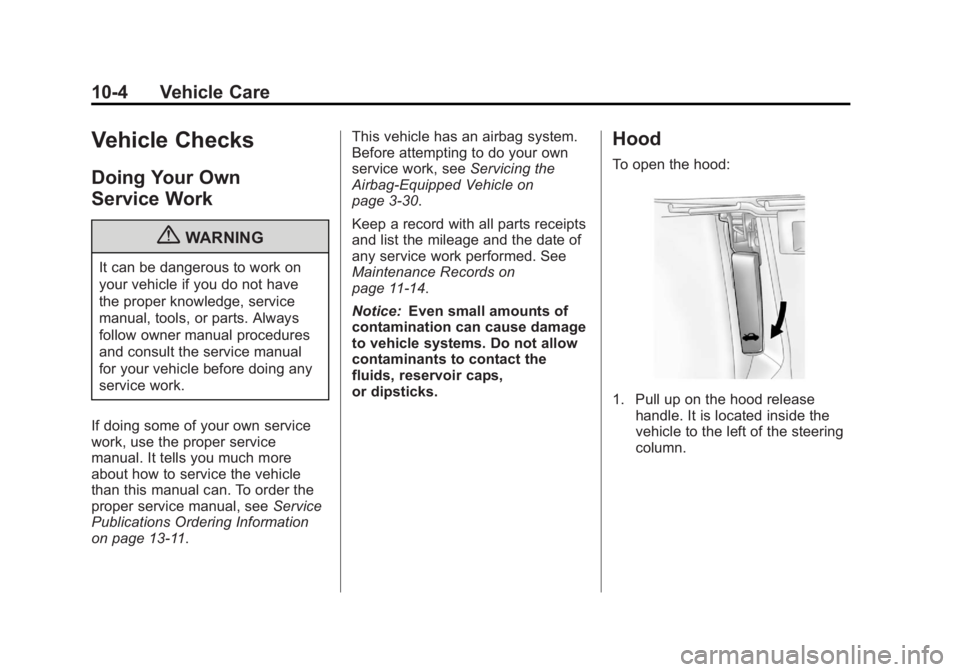
To open the hood:
1. Pull up on the hood release handle. It is located inside the
vehicle to the left of the steering
column.
Page 233 of 372
Black plate (5,1)Chevrolet Orlando Owner Manual - 2013 - CRC - 6/5/12
Vehicle Care 10-5
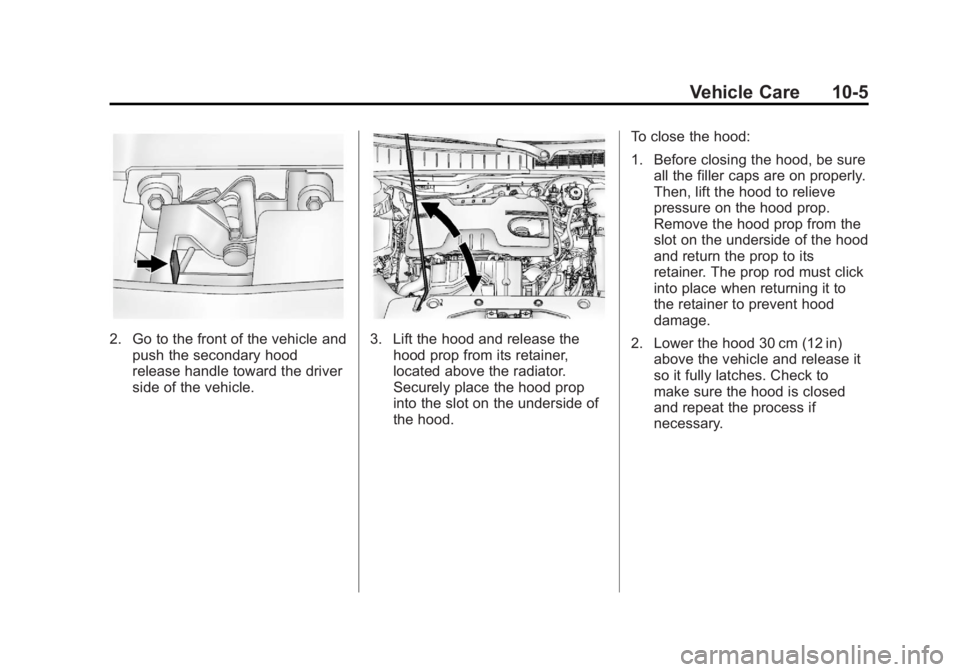
2. Go to the front of the vehicle andpush the secondary hood
release handle toward the driver
side of the vehicle.3. Lift the hood and release thehood prop from its retainer,
located above the radiator.
Securely place the hood prop
into the slot on the underside of
the hood. To close the hood:
1. Before closing the hood, be sure
all the filler caps are on properly.
Then, lift the hood to relieve
pressure on the hood prop.
Remove the hood prop from the
slot on the underside of the hood
and return the prop to its
retainer. The prop rod must click
into place when returning it to
the retainer to prevent hood
damage.
2. Lower the hood 30 cm (12 in) above the vehicle and release it
so it fully latches. Check to
make sure the hood is closed
and repeat the process if
necessary.
Page 240 of 372
Black plate (12,1)Chevrolet Orlando Owner Manual - 2013 - CRC - 6/5/12
10-12 Vehicle Care
How to Inspect the Engine Air
Cleaner/Filter
To inspect the air cleaner/filter,
remove the filter from the vehicle
and lightly shake the filter to release
loose dust and dirt. If the filter
remains covered with dirt, a new
filter is required.
To inspect or replace the engine air
cleaner/filter:
1. Open the hood. SeeHood on
page 10‑4.
2. Locate the air filter housing on the passenger side of the engine
compartment. See Engine
Compartment Overview on
page 10‑6.
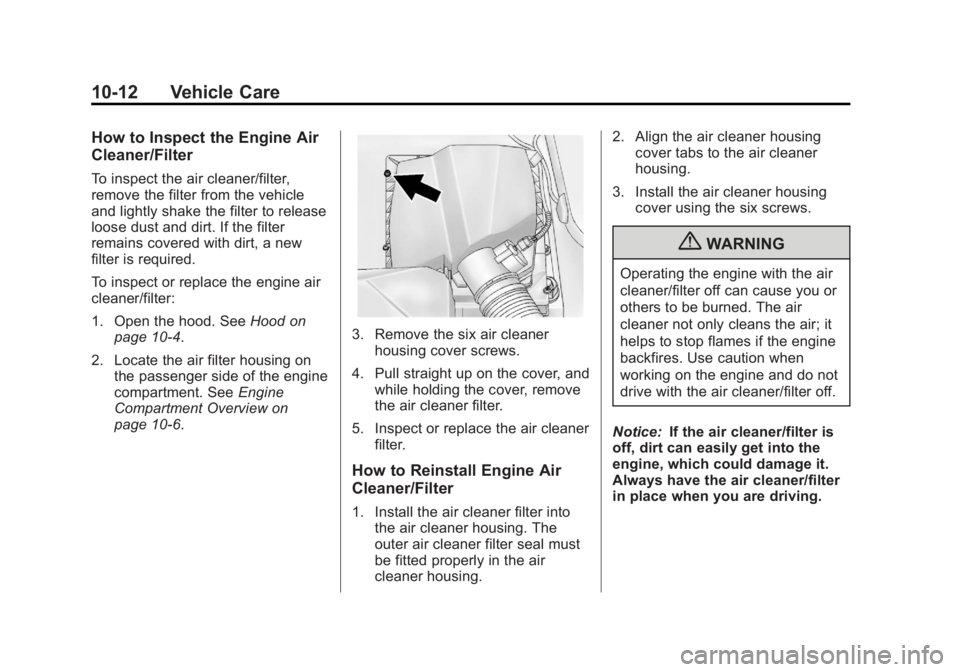
3. Remove the six air cleaner housing cover screws.
4. Pull straight up on the cover, and while holding the cover, remove
the air cleaner filter.
5. Inspect or replace the air cleaner filter.
How to Reinstall Engine Air
Cleaner/Filter
1. Install the air cleaner filter intothe air cleaner housing. The
outer air cleaner filter seal must
be fitted properly in the air
cleaner housing. 2. Align the air cleaner housing
cover tabs to the air cleaner
housing.
3. Install the air cleaner housing cover using the six screws.
{WARNING
Operating the engine with the air
cleaner/filter off can cause you or
others to be burned. The air
cleaner not only cleans the air; it
helps to stop flames if the engine
backfires. Use caution when
working on the engine and do not
drive with the air cleaner/filter off.
Notice: If the air cleaner/filter is
off, dirt can easily get into the
engine, which could damage it.
Always have the air cleaner/filter
in place when you are driving.
Page 253 of 372
Black plate (25,1)Chevrolet Orlando Owner Manual - 2013 - CRC - 6/5/12
Vehicle Care 10-25
Headlamp Aiming
Headlamp aim has been preset and
should need no further adjustment.
If the vehicle is damaged in a crash,
the headlamp aim may be affected.
If adjustment to the headlamps is
necessary, see your dealer.
Bulb Replacement
For the proper type of replacement
bulbs, seeReplacement Bulbs on
page 10‑30.
For any bulb‐changing procedure
not listed in this section, contact
your dealer.
Halogen Bulbs
{WARNING
Halogen bulbs have pressurized
gas inside and can burst if you
drop or scratch the bulb. You or
others could be injured. Be sure
to read and follow the instructions
on the bulb package.
Headlamps, Front Turn
Signal, Sidemarker, and
Parking Lamps
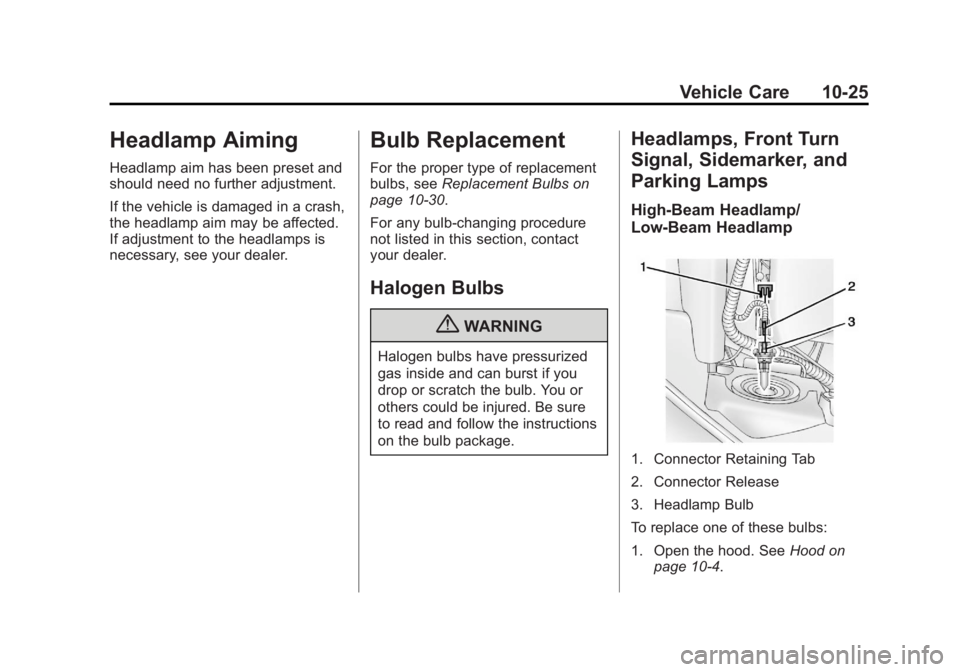
High-Beam Headlamp/
Low-Beam Headlamp
1. Connector Retaining Tab
2. Connector Release
3. Headlamp Bulb
To replace one of these bulbs:
1. Open the hood. See Hood on
page 10‑4.
Page 254 of 372
Black plate (26,1)Chevrolet Orlando Owner Manual - 2013 - CRC - 6/5/12
10-26 Vehicle Care
2. Remove the connectorretaining tab (1).
3. Disconnect the wiring harness connector from the bulb (3) by
pressing the connector
release (2) and pulling
straight back.
4. Remove the bulb (3) from the headlamp assembly by turning
counterclockwise and pulling
straight back.
5. Install the new bulb in the headlamp assembly by turning
clockwise.
6. Install the wiring harness connector to the bulb. Be sure
the connector release (2) locks
into place.
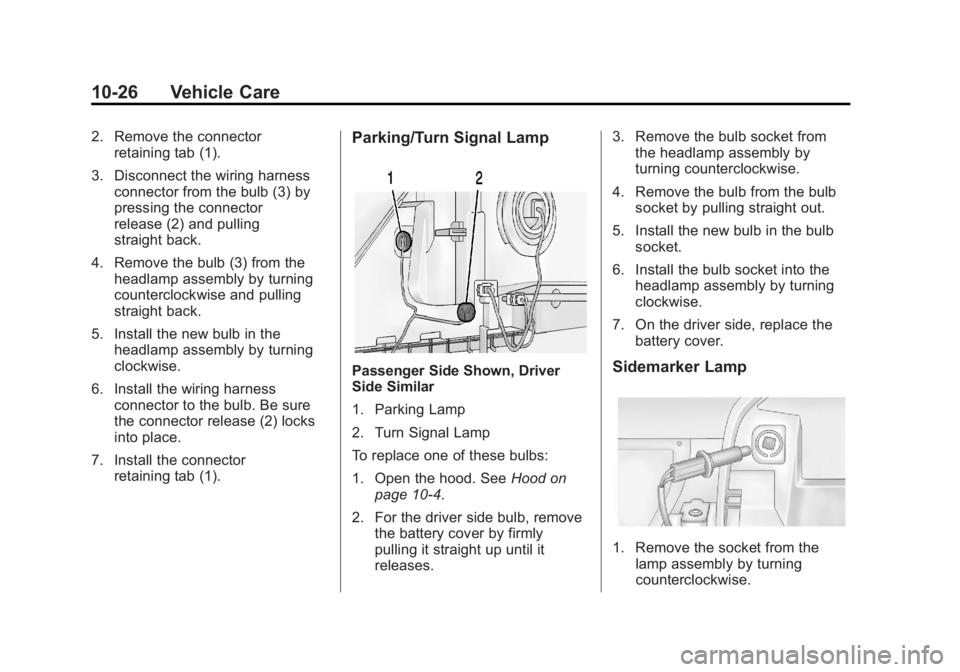
7. Install the connector retaining tab (1).Parking/Turn Signal Lamp
Passenger Side Shown, Driver
Side Similar
1. Parking Lamp
2. Turn Signal Lamp
To replace one of these bulbs:
1. Open the hood. See Hood on
page 10‑4.
2. For the driver side bulb, remove the battery cover by firmly
pulling it straight up until it
releases. 3. Remove the bulb socket from
the headlamp assembly by
turning counterclockwise.
4. Remove the bulb from the bulb socket by pulling straight out.
5. Install the new bulb in the bulb socket.
6. Install the bulb socket into the headlamp assembly by turning
clockwise.
7. On the driver side, replace the battery cover.Sidemarker Lamp
1. Remove the socket from thelamp assembly by turning
counterclockwise.