2017 CHEVROLET ORLANDO clock
[x] Cancel search: clockPage 21 of 372
Black plate (15,1)Chevrolet Orlando Owner Manual - 2013 - CRC - 6/5/12
In Brief 1-15
Storing a Favorite Station
Stations from all bands can be
stored in the favorite lists in any
order. Up to six stations can be
stored in each favorite page and the
number of available favorite pages
can be set.
To store the station to a position in
the list, press the corresponding
numeric button 1 to 6 until a beep is
heard.
For more information, see“Storing a
Station as a Favorite” inAM-FM
Radio on page 7‑7.
Setting the Clock
Adjusting the Time
1. Press the CONFIG button and select Time Settings.
2. Select Set Time.
3. Turn the MENU knob to adjust the highlighted number.
4. Press the MENU knob to select the next number. 5. To save the time and return to
the Time Settings menu, press
the BACK button at any time or
press the MENU knob after
adjusting the minutes.
Setting the 12/24 Hour Format
1. Press the CONFIG button and select Time Settings.
2. Highlight 12/24 Hour Format.
3. Press the MENU knob to select the 12 hour or 24 hour display
format.
For more information, see Clock on
page 5‑5.Satellite Radio
Vehicles with a SiriusXM® satellite
radio tuner and a valid SiriusXM
satellite radio subscription can
receive SiriusXM programming.
SiriusXM Satellite Radio
Service
SiriusXM is a satellite radio service
based in the 48 contiguous United
States and 10 Canadian provinces.
SiriusXM satellite radio has a wide
variety of programming and
commercial-free music, coast to
coast, and in digital-quality sound.
A fee is required to receive the
SiriusXM service.
Refer to:
.www.siriusxm.com or call
1-866-635-2349 (U.S.).
.www.xmradio.ca or call
1-877-209-0079 (Canada).
See Satellite Radio on page 7‑9.
Page 101 of 372
Black plate (1,1)Chevrolet Orlando Owner Manual - 2013 - CRC - 6/5/12
Instruments and Controls 5-1
Instruments and
Controls
Controls
Steering Wheel Adjustment . . . 5-2
Steering Wheel Controls . . . . . . 5-3
Horn . . . . . . . . . . . . . . . . . . . . . . . . . . 5-3
Windshield Wiper/Washer . . . . . 5-3
Rear Window Wiper/Washer . . . . . . . . . . . . . . . . . . . . . . 5-4
Compass . . . . . . . . . . . . . . . . . . . . . 5-5
Clock . . . . . . . . . . . . . . . . . . . . . . . . . 5-5
Power Outlets . . . . . . . . . . . . . . . . . 5-6
Cigarette Lighter . . . . . . . . . . . . . . 5-6
Ashtrays . . . . . . . . . . . . . . . . . . . . . . 5-7
Warning Lights, Gauges, and
Indicators
Warning Lights, Gauges, and Indicators . . . . . . . . . . . . . . . . . . . . 5-7
Instrument Cluster . . . . . . . . . . . . 5-8
Speedometer . . . . . . . . . . . . . . . . . 5-9
Odometer . . . . . . . . . . . . . . . . . . . . . 5-9
Tachometer . . . . . . . . . . . . . . . . . . . 5-9
Fuel Gauge . . . . . . . . . . . . . . . . . . . 5-9
Engine Coolant Temperature
Gauge . . . . . . . . . . . . . . . . . . . . . . 5-10 Safety Belt Reminders . . . . . . . 5-10
Airbag Readiness Light . . . . . . 5-11
Charging System Light . . . . . . . 5-11
Malfunction
Indicator Lamp . . . . . . . . . . . . . 5-12
Service Vehicle Soon Light . . . . . . . . . . . . . . . . . . . . . . . 5-14
Brake System Warning Light . . . . . . . . . . . . . . . . . . . . . . . 5-14
Antilock Brake System (ABS) Warning Light . . . . . . . . . . . . . . 5-15
Up-Shift Light . . . . . . . . . . . . . . . . 5-16
Power Steering Warning Light . . . . . . . . . . . . . . . . . . . . . . . 5-16
Traction Off Light . . . . . . . . . . . . 5-16
StabiliTrak
®OFF Light . . . . . . . 5-17
Traction Control System (TCS)/StabiliTrak
®Light . . . . 5-17
Tire Pressure Light . . . . . . . . . . 5-17
Engine Oil Pressure Light . . . . 5-18
Low Fuel Warning Light . . . . . . 5-18
Security Light . . . . . . . . . . . . . . . . 5-19
Reduced Engine Power Light . . . . . . . . . . . . . . . . . . . . . . . 5-19
High-Beam On Light . . . . . . . . . 5-19
Daytime Running Lamps (DRL) Indicator Light . . . . . . . 5-20
Front Fog Lamp Light . . . . . . . . 5-20 Lamps On Reminder . . . . . . . . . 5-20
Cruise Control Light . . . . . . . . . 5-20
Door Ajar Light . . . . . . . . . . . . . . 5-21
Information Displays
Driver Information
Center (DIC) . . . . . . . . . . . . . . . 5-21
Vehicle Messages
Vehicle Messages . . . . . . . . . . . 5-24
Battery Voltage and ChargingMessages . . . . . . . . . . . . . . . . . . 5-25
Brake System Messages . . . . 5-25
Compass Messages . . . . . . . . . 5-25
Cruise Control Messages . . . . 5-25
Door Ajar Messages . . . . . . . . . 5-25
Engine Cooling System Messages . . . . . . . . . . . . . . . . . . 5-26
Engine Oil Messages . . . . . . . . 5-26
Engine Power Messages . . . . 5-27
Fuel System Messages . . . . . . 5-27
Key and Lock Messages . . . . . 5-27
Lamp Messages . . . . . . . . . . . . . 5-27
Object Detection System Messages . . . . . . . . . . . . . . . . . . 5-28
Ride Control System Messages . . . . . . . . . . . . . . . . . . 5-28
Airbag System Messages . . . . 5-28
Security Messages . . . . . . . . . . 5-28
Page 105 of 372
Black plate (5,1)Chevrolet Orlando Owner Manual - 2013 - CRC - 6/5/12
Instruments and Controls 5-5
ON:Press the upper portion of the
button for continuous rear window
wipes.
OFF: The rear wiper turns off when
the button is returned to the middle
position.
INT (Intermittent Rear Wipes):
Press the lower portion of the button
to set a delay between wipes.
a(Rear Washer): Push the
windshield wiper lever forward to
spray washer fluid on the rear
window. The lever automatically
returns to its original position when
released.
The windshield washer reservoir is
used for the windshield and the rear
window. Check the fluid level in the
reservoir if either washer is not
working. See Washer Fluid on
page 10‑18.
Compass
The vehicle may have a compass
display in the Driver Information
Center (DIC). The compass receives its heading and other information
from the Global Positioning
System (GPS) antenna, StabiliTrak,
and vehicle speed information.
Avoid covering the GPS antenna,
located on the roof, for long periods
of time with objects that may
interfere with the antenna's ability to
receive a satellite signal. The
compass system is designed to
operate for a certain number of
miles or degrees of turn before
needing a signal from the GPS
satellites. When the compass
display shows CAL, drive the
vehicle for a short distance in an
open area where it can receive a
GPS signal. The compass system
will automatically determine when
the GPS signal is restored and
provide a heading again. See
Compass Messages on page 5‑25
for more information on the
messages that may be displayed for
the compass.
Clock
The infotainment system controls
are used to access the time and
date settings through the menu
system. See
Operation on page 7‑4
for information about how to use the
menu system.
Setting the Time
1. Press the CONFIG button and select Time Settings.
2. Select Set Time.
3. Turn the MENU knob to adjust the highlighted number.
4. Press the MENU knob to select the next number.
5. To save the time and return to the Time Settings menu, press
the BACK button at any time or
press the MENU knob after
adjusting the minutes.
Page 145 of 372
Black plate (3,1)Chevrolet Orlando Owner Manual - 2013 - CRC - 6/5/12
Infotainment System 7-3
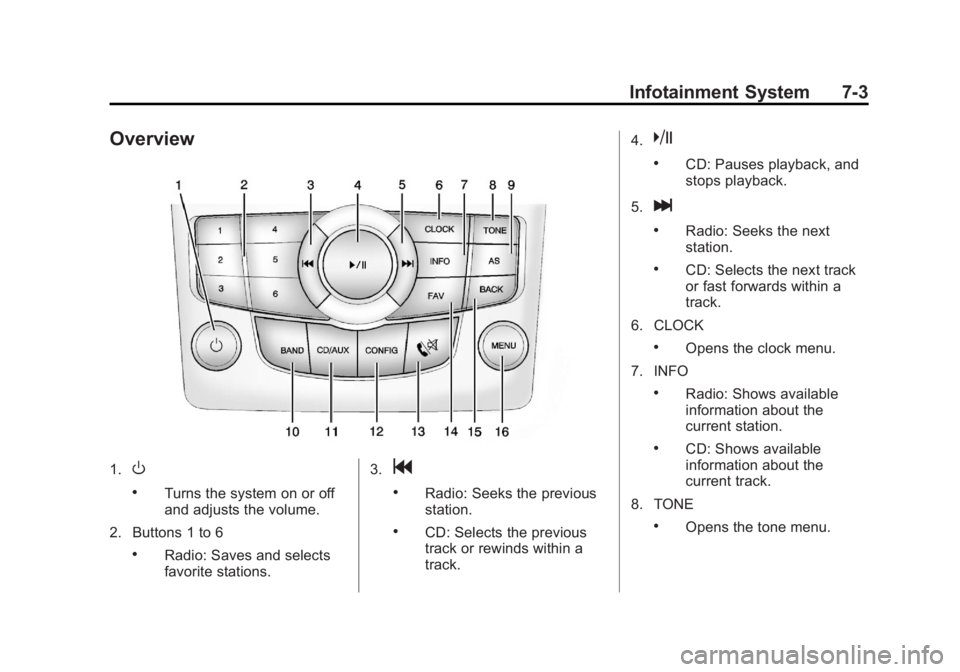
Overview
1.O
.Turns the system on or off
and adjusts the volume.
2. Buttons 1 to 6
.Radio: Saves and selects
favorite stations. 3.
g
.Radio: Seeks the previous
station.
.CD: Selects the previous
track or rewinds within a
track.4.
k
.CD: Pauses playback, and
stops playback.
5.
l
.Radio: Seeks the next
station.
.CD: Selects the next track
or fast forwards within a
track.
6. CLOCK
.Opens the clock menu.
7. INFO
.Radio: Shows available
information about the
current station.
.CD: Shows available
information about the
current track.
8. TONE
.Opens the tone menu.
Page 177 of 372

Black plate (3,1)Chevrolet Orlando Owner Manual - 2013 - CRC - 6/5/12
Climate Controls 8-3
Heated Seats (If Equipped):Press
to turn the heated seats on or off.
See Heated Front Seats on
page 3‑6
Automatic Climate
Control System
The heating, cooling, and ventilation
for the vehicle can be controlled
with this system.
1. Temperature Control
2. Rear Window Defogger
3. AUTO (Automatic Operation) 4. Defrost
5. Fan Control
6. Driver and Passenger Heated
Seats (If Equipped)
7. Power
8. Recirculation
9. MODE (Air Delivery Mode)
10. AQS (Air Quality Sensor)
11. Air Conditioning
Automatic Operation
The system automatically controls
the fan speed, air delivery, air
conditioning, and recirculation in
order to heat or cool the vehicle to
the desired temperature.
When the indicator light is on, the
system is in full automatic operation.
If the air delivery mode or fan
setting is manually adjusted, the
auto indicator turns off and displays
will show the selected settings. To place the system in automatic
mode do the following:
1. Press AUTO.
2. Set the temperature. Allow the
system time to stabilize. Then
adjust the temperature as
needed for best comfort.
English units can be changed to
metric units through the Driver
Information Center (DIC). See
Vehicle Personalization on
page 5‑30.
Manual Operation
O(Power): Press to turn the
climate control system on or off.
A(Fan Control): Turn the knob
clockwise or counterclockwise to
increase or decrease the fan speed.
The selected fan speed is indicated
by a number on the display screen.
Press AUTO to return to automatic
operation.
Page 221 of 372
Black plate (41,1)Chevrolet Orlando Owner Manual - 2013 - CRC - 6/5/12
Driving and Operating 9-41
The tethered fuel cap is behind the
fuel door on the vehicle's passenger
side. Turn the fuel cap
counterclockwise to remove. While
refueling, hang the tethered fuel cap
from the disk on the end of the fuel
cap to the mating feature on the fuel
door hinge. Reinstall the cap by
turning it clockwise until it clicks.
Do not top off or overfill the tank.
Wait a few seconds before removing
the nozzle. Clean fuel from painted
surfaces as soon as possible. See
Exterior Care on page 10‑78.
{WARNING
If a fire starts while you are
refueling, do not remove the
nozzle. Shut off the flow of fuel by
shutting off the pump or by
notifying the station attendant.
Leave the area immediately.Notice:
If a new fuel cap is
needed, be sure to get the right
type of cap from your dealer. The
wrong type of fuel cap might not
fit properly, might cause the
malfunction indicator lamp to
light, and could damage the fuel
tank and emissions system. See
Malfunction Indicator Lamp on
page 5‑12.
Filling a Portable Fuel
Container
{WARNING
Filling a portable fuel container
while it is in the vehicle can cause
fuel vapors that can ignite either
by static electricity or other
means. You or others could be
badly burned and the vehicle
could be damaged. Always:
.Use approved fuel
containers.
(Continued)
WARNING (Continued)
.Remove container from
vehicle, trunk, or pickup bed
before filling.
.Place container on the
ground.
.Place the nozzle inside the fill
opening of the container
before dispensing fuel, and
keep it in contact with the fill
opening until filling is
complete.
.Do not smoke while
pumping fuel.
Page 244 of 372
Black plate (16,1)Chevrolet Orlando Owner Manual - 2013 - CRC - 6/5/12
10-16 Vehicle Care
Notice:In cold weather, water
can freeze and crack the engine,
radiator, heater core and other
parts. Use the recommended
coolant and the proper coolant
mixture.
1. Remove the coolant surge tank pressure cap when the cooling
system, including the coolant
surge tank pressure cap and
upper radiator hose, is no
longer hot.
Turn the pressure cap slowly
counterclockwise about
one-quarter of a turn. If you hear
a hiss, wait for that to stop. This
will allow any pressure still left to
be vented out the
discharge hose. 2. Keep turning the pressure cap
slowly, and remove it.
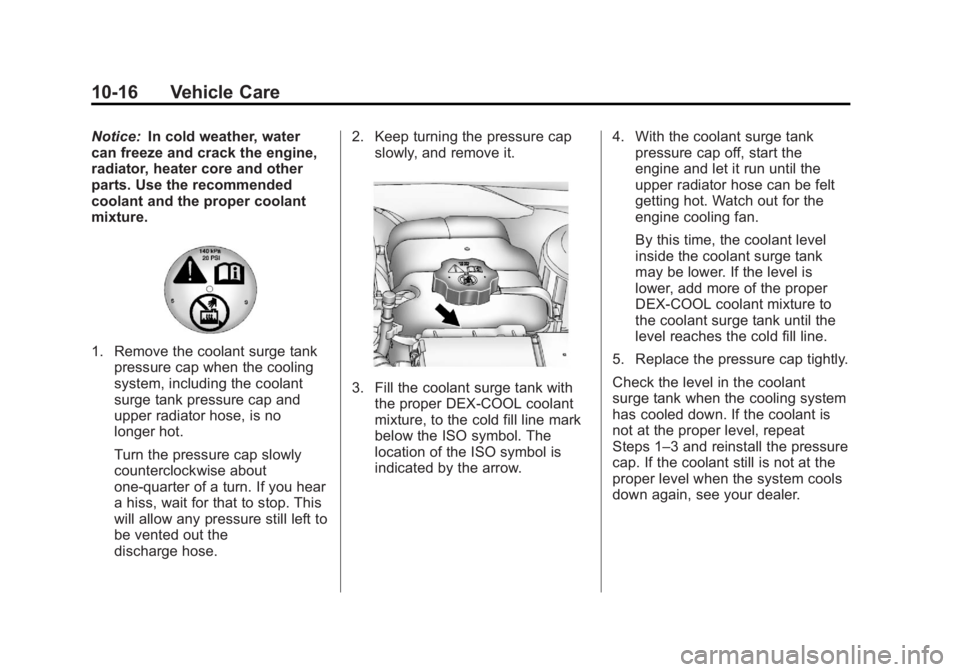
3. Fill the coolant surge tank withthe proper DEX-COOL coolant
mixture, to the cold fill line mark
below the ISO symbol. The
location of the ISO symbol is
indicated by the arrow. 4. With the coolant surge tank
pressure cap off, start the
engine and let it run until the
upper radiator hose can be felt
getting hot. Watch out for the
engine cooling fan.
By this time, the coolant level
inside the coolant surge tank
may be lower. If the level is
lower, add more of the proper
DEX-COOL coolant mixture to
the coolant surge tank until the
level reaches the cold fill line.
5. Replace the pressure cap tightly.
Check the level in the coolant
surge tank when the cooling system
has cooled down. If the coolant is
not at the proper level, repeat
Steps 1–3 and reinstall the pressure
cap. If the coolant still is not at the
proper level when the system cools
down again, see your dealer.
Page 254 of 372
Black plate (26,1)Chevrolet Orlando Owner Manual - 2013 - CRC - 6/5/12
10-26 Vehicle Care
2. Remove the connectorretaining tab (1).
3. Disconnect the wiring harness connector from the bulb (3) by
pressing the connector
release (2) and pulling
straight back.
4. Remove the bulb (3) from the headlamp assembly by turning
counterclockwise and pulling
straight back.
5. Install the new bulb in the headlamp assembly by turning
clockwise.
6. Install the wiring harness connector to the bulb. Be sure
the connector release (2) locks
into place.
7. Install the connector retaining tab (1).Parking/Turn Signal Lamp
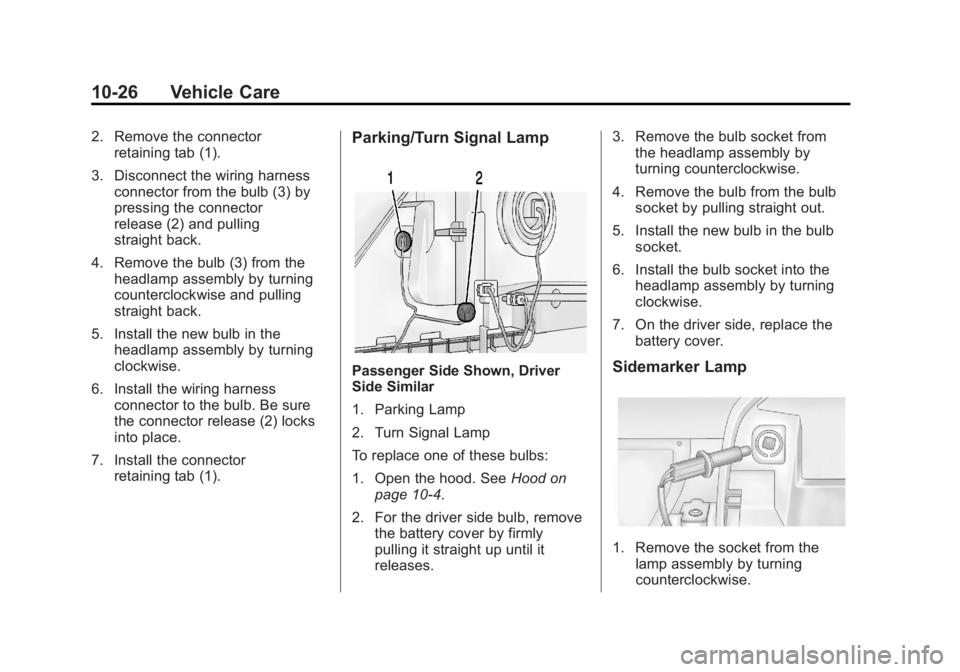
Passenger Side Shown, Driver
Side Similar
1. Parking Lamp
2. Turn Signal Lamp
To replace one of these bulbs:
1. Open the hood. See Hood on
page 10‑4.
2. For the driver side bulb, remove the battery cover by firmly
pulling it straight up until it
releases. 3. Remove the bulb socket from
the headlamp assembly by
turning counterclockwise.
4. Remove the bulb from the bulb socket by pulling straight out.
5. Install the new bulb in the bulb socket.
6. Install the bulb socket into the headlamp assembly by turning
clockwise.
7. On the driver side, replace the battery cover.Sidemarker Lamp
1. Remove the socket from thelamp assembly by turning
counterclockwise.