2017 CHEVROLET ORLANDO ECU
[x] Cancel search: ECUPage 258 of 372

Black plate (30,1)Chevrolet Orlando Owner Manual - 2013 - CRC - 6/5/12
10-30 Vehicle Care
2. Turn and pull the license platelamp assembly down.
3. Turn the bulb socket counterclockwise and pull the
bulb straight out of the socket.
4. Push the new bulb into the socket.
5. Install the bulb socket by turning clockwise into the license plate
lamp assembly.
6. Replace the license plate lamp assembly by using the two
screws to secure.
Replacement Bulbs
Exterior Lamp Bulb
Number
Back-Up Lamp 3157K
Front Fog Lamp H8LL
Front and Rear
Sidemarker Lamp 194 (W5W)
Front Parking Lamp 194 (W5W)
Front Turn
Signal Lamp 3457NAK
High‐Beam/Low‐
Beam Headlamp H13LL
Liftgate Taillamp 3057K
Rear Stop Lamp/
Taillamp 3057K
Rear Turn
Signal Lamp 5702NAK
For replacement bulbs not listed
here, contact your dealer.
Electrical System
Electrical System
Overload
The vehicle has fuses and circuit
breakers to protect against an
electrical system overload.
When the current electrical load is
too heavy, the circuit breaker opens
and closes, protecting the circuit
until the current load returns to
normal or the problem is fixed.
This greatly reduces the chance of
circuit overload and fire caused by
electrical problems.
Fuses and circuit breakers protect
power devices in the vehicle.
Replace a bad fuse with a new one
of the identical size and rating.
If there is a problem on the road and
a fuse needs to be replaced, the
same amperage fuse can be
borrowed. Choose some feature of
the vehicle that is not needed to use
and replace it as soon as possible.
Page 305 of 372
Black plate (77,1)Chevrolet Orlando Owner Manual - 2013 - CRC - 6/5/12
Vehicle Care 10-77
If the vehicle must be towed, a dolly
should be used. See "Dolly Towing"
that follows for more information.
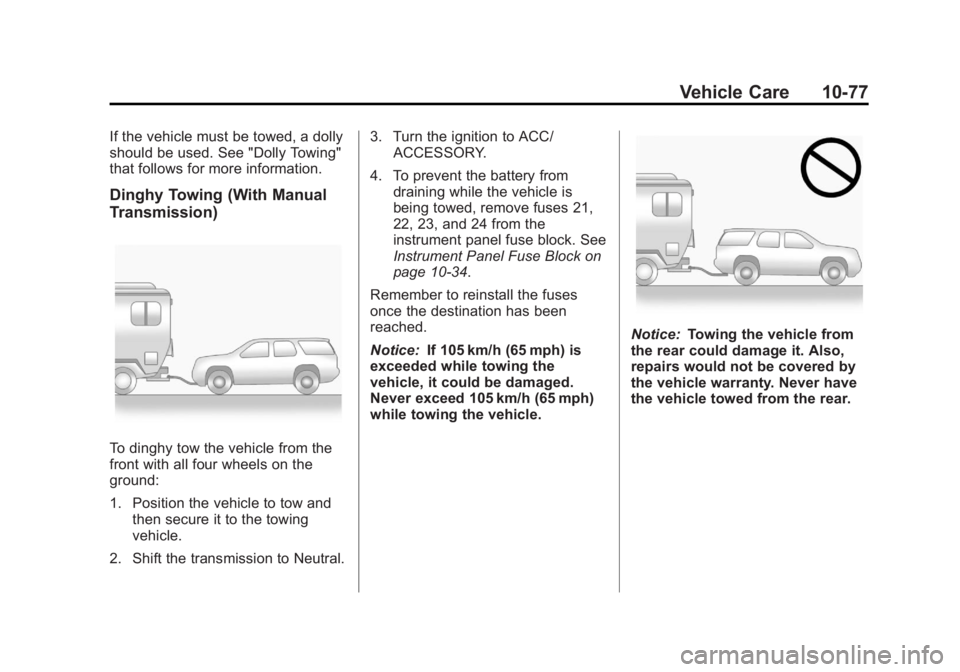
Dinghy Towing (With Manual
Transmission)
To dinghy tow the vehicle from the
front with all four wheels on the
ground:
1. Position the vehicle to tow andthen secure it to the towing
vehicle.
2. Shift the transmission to Neutral. 3. Turn the ignition to ACC/
ACCESSORY.
4. To prevent the battery from draining while the vehicle is
being towed, remove fuses 21,
22, 23, and 24 from the
instrument panel fuse block. See
Instrument Panel Fuse Block on
page 10‑34.
Remember to reinstall the fuses
once the destination has been
reached.
Notice: If 105 km/h (65 mph) is
exceeded while towing the
vehicle, it could be damaged.
Never exceed 105 km/h (65 mph)
while towing the vehicle.
Notice: Towing the vehicle from
the rear could damage it. Also,
repairs would not be covered by
the vehicle warranty. Never have
the vehicle towed from the rear.
Page 306 of 372
Black plate (78,1)Chevrolet Orlando Owner Manual - 2013 - CRC - 6/5/12
10-78 Vehicle Care
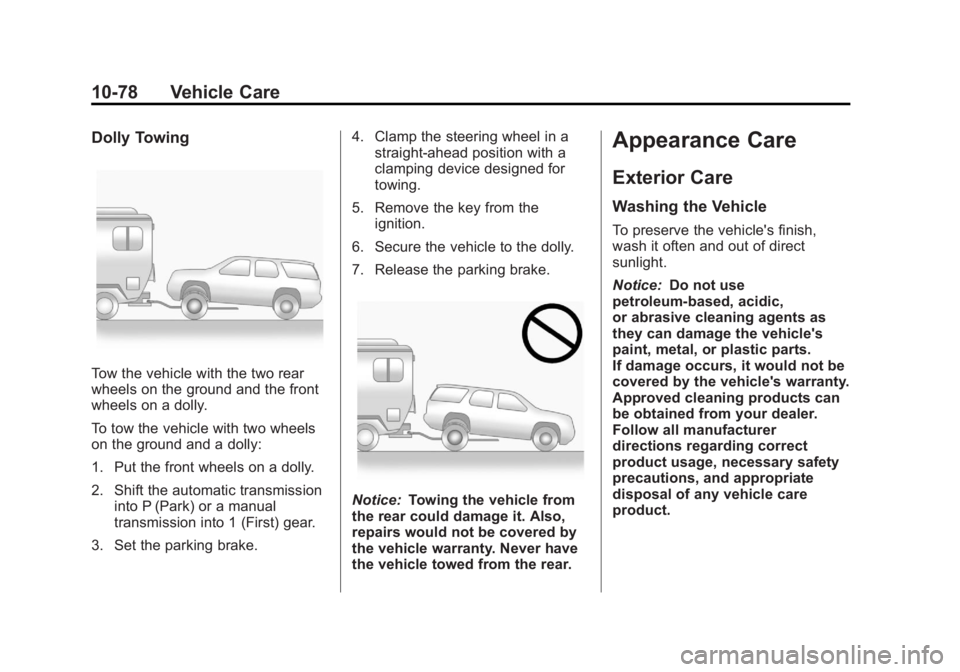
Dolly Towing
Tow the vehicle with the two rear
wheels on the ground and the front
wheels on a dolly.
To tow the vehicle with two wheels
on the ground and a dolly:
1. Put the front wheels on a dolly.
2. Shift the automatic transmissioninto P (Park) or a manual
transmission into 1 (First) gear.
3. Set the parking brake. 4. Clamp the steering wheel in a
straight-ahead position with a
clamping device designed for
towing.
5. Remove the key from the ignition.
6. Secure the vehicle to the dolly.
7. Release the parking brake.
Notice: Towing the vehicle from
the rear could damage it. Also,
repairs would not be covered by
the vehicle warranty. Never have
the vehicle towed from the rear.
Appearance Care
Exterior Care
Washing the Vehicle
To preserve the vehicle's finish,
wash it often and out of direct
sunlight.
Notice: Do not use
petroleum-based, acidic,
or abrasive cleaning agents as
they can damage the vehicle's
paint, metal, or plastic parts.
If damage occurs, it would not be
covered by the vehicle's warranty.
Approved cleaning products can
be obtained from your dealer.
Follow all manufacturer
directions regarding correct
product usage, necessary safety
precautions, and appropriate
disposal of any vehicle care
product.
Page 313 of 372
Black plate (85,1)Chevrolet Orlando Owner Manual - 2013 - CRC - 6/5/12
Vehicle Care 10-85
Care of Safety Belts
Keep belts clean and dry.
{WARNING
Do not bleach or dye safety belts.
It may severely weaken them. In
a crash, they might not be able to
provide adequate protection.
Clean safety belts only with mild
soap and lukewarm water.
Floor Mats
{WARNING
If a floor mat is the wrong size or
is not properly installed, it can
interfere with the pedals.
Interference with the pedals can
cause unintended acceleration
and/or increased stopping
distance which can cause a crash
and injury. Make sure the floor
mat does not interfere with the
pedals.Use the following guidelines for
proper floor mat usage.
.The original equipment floor
mats were designed for your
vehicle. If the floor mats need
replacing, it is recommended
that GM certified floor mats be
purchased. Non-GM floor mats
may not fit properly and may
interfere with the accelerator or
brake pedal. Always check that
the floor mats do not interfere
with the pedals.
.Use the floor mat with the
correct side up. Do not turn
it over.
.Do not place anything on top of
the driver side floor mat.
.Use only a single floor mat on
the driver side.
.Do not place one floor mat on
top of another.
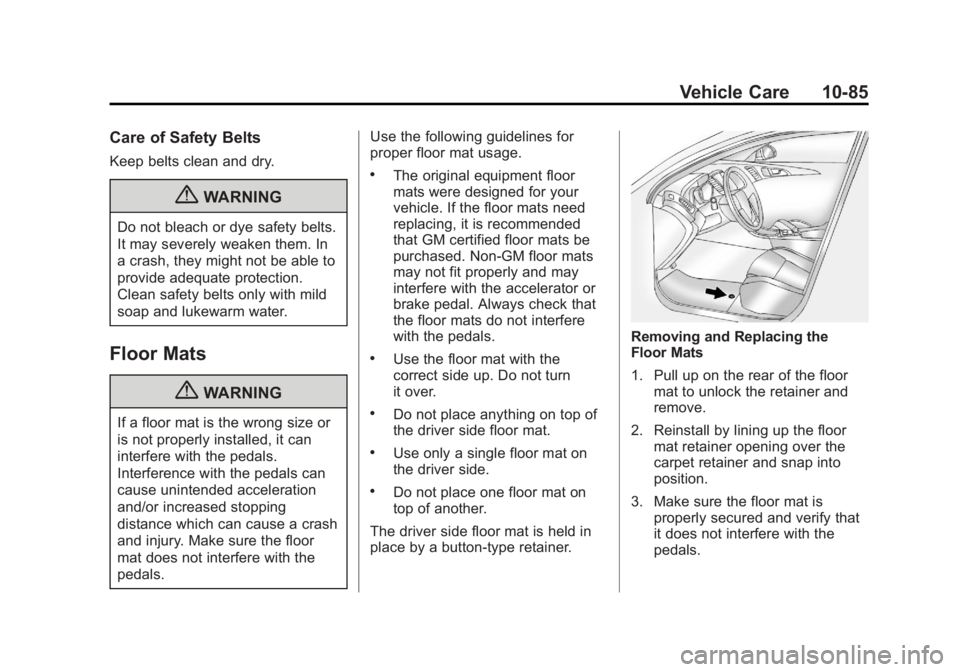
The driver side floor mat is held in
place by a button-type retainer.
Removing and Replacing the
Floor Mats
1. Pull up on the rear of the floor mat to unlock the retainer and
remove.
2. Reinstall by lining up the floor mat retainer opening over the
carpet retainer and snap into
position.
3. Make sure the floor mat is properly secured and verify that
it does not interfere with the
pedals.
Page 340 of 372
Black plate (6,1)Chevrolet Orlando Owner Manual - 2013 - CRC - 6/5/12
13-6 Customer Information
.Model, year, color, and license
plate number of the vehicle.
.Odometer reading, Vehicle
Identification Number (VIN), and
delivery date of the vehicle.
.Description of the problem.
Coverage
Services are provided up to 5 years/
160 000 km (100,000 mi), whichever
comes first.
In the U.S., anyone driving the
vehicle is covered. In Canada, a
person driving the vehicle without
permission from the owner is not
covered.
Roadside Assistance is not a part of
the New Vehicle Limited Warranty.
Chevrolet and General Motors of
Canada Limited reserve the right to
make any changes or discontinue
the Roadside Assistance program at
any time without notification.
Chevrolet and General Motors of
Canada Limited reserve the right to
limit services or payment to an
owner or driver if they decide theclaims are made too often, or the
same type of claim is made many
times.
Services Provided
.Emergency Fuel Delivery:
Delivery of enough fuel for the
vehicle to get to the nearest
service station.
.Lock-Out Service:
Service to
unlock the vehicle if you are
locked out. A remote unlock may
be available if you have OnStar.
For security reasons, the driver
must present identification
before this service is given.
.Emergency Tow from a Public
Road or Highway: Tow to the
nearest Chevrolet dealer for
warranty service, or if the vehicle
was in a crash and cannot be
driven. Assistance is also given
when the vehicle is stuck in the
sand, mud, or snow.
.Flat Tire Change: Service to
change a flat tire with the spare
tire. The spare tire, if equipped,
must be in good condition and
properly inflated. It is the owner's
responsibility for the repair or
replacement of the tire if it is not
covered by the warranty.
.Battery Jump Start: Service to
jump start a dead battery.
Services Not Included in
Roadside Assistance
.Impound towing caused by
violation of any laws.
.Legal fines.
.Mounting, dismounting,
or changing of snow tires,
chains, or other traction devices.
.Towing or services for vehicles
driven on a non-public road or
highway.
Page 349 of 372
Black plate (15,1)Chevrolet Orlando Owner Manual - 2013 - CRC - 6/5/12
Customer Information 13-15
if the vehicle is leased, with the
consent of the lessee; in response
to an official request by police or
similar government office; as part of
GM's defense of litigation through
the discovery process; or, as
required by law. Data that GM
collects or receives may also be
used for GM research needs or may
be made available to others for
research purposes, where a need is
shown and the data is not tied to a
specific vehicle or vehicle owner.
OnStar®
If the vehicle is equipped with
OnStar® and has an active
subscription, refer to the OnStar®
Terms and Conditions for
information on data collection and
use. SeeOnStar Overview on
page 14‑1.
Radio Frequency
Identification (RFID)
RFID technology is used in some
vehicles for functions such as tire
pressure monitoring and ignition
system security, as well as in
connection with conveniences such
as Remote Keyless Entry (RKE)
transmitters for remote door locking/
unlocking and starting, and
in-vehicle transmitters for garage
door openers. RFID technology in
GM vehicles does not use or record
personal information or link with any
other GM system containing
personal information.
Radio Frequency
Statement
This vehicle has systems that
operate on a radio frequency that
comply with Part 15 of the Federal
Communications Commission (FCC)
rules and with Industry Canada
Standards RSS‐GEN/210/220/310.
Operation is subject to the following
two conditions:
1. The device may not cause harmful interference.
2. The device must accept any interference received, including
interference that may cause
undesired operation of the
device.
Changes or modifications to any of
these systems by other than an
authorized service facility could void
authorization to use this equipment.
Page 351 of 372

Black plate (1,1)Chevrolet Orlando Owner Manual - 2013 - CRC - 6/5/12
OnStar 14-1
OnStar
OnStar Overview
OnStar Overview . . . . . . . . . . . . 14-1
OnStar Services
Emergency . . . . . . . . . . . . . . . . . . 14-2
Security . . . . . . . . . . . . . . . . . . . . . . 14-2
Navigation . . . . . . . . . . . . . . . . . . . 14-2
Connections . . . . . . . . . . . . . . . . . 14-3
Diagnostics . . . . . . . . . . . . . . . . . . 14-5
OnStar Additional Information
OnStar AdditionalInformation . . . . . . . . . . . . . . . . . 14-5
OnStar Overview
If equipped, this vehicle has a
comprehensive, in-vehicle system
that can connect to a live Advisor
for Emergency, Security, Navigation,
Connection, and Diagnostic
Services.
The OnStar system status light is
next to the OnStar buttons. If the
status light is:
.Solid Green: System is ready.
.Flashing Green: On a call.
.Red: Indicates a problem.
Push
|or call 1-888-4ONSTAR
(1-888-466-7827) to speak to an
Advisor. Push
=to:
.Make a call, end a call,
or answer an incoming call.
.Give OnStar Hands-Free Calling
voice commands.
.Give OnStar Turn-by-Turn
Navigation voice commands.
Requires the available Directions
and Connections service plan.
Push
|to connect to a live
Advisor to:
.Verify account information or
update contact information.
.Get driving directions. Requires
the available Directions and
Connections service plan.
.Receive On-Demand
Diagnostics for a check of the
vehicle’s key operating systems.
.Receive Roadside Assistance.
Page 352 of 372

Black plate (2,1)Chevrolet Orlando Owner Manual - 2013 - CRC - 6/5/12
14-2 OnStar
Push the OnStar Emergency
button
>to get a priority
connection to an Emergency
Advisor available
24/7 to:
.Get help for an emergency.
.Be a Good Samaritan or
respond to an AMBER Alert.
.Get crisis assistance and
evacuation routes.
OnStar Services
Emergency
With Automatic Crash Response,
the built-in system can automatically
connect to help in most crashes,
even if help cannot be requested.
Push
>to connect to an
Emergency Advisor. GPS
technology is used to identify the
vehicle location and can provide
critical information to emergency
personnel. The Advisor is also
trained to offer critical assistance in
emergency situations before first
responders arrive.
Security
OnStar provides services like Stolen
Vehicle Assistance, Remote Ignition
Block, and Roadside Assistance,
if the vehicle is equipped with these
services. OnStar can unlock the
vehicle doors remotely, if it is equipped with automatic door locks,
and can help police locate the
vehicle if it is stolen.
Navigation
OnStar navigation requires the
Directions and Connections
service plan.
Push
|to receive directions or
have them sent to the vehicle
navigation screen, if equipped.
Destinations can also be forwarded
to the vehicle from Google Maps™
or MapQuest.com. The OnStar
mapping database is continuously
updated. Visit www.onstar.com for
coverage maps.
Turn-by-Turn Navigation
1. Push|to connect to a live
Advisor.
2. Request directions.
3. Directions are downloaded to the vehicle.
4. Follow the voice-guided commands.