2017 CHEVROLET MALIBU engine
[x] Cancel search: enginePage 323 of 419
Chevrolet Malibu Owner Manual (GMNA-Localizing-U.S./Canada/Mexico-10122664) - 2017 - crc - 5/23/16
322 Vehicle Care
Tire Designations
Tire Size
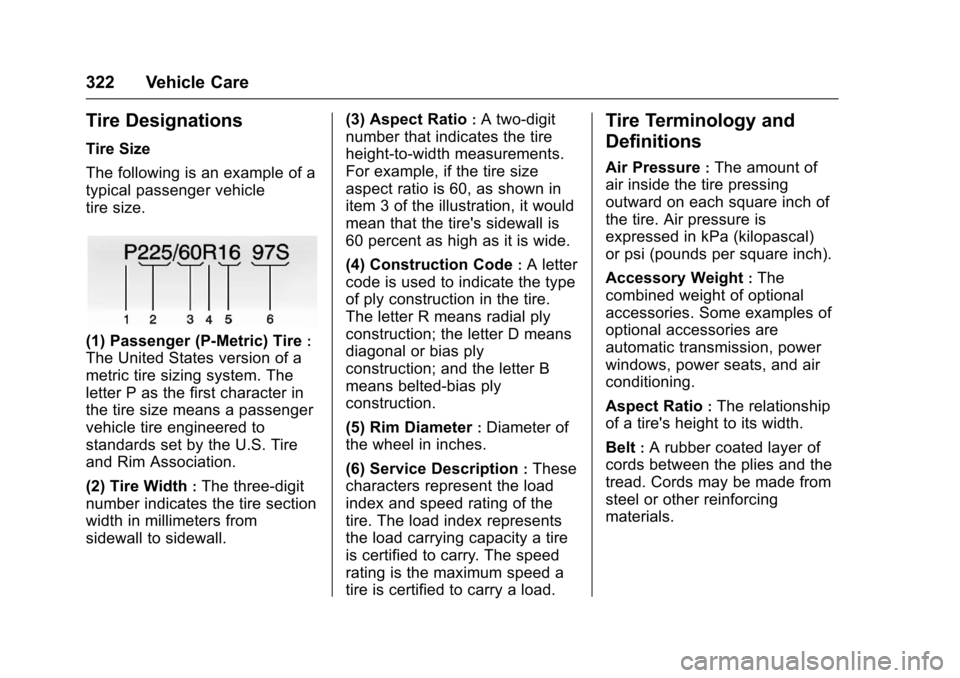
The following is an example of a
typical passenger vehicle
tire size.
(1) Passenger (P-Metric) Tire:
The United States version of a
metric tire sizing system. The
letter P as the first character in
the tire size means a passenger
vehicle tire engineered to
standards set by the U.S. Tire
and Rim Association.
(2) Tire Width:The three-digit
number indicates the tire section
width in millimeters from
sidewall to sidewall.
(3) Aspect Ratio:Atwo-digit
number that indicates the tire
height-to-width measurements.
For example, if the tire size
aspect ratio is 60, as shown in
item 3 of the illustration, it would
mean that the tire's sidewall is
60 percent as high as it is wide.
(4) Construction Code:Aletter
code is used to indicate the type
of ply construction in the tire.
The letter R means radial ply
construction; the letter D means
diagonal or bias ply
construction; and the letter B
means belted-bias ply
construction.
(5) Rim Diameter:Diameter of
the wheel in inches.
(6) Service Description:These
characters represent the load
index and speed rating of the
tire. The load index represents
the load carrying capacity a tire
is certified to carry. The speed
rating is the maximum speed a
tire is certified to carry a load.
Tire Terminology and
Definitions
Air Pressure:The amount of
air inside the tire pressing
outward on each square inch of
the tire. Air pressure is
expressed in kPa (kilopascal)
or psi (pounds per square inch).
Accessory Weight:The
combined weight of optional
accessories. Some examples of
optional accessories are
automatic transmission, power
windows, power seats, and air
conditioning.
Aspect Ratio:The relationship
of a tire's height to its width.
Belt:Arubbercoatedlayerof
cords between the plies and the
tread. Cords may be made from
steel or other reinforcing
materials.
Page 340 of 419
Chevrolet Malibu Owner Manual (GMNA-Localizing-U.S./Canada/Mexico-10122664) - 2017 - crc - 5/23/16
Vehicle Care 339
{Warning
Changing a tire can be
dangerous. The vehicle can slip
off the jack and roll over or fall
causing injury or death. Find a
level place to change the tire. To
help prevent the vehicle from
moving:
1. Set the parking brake firmly.
2. Put an automatictransmission in P (Park) or amanual transmission in1(First) or R(Reverse).
3. Turn off the engine and donot restart while the vehicleis raised.
4. Do not allow passengers toremain in the vehicle.
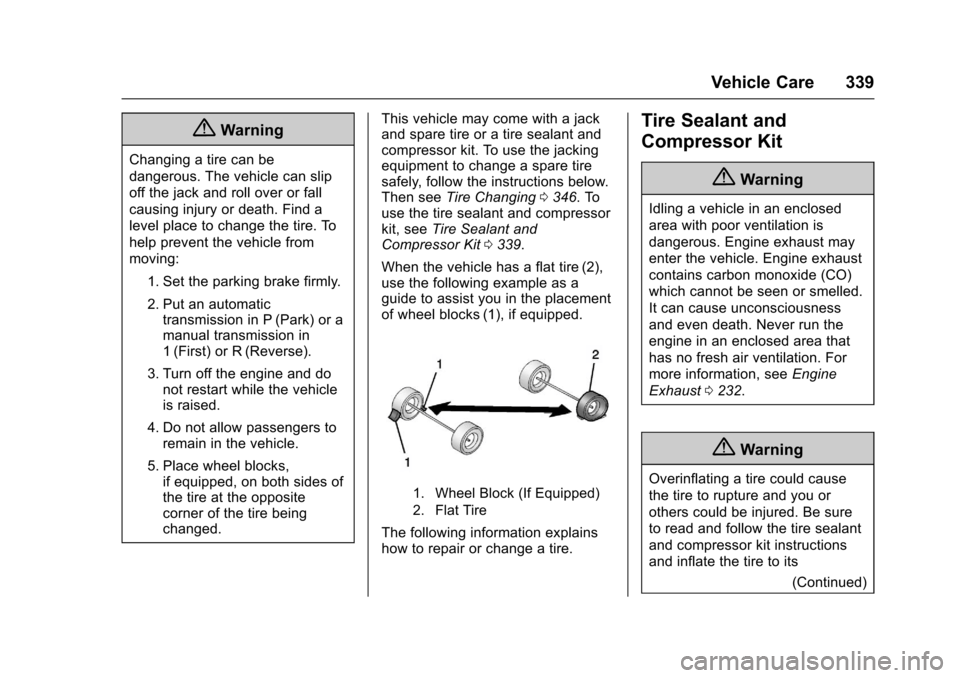
5. Place wheel blocks,if equipped, on both sides ofthe tire at the oppositecorner of the tire beingchanged.
This vehicle may come with a jackand spare tire or a tire sealant andcompressor kit. To use the jackingequipment to change a spare tiresafely, follow the instructions below.Then seeTire Changing0346.Touse the tire sealant and compressorkit, seeTire Sealant andCompressor Kit0339.
When the vehicle has a flat tire (2),use the following example as aguide to assist you in the placementof wheel blocks (1), if equipped.
1. Wheel Block (If Equipped)
2. Flat Tire
The following information explainshow to repair or change a tire.
Tire Sealant and
Compressor Kit
{Warning
Idling a vehicle in an enclosed
area with poor ventilation is
dangerous. Engine exhaust may
enter the vehicle. Engine exhaust
contains carbon monoxide (CO)
which cannot be seen or smelled.
It can cause unconsciousness
and even death. Never run the
engine in an enclosed area that
has no fresh air ventilation. For
more information, seeEngine
Exhaust0232.
{Warning
Overinflating a tire could cause
the tire to rupture and you or
others could be injured. Be sure
to read and follow the tire sealant
and compressor kit instructions
and inflate the tire to its
(Continued)
Page 354 of 419
Chevrolet Malibu Owner Manual (GMNA-Localizing-U.S./Canada/Mexico-10122664) - 2017 - crc - 5/23/16
Vehicle Care 353
Caution
Ignoring these steps could result
in costly damage to the vehicle
that would not be covered by the
vehicle warranty. Trying to start
the vehicle by pushing or pulling it
will not work, and it could damage
the vehicle.
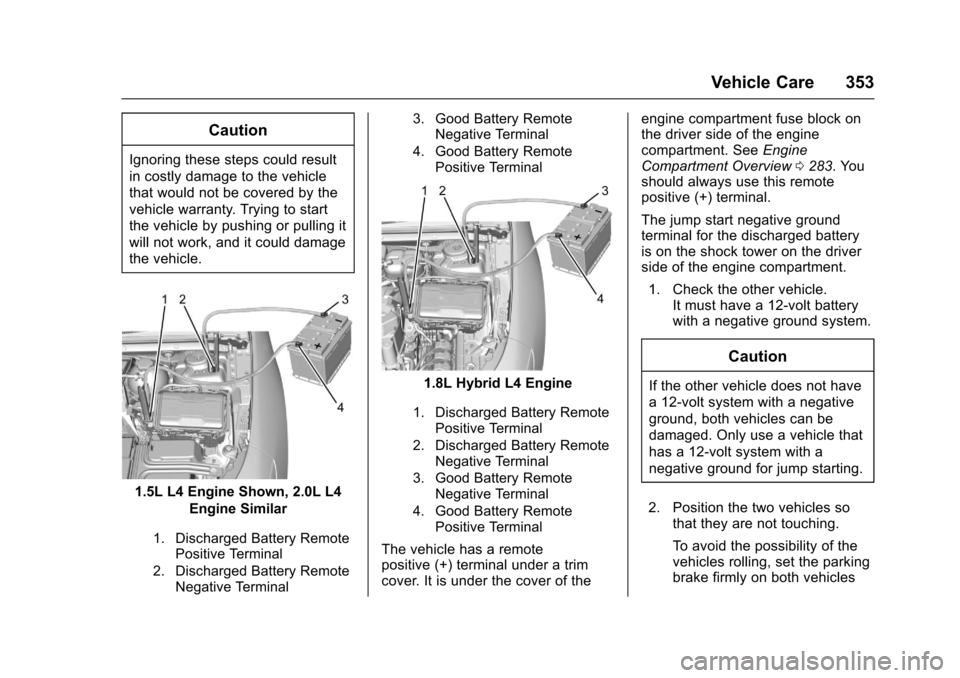
1.5L L4 Engine Shown, 2.0L L4
Engine Similar
1. Discharged Battery RemotePositive Terminal
2. Discharged Battery RemoteNegative Terminal
3. Good Battery RemoteNegative Terminal
4. Good Battery RemotePositive Terminal
1.8L Hybrid L4 Engine
1. Discharged Battery RemotePositive Terminal
2. Discharged Battery RemoteNegative Terminal
3. Good Battery RemoteNegative Terminal
4. Good Battery RemotePositive Terminal
The vehicle has a remotepositive (+) terminal under a trimcover. It is under the cover of the
engine compartment fuse block onthe driver side of the enginecompartment. SeeEngineCompartment Overview0283.Youshould always use this remotepositive (+) terminal.
The jump start negative groundterminal for the discharged batteryis on the shock tower on the driverside of the engine compartment.
1. Check the other vehicle.It must have a 12-volt batterywith a negative ground system.
Caution
If the other vehicle does not have
a12-voltsystemwithanegative
ground, both vehicles can be
damaged. Only use a vehicle that
has a 12-volt system with a
negative ground for jump starting.
2. Position the two vehicles sothat they are not touching.
To a v o i d t h e p o s s i b i l i t y o f t h evehicles rolling, set the parkingbrake firmly on both vehicles
Page 355 of 419
Chevrolet Malibu Owner Manual (GMNA-Localizing-U.S./Canada/Mexico-10122664) - 2017 - crc - 5/23/16
354 Vehicle Care
involved in the jump startprocedure. Put an automatictransmission in P (Park) or amanual transmission in Neutralbefore setting the parkingbrake.
3. Set the parking brake firmly onboth vehicles. Put an automatictransmission in P (Park) or amanual transmission in Neutralbefore setting the parkingbrake.
Caution
If any accessories are left on or
plugged in during the jump
starting procedure, they could be
damaged. The repairs would not
be covered by the vehicle
warranty. Whenever possible, turn
off or unplug all accessories on
either vehicle when jump starting.
4. Turn the ignition to LOCK/OFFand switch off all lights andaccessories in both vehicles,except the hazard warningflashers if needed.
{Warning
An electric fan can start up even
when the engine is not running
and can injure you. Keep hands,
clothing, and tools away from any
underhood electric fan.
{Warning
Using a match near a battery can
cause battery gas to explode.
People have been hurt doing this,
and some have been blinded.
Use a flashlight if you need more
light.
Battery fluid contains acid that
can burn you. Do not get it on
you. If you accidentally get it in
your eyes or on your skin, flush
the place with water and get
medical help immediately.
{Warning
Fans or other moving engine
parts can injure you badly. Keep
your hands away from moving
parts once the engine is running.
6. Connect the red positive (+)cable to the positive (+) orremote positive (+) terminal ofthe discharged battery.
7. Connect the other end of thepositive (+) cable to thepositive (+) terminal of thegood battery. Use a remotepositive (+) terminal if thevehicle has one.
8. Connect one end of the blacknegative (✓)cabletothenegative (✓)terminalofthegood battery.
9. Connect the other end of thenegative (✓)cabletothenegative (–)groundterminalforthe discharged battery.
Page 356 of 419
Chevrolet Malibu Owner Manual (GMNA-Localizing-U.S./Canada/Mexico-10122664) - 2017 - crc - 5/23/16
Vehicle Care 355
10. Start the vehicle with the goodbattery and run the engine atidle speed for at leastfour minutes.
11 . Tr y t o s t a r t t h e v e h i c l e t h a t h a dthe dead battery. If it will notstart after a few tries, itprobably needs service.
For hybrid vehicles, the engine willonly start if needed after pressingON/RUN/START. The vehicle readylight will come on when thepropulsion system is on and ready.In cold temperatures, the engine willnot run with the hood open. Closethe hood.
Caution
If the jumper cables are
connected or removed in the
wrong order, electrical shorting
may occur and damage the
vehicle. The repairs would not be
covered by the vehicle warranty.
Always connect and remove the
jumper cables in the correct order,
(Continued)
Caution (Continued)
making sure that the cables do
not touch each other or other
metal.
Jumper Cable Removal
Reverse the sequence exactly whenremoving the jumper cables.
After starting the disabled vehicleand removing the jumper cables,allow it to idle for several minutes.
Towing the Vehicle
Caution
Incorrectly towing a disabled
vehicle may cause damage. The
damage would not be covered by
the vehicle warranty.
Do not lash or hook to
suspension components. Use the
proper straps around the tires to
secure the vehicle.
Have the vehicle towed on a wheellift tow truck. A flatbed car carriercould damage the vehicle. Thewheel lift tow truck must raise therear of the vehicle and wheel dolliesmust be used to lift the front wheelsoff the ground.
Consult your dealer or aprofessional towing service if thedisabled vehicle must be towed.
Page 357 of 419
Chevrolet Malibu Owner Manual (GMNA-Localizing-U.S./Canada/Mexico-10122664) - 2017 - crc - 5/23/16
356 Vehicle Care
Recreational Vehicle
Towing
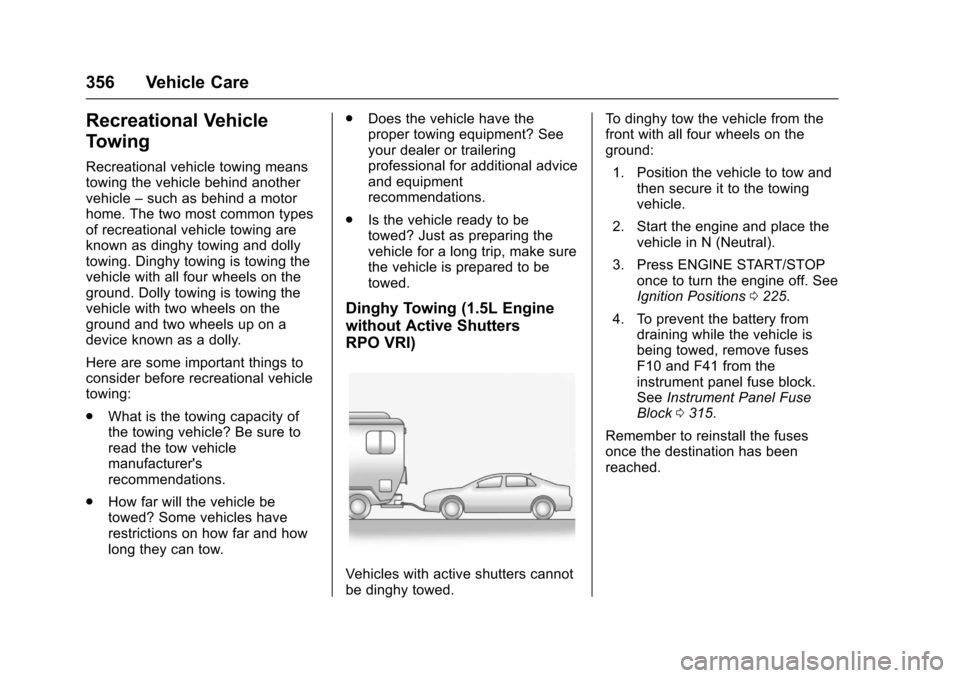
Recreational vehicle towing meanstowing the vehicle behind anothervehicle–such as behind a motorhome. The two most common typesof recreational vehicle towing areknown as dinghy towing and dollytowing. Dinghy towing is towing thevehicle with all four wheels on theground. Dolly towing is towing thevehicle with two wheels on theground and two wheels up on adevice known as a dolly.
Here are some important things toconsider before recreational vehicletowing:
.What is the towing capacity ofthe towing vehicle? Be sure toread the tow vehiclemanufacturer'srecommendations.
.How far will the vehicle betowed? Some vehicles haverestrictions on how far and howlong they can tow.
.Does the vehicle have theproper towing equipment? Seeyour dealer or traileringprofessional for additional adviceand equipmentrecommendations.
.Is the vehicle ready to betowed? Just as preparing thevehicle for a long trip, make surethe vehicle is prepared to betowed.
Dinghy Towing (1.5L Engine
without Active Shutters
RPO VRI)
Vehicles with active shutters cannotbe dinghy towed.
To d i n g h y t o w t h e v e h i c l e f r o m t h efront with all four wheels on theground:
1. Position the vehicle to tow andthen secure it to the towingvehicle.
2. Start the engine and place thevehicle in N (Neutral).
3. Press ENGINE START/STOPonce to turn the engine off. SeeIgnition Positions0225.
4. To prevent the battery fromdraining while the vehicle isbeing towed, remove fusesF10 and F41 from theinstrument panel fuse block.SeeInstrument Panel FuseBlock0315.
Remember to reinstall the fusesonce the destination has beenreached.
Page 358 of 419
Chevrolet Malibu Owner Manual (GMNA-Localizing-U.S./Canada/Mexico-10122664) - 2017 - crc - 5/23/16
Vehicle Care 357
Caution
If 105 km/h (65 mph) is exceeded
while towing the vehicle, it could
be damaged. Never exceed
105 km/h (65 mph) while towing
the vehicle.
Caution
Use of a shield mounted in front
of the vehicle grille could restrict
airflow and cause damage to the
transmission. The repairs would
not be covered by the vehicle
warranty. If using a shield, only
use one that attaches to the
towing vehicle.
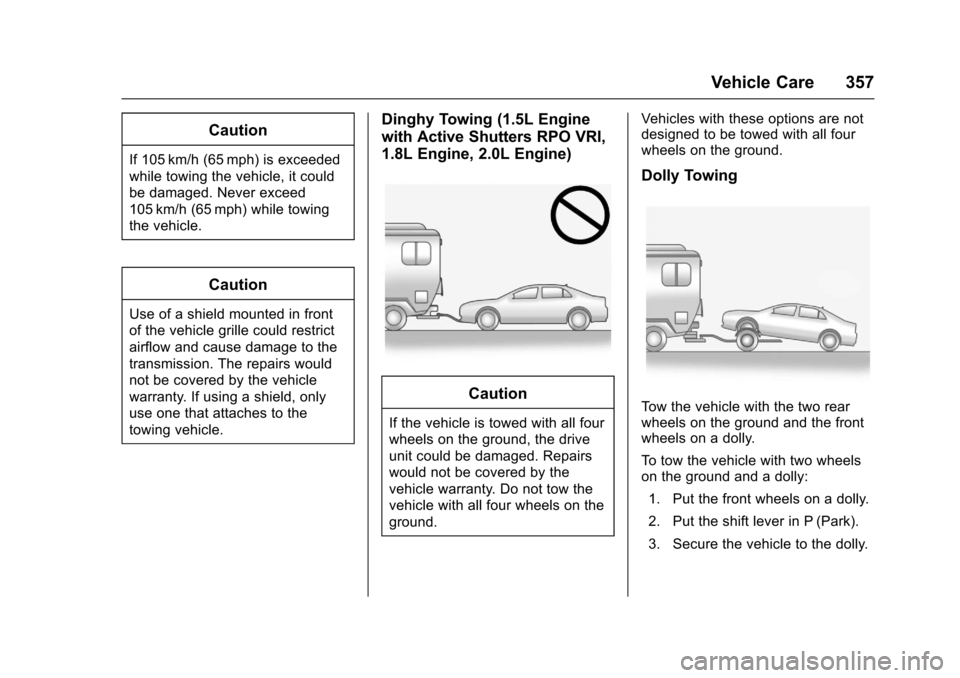
Dinghy Towing (1.5L Engine
with Active Shutters RPO VRI,
1.8L Engine, 2.0L Engine)
Caution
If the vehicle is towed with all four
wheels on the ground, the drive
unit could be damaged. Repairs
would not be covered by the
vehicle warranty. Do not tow the
vehicle with all four wheels on the
ground.
Vehicles with these options are notdesigned to be towed with all fourwheels on the ground.
Dolly Towing
To w t h e v e h i c l e w i t h t h e t w o r e a rwheels on the ground and the frontwheels on a dolly.
To t o w t h e v e h i c l e w i t h t w o w h e e l son the ground and a dolly:
1. Put the front wheels on a dolly.
2. Put the shift lever in P (Park).
3. Secure the vehicle to the dolly.
Page 370 of 419
Chevrolet Malibu Owner Manual (GMNA-Localizing-U.S./Canada/Mexico-10122664) - 2017 - crc - 5/23/16
Service and Maintenance 369
frequent checks and services. TheAdditional Required Services -Normal are for vehicles that:
.Carry passengers and cargowithin recommended limits onthe Tire and Loading Informationlabel. SeeVehicle LoadLimits0222.
.Are driven on reasonable roadsurfaces within legal drivinglimits.
.Use the recommended fuel. SeeFuel0268.
Refer to the information in theMaintenance Schedule AdditionalRequired Services - Normal chart.
The Additional Required Services -Severe are for vehicles that are:
.Mainly driven in heavy city trafficin hot weather.
.Mainly driven in hilly ormountainous terrain.
.Frequently towing a trailer.
.Used for high speed orcompetitive driving.
.Used for taxi, police, or deliveryservice.
Refer to the information in theMaintenance Schedule AdditionalRequired Services - Severe chart.
{Warning
Performing maintenance work can
be dangerous and can cause
serious injury. Perform
maintenance work only if the
required information, proper tools,
and equipment are available.
If they are not, see your dealer to
have a trained technician do the
work. SeeDoing Your Own
Service Work0280.
Maintenance
Schedule
Owner Checks and Services
At Each Fuel Stop
.Check the engine oil level. SeeEngine Oil0288.
Once a Month
.Check the tire inflationpressures. SeeTirePressure0325.
.Inspect the tires for wear. SeeTire Inspection0331.
.Check the windshield washerfluid level. SeeWasherFluid0299.
Engine Oil Change
When the CHANGE ENGINE OILSOON message displays, have theengine oil and filter changed withinthe next 1 000 km/600 mi. If drivenunder the best conditions, theengine oil life system may notindicate the need for vehicle servicefor up to a year. The engine oil andfilter must be changed at least once