Page 304 of 419
Chevrolet Malibu Owner Manual (GMNA-Localizing-U.S./Canada/Mexico-10122664) - 2017 - crc - 5/23/16
Vehicle Care 303
Extended Storage: Remove the12-volt battery black, negative (✓)cable from the battery or use abattery trickle charger.
Remember to reconnect the batterywhen ready to drive the vehicle.
Starter Switch Check
{Warning
When you are doing this
inspection, the vehicle could
move suddenly. If the vehicle
moves, you or others could be
injured.
1. Before starting this check, besure there is enough roomaround the vehicle.
2. Apply both the parking brakeand the regular brake.
Do not use the acceleratorpedal, and be ready to turn offthe engine immediately if itstarts.
3. Try to start the engine in eachgear. The vehicle should startonly in P (Park) or N (Neutral).If the vehicle starts in any otherposition, contact your dealer forservice.
Automatic Transmission
Shift Lock Control
Function Check
{Warning
When you are doing this
inspection, the vehicle could
move suddenly. If the vehicle
moves, you or others could be
injured.
1. Before starting this check, besure there is enough roomaround the vehicle. It should beparked on a level surface.
2. Apply the parking brake. Beready to apply the regularbrake immediately if the vehiclebegins to move.
3. With the engine off, turn theignition on, but do not start theengine. Without applying theregular brake, try to move theshift lever out of P (Park) withnormal effort. If the shift levermoves out of P (Park), contactyour dealer for service.
Park Brake and P (Park)
Mechanism Check
{Warning
When you are doing this check,
the vehicle could begin to move.
Yo u o r o t h e r s c o u l d b e i n j u r e d
and property could be damaged.
Make sure there is room in front
of the vehicle in case it begins to
roll. Be ready to apply the regular
brake at once should the vehicle
begin to move.
Page 305 of 419
Chevrolet Malibu Owner Manual (GMNA-Localizing-U.S./Canada/Mexico-10122664) - 2017 - crc - 5/23/16
304 Vehicle Care
Park on a fairly steep hill, with thevehicle facing downhill. Keepingyour foot on the regular brake, setthe parking brake.
.To c h e c k t h e p a r k i n g b r a k e ' sholding ability: With the enginerunning and the transmission inN(Neutral), slowly remove footpressure from the regular brakepedal. Do this until the vehicle isheld by the parking brake only.
.To c h e c k t h e P ( P a r k )mechanism's holding ability:With the engine running, shift toP(Park). Then release theparking brake followed by theregular brake.
Contact your dealer if service isrequired.
Wiper Blade Replacement
Windshield wiper blades should beinspected for wear or cracking.
It is a good idea to clean the wiperblade assembly on a regular basis.When worn, or when cleaning isineffective, replace the wiper blade.For proper windshield wiper bladelength and type, seeMaintenanceReplacement Parts0378.
Caution
Allowing the wiper arm to touch
the windshield when no wiper
blade is installed could damage
the windshield. Any damage that
occurs would not be covered by
the vehicle warranty. Do not allow
the wiper arm to touch the
windshield.
To r e p l a c e t h e w i p e r b l a d e :
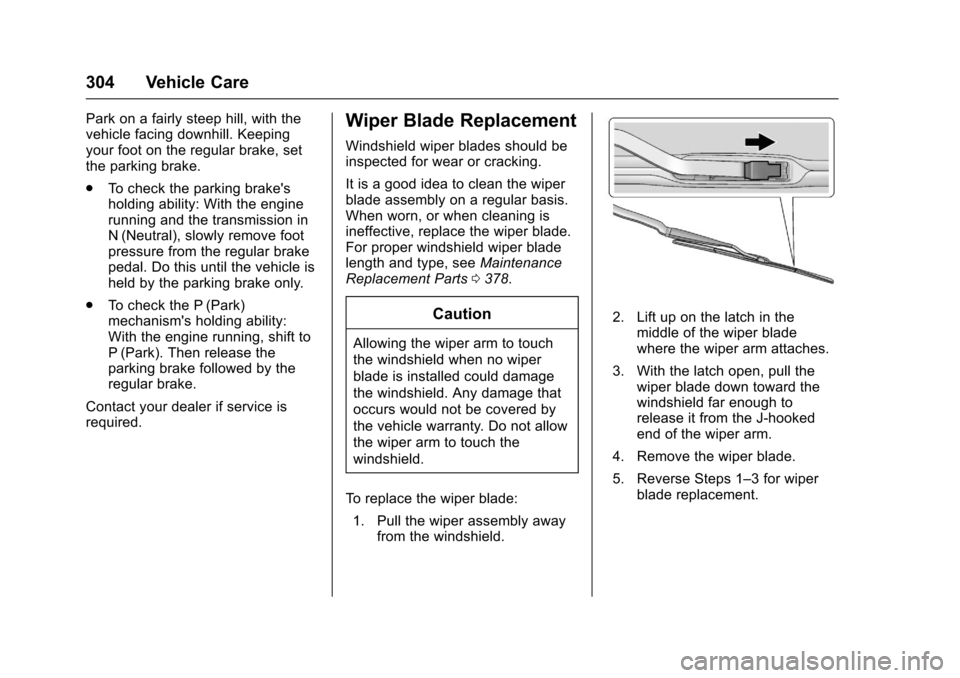
1. Pull the wiper assembly awayfrom the windshield.
2. Lift up on the latch in themiddle of the wiper bladewhere the wiper arm attaches.
3. With the latch open, pull thewiper blade down toward thewindshield far enough torelease it from the J-hookedend of the wiper arm.
4. Remove the wiper blade.
5. Reverse Steps 1–3forwiperblade replacement.
Page 307 of 419
Chevrolet Malibu Owner Manual (GMNA-Localizing-U.S./Canada/Mexico-10122664) - 2017 - crc - 5/23/16
306 Vehicle Care
2. For the driver side bulb,remove the windshield washerbottle filler neck by firmlypulling it straight up and out ofthe bottle.
3. For hybrid vehicles, remove theengine air cleaner housing bygripping firmly and pullingstraight up.
4. Remove the cover from theback of the headlampassembly by turning itcounterclockwise.
5. Disconnect the electricalconnector.
6. Remove the bulb from the lampassembly by turningcounterclockwise.
7. Install a new bulb in the lampassembly.
8. Connect the electricalconnector.
9. Replace the cover from theback of the headlampassembly by turning itclockwise.
10. For the driver side, reinstall thewindshield washer bottle fillerneck by firmly pushing itstraight into the bottle. Makesure that the filler neck clipengages into the bracket onthe upper tie-bar.
11 . R e p l a c e t h e e n g i n e a i r c l e a n e rhousing by aligning the pegswith the grommets andpressing firmly down.
Front Turn Signal, Parking, and
Sidemarker Lamps
To r e p l a c e o n e o f t h e s e l a m p s :
1. For the driver side bulb,remove the windshield washerbottle filler neck by firmlypulling it straight up and out ofthe bottle.
2. For hybrid vehicles, remove theengine air cleaner housing bygripping firmly and pullingstraight up.
3. Remove the bulb socket fromthe headlamp assembly byturning it counterclockwise.
4. Remove the bulb from thesocket.
5. Replace the bulb in the bulbsocket.
6. Install the bulb socket in theheadlamp assembly by turningit clockwise.
7. For the driver side, reinstall thewindshield washer bottle fillerneck by firmly pushing itstraight into the bottle. Makesure that the filler neck clipengages into the bracket onthe upper tie-bar.
8. Replace the engine air cleanerhousing by aligning the pegswith the grommets andpressing firmly down.
Page 311 of 419
Chevrolet Malibu Owner Manual (GMNA-Localizing-U.S./Canada/Mexico-10122664) - 2017 - crc - 5/23/16
310 Vehicle Care
Electrical System
Overload
The vehicle has fuses and circuitbreakers to protect against anelectrical system overload.
When the current electrical load istoo heavy, the circuit breaker opensand closes, protecting the circuituntil the current load returns tonormal or the problem is fixed. Thisgreatly reduces the chance of circuitoverload and fire caused byelectrical problems.
Fuses and circuit breakers protectpower devices in the vehicle.
Replace a bad fuse with a new oneof the identical size and rating.
If there is a problem on the road andafuseneedstobereplaced,thesame amperage fuse can beborrowed. Choose some feature ofthe vehicle that is not needed andreplace it as soon as possible.
Headlamp Wiring
An electrical overload may causethe lamps to go on and off, or insome cases to remain off. Have theheadlamp wiring checkedright away.
Windshield Wipers
If the wiper motor overheats due toheavy snow or ice, the windshieldwipers will stop until the motor coolsand will then restart.
Although the circuit is protectedfrom electrical overload, overloaddue to heavy snow or ice maycause wiper linkage damage.Always clear ice and heavy snowfrom the windshield before using thewindshield wipers.
If the overload is caused by anelectrical problem and not snow orice, be sure to get it fixed.
Fuses
The wiring circuits in the vehicle areprotected from short circuits byfuses. This greatly reduces thechance of damage caused byelectrical problems.
To c h e c k a f u s e , l o o k a t t h esilver-colored band inside the fuse.If the band is broken or melted,replace the fuse. Be sure to replaceabadfusewithanewoneoftheidentical size and rating.
Fuses of the same amperage canbe temporarily borrowed fromanother fuse location, if a fuse goesout. Replace the fuse as soon aspossible.
To i d e n t i f y a n d c h e c k f u s e s , c i r c u i tbreakers, and relays, seeEngineCompartment Fuse Block0311andInstrument Panel Fuse Block0315.
Page 312 of 419
Chevrolet Malibu Owner Manual (GMNA-Localizing-U.S./Canada/Mexico-10122664) - 2017 - crc - 5/23/16
Vehicle Care 311
Engine Compartment
Fuse Block
The engine compartment fuse blockis on the driver side of the enginecompartment.
Caution
Spilling liquid on any electrical
component on the vehicle may
damage it. Always keep the
covers on any electrical
component.
Page 314 of 419
Chevrolet Malibu Owner Manual (GMNA-Localizing-U.S./Canada/Mexico-10122664) - 2017 - crc - 5/23/16
Vehicle Care 313
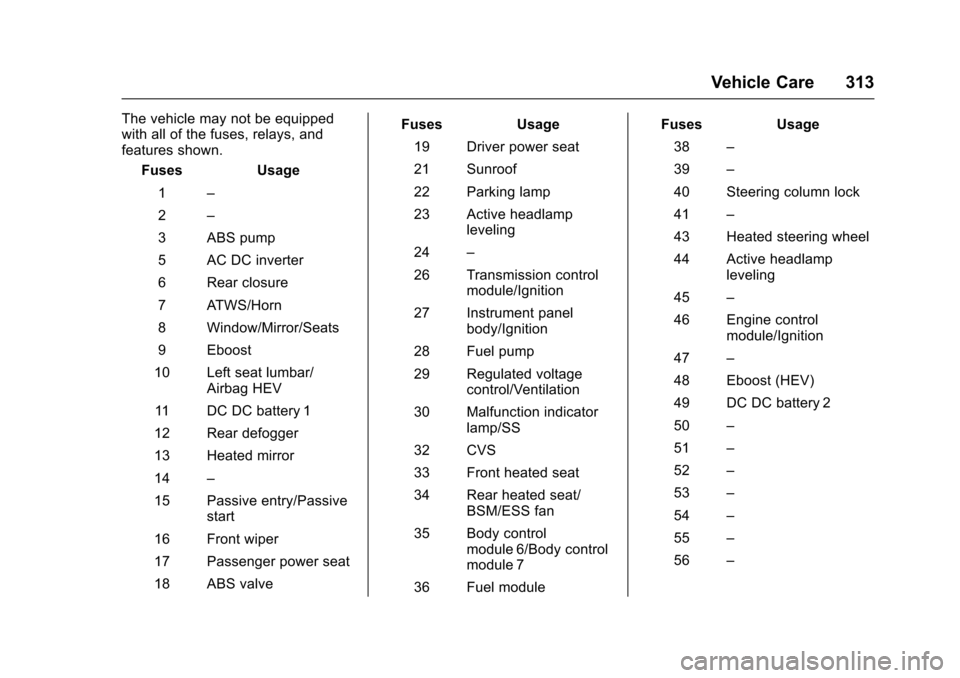
The vehicle may not be equippedwith all of the fuses, relays, andfeatures shown.
Fuses Usage
1–
2–
3ABSpump
5ACDCinverter
6Rearclosure
7ATWS/Horn
8Window/Mirror/Seats
9Eboost
10 Left seat lumbar/Airbag HEV
11 D C D C b a t t e r y 1
12 Rear defogger
13 Heated mirror
14–
15 Passive entry/Passivestart
16 Front wiper
17 Passenger power seat
18 ABS valve
Fuses Usage
19 Driver power seat
21 Sunroof
22 Parking lamp
23 Active headlampleveling
24–
26 Transmission controlmodule/Ignition
27 Instrument panelbody/Ignition
28 Fuel pump
29 Regulated voltagecontrol/Ventilation
30 Malfunction indicatorlamp/SS
32 CVS
33 Front heated seat
34 Rear heated seat/BSM/ESS fan
35 Body controlmodule 6/Body controlmodule 7
36 Fuel module
Fuses Usage
38–
39–
40 Steering column lock
41–
43 Heated steering wheel
44 Active headlampleveling
45–
46 Engine controlmodule/Ignition
47–
48 Eboost (HEV)
49 DC DC battery 2
50–
51–
52–
53–
54–
55–
56–
Page 315 of 419
Chevrolet Malibu Owner Manual (GMNA-Localizing-U.S./Canada/Mexico-10122664) - 2017 - crc - 5/23/16
314 Vehicle Care
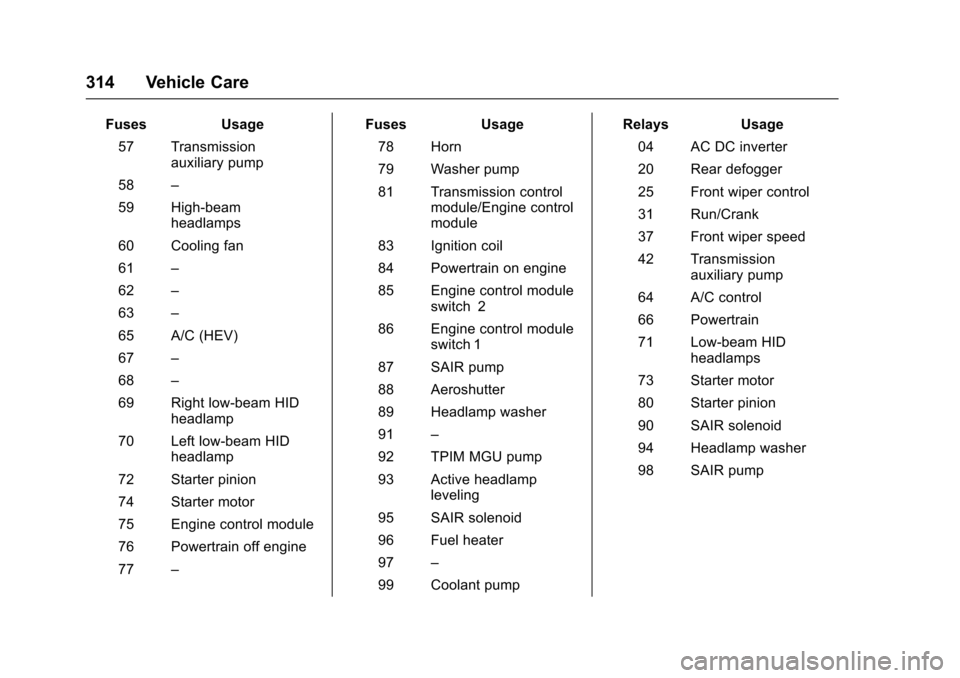
FusesUsage
57 Transmissionauxiliary pump
58–
59 High-beamheadlamps
60 Cooling fan
61–
62–
63–
65 A/C (HEV)
67–
68–
69 Right low-beam HIDheadlamp
70 Left low-beam HIDheadlamp
72 Starter pinion
74 Starter motor
75 Engine control module
76 Powertrain off engine
77–
FusesUsage
78 Horn
79 Washer pump
81 Transmission controlmodule/Engine controlmodule
83 Ignition coil
84 Powertrain on engine
85 Engine control moduleswitch 2
86 Engine control moduleswitch 1
87 SAIR pump
88 Aeroshutter
89 Headlamp washer
91–
92 TPIM MGU pump
93 Active headlampleveling
95 SAIR solenoid
96 Fuel heater
97–
99 Coolant pump
RelaysUsage
04 AC DC inverter
20 Rear defogger
25 Front wiper control
31 Run/Crank
37 Front wiper speed
42 Transmissionauxiliary pump
64 A/C control
66 Powertrain
71 Low-beam HIDheadlamps
73 Starter motor
80 Starter pinion
90 SAIR solenoid
94 Headlamp washer
98 SAIR pump
Page 317 of 419
Chevrolet Malibu Owner Manual (GMNA-Localizing-U.S./Canada/Mexico-10122664) - 2017 - crc - 5/23/16
316 Vehicle Care
Fuses Amps Usage
F9 5 Engine controlmodule/Rearbattery
F10 15 Body controlmodule 2
F11––
F12––
F13––
F14––
F15 20 Transmissioncontrol module(Stop/Start)
F16 30 Amplifier
F17–Seat powerlumbar
F18––
F19––
F20 15 Body controlmodule 1
F21 15 Body controlmodule 4
Fuses Amps Usage
F22––
F23 10 Electricsteeringcolumn lock(China only)
F24 10 Airbag
F25 7.5 Data linkconnector
F26––
F27 30 AC DC inverter
F28––
F29 20 Body controlmodule 8
F30 10 Overheadconsole
F31 2 Steering wheelcontrols
F32––
F33 10 HVAC
F34––
Fuses Amps Usage
F35––
F36 5 Wirelesscharger
F37 20 Frontaccessorypower outlets/Cigar lighter(China only)
F38 5 OnStar
F39 7.5 Display
F40 10 Obstacledetection
F41 15 Body controlmodule 1(Stop/Start)
F42 15 Radio
CB1––
CB2 15 Consoleaccessorypower outlet