2017 CHEVROLET EXPRESS CARGO VAN warning
[x] Cancel search: warningPage 236 of 346
Chevrolet Express Owner Manual (GMNA-Localizing-U.S./Canada/Mexico-9967827) - 2017 - crc - 5/2/16
Vehicle Care 235
Warning (Continued)
Add brake fluid only when work is
done on the brake hydraulic
system.
When the brake fluid falls to a lowlevel, the brake warning light comeson. SeeBrake System WarningLight0104.
Brake fluid absorbs water over time.Replace brake fluid at the specifiedintervals to prevent increasedstopping distance. SeeMaintenanceSchedule0297.
Checking Brake Fluid
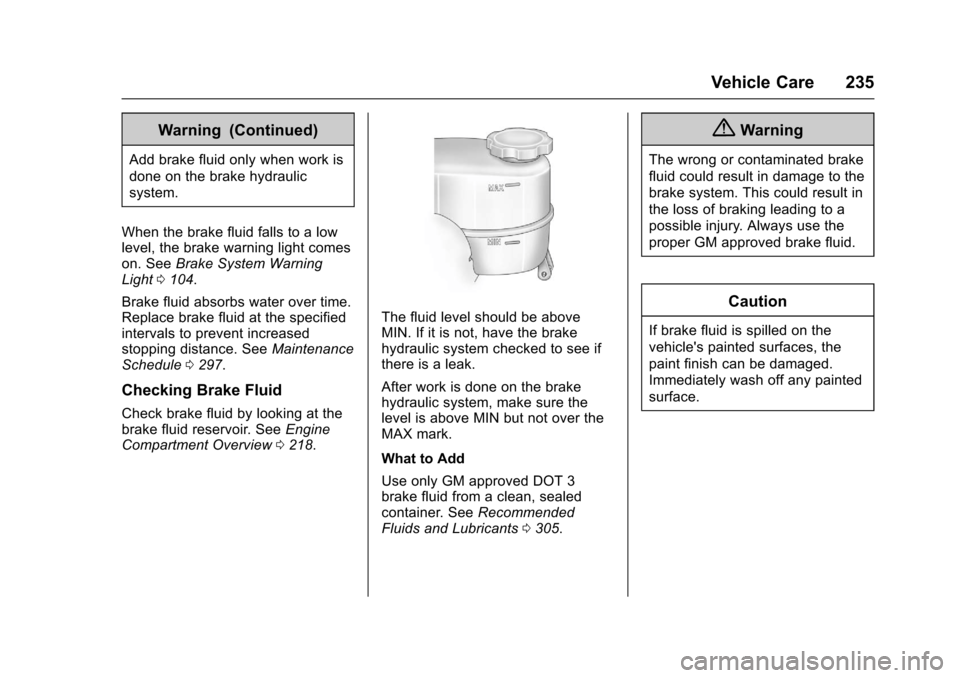
Check brake fluid by looking at thebrake fluid reservoir. SeeEngineCompartment Overview0218.
The fluid level should be aboveMIN. If it is not, have the brakehydraulic system checked to see ifthere is a leak.
After work is done on the brakehydraulic system, make sure thelevel is above MIN but not over theMAX mark.
What to Add
Use only GM approved DOT 3brake fluid from a clean, sealedcontainer. SeeRecommendedFluids and Lubricants0305.
{Warning
The wrong or contaminated brake
fluid could result in damage to the
brake system. This could result in
the loss of braking leading to a
possible injury. Always use the
proper GM approved brake fluid.
Caution
If brake fluid is spilled on the
vehicle's painted surfaces, the
paint finish can be damaged.
Immediately wash off any painted
surface.
Page 237 of 346
Chevrolet Express Owner Manual (GMNA-Localizing-U.S./Canada/Mexico-9967827) - 2017 - crc - 5/2/16
236 Vehicle Care
Battery - North America
The original equipment battery ismaintenance free. Do not removethe cap and do not add fluid.
Refer to the replacement numbershown on the original battery labelwhen a new battery is needed. SeeEngine Compartment Overview0218for battery location.
{Warning
WA R N I N G :Battery posts,
terminals, and related
accessories contain lead and lead
compounds, chemicals known to
the State of California to cause
cancer and birth defects or other
reproductive harm. Batteries also
contain other chemicals known to
the State of California to cause
cancer.WASH HANDS AFTER
HANDLING.
SeeCalifornia Proposition
65 Warning0215.
Vehicle Storage
{Warning
Batteries have acid that can burn
you and gas that can explode.
Yo u c a n b e b a d l y h u r t i f y o u a r e
not careful. SeeJump Starting -
North America0282for tips on
working around a battery without
getting hurt.
Infrequent Usage: Remove theblack, negative (✓)cablefromthebattery to keep the battery fromrunning down.
Extended Storage: Remove theblack, negative (✓)cablefromthebattery or use a battery tricklecharger.
Rear Axle
When to Check Lubricant
It is not necessary to regularlycheck rear axle fluid unless yoususpect there is a leak or you hear
an unusual noise. A fluid loss couldindicate a problem. Have itinspected and repaired.
How to Check Lubricant
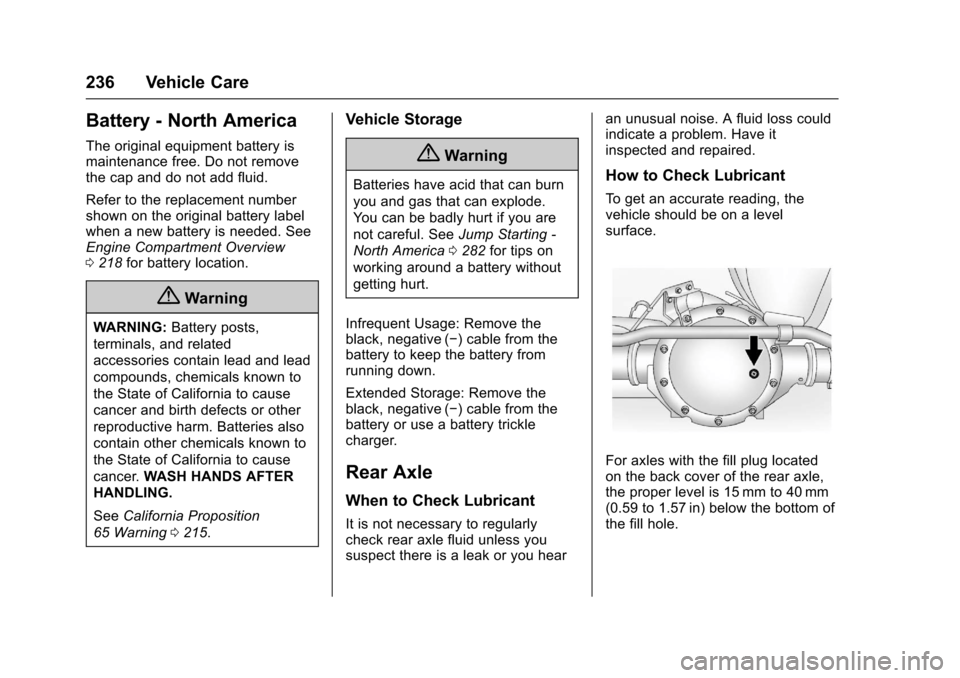
To g e t a n a c c u r a t e r e a d i n g , t h evehicle should be on a levelsurface.
For axles with the fill plug locatedon the back cover of the rear axle,the proper level is 15 mm to 40 mm(0.59 to 1.57 in) below the bottom ofthe fill hole.
Page 239 of 346

Chevrolet Express Owner Manual (GMNA-Localizing-U.S./Canada/Mexico-9967827) - 2017 - crc - 5/2/16
238 Vehicle Care
Among those acts presumed toconstitute tampering are the actslisted below.
Insulation:
.Removal of the noise shields orany underhood insulation.
Engine:
.Removal or rendering enginespeed governor, if the vehiclehas one, inoperative so as toallow engine speed to exceedmanufacturer specifications.
Fan and Drive:
.Removal of fan clutch, if thevehicle has one, or renderingclutch inoperative.
.Removal of the fan shroud, if thevehicle has one.
Air Intake:
.Removal of the air cleanersilencer.
.Modification of the air cleaner.
Exhaust:
.Removal of the muffler and/orresonator.
.Removal of the exhaust pipesand exhaust pipe clamps.
Fuel Operated Heater (FOH)—Diesel Engine:
.Removal of the muffler.
Starter Switch Check
{Warning
When you are doing this
inspection, the vehicle could
move suddenly. If the vehicle
moves, you or others could be
injured.
1. Before starting this check, besure there is enough roomaround the vehicle.
2. Apply both the parking brakeand the regular brake.
Do not use the acceleratorpedal, and be ready to turn offthe engine immediately if itstarts.
3. Try to start the engine in eachgear. The vehicle should startonly in P (Park) or N (Neutral).If the vehicle starts in any otherposition, contact your dealer forservice.
Automatic Transmission
Shift Lock Control
Function Check
{Warning
When you are doing this
inspection, the vehicle could
move suddenly. If the vehicle
moves, you or others could be
injured.
1. Before starting this check, besure there is enough roomaround the vehicle. It should beparked on a level surface.
2. Apply the parking brake. Beready to apply the regularbrake immediately if the vehiclebegins to move.
Page 240 of 346
Chevrolet Express Owner Manual (GMNA-Localizing-U.S./Canada/Mexico-9967827) - 2017 - crc - 5/2/16
Vehicle Care 239
3. With the engine off, turn theignition on, but do not start theengine. Without applying theregular brake, try to move theshift lever out of P (Park) withnormal effort. If the shift levermoves out of P (Park), contactyour dealer for service.
Ignition Transmission
Lock Check
While parked and with the parkingbrake set, try to turn the ignition toLOCK/OFF in each shift leverposition.
.The ignition should turn toLOCK/OFF only when the shiftlever is in P (Park).
.The ignition key should comeout only in LOCK/OFF.
Contact your dealer if service isrequired.
Park Brake and P (Park)
Mechanism Check
{Warning
When you are doing this check,
the vehicle could begin to move.
Yo u o r o t h e r s c o u l d b e i n j u r e d
and property could be damaged.
Make sure there is room in front
of the vehicle in case it begins to
roll. Be ready to apply the regular
brake at once should the vehicle
begin to move.
Park on a fairly steep hill, with thevehicle facing downhill. Keepingyour foot on the regular brake, setthe parking brake.
.To c h e c k t h e p a r k i n g b r a k e ' sholding ability: With the enginerunning and the transmission inN(Neutral), slowly remove footpressure from the regular brakepedal. Do this until the vehicle isheld by the parking brake only.
.To c h e c k t h e P ( P a r k )mechanism's holding ability:With the engine running, shift toP(Park). Then release theparking brake followed by theregular brake.
Contact your dealer if service isrequired.
Wiper Blade Replacement
Windshield wiper blades should beinspected for wear and cracking.SeeMaintenance Schedule0297.
Replacement blades come indifferent types and are removed indifferent ways. For proper type andlength, seeMaintenanceReplacement Parts0306.
Caution
Allowing the wiper arm to touch
the windshield when no wiper
blade is installed could damage
the windshield. Any damage that
occurs would not be covered by
(Continued)
Page 241 of 346
Chevrolet Express Owner Manual (GMNA-Localizing-U.S./Canada/Mexico-9967827) - 2017 - crc - 5/2/16
240 Vehicle Care
Caution (Continued)
the vehicle warranty. Do not allow
the wiper arm to touch the
windshield.
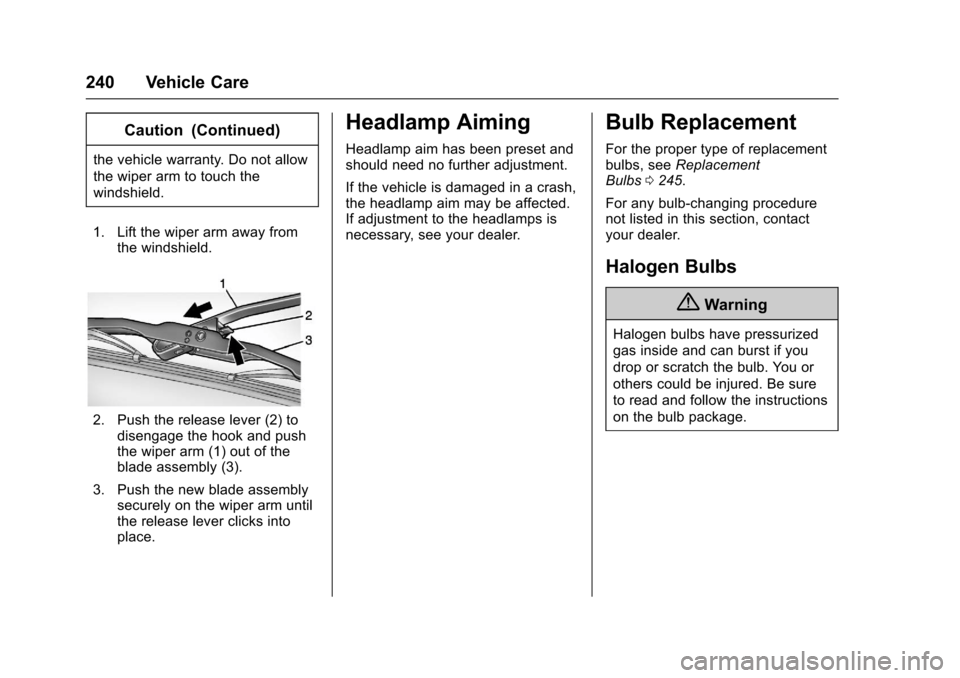
1. Lift the wiper arm away fromthe windshield.
2. Push the release lever (2) todisengage the hook and pushthe wiper arm (1) out of theblade assembly (3).
3. Push the new blade assemblysecurely on the wiper arm untilthe release lever clicks intoplace.
Headlamp Aiming
Headlamp aim has been preset andshould need no further adjustment.
If the vehicle is damaged in a crash,the headlamp aim may be affected.If adjustment to the headlamps isnecessary, see your dealer.
Bulb Replacement
For the proper type of replacementbulbs, seeReplacementBulbs0245.
For any bulb-changing procedurenot listed in this section, contactyour dealer.
Halogen Bulbs
{Warning
Halogen bulbs have pressurized
gas inside and can burst if you
drop or scratch the bulb. You or
others could be injured. Be sure
to read and follow the instructions
on the bulb package.
Page 253 of 346
Chevrolet Express Owner Manual (GMNA-Localizing-U.S./Canada/Mexico-9967827) - 2017 - crc - 5/2/16
252 Vehicle Care
Wheels and Tires
Tires
Every new GM vehicle has
high-quality tires made by a
leading tire manufacturer. See
the warranty manual for
information regarding the tire
warranty and where to get
service. For additional
information refer to the tire
manufacturer.
{Warning
.Poorly maintained and
improperly used tires are
dangerous.
.Overloading the tires can
cause overheating as a
result of too much
flexing. There could be a
blowout and a serious
crash. SeeVehicle Load
Limits0171.
(Continued)
Warning (Continued)
.Underinflated tires pose
the same danger as
overloaded tires. The
resulting crash could
cause serious injury.
Check all tires frequently
to maintain the
recommended pressure.
Tire pressure should be
checked when the tires
are cold.
.Overinflated tires are
more likely to be cut,
punctured, or broken by
asuddenimpact—such
as when hitting a pothole.
Keep tires at the
recommended pressure.
.Worn or old tires can
cause a crash. If the
tread is badly worn,
replace them.
(Continued)
Warning (Continued)
.Replace any tires that
have been damaged by
impacts with potholes,
curbs, etc.
.Improperly repaired tires
can cause a crash. Only
the dealer or an
authorized tire service
center should repair,
replace, dismount, and
mount the tires.
.Do not spin the tires in
excess of 56 km/h
(35 mph) on slippery
surfaces such as snow,
mud, ice, etc. Excessive
spinning may cause the
tires to explode.
Page 263 of 346

Chevrolet Express Owner Manual (GMNA-Localizing-U.S./Canada/Mexico-9967827) - 2017 - crc - 5/2/16
262 Vehicle Care
lead to tire failure. Under-inflationalso reduces fuel efficiency and tiretread life, and may affect thevehicle's handling and stoppingability.
Please note that the TPMS is not asubstitute for proper tiremaintenance, and it is the driver'sresponsibility to maintain correct tirepressure, even if under-inflation hasnot reached the level to triggerillumination of the TPMS low tirepressure telltale.
Yo u r v e h i c l e h a s a l s o b e e nequipped with a TPMS malfunctionindicator to indicate when thesystem is not operating properly.The TPMS malfunction indicator iscombined with the low tire pressuretelltale. When the system detects amalfunction, the telltale will flash forapproximately one minute and thenremain continuously illuminated.This sequence will continue uponsubsequent vehicle start-ups aslong as the malfunction exists.
When the malfunction indicator isilluminated, the system may not beable to detect or signal low tire
pressure as intended. TPMSmalfunctions may occur for a varietyof reasons, including the installationof replacement or alternate tires orwheels on the vehicle that preventthe TPMS from functioning properly.Always check the TPMS malfunctiontelltale after replacing one or moretires or wheels on your vehicle toensure that the replacement oralternate tires and wheels allow theTPMS to continue to functionproperly.
SeeTire Pressure MonitorOperation0262.
SeeRadio FrequencyStatement0322.
Tire Pressure Monitor
Operation
This vehicle may have a TirePressure Monitor System (TPMS).The TPMS is designed to warn thedriver when a low tire pressurecondition exists. TPMS sensors aremounted onto each tire and wheelassembly, excluding the spare tireand wheel assembly. The TPMSsensors monitor the air pressure in
the tires and transmit the tirepressure readings to a receiverlocated in the vehicle.
When a low tire pressure conditionis detected, the TPMS illuminatesthe low tire pressure warning lightlocated on the instrument cluster.If the warning light comes on, stopas soon as possible and inflate thetires to the recommended pressureshown on the Tire and LoadingInformation label. SeeVehicle LoadLimits0171.
AmessagetocheckthepressureinaspecifictiredisplaysintheDriverInformation Center (DIC). The lowtire pressure warning light and theDIC warning message come on ateach ignition cycle until the tires areinflated to the correct inflationpressure. If the vehicle has DICbuttons, tire pressure levels can beviewed. For additional information
Page 264 of 346

Chevrolet Express Owner Manual (GMNA-Localizing-U.S./Canada/Mexico-9967827) - 2017 - crc - 5/2/16
Vehicle Care 263
and details about the DIC operationand displays, seeDriver InformationCenter (DIC)0108andTireMessages011 8.
The low tire pressure warning lightmay come on in cool weather whenthe vehicle is first started, and thenturn off as the vehicle is driven. Thiscould be an early indicator that theair pressure is getting low andneeds to be inflated to the properpressure.
ATire and Loading Information labelshows the size of the originalequipment tires and the correctinflation pressure for the tires whenthey are cold. SeeVehicle LoadLimits0171,foranexampleoftheTire and Loading Information labeland its location. Also seeTirePressure0260.
The TPMS can warn about a lowtire pressure condition but it doesnot replace normal tiremaintenance. SeeTire Inspection0265,Tire Rotation0265andTires0252.
Caution
Tire sealant materials are not all
the same. A non-approved tire
sealant could damage the TPMS
sensors. TPMS sensor damage
caused by using an incorrect tire
sealant is not covered by the
vehicle warranty. Always use only
the GM approved tire sealant
available through your dealer or
included in the vehicle.
TPMS Malfunction Light and
Message
The TPMS will not function properlyif one or more of the TPMS sensorsare missing or inoperable. When thesystem detects a malfunction, thelow tire pressure warning lightflashes for about one minute andthen stays on for the remainder ofthe ignition cycle. A DIC warningmessage also displays. Themalfunction light and DIC warningmessage come on at each ignition
cycle until the problem is corrected.Some of the conditions that cancause these to come on are:
.One of the road tires has beenreplaced with the spare tire. Thespare tire does not have aTPMS sensor. The malfunctionlight and the DIC messageshould go off after the road tireis replaced and the sensormatching process is performedsuccessfully. See "TPMS SensorMatching Process" later in thissection.
.The TPMS sensor matchingprocess was not done or notcompleted successfully afterrotating the tires. Themalfunction light and the DICmessage should go off aftersuccessfully completing thesensor matching process. See"TPMS Sensor MatchingProcess" later in this section.
.One or more TPMS sensors aremissing or damaged. Themalfunction light and the DICmessage should go off when theTPMS sensors are installed and