2017 CHEVROLET CITY EXPRESS light
[x] Cancel search: lightPage 191 of 348
Chevrolet Express Owner Manual (GMNA-Localizing-U.S./Canada/Mexico-
9967827) - 2017 - crc - 9/26/16
190 Driving and Operating
Ride Control Systems
Traction Control/
Electronic Stability
Control
The vehicle may have a vehicle
stability enhancement system called
StabiliTrak. It is an advanced
computer controlled system that
assists the driver with directional
control of the vehicle in difficult
driving conditions.
StabiliTrak activates when the
computer senses a discrepancy
between the intended path and the
direction the vehicle is actually
traveling. StabiliTrak selectively
applies braking pressure at any one
of the vehicle's brakes to assist the
driver with keeping the vehicle on
the intended path.
When the vehicle is started and
begins to move, the system
performs several diagnostic checks
to ensure there are no problems.
The system may be heard or felt
while it is working. This is normal
and does not mean there is aproblem with the vehicle. The
system should initialize before the
vehicle reaches 40 km/h (25 mph).
In some cases, it may take
approximately 3.2 km (2 mi) of
driving before the system initializes.
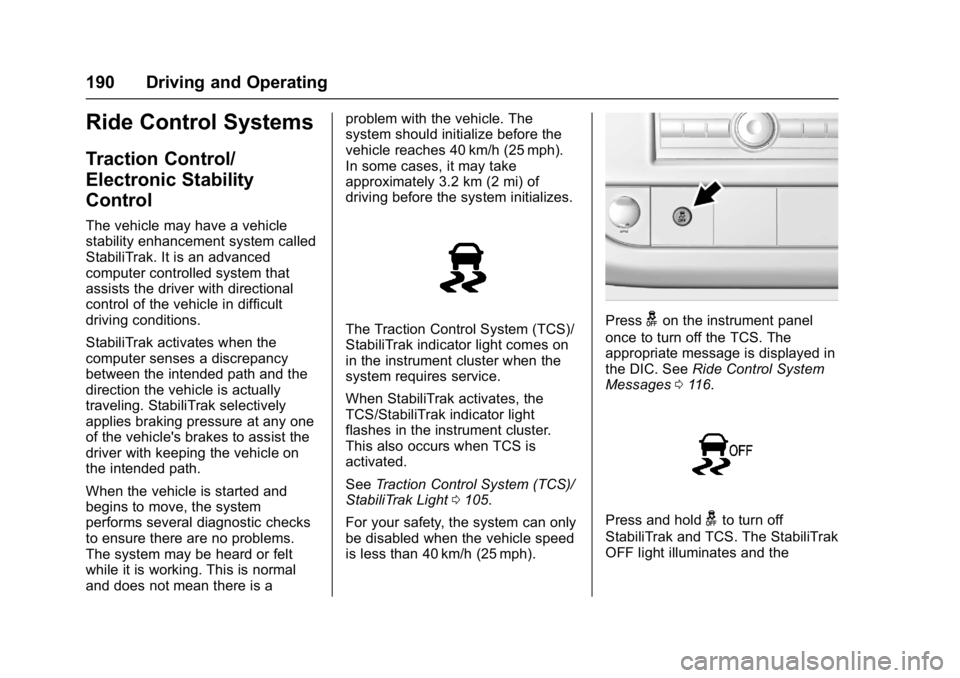
The Traction Control System (TCS)/
StabiliTrak indicator light comes on
in the instrument cluster when the
system requires service.
When StabiliTrak activates, the
TCS/StabiliTrak indicator light
flashes in the instrument cluster.
This also occurs when TCS is
activated.
See
Traction Control System (TCS)/
StabiliTrak Light 0105.
For your safety, the system can only
be disabled when the vehicle speed
is less than 40 km/h (25 mph).Pressgon the instrument panel
once to turn off the TCS. The
appropriate message is displayed in
the DIC. See Ride Control System
Messages 0116.
Press and holdgto turn off
StabiliTrak and TCS. The StabiliTrak
OFF light illuminates and the
Page 195 of 348
Chevrolet Express Owner Manual (GMNA-Localizing-U.S./Canada/Mexico-
9967827) - 2017 - crc - 9/26/16
194 Driving and Operating
.Vehicles with a 6-speed
automatic transmission have
Cruise Grade Braking to help
maintain driver selected speed.
Cruise Grade Braking is enabled
when the vehicle is started and
cruise control is active. It is not
enabled in Range Selection Mode.
It assists in maintaining driver
selected speed when driving on
downhill grades by using the engine
and transmission to slow the
vehicle.
To disable and enable Cruise Grade
Braking for the current ignition key
cycle, press and hold the Tow/Haul
button for three seconds. A DIC
message displays. See
Transmission Messages 0118.
When the brakes are applied the
cruise control is disengaged. Ending Cruise Control
There are four ways to end cruise
control:
.
Step lightly on the brake pedal.
. Press
[.
. Shift the transmission to
N (Neutral).
. To turn off cruise control,
press
I.
Erasing Speed Memory
The cruise control set speed is
erased from memory if
Iis
pressed or if the vehicle is
turned off.
Driver Assistance
Systems
Rear Vision
Camera (RVC)
If equipped, the RVC system is
designed to help the driver when
backing up by displaying a view of
the area behind the vehicle.
{Warning
The camera(s) do not display
children, pedestrians, bicyclists,
crossing traffic, animals, or any
other object outside of the
cameras’ field of view, below the
bumper, or under the vehicle.
Shown distances may be different
from actual distances. Do not
drive or park the vehicle using
only these camera(s). Always
check behind and around the
vehicle before driving. Failure to
use proper care may result in
injury, death, or vehicle damage.
Page 196 of 348

Chevrolet Express Owner Manual (GMNA-Localizing-U.S./Canada/Mexico-
9967827) - 2017 - crc - 9/26/16
Driving and Operating 195
Vehicles without Navigation
System
When the vehicle is on and shifted
into R (Reverse), the video image
appears on the inside rearview
mirror. The video image disappears
after the vehicle is shifted out of
R (Reverse).
Vehicles with Navigation
System
When the vehicle is shifted into
R (Reverse), the video image
appears on the navigation screen.
After a delay, the navigation screen
displays the previous screen after
the vehicle is shifted out of
R (Reverse).
The delay that is received after
shifting out of R (Reverse) is
approximately 10 seconds. Return to
the previous screen sooner by
performing one of the following:
.Press a hard key on the
navigation system.
. Shift into P (Park).
. Reach a vehicle speed of
8 km/h (5 mph). Symbols and Guidelines
The navigation system may have a
feature that allows for viewing
parking assist symbols and/or
guidelines on the navigation screen
while using the RVC. The Rear
Parking Assist (RPA) system must
not be disabled to use the caution
symbols. If RPA has been disabled
and the symbols have been turned
on, the Rear Parking Assist
Symbols Unavailable error message
may display. See
Parking Assist
0 197.
The symbols appear near objects
detected by the RPA system. The
symbol may cover the object when
viewing the navigation screen. The
guideline overlay can help the driver
align the vehicle when backing into
a parking spot.
To turn the symbols or guidelines on
or off:
1. Shift into P (Park).
2. Press MENU to enter the configure menu options. Turn
the Multifunction knob until the
Display feature is highlighted and press the Multifunction
knob; or press the Display
screen button.
3. Select the Rear Camera Options screen button. The
Rear Camera Options screen
displays.
4. Touch the Symbols or Guidelines screen button. The
screen button will be
highlighted when the feature
is on.
RVC Location
The camera is next to the license
plate.
Page 197 of 348
Chevrolet Express Owner Manual (GMNA-Localizing-U.S./Canada/Mexico-
9967827) - 2017 - crc - 9/26/16
196 Driving and Operating
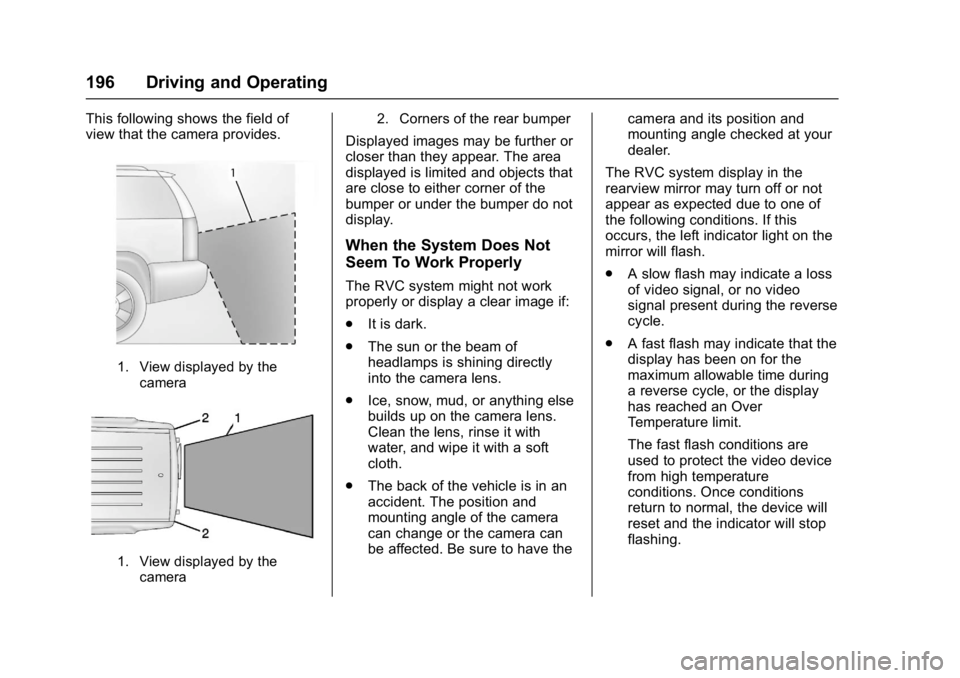
This following shows the field of
view that the camera provides.
1. View displayed by thecamera
1. View displayed by thecamera 2. Corners of the rear bumper
Displayed images may be further or
closer than they appear. The area
displayed is limited and objects that
are close to either corner of the
bumper or under the bumper do not
display.
When the System Does Not
Seem To Work Properly
The RVC system might not work
properly or display a clear image if:
.
It is dark.
. The sun or the beam of
headlamps is shining directly
into the camera lens.
. Ice, snow, mud, or anything else
builds up on the camera lens.
Clean the lens, rinse it with
water, and wipe it with a soft
cloth.
. The back of the vehicle is in an
accident. The position and
mounting angle of the camera
can change or the camera can
be affected. Be sure to have the camera and its position and
mounting angle checked at your
dealer.
The RVC system display in the
rearview mirror may turn off or not
appear as expected due to one of
the following conditions. If this
occurs, the left indicator light on the
mirror will flash.
. A slow flash may indicate a loss
of video signal, or no video
signal present during the reverse
cycle.
. A fast flash may indicate that the
display has been on for the
maximum allowable time during
a reverse cycle, or the display
has reached an Over
Temperature limit.
The fast flash conditions are
used to protect the video device
from high temperature
conditions. Once conditions
return to normal, the device will
reset and the indicator will stop
flashing.
Page 200 of 348
Chevrolet Express Owner Manual (GMNA-Localizing-U.S./Canada/Mexico-
9967827) - 2017 - crc - 9/26/16
Driving and Operating 199
Caution (Continued)
.Fuel containing metals such
as methylcyclopentadienyl
manganese tricarbonyl
(MMT), which can damage
the emissions control
system and spark plugs.
. Fuel with a posted octane
rating of less than the
recommended fuel. Using
this fuel will lower fuel
economy and performance,
and may decrease the life of
the emissions catalyst.
California Fuel
Requirements
If the vehicle is certified to meet
California Emissions Standards, it is
designed to operate on fuels that
meet California specifications. See
the underhood emission control
label. If this fuel is not available in
states adopting California Emissions
Standards, the vehicle will operate
satisfactorily on fuels meeting
federal specifications, but emission control system performance may be
affected. The malfunction indicator
lamp could turn on and the vehicle
may not pass a smog-check test.
See
Malfunction Indicator Lamp
(Check Engine Light) 0102. If this
occurs, return to your authorized
dealer for diagnosis. If it is
determined that the condition is
caused by the type of fuel used,
repairs may not be covered by the
vehicle warranty.
Fuels in Foreign
Countries
The U.S., Canada, and Mexico post
fuel octane ratings in anti-knock
index (AKI). For fuel not to use in a
foreign country, see “Prohibited
Fuels” inFuel 0198.
Fuel Additives
To keep fuel systems clean, TOP
TIER®detergent gasoline is
recommended. See Fuel0198.
If TOP TIER detergent gasoline is
not available, one bottle of GM Fuel
System Treatment Cleaner added to
the fuel tank at every engine oil change, can help. GM Fuel System
Treatment Cleaner is the only
gasoline additive recommended by
General Motors. It is available at
your dealer.
If your vehicle is able to use E85 or
FlexFuel, GM Fuel System
Treatment Cleaner - FlexFuel is the
only recommended additive for use.
Do not use any other additives with
an E85 or FlexFuel vehicle. See
E85 or FlexFuel
0199.
E85 or FlexFuel
Vehicles with a yellow fuel cap can
use either unleaded gasoline or fuel
containing up to 85% ethanol (E85).
All other vehicles should use only
the unleaded gasoline as described
in Fuel 0198.
The use of E85 or FlexFuel is
encouraged when the vehicle is
designed to use it. E85 or FlexFuel
is made from renewable sources.
To help locate fuel stations that
carry E85 or FlexFuel, the U.S.
Department of Energy has an
Page 202 of 348
Chevrolet Express Owner Manual (GMNA-Localizing-U.S./Canada/Mexico-
9967827) - 2017 - crc - 9/26/16
Driving and Operating 201
Warning (Continued)
.Fuel can spray out if the fuel
cap is opened too quickly.
This spray can happen if the
tank is nearly full, and is
more likely in hot weather.
Open the fuel cap slowly
and wait for any hiss noise
to stop, then unscrew the
cap all the way.
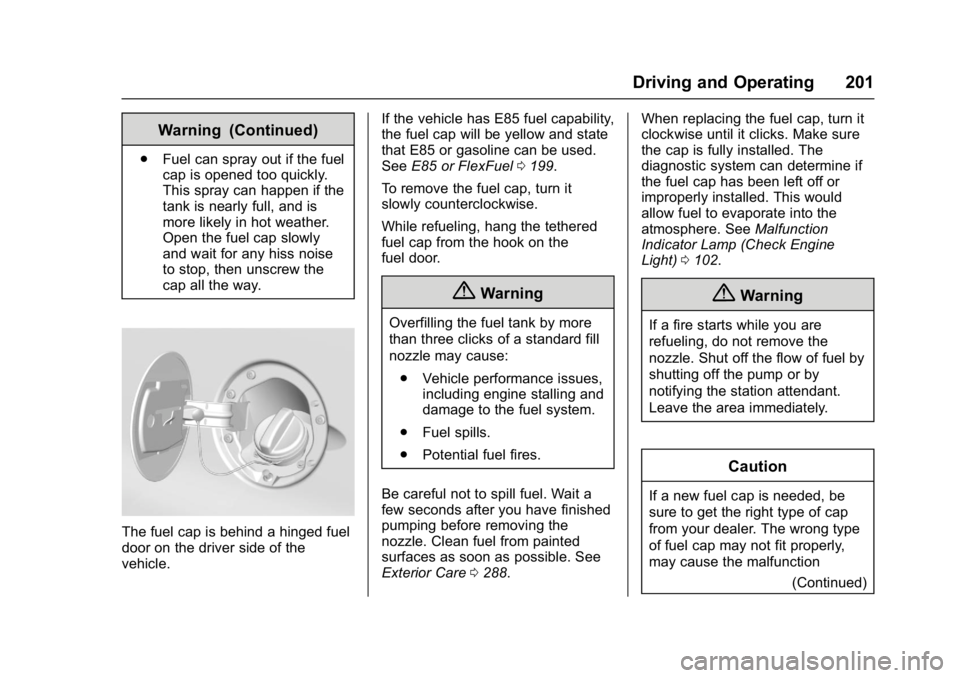
The fuel cap is behind a hinged fuel
door on the driver side of the
vehicle. If the vehicle has E85 fuel capability,
the fuel cap will be yellow and state
that E85 or gasoline can be used.
See
E85 or FlexFuel 0199.
To remove the fuel cap, turn it
slowly counterclockwise.
While refueling, hang the tethered
fuel cap from the hook on the
fuel door.
{Warning
Overfilling the fuel tank by more
than three clicks of a standard fill
nozzle may cause: . Vehicle performance issues,
including engine stalling and
damage to the fuel system.
. Fuel spills.
. Potential fuel fires.
Be careful not to spill fuel. Wait a
few seconds after you have finished
pumping before removing the
nozzle. Clean fuel from painted
surfaces as soon as possible. See
Exterior Care 0288. When replacing the fuel cap, turn it
clockwise until it clicks. Make sure
the cap is fully installed. The
diagnostic system can determine if
the fuel cap has been left off or
improperly installed. This would
allow fuel to evaporate into the
atmosphere. See
Malfunction
Indicator Lamp (Check Engine
Light) 0102.
{Warning
If a fire starts while you are
refueling, do not remove the
nozzle. Shut off the flow of fuel by
shutting off the pump or by
notifying the station attendant.
Leave the area immediately.
Caution
If a new fuel cap is needed, be
sure to get the right type of cap
from your dealer. The wrong type
of fuel cap may not fit properly,
may cause the malfunction
(Continued)
Page 203 of 348
Chevrolet Express Owner Manual (GMNA-Localizing-U.S./Canada/Mexico-
9967827) - 2017 - crc - 9/26/16
202 Driving and Operating
Caution (Continued)
indicator lamp to light, and could
damage the fuel tank and
emissions system. See
Malfunction Indicator Lamp
(Check Engine Light)0102.
Filling a Portable Fuel
Container
{Warning
Filling a portable fuel container
while it is in the vehicle can cause
fuel vapors that can ignite either
by static electricity or other
means. You or others could be
badly burned and the vehicle
could be damaged. Always:
. Use approved fuel
containers.
. Remove the container from
the vehicle, trunk, or pickup
bed before filling.
(Continued)
Warning (Continued)
.Place the container on the
ground.
. Place the nozzle inside the
fill opening of the container
before dispensing fuel, and
keep it in contact with the fill
opening until filling is
complete.
. Fill the container no more
than 95% full to allow for
expansion.
. Do not smoke, light
matches, or use lighters
while pumping fuel.
. Avoid using cell phones or
other electronic devices.
Trailer Towing
General Towing
Information
Only use towing equipment that has
been designed for the vehicle.
Contact your dealer or trailering
dealer for assistance with preparing
the vehicle for towing a trailer. Read
the entire section before towing a
trailer.
For towing a disabled vehicle, see
Towing the Vehicle 0286. For
towing the vehicle behind another
vehicle such as a motor home, see
Recreational Vehicle Towing 0286.
Driving Characteristics
and Towing Tips
Driving with a Trailer
When towing a trailer:
.
Become familiar with the state
and local laws that apply to
trailer towing.
Page 212 of 348
Chevrolet Express Owner Manual (GMNA-Localizing-U.S./Canada/Mexico-
9967827) - 2017 - crc - 9/26/16
Driving and Operating 211
State and local regulations may also
require the trailer to have its own
braking system if loaded above a
certain threshold.
Be sure to read and follow the
instructions for the trailer brakes so
they are installed, adjusted, and
maintained properly.
Do not tap into the vehicle's
hydraulic brake system.
Trailer Wiring Harness
The optional heavy-duty trailer
wiring package includes a wiring
harness, with a seven-pin connector
at the rear of the vehicle and a
four-wire harness assembly under
the driver side of the instrument
panel. The four-wire harness
assembly comes without a
connector.
If the vehicle does not have a trailer
hitch, the seven-wire harness
assembly with connector is taped
together and located in a frame
pocket at the driver side rear left
corner of the frame.If the vehicle has a trailer hitch, the
seven-wire harness assembly with
connector is attached to a bracket
on the hitch platform. In both cases,
the seven-wire harness has a
connector and includes a 30-amp
feed wire.
Use only a round, seven-wire
connector with flat blade terminals
meeting SAE J2863 specifications
for proper electrical connectivity.
The seven-wire harness connector
contains the following trailer circuits:
.
Light Green: Back-up Lamps
(10A fuse)**
. White: Ground
. Dark Blue: Trailer Brake Signal
. Dark Green: Right Rear Stop
and Turn Signal*
. Red/Black Stripe: Battery Feed
(30A Fuse)
. Brown: Trailer Park Lamp
Supply Voltage (15A fuse)**
. Yellow: Left Rear Stop and Turn
Signal * The four-wire harness (without
connector) contains the following
circuits:
.
Black: Ground
. Red/White: Battery Feed
. Dark Blue: Trailer Brake Signal
. Light Blue: CHMSL/Stoplamp
Supply Voltage
* If the vehicle is a cutaway with
trailer provisions, a 15 amp fuse will
be shared for both left/stop trailer
turn and right/stop trailer turn
signals. However, the cutaway
lighting connector will have a
10 amp fuse for each signal.
** If the vehicle is a cutaway with
trailer provisions, a 15 amp fuse will
be shared for trailer park lamps and
cutaway rear lighting connector park
lamps. Also, a 10 amp fuse will be
shared for trailer back-up lamps and
cutaway rear lighting connector
back-up lamps.