2017 CADILLAC ESCALADE ECO mode
[x] Cancel search: ECO modePage 41 of 354

Cadillac Escalade Owner Manual (GMNA-Localizing-MidEast-10293077) -
2017 - crc - 8/24/16
40 KEYS, DOORS, AND WINDOWS
manually close the liftgate. This will
allow normal power operation
functions to resume.
If the vehicle is locked while the
liftgate is closing, and an obstacle
prevents the liftgate from completely
closing, the horn will sound as an
alert that the liftgate did not close.
Pinch sensors are on the side edges of
the liftgate. If an object is caught
between the liftgate and the vehicle
and presses against a sensor, the
liftgate will reverse direction and stop
at a partially open position. The
liftgate will remain open until it is
activated again or closed manually.
Setting the 3/4 Mode
To change the position the liftgate
stops at when opening:1. Select MAX or 3/4 mode and open the liftgate.
2. Stop the liftgate movement at the desired height by pressing
any liftgate button. Manually
adjust the liftgate position if
needed. 3. Press and hold
lon the
bottom edge of the liftgate next
to the latch on the outside of the
liftgate until the turn signals
flash and a beep sounds. This
indicates the setting has been
recorded.
The liftgate cannot be set below a
minimum programmable height.
If there is no light flash or sound,
then the height adjustment may be
too low.
Manual Operation
Select OFF to manually operate the
liftgate.
Caution
Attempting to move the liftgate too
quickly and with excessive force
may result in damage to the
vehicle.
Operate the liftgate manually with a
smooth motion and moderate speed.
The system includes a feature which
limits the manual closing speed to
protect the components.
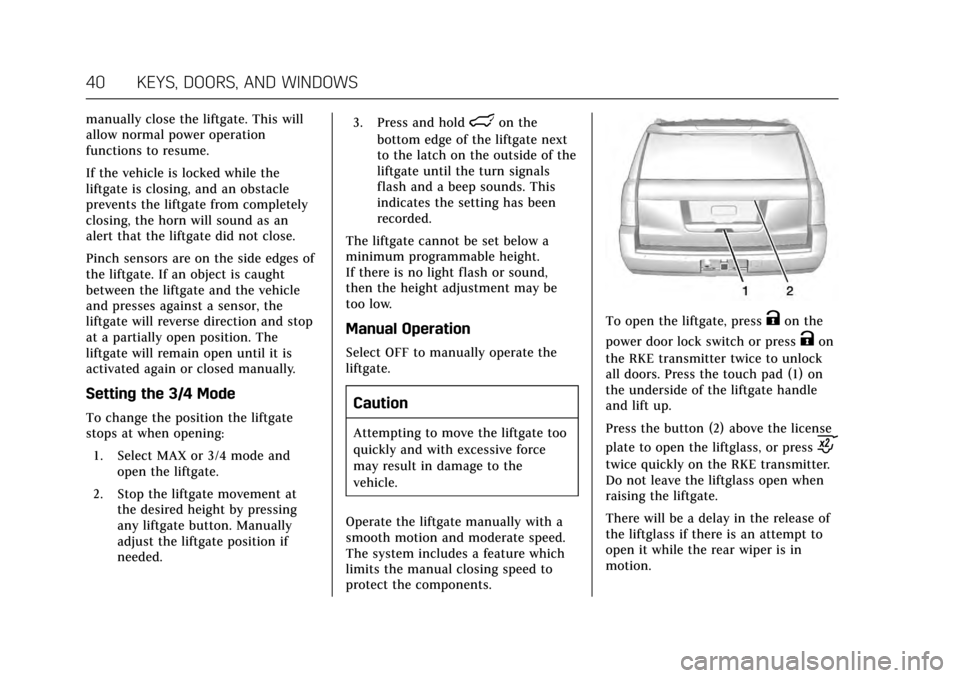
To open the liftgate, pressKon the
power door lock switch or press
Kon
the RKE transmitter twice to unlock
all doors. Press the touch pad (1) on
the underside of the liftgate handle
and lift up.
Press the button (2) above the license
plate to open the liftglass, or press
c
twice quickly on the RKE transmitter.
Do not leave the liftglass open when
raising the liftgate.
There will be a delay in the release of
the liftglass if there is an attempt to
open it while the rear wiper is in
motion.
Page 42 of 354

Cadillac Escalade Owner Manual (GMNA-Localizing-MidEast-10293077) -
2017 - crc - 8/24/16
KEYS, DOORS, AND WINDOWS 41
Use the pull cup to lower and close
the liftgate. Do not press the touch
pad while closing the liftgate. This will
cause the liftgate to be unlatched.
The RKE transmitter must be within
1 m (3 ft) of the liftgate to
automatically unlock it. SeeRemote
Keyless Entry (RKE) System
Operation 028.
The liftgate has an electric latch.
If the battery is disconnected or has
low voltage, the liftgate will not open.
The liftgate will resume operation
when the battery is reconnected and
charged.
Hands-Free Operation
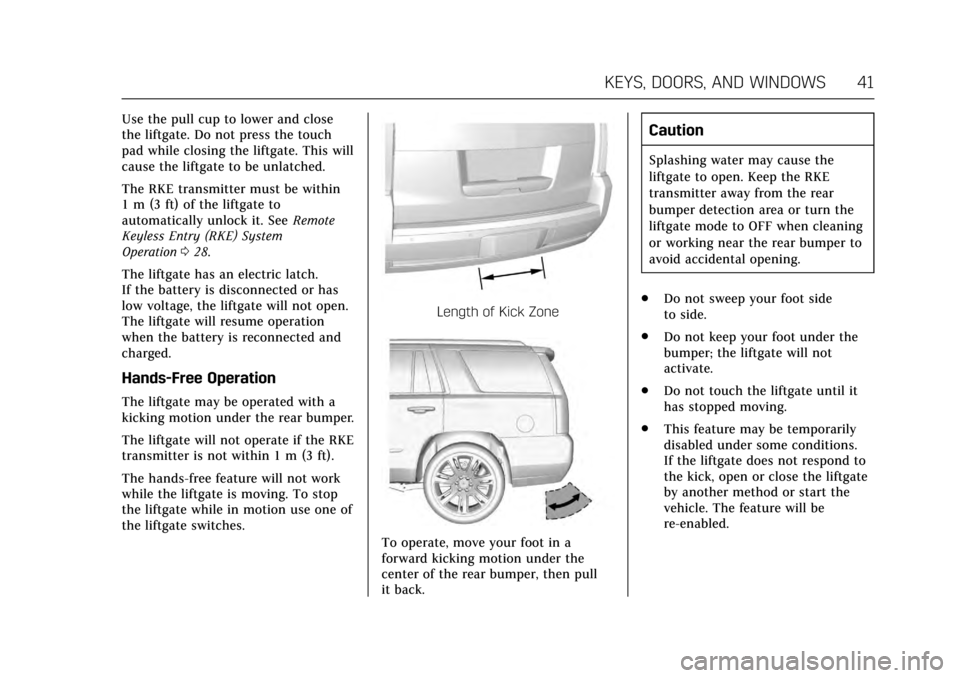
The liftgate may be operated with a
kicking motion under the rear bumper.
The liftgate will not operate if the RKE
transmitter is not within 1 m (3 ft).
The hands-free feature will not work
while the liftgate is moving. To stop
the liftgate while in motion use one of
the liftgate switches.
Length of Kick Zone
To operate, move your foot in a
forward kicking motion under the
center of the rear bumper, then pull
it back.
Caution
Splashing water may cause the
liftgate to open. Keep the RKE
transmitter away from the rear
bumper detection area or turn the
liftgate mode to OFF when cleaning
or working near the rear bumper to
avoid accidental opening.
. Do not sweep your foot side
to side.
. Do not keep your foot under the
bumper; the liftgate will not
activate.
. Do not touch the liftgate until it
has stopped moving.
. This feature may be temporarily
disabled under some conditions.
If the liftgate does not respond to
the kick, open or close the liftgate
by another method or start the
vehicle. The feature will be
re-enabled.
Page 82 of 354

Cadillac Escalade Owner Manual (GMNA-Localizing-MidEast-10293077) -
2017 - crc - 8/24/16
SEATS AND RESTRAINTS 81
Driver Side Shown, Passenger SideSimilar
The roof-rail airbags for the driver,
front outboard passenger, and second
and third row outboard passengers are
in the ceiling above the side windows.
{Warning
If something is between an
occupant and an airbag, the airbag
might not inflate properly or it
might force the object into that
person causing severe injury or
even death. The path of an inflating
airbag must be kept clear. Do not (Continued)
Warning (Continued)
put anything between an occupant
and an airbag, and do not attach or
put anything on the steering wheel
hub or on or near any other airbag
covering.
Do not use seat or console
accessories that block the inflation
path of a seat-mounted side impact
airbag or the front center airbag.
Never secure anything to the roof of
a vehicle with roof-rail airbags by
routing a rope or tie-down through
any door or window opening. If you
do, the path of an inflating roof-rail
airbag will be blocked.
When Should an Airbag
Inflate?
This vehicle is equipped with airbags.
SeeAirbag System 078. Airbags are
designed to inflate if the impact
exceeds the specific airbag system's
deployment threshold. Deployment
thresholds are used to predict how
severe a crash is likely to be in time for the airbags to inflate and help
restrain the occupants. The vehicle
has electronic sensors that help the
airbag system determine the severity
of the impact. Deployment thresholds
can vary with specific vehicle design.
Frontal airbags are designed to inflate
in moderate to severe frontal or near
frontal crashes to help reduce the
potential for severe injuries, mainly to
the driver's or front outboard
passenger's head and chest.
Whether the frontal airbags will or
should inflate is not based primarily
on how fast the vehicle is traveling.
It depends on what is hit, the
direction of the impact, and how
quickly the vehicle slows down.
Frontal airbags may inflate at
different crash speeds depending on
whether the vehicle hits an object
straight on or at an angle, and
whether the object is fixed or moving,
rigid or deformable, narrow or wide.
Frontal airbags are not intended to
inflate during vehicle rollovers, rear
impacts, or many side impacts.
Page 83 of 354

Cadillac Escalade Owner Manual (GMNA-Localizing-MidEast-10293077) -
2017 - crc - 8/24/16
82 SEATS AND RESTRAINTS
In addition, the vehicle has advanced
technology frontal airbags. Advanced
technology frontal airbags adjust the
restraint according to crash severity.
The vehicle also has a seat position
sensor that enables the sensing
system to monitor the position of the
driver seat. The seat position sensor
provides information that is used to
adjust the deployment of the driver
frontal airbag.
The front center airbag is designed to
inflate in moderate to severe side
crashes depending upon the location
of the impact, when either side of the
vehicle is struck. In addition, the front
center airbag is designed to inflate
when the sensing system predicts that
the vehicle is about to roll over on its
side. The front center airbag is not
designed to inflate in frontal impacts,
near frontal impacts, or rear impacts.
Seat-mounted side impact airbags are
designed to inflate in moderate to
severe side crashes depending on the
location of the impact. Seat-mounted
side impact airbags are not designed
to inflate in frontal impacts, near
frontal impacts, rollovers, or rearimpacts. A seat-mounted side impact
airbag is designed to inflate on the
side of the vehicle that is struck.
Roof-rail airbags are designed to
inflate in moderate to severe side
crashes depending on the location of
the impact. In addition, these roof-rail
airbags are designed to inflate during
a rollover or in a severe frontal
impact. Roof-rail airbags are not
designed to inflate in rear impacts.
Both roof-rail airbags will inflate when
either side of the vehicle is struck,
if the sensing system predicts that the
vehicle is about to roll over on its
side, or in a severe frontal impact.
In any particular crash, no one can
say whether an airbag should have
inflated simply because of the vehicle
damage or the repair costs.
What Makes an Airbag
Inflate?
In a deployment event, the sensing
system sends an electrical signal
triggering a release of gas from the
inflator. Gas from the inflator fills the
airbag causing the bag to break out of
the cover. The inflator, the airbag, and
related hardware are all part of the
airbag module.
For airbag locations, see
Where Are the
Airbags? 080.
How Does an Airbag
Restrain?
In moderate to severe frontal or near
frontal collisions, even belted
occupants can contact the steering
wheel or the instrument panel. In
moderate to severe side collisions,
even belted occupants can contact the
inside of the vehicle.
Airbags supplement the protection
provided by safety belts by
distributing the force of the impact
more evenly over the occupant's body.
Rollover capable roof-rail airbags are
designed to help contain the head and
chest of occupants in the outboard
seating positions in the first, second,
and third rows. The rollover capable
roof-rail airbags are designed to help
reduce the risk of full or partial
Page 99 of 354

Cadillac Escalade Owner Manual (GMNA-Localizing-MidEast-10293077) -
2017 - crc - 8/24/16
98 SEATS AND RESTRAINTS
Second Row—Bucket
H:Seating positions with two lower
anchors.
I: Seating positions with top tether
anchors.
Third Row Seat
I: Seating positions with top tether
anchors.
To assist in locating the lower
anchors, each seating position with
lower anchors has two labels, near the
crease between the seatback and the
seat cushion.
To assist in locating the top tether
anchors, the top tether anchor symbol
is near the top tether anchors for
second row seats. For third row seats,
the top tether anchor symbol is on the
flipper panel.
Second Row Seat —Bucket
For models with bucket second row
seating, the top tether anchors are at
the bottom rear of the seat cushion
for each seating position in the second
Page 100 of 354

Cadillac Escalade Owner Manual (GMNA-Localizing-MidEast-10293077) -
2017 - crc - 8/24/16
SEATS AND RESTRAINTS 99
row. Be sure to use an anchor on the
same side of the vehicle as the seating
position where the child restraint will
be placed.
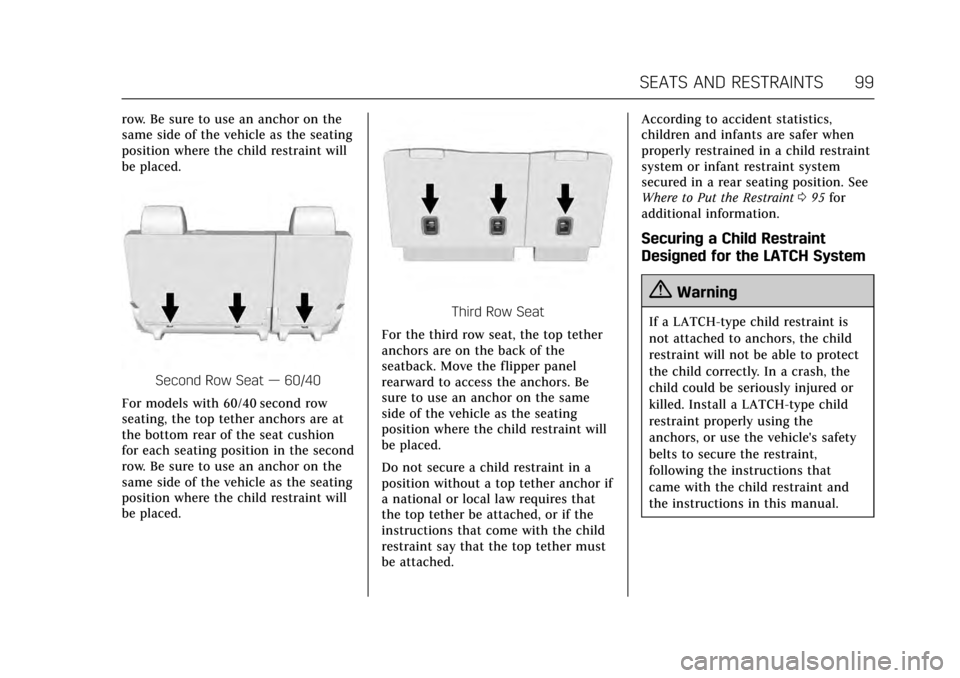
Second Row Seat—60/40
For models with 60/40 second row
seating, the top tether anchors are at
the bottom rear of the seat cushion
for each seating position in the second
row. Be sure to use an anchor on the
same side of the vehicle as the seating
position where the child restraint will
be placed.
Third Row Seat
For the third row seat, the top tether
anchors are on the back of the
seatback. Move the flipper panel
rearward to access the anchors. Be
sure to use an anchor on the same
side of the vehicle as the seating
position where the child restraint will
be placed.
Do not secure a child restraint in a
position without a top tether anchor if
a national or local law requires that
the top tether be attached, or if the
instructions that come with the child
restraint say that the top tether must
be attached. According to accident statistics,
children and infants are safer when
properly restrained in a child restraint
system or infant restraint system
secured in a rear seating position. See
Where to Put the Restraint
095 for
additional information.
Securing a Child Restraint
Designed for the LATCH System
{Warning
If a LATCH-type child restraint is
not attached to anchors, the child
restraint will not be able to protect
the child correctly. In a crash, the
child could be seriously injured or
killed. Install a LATCH-type child
restraint properly using the
anchors, or use the vehicle's safety
belts to secure the restraint,
following the instructions that
came with the child restraint and
the instructions in this manual.
Page 127 of 354

Cadillac Escalade Owner Manual (GMNA-Localizing-MidEast-10293077) -
2017 - crc - 8/24/16
126 INSTRUMENTS AND CONTROLS
2. Press SEL on the center of thefive-way control to enter the
Options menu.
Units : Press SEL while Units is
highlighted to enter the Unit menu.
Choose US or metric units by pressing
SEL while the desired item is
highlighted. A checkmark will be
displayed next to the selected item.
Info Pages : Press SEL while Info
Pages is highlighted to select the
items to be displayed in the DIC info
displays. See Driver Information Center
(DIC) 0138.
Head-up Display (HUD) Rotation :
This feature allows for adjusting the
angle of the HUD image. Press SEL on
the steering wheel controls while
Head-up Display Rotation is
highlighted to enter Adjust Mode.
Press
yorzto adjust the angle of
the HUD display. Press
SorTto
highlight OK, then press SEL to save
the setting. Cancel can also be
selected to cancel the setting. The
vehicle must be in P (Park). Fav Button Options :
Press SEL while
Fav Button Options is highlighted to
select between FAV Primary and SEEK
Primary. This selection allows for
configuration of the
CandB
steering wheel controls. When FAV
Primary is selected, pressing
Cand
Bwill go to the next or previous
favorite and pressing and holding
C
andBwill seek. When SEEK Primary
is selected, pressing
CandBwill
seek and pressing and holding
Cand
Bwill go to the next or previous
favorite.
Display Layout : Press SEL while
Display Layout is highlighted to
change the configuration of the
cluster. See “Reconfigurable
Instrument Cluster” earlier in this
section.
Open Source Software : Press SEL
while Open Source Software is
highlighted to display open source
software information.
Speedometer
The speedometer shows the vehicle's
speed in kilometers per hour (km/h)
or miles per hour (mph).
This vehicle is equipped with an
overspeed warning device. When the
vehicle's speed reaches 120 km/h
(75 mph), a chime will sound.
A message also displays in the Driver
Information Center (DIC). See Vehicle
Speed Messages 0153.
Odometer
The odometer shows how far the
vehicle has been driven, in either
kilometers or miles.
Trip Odometer
The trip odometer shows how far the
vehicle has been driven since the trip
odometer was last reset.
The trip odometer is accessed and
reset through the Driver Information
Center (DIC). See Driver Information
Center (DIC) 0138.
Page 131 of 354

Cadillac Escalade Owner Manual (GMNA-Localizing-MidEast-10293077) -
2017 - crc - 8/24/16
130 INSTRUMENTS AND CONTROLS
{Warning
If the airbag readiness light ever
comes on and stays on, it means
that something may be wrong with
the airbag system. To help avoid
injury to yourself or others, have
the vehicle serviced right away. See
Airbag Readiness Light0129 for
more information, including
important safety information.
Charging System Light
The charging system light comes on
briefly when the ignition is turned on,
but the engine is not running, as a
check to show the light is working.
It should go out when the engine is
started. If the light stays on, or comes on
while driving, there may be a problem
with the electrical charging system.
Have it checked by your dealer.
Driving while this light is on could
drain the battery.
When this light comes on, or is
flashing, the Driver Information
Center (DIC) also displays a message.
See
Battery Voltage and Charging
Messages 0144.
If a short distance must be driven
with the light on, be sure to turn off
all accessories, such as the radio and
air conditioner.
Malfunction Indicator Lamp
(Check Engine Light)
This light is part of the vehicle’s
emission control on-board diagnostic
system. If this light is on while the
engine is running, a malfunction has
been detected and the vehicle may
require service. The light should come
on to show that it is working when
the ignition is in Service Only Mode.
See Ignition Positions 0197.
Malfunctions are often indicated by
the system before any problem is
noticeable. Being aware of the light
and seeking service promptly when it
comes on may prevent damage.
Caution
If the vehicle is driven continually
with this light on, the emission
control system may not work as
well, the fuel economy may be
lower, and the vehicle may not run
smoothly. This could lead to costly
repairs that might not be covered
by the vehicle warranty.