2017 AUDI Q7 AUX
[x] Cancel search: AUXPage 13 of 402

& WARNING
Do not assume the roads are free of ice based
on the outside temperature display. Be aware
that there may be ice on roads even when the
outs ide temperature is around 41 °F ( +S °C)
and that ice can increase the risk of accidents .
@ Tips
-Depending on vehicle equipment, the in
strument illumination (needles and gauges)
may turn on when the lights are off and the
i gnition is sw itched on . The illumination for
the gauges reduces automat ically and even
tually turns off as brightness outside in
creases . This funct ion reminds the driver to
turn the low beams on at the app ropr iate
time .
- You can se lect the u nits used for tempe ra
tu re , speed and othe r measureme nts in the
Infotainment system¢
page 249.
-If your vehicle is stationary or if yo u are driv
i ng at very low speeds, the temperat ure dis
played may be s ligh tly higher than the ac
tua l tempe ra ture outside due to the heat ra
diating from the engine.
- At temperatures below 41 °F (+S °C), a
snowflake symbol appears in front of the
temperature display¢.&. .
Coolant temperature indicator
The coolant tempe rature display (D ¢ page 10,
fig . 3
or ¢ page 10, fig. 4 only funct ions when
the ignition is switched on . To prevent engine
damage, please observe the follow ing notes
about t he temperature ranges.
Cold r ange
If only the L EDs at the bottom of the gauge turn
on, the engine has not reached operating tem
perature yet . Avo id h igh engine speeds, full ac
celerat ion and heavy engine loads .
Normal range
~ The engine has reached its operating temper a-,.....
~ ture once the L EDs up to the center of the gauge
8 turn on . If the . indicator light in the instru-o :E: '
ment cluster d isp lay turns on, the coo lant tem
peratur e is too high
¢ page 26.
(D Note
-Aux iliary headlights and ot her a ccesso ries in
front o f the coo ling -air intake impa ir the
cooling effect of the coolant . This increases
the risk of the engine overheating dur ing
high outside temperat ures and heavy en
gine load.
- The front spoiler a lso helps to distribute
cooling air correctly while driving. If the
spoiler is damaged, the cooling effect will
be impaired and the r isk of the eng ine over
heating will increase . See an authorized
Audi dealer or author ized Audi Service Fa
cility for assistance .
@ Tips
Diesel engines: due to the h igh efficiency of
these engines, the engine may not a lways
r each operat ing temperatu re in cold outside
temperat ures . This is norm al and no t a cause
f or concern.
Tachometer
The ta chometer displays the engine speed in rev
olutions per minute (RPM).
T he beg inning of t he red zone in the tachometer
indica tes the maxim um permissible engi ne speed
f o r all gea rs once the engi ne h as bee n broken in.
Be fore reach ing t his zone, you shou ld shift into
the next h ighest gear, select the D/S se lector lev
er posit io n, or remove yo ur foot from the acc eler
ator pedal.
(D Note
The need le in the tachometer @¢ page 10,
fig . 3
or ¢ page 10, fig . 4 may on ly be in t he
r ed area of the gauge for a sho rt time or there
i s a risk of engine damage . The location where
the red zone begins varies depending on the
engine.
IJII,,
11
Page 73 of 402

u co ...... N r-... N ...... 0
0
:E: '
Description
A ppl ies to: ve hicles wit h 3-z on e del uxe automatic cl imate
co ntrol or 4 -zo ne de luxe automa tic cl imate co ntr ol
The climate control system warms, cools and re
moves humidity from the air in the vehicle interi
or . It is the most effective when the windows and
sunroof* are closed. If there is a bui ld-up of heat
inside the veh icle, ventilat ion can help to speed
up the cooling process.
In all heating mode functions except for
defrost,
the blower on ly switches to a higher speed once
the eng ine coolant has reached a sufficient tem
perature.
Pollutant filter
The pollutant filter removes pollutants such as
dust and pollen from the air .
Key recognition
The climate control settings are automatically
stored and assigned to the remote control key
that is in use.
Warm and cold
(®} For the sake of the environment
-If you would like to reduce fuel consump
tion, switch the air conditioning off. This
will also reduce emissions.
- In vehicles with a diesel engine, you can
switch the auxiliary heater off in the Info
tainment system.
(D Tips
-To prevent interference with the heating
and cooling output and to prevent the win
dows from fogging over, the air intake in
front of the windshield must be free of ice,
snow or leaves.
- Condensation from the cooling system can
drip and form a puddle of water under the
vehicle. This is normal and does not mean
there is a leak.
- The energy management system may tem
porarily switch off certain functions, such as
the seat heating* or rear window defogger.
These systems are available again as soon
as the energy supply has been restored.
71
Page 76 of 402

Warm and cold
Vents
You can open or close the center and rear vents in
the cockpit and the vents in the rear center con
sole and door pillars using the ridged thumb
wheels. The levers adjust the direction of the air
flow from the vents.
Residual heat
You can activate the residual heat function when
the ignition is switched
off by pressing the knob
@ (left side). The residual heat from the coolant
is used to heat the vehicle inter ior. The residual
heat function switches
off automatically after
about 15 minutes.
A WARNING
- You should not use the recirculation mode
for an extended period of time, because no
fresh air is drawn in and the windows can
fog when coo ling mode is sw itched
off. This
increases the risk of an accident.
- Individuals with reduced sensitivity to pain
or temperature could develop burns when
using the seat heating function. To reduce
74
the risk of injury, these individuals should
not use seat heating.
(D Note
To avoid damage to the heating elements in
the seats, do not knee l on the seats or place
heavy loads on a small area of the seat .
Setup
Applies to : vehicles wit h 3-zo ne de luxe automatic climate
control
The climate control system basic settings are ac
cessed in the Infotainment system.
"'Select in the Infotainment system: IMENU ! but
ton
> Vehicle > l eft control button > Air condi
tioning
Seat heating/seat ventilation*
You can adjust the seat heating/ventilation bal
ance for the driver and front passenger.
Automatic auxiliary heater*
The aux iliary heater he lps to warm the vehicle in
terior more quickly.
Page 79 of 402

u co ...... N r-... N ...... 0
0
:E: '
Use the rocker switch(;) to select the funct io n.
When synchronization is switched on, the set
tings for the driver's side are applied to the front
passenger's side and the rear (except for seat
heating/ventilation*). When the settings on the
front passenger 's side or in the rear are changed,
the synchron izat ion is automatically sw itched off
and
4-zone appears in the display .
SET REAR
function
Use the rocker switch (D to select the funct ion .
When the function is switched on, you can adjust
all settings for the rear using the climate control
system controls in the cockpit . The rear climate
control system controls cannot be operated at
the same time. This function switches off auto
matically after a certain period of time or after
l eaving the menu.
Vents
You can open or close the center and rear vents in
the cockpit and the vents in the rear center con
sole and door pillars using the ridged thumb
wheels. The levers adjust the direct io n of the air
flow from the vents. The w ide ven t is opened and
closed using the~ button ~
page 8, fig. 2@ .
Residual heat
You can activate the residual heat funct ion when
the ignition is switched off by pressing the knob
@ (left side). The residual heat from the coolant
is used to heat the vehicle inter io r. The resid ual
heat function switches off automatically after
about 15 min utes.
& WARNING
- You should not use the recirculation mode
for an extended period of time, because no
fresh a ir is drawn in and the windows can
fog when coo ling mode is switched off . This
increases the risk of an accident .
- Individuals with reduced sensitivity to pain
or temperature could develop burns when
using the seat heating function . To reduce
the risk of injury, these ind iv iduals should
not use seat heating.
Warm and cold
(D Note
To avoid damage to the heating elements in
the seats, do not kneel on the seats or place
heavy loads on a small area of the seat.
(D Tips
It is not possible to operate the rear climate
control system controls when the power ch ild
safety lock is switched on. With With the
SET REAR function, you can apply all settings
to the rear using the climate control system
controls in the cockpit
~ page 43.
Setup
Applies to: vehicles with 4 -zone deluxe automat ic climate
contro l
The climate control system basic settings are ac
cessed in the Infotainment system .
.. Select in the Infotainment system: I MENU! but
ton
> Vehicle > l eft control b utton > Air condi
tioning
Seat heating/seat ventilation*
You can adjust the seat heating/ventilation bal
ance fo r the driver, front passenger and rear pas
sengers .
Footwell temperature
You can adjust the footwell temperature so that
it is cooler or warmer.
Auto recirculation
When switched on, automat ic rec irculat ion con
trols the recirculation mode automatically . You
must press the
® MAX button if fog forms on
the windows.
Automatic auxiliary heater*
The aux iliary heater he lps to warm the vehicle in
terior more quickly.
Steering wheel heating
Applies to: vehicles with stee ring wheel heating
The steering wheel rim can be heated .
.. Press the button on the multifunction steering
wheel to switch the steering wheel heating on ..,_
77
Page 237 of 402

Audi music interface
Appl ies to: ve hicles with Audi m usic in terface
Connect your mobile devices to the Audi music
interface in order to operate them through the
MMI and charge the battery.
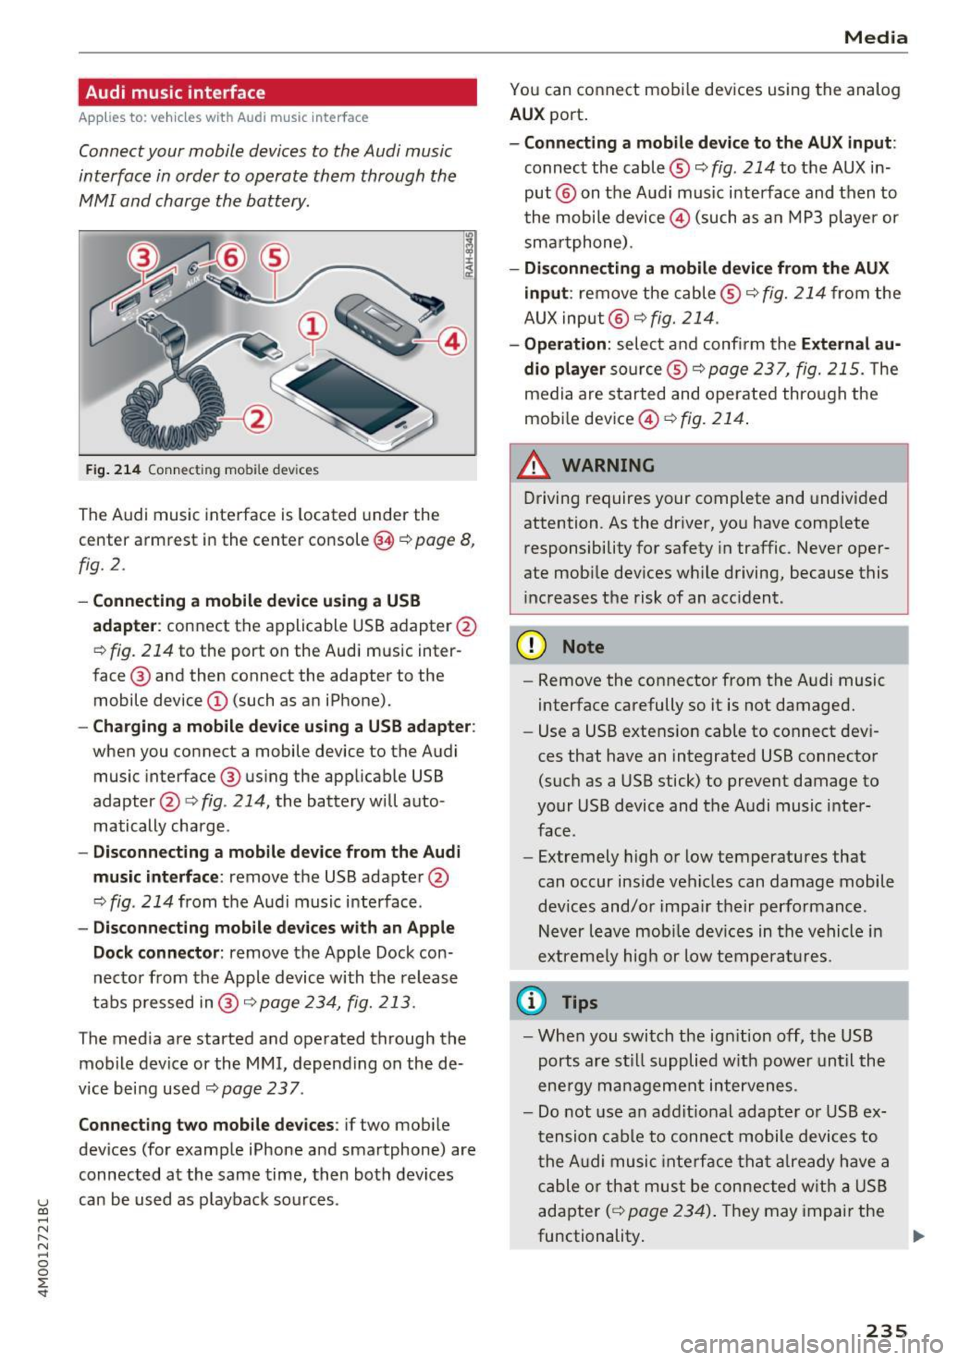
Fig. 214 Connect ing mob ile dev ices
The Audi music interface is located under the
center armrest in the center console(§
r::;, page 8,
fig. 2.
- Connecting a mobile device using a USB
adapte r:
connect the applicable USB adapter @
r:::;, fig. 214 to the port on the Audi music inter
face @ and then connect the adapter to the
mobile device@ (such as an iPhone).
-Charging a mobile device using a USB adapter:
when you connect a mobile device to the Audi
music interface @ using the app licable USB
adapter @¢
fig. 214, the battery will auto
matically charge .
-Disconnecting a mobile device from the Audi
music interface :
remove the USB adapter @
r:::;, fig. 214 from the Audi music i nterface .
-Disconnecting mobile devices with an Apple
Dock connector :
remove the Apple Dock con
necto r from the Apple device with the release
tabs pressed in@ ,:;;,
page 234, fig. 213 .
The media are started and operated through the
mobile device or the
MMI, depending on the de
v ice being used
r:::;,page 237.
Connecting two mobile devices : if two mob ile
dev ices (for example iPhone and smartphone) are
connected at the same time, then both devices
u can be used as p layback sources . (0 ...... N r--. N ...... 0
0
:E
You can connect mobile devices using the analog
AUX port.
-Connecting a mobile device to the AUX input :
connect the cable® r::;, fig. 214 to the AUX in
put @ on the Aud i music interface and then to
t he mobile device@) (such as an MP3 player or
sma rtphone) .
-Disconnecting a mobile device from the AUX
input :
remove the cable ® r::;, fig. 214 from the
AUX input @
r::;, fig. 214.
-Operation: select and confirm the External au
dio player
so urce ® ¢page 237, fig. 215. The
media are sta rted and operated through the
mobile device@)
¢fig. 214.
A WARNING
Driving requires your complete and undivided
attention. As the driver, you have complete
responsibility for safety in traffic. Never oper
ate mob ile dev ices wh ile driving, because this
increases the risk of an acc ident.
(D Note
- Remove the connector from the Audi music
interface carefully so it is not damaged.
- Use a USB extens ion cable to connect dev i
ces that have an integrated USB connector
(such as a USB stick) to prevent damage to
your USB device and the Audi music inter
face.
- Extremely high or low temperatures that
can occur inside vehicles can damage mobile
dev ices and/or impair their performance.
Never leave mob ile devices in the vehicle i n
extreme ly high or low temperatures.
© Tips
-When you switch the ign ition off, the USB
ports are still supplied w ith power until the
ene rgy management intervenes.
- Do not use an addit ional adapte r or USB ex
tension cable to connect mobile devices to
the Audi music interface that already have a
cable or that must be connected with a USB
adapter
( r::;, page 234). They may impair the
functionality . .,.
235
Page 238 of 402

Media
-You can purchase the AUX connector cable
from an authorized Audi dealer or at spe
cialty stores.
- Functionality is not guaranteed for mobile
devices that do not conform to the USB 2.0
specification.
- USB hubs are not supported.
- Some versions of the iPod such as the iPod
shuffle cannot be connected to the USB
adapter for devices with Apple Dock connec
tor. Connect these devices using a AUX con nector cable.
- Changed content on a mobile device
l) that
is connected to the Audi music interface
may not be displayed in the media center.
In this case, reset the
Media settings back
to
Factory settings Q page 250.
- Video playback through the Audi music in
terface is only supported if the connected
device is recognized as a USB storage device
(for example a USB stick) . Apple devices and
MTP devices (such as smartphones) are not
recognized as USB storage devices .
- iPod/iPhone malfunctions also affect the
operation of the MMI. Reset your iPod/
iPhone if this happens.
- Audi recommends updating the iPod/iPhone
software to the latest version. For impor
tant information on operating your iPod/
iPhone, refer to the user guide for the de
vice.
- The USB adapter on the Audi music inter
face will support iPod touch/iPhone from the 5th generation or later with the light
ning connector.
- For more information about the Audi music
interface and supported devices, check the
Audi database for mobile devices at
www.audiusa.com/mp3 or contact an au
thorized Audi dealer or authorized Audi
Service Facility .
1
> A pp lies o nly to MTP de vice s. Doe s not apply to A pple de vi
ces and U SB mass s torage device s.
236
· Rear Seat Entertainment preparation
App lies to: vehicles with Rear Seat Entertainment preparation
T he Rear Seat Entertainment preparation in
cludes cables and a mount for Audi Entertain
ment mobile in the driver's and front passenger's
seat backrests.
T he suitable Audi Entertainment mobile Rear
Seat Entertainment package is available through
Audi Genuine Accessories .
Using Audi Genuine Accessories is recommended.
Audi has established their reliability, safety and
suitability.
We cannot evaluate or endorse other produ cts in
this way , even if the product is approved by acer
tified testing agency or government agency .
~ Note
Only use devices that are approved for the
Rear Seat Entertainment preparation . Unap
proved devices may cause damage to the vehi
cle electronics.
(D Tips
- Contact an authorized Audi dealer or au
thorized Audi Service Facility for additional information about
Audi Entertainment mo
bile.
- Always read the chapter~ page 383.
-The Rear Seat Entertainment preparation is
not intended to charge external electronic
devices .
Page 239 of 402

u (0 ...... N r--. N ...... 0
0
:E
Accessing media
You can start and operate various media
th rough the MMI control panel.
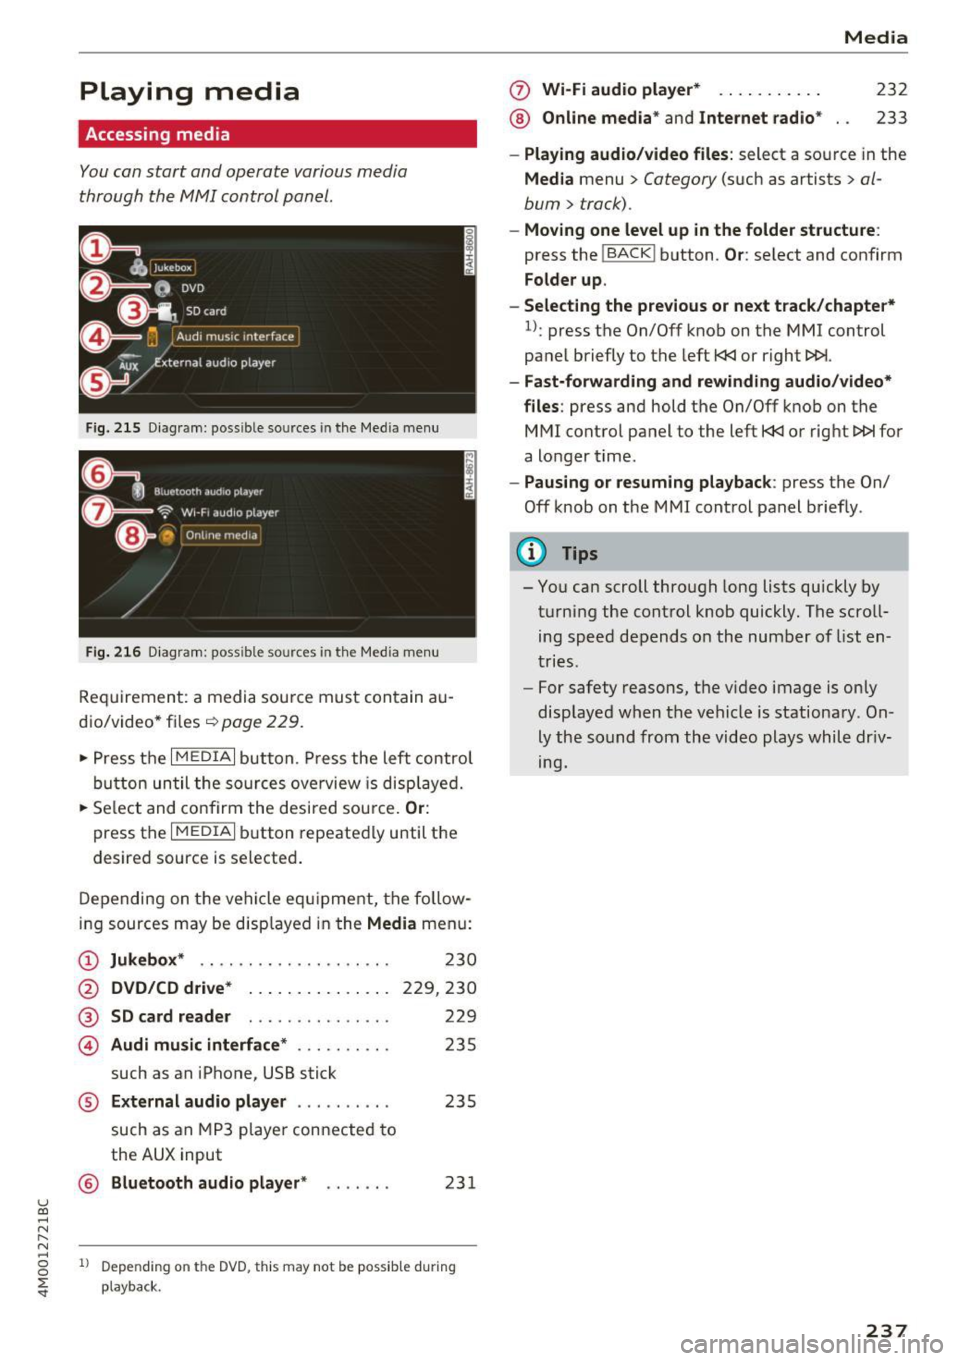
F ig . 2 15 Diag ram: possible sources in the Med ia m enu
Fi g. 216 D iagram : possible sources in the Media me nu
Req uirement: a media sou rce mu st con tain au
dio/video* files ¢
page 229.
~ Press t he I M EDIA i button. Press the left control
bu tton until the so urces ove rview is disp laye d.
~ Se le ct and confirm the desi red sou rce. Or :
press the I MEDIAi button repeated ly until the
desired source is selecte d.
D epen ding on t he veh icle eq uipment, the fo llow
ing sources may be disp layed in the
Media menu:
(D Jukebox * .. ... ... .... .. ... .. .
@ DVD /CD d rive * .. . .... ... .. .. .
®
© SD card reader
Audi mu sic interface * ......... .
such as an iPhone, USB stick 2
30
229,230
229
235
® External audio player . . . . . . . . . . 235
such as an MP3 playe r con nected to
the
AUX input
© B luetooth audio player * . . . . . . . 231
1l Depe ndi ng on the DVD, thi s may not be possib le d urin g
playba ck.
0 Wi-Fi audio player* ... ....... .
® Online med ia * and Internet radio * Media
232
233
-
Play ing audio /video files : select a source in the
Media menu > Category (such as artists > al
bum
> track).
- Moving one level up in the folder structure :
press the !BACKI button . Or: select and confirm
Folder up .
- Selecting the previous or next track /chapte r*
1
l: press the On/Off knob on the MMI control
panel briefly to the left
t
- Fast-forw arding and rewinding audio/video*
files :
press and hold the On/Off knob on the
MMI control pa nel to the left
t
a longer t ime .
-Paus ing or resuming playback : press the On/
Off knob on the MMI cont rol panel brief ly .
(D Tips
- You can scroll through long lists quickly by
turning the control knob quickly . The scroll
ing speed depends o n the numbe r of list en
tries .
- For safety reasons, t he v ideo image is on ly
displaye d when the vehicle is stationary. On
ly the so und from th e video plays whil e dr iv
ing.
237
Page 242 of 402

Media
Playlist
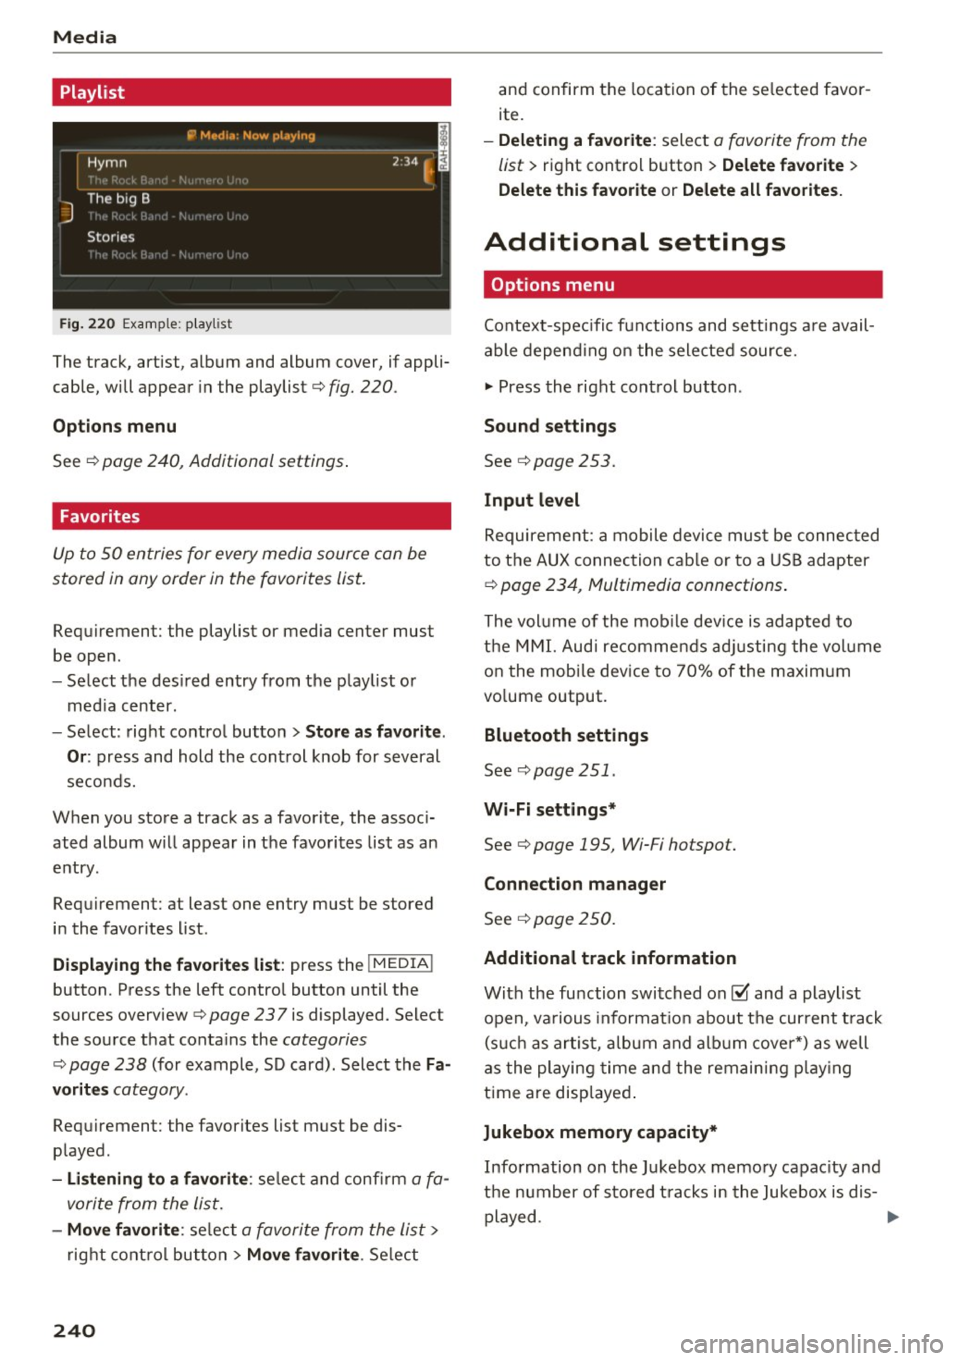
Fig . 2 20 Example: p lay list
The track, artist, album and album cover, if appli
cable, will appear in the playlist
¢ fig. 220 .
Option s menu
See ¢ page 240, Additional settings .
Favorites
Up to 50 entries for every media source can be
stored in any order in the favorites list.
Requirement: the playlist or media center must
be open.
- Select the des ired entry from the play list or
med ia center.
- Select: right control button
> Store a s favorit e.
Or :
press and hold the cont rol knob for several
seco nds.
When you store a track as a favorite, the assoc i
ated album w ill appear in the favorites list as an
entry.
Requirement: at least one entry must be stored
in the favorites list.
Displaying the fa vo rite s list : press the !MEDIA !
button. Press the left contro l button until the
sources overview
c=> page 23 7 is displayed. Select
the source that conta ins the
categories
¢ page 238 (for example, SD card). Select the Fa
v orit es
category .
Requirement: the favorites list must be dis
played.
- List ening to a favorite : select and confirm a fa
vorite from the list.
- Mov e favorite : select a favorite from the list>
right cont rol button > Move fa vorite . Select
240
and confirm the location of the se lected favor
ite.
- Deleting a f avorit e: select a favorite from the
list>
right control b utton> Delete fa vorite >
Delete thi s favorite or Delete all fa vo rite s.
Additional settings
' Options menu
Context-spec ifi c fu nctions and settings a re avail
able depend ing on the sele cted source.
" Press the right control button .
Sound settings
See c:::> page 253.
Input l evel
Requirement: a mobile device mus t be connec ted
to the AUX connection cab le or to a USB adapter
c:::> page 234, f\1ultimedia connections.
The volume of the mob ile dev ice is adapted to
t h e MMI. Aud i recommends adj usting the volume
on the mobi le device to 70% of the maximum
vo lume output.
Bluetooth settings
See c:::> page 2 51.
Wi-Fi settings*
See ¢ page 195, Wi-Fi hotspot.
Connection manager
See c:::> page 250.
Additional track information
With the fu nction switched on~ and a playlist
open, va rious informat io n about t he cur rent t rack
(such as artist, a lbum and alb um cove r*) as well
as the playing time and the remain ing p lay ing
time are displayed .
Jukebox memory capacity*
Information on the Jukebox memory capac ity and
the number of stored t racks i n the Jukebox is dis-
played. ""'