Page 150 of 297

This also acts on the dynamic vehicle control systems
(engine, gearbox/transmission, ESC system).
Driving Modes
The Alfa DNA system lever will always return to the
center position after use.
The selected driving mode is indicated by the corre-
sponding LED switching in the panel and by an indi-
cation on the display.
Dynamic Mode
Activation
Move the Alfa DNA system lever upwards (to the letter
“D”) and hold in this position for half a second, until
the corresponding LED lights up and the Dynamic
mode activation indicator appears on the display.
When Dynamic mode is activated, the turbocharger
pressure and engine oil temperature screen is displayed
automatically. When released, the Alfa DNA system
lever will return to the central position.
NOTE:Dynamic Mode will be inhibited until the
vehicle has accumulated 155 miles (250 km).
Electronic Stability Control (ESC) and Anti-Slip Regu-
lation (ASR) systems:
The ESC and ASR system ensures more enjoyable,
sportier driving while guaranteeing the stability of the
vehicle.
Electronic Q2 system:
The system increases vehicle stability while accelerating
on bends, improving the agility of the vehicle.
Alfa DNA Mode Selector
148 STARTING AND OPERATING
Page 152 of 297

NOTE:In Race mode, the sensitivity of the accelerator
pedal increases considerably. Consequently, driving is
less fluid and comfortable.
In Race mode, the transmission only works in MANUAL
mode.
Deactivation
To deactivate Race mode and return to Dynamic mode,
move the Alfa DNA system lever downwards (to letter
“A”) and keep it in this position for half a second.
The LED corresponding to Dynamic mode will light up
and the Dynamic mode activation indication will ap-
pear on the display.
Natural Mode
Electronic Stability Control (ESC) and Anti-Slip Regu-
lation (ASR) systems:
ESC and ASR system thresholds are aimed at providing
comfort and safety in normal grip and driving condi-
tions.
Electronic Q2 system:
The system is calibrated to ensure the best driving
comfort. Engine And Gearbox/Transmission:
Standard response shifting.
All Weather Mode
Activation
Move the Alfa DNA system lever downwards (to the
letter “A”) and hold in this position for half a second,
until the corresponding LED lights up and the All
Weather mode activation indicator appears on the dis-
play.
Electronic Stability Control (ESC) and Anti-Slip
Regulation (ASR) systems:
ESC and ASR system thresholds are aimed at ensuring
maximum safety in low-grip driving conditions. It is
advisable to select All Weather mode in the presence of
low-grip road surfaces.
Electronic Q2 System:
The system is deactivated.
Engine And Gearbox/Transmission:
Standard response shifting.
150 STARTING AND OPERATING
Page 216 of 297
�VEHICLE STORAGE ...................251
� REPLACEMENT BULBS ................251
� BULB REPLACEMENT .................252
▫ Front Light Clusters ..................252
▫ Front Side Marker ....................256
▫ Rear Light Clusters ...................257
▫ Direction Indicators ..................257
▫ Tail Lights/Brake Lights ...............258
▫ Reversing Light .....................258 ▫
Third Brake Lights ...................260
▫ License Plate Lights ..................260
▫ Roof Light ........................ .261
▫ Luggage Compartment Roof Light ........262
� FLUID CAPACITIES ...................263
� FLUIDS, LUBRICANTS, AND
GENUINE PARTS .....................264
▫ Engine ............................264
▫ Chassis .......................... .265
214 MAINTAINING YOUR VEHICLE
Page 247 of 297

Cleaning Headlights
Your vehicle has plastic headlights that are lighter and
less susceptible to stone breakage than glass headlights.
Plastic is not as scratch resistant as glass and therefore
different lens cleaning procedures must be followed.
To minimize the possibility of scratching the lenses and
reducing light output, avoid wiping with a dry cloth. To
remove road dirt, wash with a mild soap solution
followed by rinsing.
Do not use abrasive cleaning components, solvents,
steel wool or other aggressive material to clean the
lenses.
Glass Surfaces
All glass surfaces should be cleaned on a regular basis
with MOPAR, or any commercial household-type glass
cleaner. Never use an abrasive type cleaner. Use caution
when cleaning the inside rear window equipped. Do
not use scrapers or other sharp instrument that may
scratch the elements.
Labels can be peeled off after soaking with warm water
(if equipped), keep all objects a safe distance from the
windows.When cleaning the rear view mirror, spray cleaner on
the towel or cloth that you are using. Do not spray
cleaner directly on the mirror.
Instrument Panel Cover
The instrument panel cover has a low glare surface
which minimizes reflections on the windshield. Do not
use protectants or other products which may cause
undesirable reflections. Use soap and warm water to
restore the low glare surface.
Instrument Panel Bezels
CAUTION!
When installing hanging air fresheners in your
vehicle, read the installation instructions carefully.
Some air fresheners will damage the finish of
painted or decorated parts if allowed to directly
contact any surface.
Cleaning Plastic Instrument Cluster Lenses
The lenses in front of the instruments in this vehicle are
molded in clear plastic. When cleaning the lenses, care
must be taken to avoid scratching the plastic.
7
MAINTAINING YOUR VEHICLE 245
Page 253 of 297
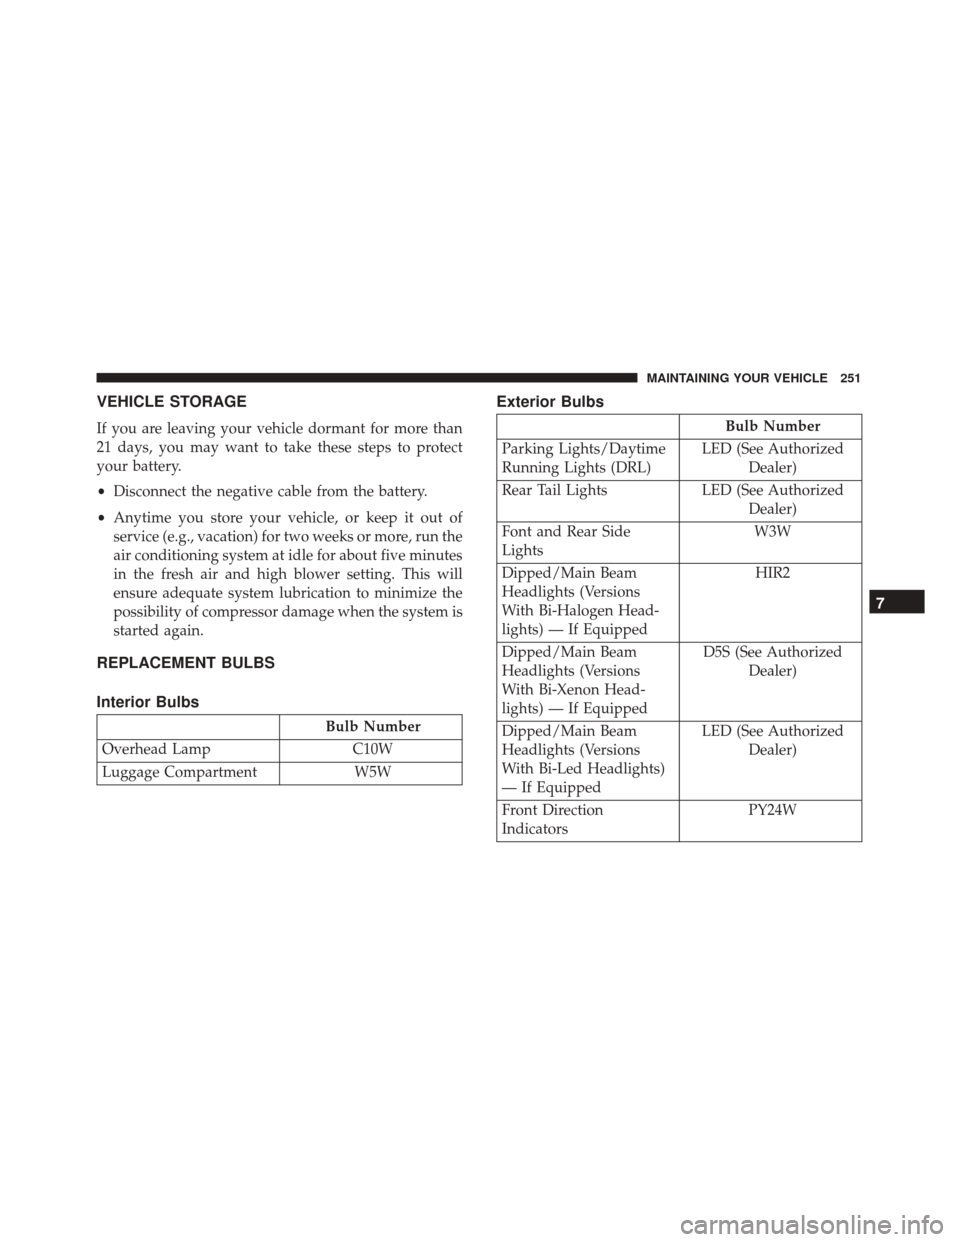
VEHICLE STORAGE
If you are leaving your vehicle dormant for more than
21 days, you may want to take these steps to protect
your battery.
•Disconnect the negative cable from the battery.
• Anytime you store your vehicle, or keep it out of
service (e.g., vacation) for two weeks or more, run the
air conditioning system at idle for about five minutes
in the fresh air and high blower setting. This will
ensure adequate system lubrication to minimize the
possibility of compressor damage when the system is
started again.
REPLACEMENT BULBS
Interior Bulbs
Bulb Number
Overhead Lamp C10W
Luggage Compartment W5W
Exterior Bulbs
Bulb Number
Parking Lights/Daytime
Running Lights (DRL) LED (See Authorized
Dealer)
Rear Tail Lights LED (See Authorized
Dealer)
Font and Rear Side
Lights W3W
Dipped/Main Beam
Headlights (Versions
With Bi-Halogen Head-
lights) — If Equipped HIR2
Dipped/Main Beam
Headlights (Versions
With Bi-Xenon Head-
lights) — If Equipped D5S (See Authorized
Dealer)
Dipped/Main Beam
Headlights (Versions
With Bi-Led Headlights)
— If Equipped LED (See Authorized
Dealer)
Front Direction
Indicators PY24W
7
MAINTAINING YOUR VEHICLE 251
Page 254 of 297

Bulb Number
Rear Direction Indicators P21W
Side Direction Indicators WY5W
Brake Lights LED (See Authorized
Dealer)
Third Brake Light LED (See Authorized
Dealer)
License Plate Lamps W5W
Reversing light W16W
NOTE: Numbers refer to commercial bulb types
that can be purchased from your authorized dealer.
If a bulb needs to be replaced, visit your authorized
dealer or refer to the applicable Service Manual.
BULB REPLACEMENT
NOTE: Lens fogging can occur under certain atmo-
spheric conditions. This will usually clear as atmo-
spheric conditions change to allow the condensation to
change back into a vapor. Turning the lamps on will
usually accelerate the clearing process.
Front Light Clusters
The front head lamp contains bulbs for the parking
lights/daytime running lights (DRL), low beam head-
lights, high beam headlights and direction indicators.
If bulb replacement is required, please see an autho-
rized dealer.
1 — Daytime Running Lights
2 — Direction Indicator
3 — High/Low Beam Lights
252 MAINTAINING YOUR VEHICLE
Page 255 of 297
Side Lights/Daytime Running Lights (DRL)
These are LEDs. For the replacement, contact the your
authorized dealer.
Low/High Beam Bi-Halogen Headlights
To change the bulb, proceed as follows:
1. Turn the steering wheel completely.
2. Open the protective flap by rotating the screw.3. Remove protective cover from headlamp assembly.
4. Remove the electric connector (1) and then rotate the
bulb holder (2) clockwise and remove it.
1 — Direction Indicator Bulb Protective Flap
2 — Headlamp Bulb Protective Flap
Protective Cover
7
MAINTAINING YOUR VEHICLE 253
Page 256 of 297
5. Extract the bulb and replace it.
6. Refit the new bulb, making sure that it is lockedcorrectly, and reconnect the electrical connector.
7. Reinstall protective cover in the headlamp assembly and close the protective flap.
Low/High Beam HID & LED Headlights
For the replacement, contact the your authorized dealer.
Direction Indicators
Front:
1. Turn the steering wheel completely.
2. Open the protective flap by rotating the screw.
1 — Electrical Connector
2 — Bulb Holder
1 — Direction Indicator Bulb Protective Flap
2 — Headlamp Bulb Protective Flap
254 MAINTAINING YOUR VEHICLE


