Page 115 of 557
114
Controls
Clock
Adjusting the Clock
The clock is automatically updated through the navigation system, so the time does
not need to be adjusted.
You can also adjust the time manually in the audio/information screen, with the
power mode in ON.
■Using the Settings menu on th e audio/information screen
1. Press the SETTINGS button.
2. Rotate to select System Settings, then
press .
3. Move or to select the Clock tab.
4. Rotate to select Clock Adjustment,
then press .
5. Rotate to change hour, then press .
6. Rotate to change minute, then press
.
■Adjusting the Time
1Adjusting the Clock
These indications are used to show how to operate
the interface dial.
Rotate to select.
Press to enter.
You can customize the clock display to show the 12
hour clock or 24 hour clock. 2 Customized Features P. 262
Hour
Clock/Wallpaper Type
System settings
Clock Display
17 ACURA RLX-31TY26300.book 114 ページ 2016年6月17日 金曜日 午前8時12分
Page 207 of 557
206
uuAudio System Basic Operation uAudio/Information Screen
Features
■Audio
Shows the current audio information.
■Navigation
Shows the navigation screen.
2 Refer to the Navigation System Manual
■Phone
Shows the HFL information.
2 Bluetooth ® HandsFreeLink® P. 290
■Info
Shows the Trip Computer or Clock/Wallpaper and other information. Rotate
to select an item, then press .
■Trip computer (Current Drive)
Shows the range, and instant and average fu el economy of the current trip, as well
as the average fuel economy from your last trip.
■Trip computer (History of Trip A)
Shows the range, average fuel economy and distances traveled for the current trip, as well
as the average fuel economy and distances tr aveled during the last three driving cycles.
Each time you reset the trip meter A, the information on the display updates. The
history of the previous th ree driving cycles is kept.
■Deleting the history manually
1. Move on the History of Trip A screen to select Delete History, then press .
2. You will receive a confirmation message on the screen. Rotate to select Yes,
then press .
■Clock/Wallpaper
Shows a clock screen or an image you import.
17 ACURA RLX-31TY26300.book 206 ページ 2016年6月17日 金曜日 午前8時12分
Page 208 of 557
Continued207
uuAudio System Basic Operation uAudio/Information Screen
Features
You can change, store, and delete the wa llpaper on the audio/information screen.
■Import wallpaper
You can import up to three images, one at a time, for wallpaper from a USB flash
drive.
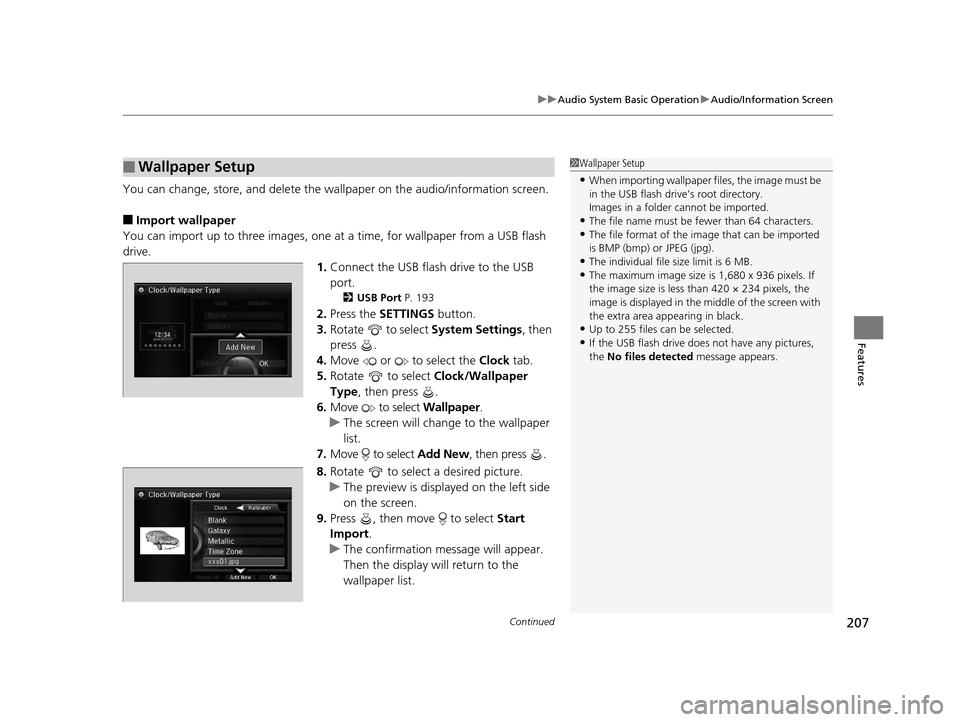
1.Connect the USB flash drive to the USB
port.
2 USB Port P. 193
2.Press the SETTINGS button.
3. Rotate to select System Settings, then
press .
4. Move or to select the Clock tab.
5. Rotate to select Clock/Wallpaper
Type , then press .
6. Move to select Wallpaper.
u The screen will change to the wallpaper
list.
7. Move to select Add New, then press .
8. Rotate to select a desired picture.
u The preview is displayed on the left side
on the screen.
9. Press , then move to select Start
Import.
u The confirmation message will appear.
Then the display will return to the
wallpaper list.
■Wallpaper Setup1Wallpaper Setup
•When importing wallpaper files, the image must be
in the USB flash drive’s root directory.
Images in a folder cannot be imported.
•The file name must be fewer than 64 characters.•The file format of the im age that can be imported
is BMP (bmp) or JPEG (jpg).
•The individual file size limit is 6 MB.•The maximum image size is 1,680 x 936 pixels. If
the image size is less than 420 × 234 pixels, the
image is displayed in the middle of the screen with
the extra area appearing in black.
•Up to 255 files can be selected.
•If the USB flash drive doe s not have any pictures,
the No files detected message appears.
17 ACURA RLX-31TY26300.book 207 ページ 2016年6月17日 金曜日 午前8時12分
Page 209 of 557
uuAudio System Basic Operation uAudio/Information Screen
208
Features
■Select wallpaper
1. Press the SETTINGS button.
2. Rotate to select System Settings, then press .
3. Move or to select the Clock tab.
4. Rotate to select Clock/Wallpaper Type , then press .
5. Move to select Wallpaper.
u The screen changes to the wallpaper list.
6. Rotate to select a desired wallpaper.
u The preview is displayed on the left side on the screen.
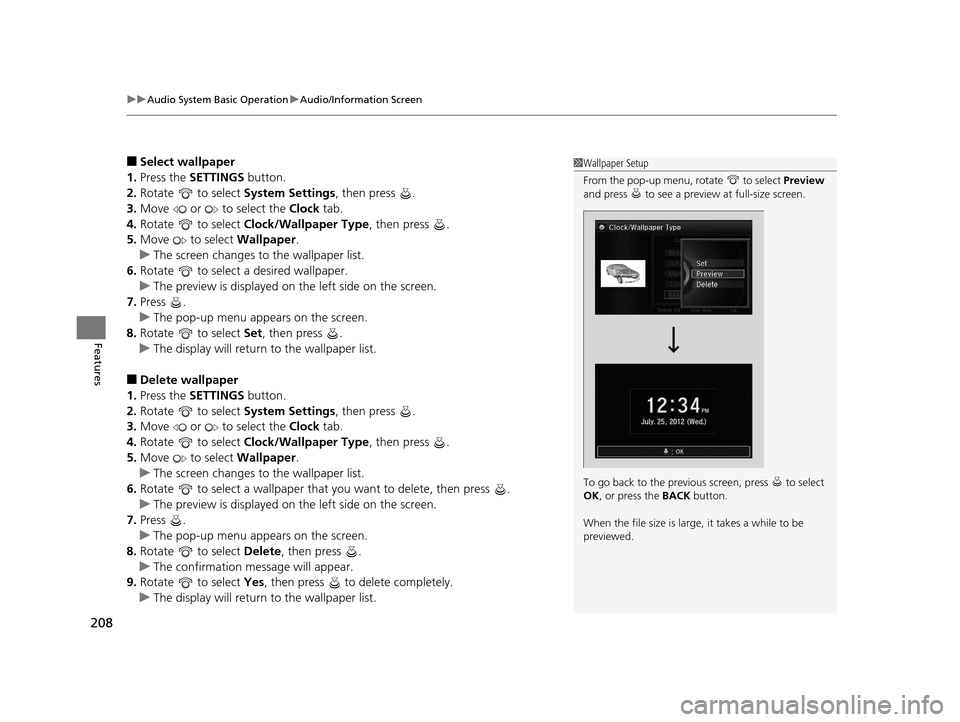
7. Press .
u The pop-up menu appears on the screen.
8. Rotate to select Set, then press .
u The display will return to the wallpaper list.
■Delete wallpaper
1. Press the SETTINGS button.
2. Rotate to select System Settings, then press .
3. Move or to select the Clock tab.
4. Rotate to select Clock/Wallpaper Type , then press .
5. Move to select Wallpaper.
u The screen changes to the wallpaper list.
6. Rotate to select a wallpaper that you want to delete, then press .
u The preview is displayed on the left side on the screen.
7. Press .
u The pop-up menu appears on the screen.
8. Rotate to select Delete, then press .
u The confirmation message will appear.
9. Rotate to select Yes, then press to delete completely.
u The display will return to the wallpaper list.
1Wallpaper Setup
From the pop-up menu, rotate to select Preview
and press to see a preview at full-size screen.
To go back to the previous screen, press to select
OK , or press the BACK button.
When the file size is large, it takes a while to be
previewed.
17 ACURA RLX-31TY26300.book 208 ページ 2016年6月17日 金曜日 午前8時12分
Page 265 of 557
264
uuCustomized Features u
Features
System Device Information
Factory Data Reset
Background Color
Header Clock Display
Clock Reset
Auto Time Zone*
Auto Daylight*
Clock
Clock Adjustment
Clock Format
Clock
Units
Language
Voice Command Tips
Others
Wallpaper
Clock/Wallpaper
Type
* Not available on all models
17 ACURA RLX-31TY26300.book 264 ページ 2016年6月17日 金曜日 午前8時12分
Page 272 of 557
271
uuCustomized Features u
Continued
Features
Auto Daylight*
Clock Reset
Info Screen Preference
Clock Format
Auto Time Zone*
Clock/Wallpaper Type
Clock Adjustment
Clock
Default
Others
Info
Settings
Navi
SettingsSee the Navigation System Manual.
AcuraLink Subscription Status
AcuraLink Msg Notice
Delete AcuraLink Message
AcuraLink
* Not available on all models
17 ACURA RLX-31TY26300.book 271 ページ 2016年6月17日 金曜日 午前8時12分
Page 274 of 557
273
uuCustomized Features u
Continued
Features
*1:Default SettingSetup
Group Customizable Features Description Selectable Settings
System
Settings
Voice
Reco
Guidance VolumeChanges the volume of the voice prompt.—
Voice PromptTurns the voice prompt on and off.On*1/
Off
Song by VoiceTurns the Song By VoiceTM on and off.2 Song By VoiceTM (SBV) P. 241On*1/Off
Song by Voice Phonetic
ModificationModifies a voice command for music stored in
the HDD or an iPod.
2 Phonetic Modification P. 243—
Phonebook Phonetic
ModificationModifies a voice command for the phonebook.
2Phonebook Phonetic Modification P. 311—
OpeningSound VolumeChanges the volume of the system’s startup sound.—
Clock
Clock/
Wallpaper
Type
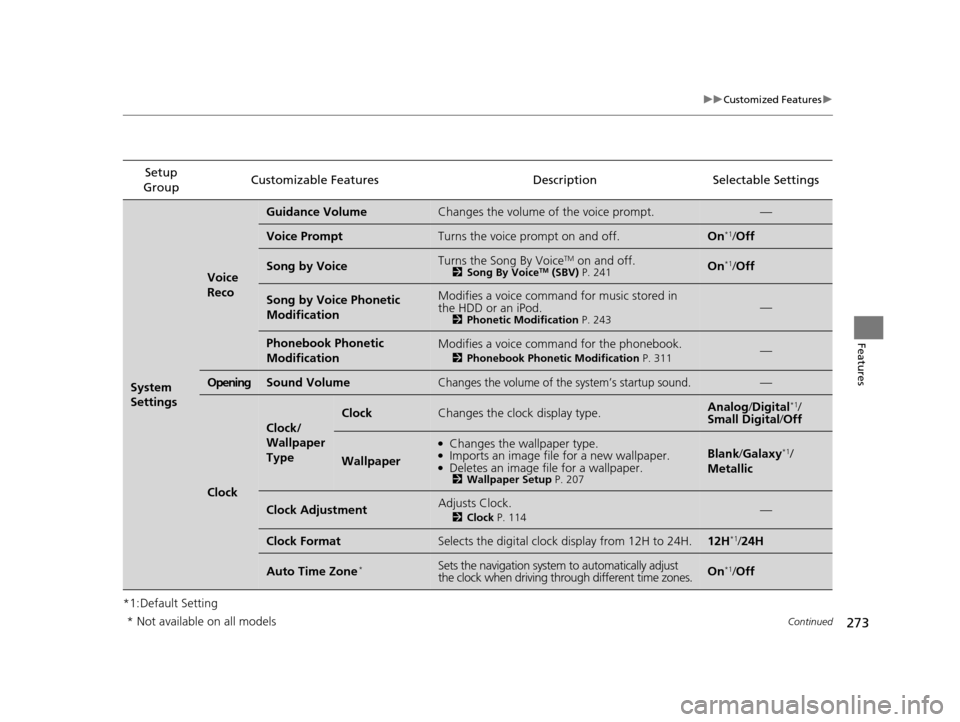
ClockChanges the clock display type.Analog/Digital*1/
Small Digital/ Off
Wallpaper
●Changes the wallpaper type.●Imports an image file for a new wallpaper.●Deletes an image file for a wallpaper.2Wallpaper Setup P. 207
Blank/Galaxy*1/
Metallic
Clock AdjustmentAdjusts Clock.
2 Clock P. 114—
Clock FormatSelects the digital clock display from 12H to 24H.12H*1/24H
Auto Time Zone*Sets the navigation system to automatically adjust
the clock when driving through different time zones.On*1/Off
* Not available on all models
17 ACURA RLX-31TY26300.book 273 ページ 2016年6月17日 金曜日 午前8時12分
Page 275 of 557
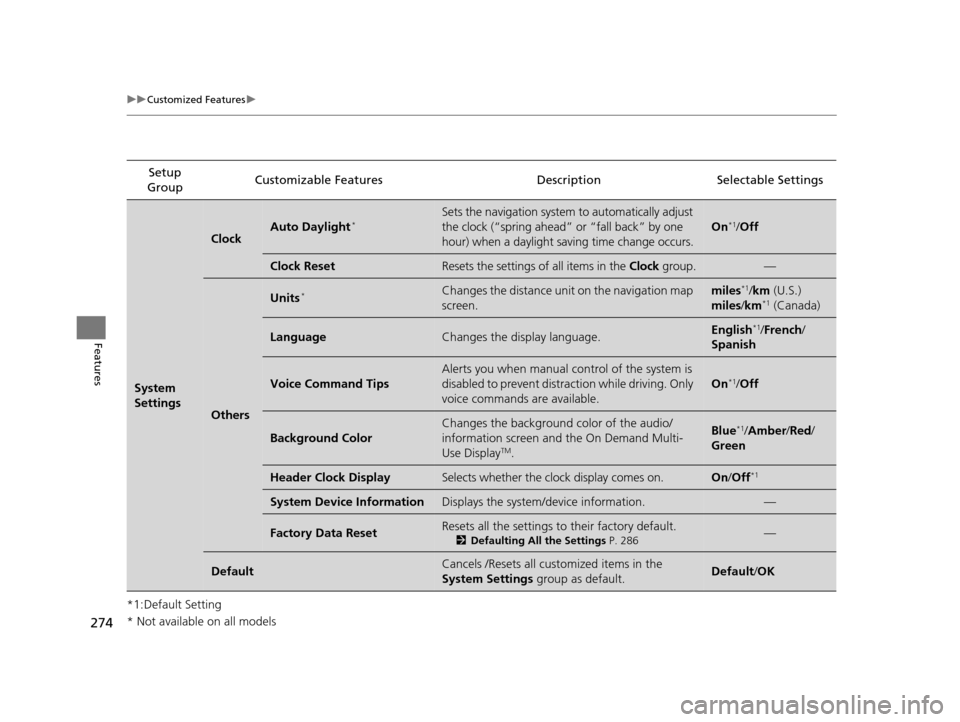
274
uuCustomized Features u
Features
*1:Default SettingSetup
Group Customizable Features Descri
ption Selectable Settings
System
Settings
ClockAuto Daylight*Sets the navigation system to automatically adjust
the clock (“spring ahead” or “fall back” by one
hour) when a daylight saving time change occurs.
On*1/Off
Clock ResetResets the settings of all items in the Clock group.—
Others
Units*Changes the distance unit on the navigation map
screen.miles*1/km (U.S.)
miles /km*1 (Canada)
LanguageChanges the display language.English*1/French /
Spanish
Voice Command Tips
Alerts you when manual control of the system is
disabled to prevent distraction while driving. Only
voice commands are available.
On*1/ Off
Background Color
Changes the background color of the audio/
information screen and the On Demand Multi-
Use Display
TM.
Blue*1/Amber /Red/
Green
Header Clock DisplaySelects whether the clock display comes on.On /Off*1
System Device InformationDisplays the system /device information.—
Factory Data ResetResets all the settings to their factory default.
2Defaulting All the Settings P. 286—
DefaultCancels /Resets all customized items in the
System Settings group as default.Default/OK
* Not available on all models
17 ACURA RLX-31TY26300.book 274 ページ 2016年6月17日 金曜日 午前8時12分